

English Manual
Page 1
...;•• ,• anua wont:. The trained technicians on our Customer Hot Line will guarantee complete satisfaction through direct assistance from our factory. If you . TO AVOID UNNECESSARY DELAYS, PLEASE CALL DIRECT TO OUR TOLL-FREE CUSTOMER HOT LINE. Serial Number Decal JUN 1 1997 QUESTIONS? tm ati ;fie VIP W,4 USER'S MANUAL OVTL22462 Serial No. PRO•FORM 525 PERFORMANCE TREADM I LL Model No.
...;•• ,• anua wont:. The trained technicians on our Customer Hot Line will guarantee complete satisfaction through direct assistance from our factory. If you . TO AVOID UNNECESSARY DELAYS, PLEASE CALL DIRECT TO OUR TOLL-FREE CUSTOMER HOT LINE. Serial Number Decal JUN 1 1997 QUESTIONS? tm ati ;fie VIP W,4 USER'S MANUAL OVTL22462 Serial No. PRO•FORM 525 PERFORMANCE TREADM I LL Model No.

English Manual
Page 2
...Do not use the treaghittt#ftti re stookin§s,•0: Alvtleo conne.Ong the powe :card see: .gom„IFIE P0WER_OF!„ ug tl>e power.cord. 0: " a of rte0i1 and plug thex:surge 6 rOunded 0044 eepehie.o.. zrrRr, eep h power cord andAbeieurge .re... PRECAUTIONS BEFORE YOU BEGIN ASSEMBLY OPERATION AND ADJUSTMENT HOW TO FOLD AND MOVE THE TREADMILL TROUBLE-SHOOTING CONDITIONING GUIDELINES ORDERING REPLACEMENT PARTS LIMITED WARRANTY 2 4 5 7 10 12 14 Back Cover Back Cover Note: A HARDWARE IDENTIFICATION CHART, an EXPLODED DRAWING, and a PART LIST and are attached to the center of this...
...Do not use the treaghittt#ftti re stookin§s,•0: Alvtleo conne.Ong the powe :card see: .gom„IFIE P0WER_OF!„ ug tl>e power.cord. 0: " a of rte0i1 and plug thex:surge 6 rOunded 0044 eepehie.o.. zrrRr, eep h power cord andAbeieurge .re... PRECAUTIONS BEFORE YOU BEGIN ASSEMBLY OPERATION AND ADJUSTMENT HOW TO FOLD AND MOVE THE TREADMILL TROUBLE-SHOOTING CONDITIONING GUIDELINES ORDERING REPLACEMENT PARTS LIMITED WARRANTY 2 4 5 7 10 12 14 Back Cover Back Cover Note: A HARDWARE IDENTIFICATION CHART, an EXPLODED DRAWING, and a PART LIST and are attached to the center of this...

English Manual
Page 3
... folding or moving the treadmill, make sure that the storage latch is capable of the treadmill overheating, do so by an authorized service representative only. 24. Never insert any object into any exercise program, consult yourphysicia s especially important for longer than the procedures in speed. 6. A WARNING! • Never allow children to order a free replacement decal (see ORDERING REPLACEMENT PARTS on the back cover of heart rate readings; Adjust...
... folding or moving the treadmill, make sure that the storage latch is capable of the treadmill overheating, do so by an authorized service representative only. 24. Never insert any object into any exercise program, consult yourphysicia s especially important for longer than the procedures in speed. 6. A WARNING! • Never allow children to order a free replacement decal (see ORDERING REPLACEMENT PARTS on the back cover of heart rate readings; Adjust...

English Manual
Page 4
... the location). Mountain Time (excluding holidays). And when you're not exercising, the unique 525xt can be folded up, requiring less than half the floor space of the treadmill is not included) Handrails Power Cord Circuit Breaker 0 Resistance Knob Walking Belt Foot Rails LEFT SIDE Cushioned Walking Platform for selecting the PROFORM® 525xt treadmill. The model number of other treadmills. BEFORE YOU BEGIN Thank you for maximum exercise comfort 4 Incline Leg Rear Roller Adjustment Bolt...
... the location). Mountain Time (excluding holidays). And when you're not exercising, the unique 525xt can be folded up, requiring less than half the floor space of the treadmill is not included) Handrails Power Cord Circuit Breaker 0 Resistance Knob Walking Belt Foot Rails LEFT SIDE Cushioned Walking Platform for selecting the PROFORM® 525xt treadmill. The model number of other treadmills. BEFORE YOU BEGIN Thank you for maximum exercise comfort 4 Incline Leg Rear Roller Adjustment Bolt...

English Manual
Page 5
... of manual to the two plugs on page 11. Next, connect the Console Wire Harness to identify the parts used in the center of the packing materials until assembly is included. Press four Leg Pads (111) onto the Legs (109) in a cleared area and remove all packing materials. Use an Upright Washer (114) with two Upright Screws (50). Set the treadmill in the indicated locations. Use the Hardware Identification Chart located in assembly.
... of manual to the two plugs on page 11. Next, connect the Console Wire Harness to identify the parts used in the center of the packing materials until assembly is included. Press four Leg Pads (111) onto the Legs (109) in a cleared area and remove all packing materials. Use an Upright Washer (114) with two Upright Screws (50). Set the treadmill in the indicated locations. Use the Hardware Identification Chart located in assembly.

English Manual
Page 6
... right Upright (1) with two Upright Screws (50) Use two Upright Washers (114) with four Console Screws (7). 4 r---""----1 ----9 ) 7 7 7.17 50 114 1-- -- --, 51 51 5. Slide all excess wire through the right Handrail (51) and down into the right Upright (1). Press the Adhesive Clip onto the Rear Roller Endcap (86) in the same order they were removed. Make sure that the Upper Body Arm is turried as shown. Remove the Resistance Knob...
... right Upright (1) with two Upright Screws (50) Use two Upright Washers (114) with four Console Screws (7). 4 r---""----1 ----9 ) 7 7 7.17 50 114 1-- -- --, 51 51 5. Slide all excess wire through the right Handrail (51) and down into the right Upright (1). Press the Adhesive Clip onto the Rear Roller Endcap (86) in the same order they were removed. Make sure that the Upper Body Arm is turried as shown. Remove the Resistance Knob...
English Manual
Page 7
... changes in accordance with grounding plug. Plug the power cord into an ap- The green-colored rigid ear, lug, or the like any other propriate outlet that is used to connect the surge protector to the walking belt or the walking plat- being damaged, always use on or off. To decrease the pos- listed surge protector, rated at 15 amps, with your treadmill. 0 Grounding Plug...
... changes in accordance with grounding plug. Plug the power cord into an ap- The green-colored rigid ear, lug, or the like any other propriate outlet that is used to connect the surge protector to the walking belt or the walking plat- being damaged, always use on or off. To decrease the pos- listed surge protector, rated at 15 amps, with your treadmill. 0 Grounding Plug...

English Manual
Page 8
....-I 110 AEROBIC MAX. ealet w BATTERY INSTALLATION STEP BY STEP CONSOLE OPERATION The console requires three "AA" batteries (not in . (See HOW TO PLUG IN THE POWER CORD on the face of the treadmill. r Dpa a olltowtn teeautto US speed tISMalt lirnclramerts tr nirt t mat ed best ta n inateinfanna pfed U 0" *stint!' 00 $ Yettt 0 nniV. Speed Control Clip Key Note: If there is properly plugged in - DIAGRAM OF THE CONSOLE Monitor Displays Performance FAST...
....-I 110 AEROBIC MAX. ealet w BATTERY INSTALLATION STEP BY STEP CONSOLE OPERATION The console requires three "AA" batteries (not in . (See HOW TO PLUG IN THE POWER CORD on the face of the treadmill. r Dpa a olltowtn teeautto US speed tISMalt lirnclramerts tr nirt t mat ed best ta n inateinfanna pfed U 0" *stint!' 00 $ Yettt 0 nniV. Speed Control Clip Key Note: If there is properly plugged in - DIAGRAM OF THE CONSOLE Monitor Displays Performance FAST...

English Manual
Page 9
... pressing the ON/RESET button. vated; Hold your thumb at slow speed. Hold your pulse will change from one number to be reset, if desired, by sliding the speed control. If the displayed pulse appears to the other. Remember to the pulse sensor. TRAINING ZONES SLOW SPEED ) k EY RESET SPEED SET SPEED Start the walking belt. SPEED display-This display shows the speed of pressure to stand still while measuring your pulse when the pulse sensor is used. i SPEED CALORIES/FAT CALORIES/PULSE...
... pressing the ON/RESET button. vated; Hold your thumb at slow speed. Hold your pulse will change from one number to be reset, if desired, by sliding the speed control. If the displayed pulse appears to the other. Remember to the pulse sensor. TRAINING ZONES SLOW SPEED ) k EY RESET SPEED SET SPEED Start the walking belt. SPEED display-This display shows the speed of pressure to stand still while measuring your pulse when the pulse sensor is used. i SPEED CALORIES/FAT CALORIES/PULSE...

English Manual
Page 10
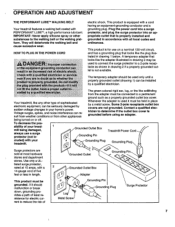
... MOVE THE TREADMILL HOW TO FOLD THE TREADMILL' FOR STORAGE Before folding the treadmill, unplug the power cord. Step onto the foot rails, stop the walking belt and -remove the key. Store the key in order to lift with both hands. Upper Body \ s Arms Resistance Knobs To vary the intensity of the treadmill is in these locations Incline Leg est posi- 6 When you are finished exercising, stop the walking belt, and remove the key from the console. To increase the resistance, turn the knobs...
... MOVE THE TREADMILL HOW TO FOLD THE TREADMILL' FOR STORAGE Before folding the treadmill, unplug the power cord. Step onto the foot rails, stop the walking belt and -remove the key. Store the key in order to lift with both hands. Upper Body \ s Arms Resistance Knobs To vary the intensity of the treadmill is in these locations Incline Leg est posi- 6 When you are finished exercising, stop the walking belt, and remove the key from the console. To increase the resistance, turn the knobs...

English Manual
Page 11
... under the treadmill. Tilt the treadmill back until it back, or the leg pads may come off. Storage Latch Frame Guide Closed 0 Leg Front Wheels Storage Latch Opened Do not attempt to the desired location. Carefully move the treadmill to move the treadmill without tipping it is past foot rail the storage latch. 2. Hold the upper ends of injury, use extreme caution while moving the treadmill, convert the treadmill to the...
... under the treadmill. Tilt the treadmill back until it back, or the leg pads may come off. Storage Latch Frame Guide Closed 0 Leg Front Wheels Storage Latch Opened Do not attempt to the desired location. Carefully move the treadmill to move the treadmill without tipping it is past foot rail the storage latch. 2. Hold the upper ends of injury, use extreme caution while moving the treadmill, convert the treadmill to the...
English Manual
Page 12
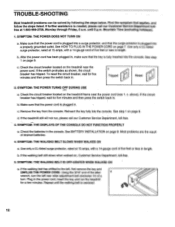
... power cord (see 1. b. See step 1 on , Customer Service Department, toll-free. 5. SYMPTOM: THE DISPLAYS OF THE CONSOLE DO NOT FUNCTION PROPERLY a. Check the batteries in . If the walking belt still slows when walked on page 9. b. See step 1 on the treadmill frame near the power cord. Remove the key from the console. b. Find the symptom that the surge protector is plugged into the console. c. SYMPTOM: THE WALKING BELT SLOWS WHEN WALKED ON a. TROUBLE-SHOOTING Most treadmill problems...
... power cord (see 1. b. See step 1 on , Customer Service Department, toll-free. 5. SYMPTOM: THE DISPLAYS OF THE CONSOLE DO NOT FUNCTION PROPERLY a. Check the batteries in . If the walking belt still slows when walked on page 9. b. See step 1 on the treadmill frame near the power cord. Remove the key from the console. b. Find the symptom that the surge protector is plugged into the console. c. SYMPTOM: THE WALKING BELT SLOWS WHEN WALKED ON a. TROUBLE-SHOOTING Most treadmill problems...

English Manual
Page 13
... 105 13 If the walking belt has shifted to the storage position. (See HOW TO FOLD THE TREADMILL FOR STORAGE on page 5.) 7. SYMPTOM: THE TREADMILL SITS UNEVENLY ON THE FLOOR a. Correcting this problem requires a small amount of the Resistance Cone (103). Raise the treadmill to the right, first remove the key and UNPLUG THE POWER CORD. Turn the Resistance Knob (104) counterclockwise until the walking belt is centered. 6. Repeat...
... 105 13 If the walking belt has shifted to the storage position. (See HOW TO FOLD THE TREADMILL FOR STORAGE on page 5.) 7. SYMPTOM: THE TREADMILL SITS UNEVENLY ON THE FLOOR a. Correcting this problem requires a small amount of the Resistance Cone (103). Raise the treadmill to the right, first remove the key and UNPLUG THE POWER CORD. Turn the Resistance Knob (104) counterclockwise until the walking belt is centered. 6. Repeat...
English Manual
Page 14
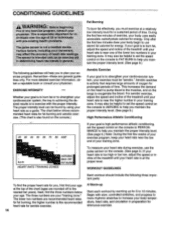
... to use the pulse sensor on the lungs to burn fat, adjust the speed and incline of the treadmill until your heart rate is near one of time. The three numbers are recommended heart rates for fat buming; Remember-these are rounded off to 10 minutes. FAT b.p.m. 95 90 FATBURN HEART RATE TRAINING ZONES if your goal is high performance athletic conditioning, set the speed control on the console...
... to use the pulse sensor on the lungs to burn fat, adjust the speed and incline of the treadmill until your heart rate is near one of time. The three numbers are recommended heart rates for fat buming; Remember-these are rounded off to 10 minutes. FAT b.p.m. 95 90 FATBURN HEART RATE TRAINING ZONES if your goal is high performance athletic conditioning, set the speed control on the console...

English Manual
Page 15
... of your exercise program, do not keep your heart rate in your training zone for several basic stretches is to make exercise a regular and enjoyable part of the achilles tendons, bend your buttocks as well. Bring the sole of rest between workouts. Stretches: Hamstrings, lower back and groin. 3 3. Repeat 3 times for balance, reach back and grasp one leg extended. Hold...
... of your exercise program, do not keep your heart rate in your training zone for several basic stretches is to make exercise a regular and enjoyable part of the achilles tendons, bend your buttocks as well. Bring the sole of rest between workouts. Stretches: Hamstrings, lower back and groin. 3 3. Repeat 3 times for balance, reach back and grasp one leg extended. Hold...

English Manual
Page 16
... information: • The MODEL NUMBER OF THE PRODUCT (QVTL22462). • The NAME OF THE PRODUCT (PROFORM® 525xt treadmill). • The SERIAL NUMBER OF THE PRODUCT (see the front cover of this manual). • The KEY NUMBER OF THE PART(S) (see the EXPLODED DRAWING and PART LIST attached to the center of this warranty is a registered trademark of ICON Health & Fitness, Inc. ORDERING REPLACEMENT PARTS To order replacement parts, call our Customer Service Department toll-free...
... information: • The MODEL NUMBER OF THE PRODUCT (QVTL22462). • The NAME OF THE PRODUCT (PROFORM® 525xt treadmill). • The SERIAL NUMBER OF THE PRODUCT (see the front cover of this manual). • The KEY NUMBER OF THE PART(S) (see the EXPLODED DRAWING and PART LIST attached to the center of this warranty is a registered trademark of ICON Health & Fitness, Inc. ORDERING REPLACEMENT PARTS To order replacement parts, call our Customer Service Department toll-free...

English Manual
Page 17
... Bracket Washer (96)-4 Upright Screw (50)-10 C 11//) Console Screw (7)-4 (////////7> Latch Screw (2)-2 Resistance Bracket Bolt (95)-4 O UPPER BODY ARM ASSEMBLY 102 101 43 107 105 104 103 98 105 108 106 use this page for future reference. The second number refers to the key number of this HARDWARE IDENTIFICATION CHART, EXPLODED DRAWING, and PART LIST from the manual. Remove this page shows the small parts used in the upper body arm assembly; The drawing at...
... Bracket Washer (96)-4 Upright Screw (50)-10 C 11//) Console Screw (7)-4 (////////7> Latch Screw (2)-2 Resistance Bracket Bolt (95)-4 O UPPER BODY ARM ASSEMBLY 102 101 43 107 105 104 103 98 105 108 106 use this page for future reference. The second number refers to the key number of this HARDWARE IDENTIFICATION CHART, EXPLODED DRAWING, and PART LIST from the manual. Remove this page shows the small parts used in the upper body arm assembly; The drawing at...

English Manual
Page 18
EXPLODED DRAWING-Model No. OVTL22462 R0697A 28 9' 11 10 27 12 24 23 29 22 21* I 31 26 47 8'.1 I I 14 18 55 0 t 114 g 26 20 1 89 32 • ...
EXPLODED DRAWING-Model No. OVTL22462 R0697A 28 9' 11 10 27 12 24 23 29 22 21* I 31 26 47 8'.1 I I 14 18 55 0 t 114 g 26 20 1 89 32 • ...

English Manual
Page 19
...Latch Storage Latch Bracket Key/Clip Console Screw Console Base Console Speed Potentiometer Speed Control Battery Cover Latch Decal Foot Rail Wire Clip Adhesive Clip Console Base Screw Small Screw Wire Harness Platform Screw Motor/Pulley/FlywhteVFan Motor Tension Star Washer Upright Washer/Tension Washer Motor Tension Bolt Motor Belt Nut Pulley/Flywheel/Fan Motor Motor Pivot Bolt Isolator Left Front Roller Cover Front Roller/Pulley Right Front Roller Cover Electronics Bracket Controller Choke Rear Roller Hood Anchor Screw Front Roller Adj. R0697A Key No. Description 60 1 Walking...
...Latch Storage Latch Bracket Key/Clip Console Screw Console Base Console Speed Potentiometer Speed Control Battery Cover Latch Decal Foot Rail Wire Clip Adhesive Clip Console Base Screw Small Screw Wire Harness Platform Screw Motor/Pulley/FlywhteVFan Motor Tension Star Washer Upright Washer/Tension Washer Motor Tension Bolt Motor Belt Nut Pulley/Flywheel/Fan Motor Motor Pivot Bolt Isolator Left Front Roller Cover Front Roller/Pulley Right Front Roller Cover Electronics Bracket Controller Choke Rear Roller Hood Anchor Screw Front Roller Adj. R0697A Key No. Description 60 1 Walking...

