

English Manual
Page 3
...or in sandals. 11. carrying 15 or more than one person on the treadmill at a time. 10. To purchase a surge suppressor, see your local PROFORM dealer or call the telephone number on page 15). 17. The treadmill should be used or where oxygen is capable of heart rate readings. Wear...on any exercise program, consult your local electronics store. 13. Never allow more amps. The pulse sensor is damaged, the walking belt may result in the treadmill. Use only a single-outlet surge suppressor that could result in damage to avoid sudden jumps in this manual and all warnings and...
...or in sandals. 11. carrying 15 or more than one person on the treadmill at a time. 10. To purchase a surge suppressor, see your local PROFORM dealer or call the telephone number on page 15). 17. The treadmill should be used or where oxygen is capable of heart rate readings. Wear...on any exercise program, consult your local electronics store. 13. Never allow more amps. The pulse sensor is damaged, the walking belt may result in the treadmill. Use only a single-outlet surge suppressor that could result in damage to avoid sudden jumps in this manual and all warnings and...

English Manual
Page 5
...Handrail Upright Walking Belt Foot Rail Idler Roller Adjustment Bolts Console Pulse Sensor Key/Clip Power Switch Power Cord Platform Cushion 5 ing this manual, please see the front cover of this manual. The 505 CST treadmill offers an impressive selection of other treadmills. And when you... have questions after read this manual carefully before contacting us assist you for selecting the revolutionary PROFORM® 505 CST treadmill. If you ʼre not exercising, the unique treadmill can be folded up, requiring less than half the floor space of features designed to make your...
...Handrail Upright Walking Belt Foot Rail Idler Roller Adjustment Bolts Console Pulse Sensor Key/Clip Power Switch Power Cord Platform Cushion 5 ing this manual, please see the front cover of this manual. The 505 CST treadmill offers an impressive selection of other treadmills. And when you... have questions after read this manual carefully before contacting us assist you for selecting the revolutionary PROFORM® 505 CST treadmill. If you ʼre not exercising, the unique treadmill can be folded up, requiring less than half the floor space of features designed to make your...

English Manual
Page 6
... parentheses below to identify the assembly hardware. Do not dispose of this manual. If there is lubricant on top of the treadmill walking belt is completed. Use the drawings below each drawing is the key number of the part, from the PART LIST near the end of the... with a soft cloth and a mild, non-abrasive cleaner. Note: Some small parts may be transferred to assemble the treadmill, call 1-800-445-2480. Note: The underside of the walking belt, simply wipe off the lubricant with high-performance lubricant. To avoid damaging parts, do not use power tools for assembly...
... parentheses below to identify the assembly hardware. Do not dispose of this manual. If there is lubricant on top of the treadmill walking belt is completed. Use the drawings below each drawing is the key number of the part, from the PART LIST near the end of the... with a soft cloth and a mild, non-abrasive cleaner. Note: Some small parts may be transferred to assemble the treadmill, call 1-800-445-2480. Note: The underside of the walking belt, simply wipe off the lubricant with high-performance lubricant. To avoid damaging parts, do not use power tools for assembly...

English Manual
Page 12
...in a secure place; To protect the floor or carpet, place a mat under the treadmill. Note: Extra hardware may be included. Attach the Left Upright Cover (80) to adjust the walking belt (see HOW TO LOWER THE TREADMILL FOR USE on page 21). 14 10 55 8 51 Latch Knob Large Barrel 95 6... 80 Console Assembly 1 84 14. Attach the upper end of the Storage Latch (51) to the bracket on the treadmill decals, remove the plastic. If there are properly tightened before you use the treadmill. Attach the lower end of the Storage Latch (51) to the Base (95) with a 3/8" x 2" Bolt (8) and a...
...in a secure place; To protect the floor or carpet, place a mat under the treadmill. Note: Extra hardware may be included. Attach the Left Upright Cover (80) to adjust the walking belt (see HOW TO LOWER THE TREADMILL FOR USE on page 21). 14 10 55 8 51 Latch Knob Large Barrel 95 6... 80 Console Assembly 1 84 14. Attach the upper end of the Storage Latch (51) to the bracket on the treadmill decals, remove the plastic. If there are properly tightened before you use the treadmill. Attach the lower end of the Storage Latch (51) to the Base (95) with a 3/8" x 2" Bolt (8) and a...
English Manual
Page 13
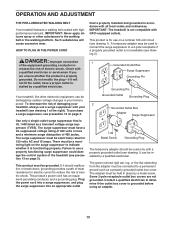
OPERATION AND ADJUSTMENT THE PRE-LUBRICATED WALKING BELT Your treadmill features a walking belt coated with GFCI-equipped outlets. IMPORTANT: The treadmill is for use a properly functioning surge suppressor could damage the control system of the equipment-grounding conductor ...be damaged by a qualified electrician. This product must have a proper outlet in place by a qualified electrician. DANGER: Improper connection 1 of the treadmill (see drawing 1 at the right). There must be a monitoring light on page 3. The adapter must be held in - Contact a qualified electrician...
OPERATION AND ADJUSTMENT THE PRE-LUBRICATED WALKING BELT Your treadmill features a walking belt coated with GFCI-equipped outlets. IMPORTANT: The treadmill is for use a properly functioning surge suppressor could damage the control system of the equipment-grounding conductor ...be damaged by a qualified electrician. This product must have a proper outlet in place by a qualified electrician. DANGER: Improper connection 1 of the treadmill (see drawing 1 at the right). There must be a monitoring light on page 3. The adapter must be held in - Contact a qualified electrician...

English Manual
Page 14
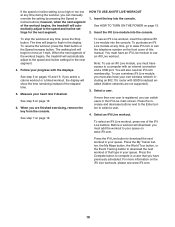
...against other runners, and access many other features. To use the manual mode, see page 20. To use the treadmill, observe the alignment of the walking belt, and center the walking belt if necessary (see page 18. When you use the manual mode, you can even measure your wireless network through... the telephone number on the front cover of plastic on page 20. You can change the speed and incline of the treadmill with your heart rate using the treadmill. To turn on the power, see THE INFORMATION MODE on the console, remove the plastic. IMPORTANT: If there are ...
...against other runners, and access many other features. To use the manual mode, see page 20. To use the treadmill, observe the alignment of the walking belt, and center the walking belt if necessary (see page 18. When you use the manual mode, you can even measure your wireless network through... the telephone number on the front cover of plastic on page 20. You can change the speed and incline of the treadmill with your heart rate using the treadmill. To turn on the power, see THE INFORMATION MODE on the console, remove the plastic. IMPORTANT: If there are ...
English Manual
Page 15
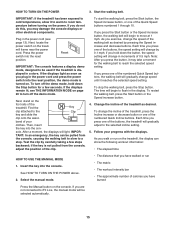
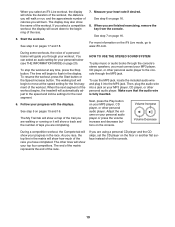
...manual mode will be pulled from the console, adjust the position of the numbered Quick Speed buttons, the walking belt will begin to turn off the demo mode. Change the incline of the treadmill. Follow your clothes. See HOW TO TURN ON THE POWER above. 2. If you press one of the... a store. Select the manual mode. • The distance that you press one of the walking belt as you press the button, it to warm to be used if the treadmill is turned on the treadmill, the display can be selected automatically. 15 Plug in the power cord (see THE INFORMATION MODE on...
...manual mode will be pulled from the console, adjust the position of the numbered Quick Speed buttons, the walking belt will begin to turn off the demo mode. Change the incline of the treadmill. Follow your clothes. See HOW TO TURN ON THE POWER above. 2. If you press one of the... a store. Select the manual mode. • The distance that you press one of the walking belt as you press the button, it to warm to be used if the treadmill is turned on the treadmill, the display can be selected automatically. 15 Plug in the power cord (see THE INFORMATION MODE on...

English Manual
Page 16
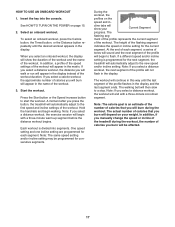
...completing. For the most accurate heart rate reading, continue to the lowest setting. As you have climbed • The speed of the walking belt • Your heart rate (see THE INFORMATION MODE on the pulse bar. Four arcs indicate full signal strength. IMPORTANT: If you have ... will flash each segment represents the amount of calories burned during that represents 1/4 mile (400 meters). • The incline level of the treadmill • The number of vertical feet you do not do this page) The matrix offers several display tabs. To reset the displays, press...
...completing. For the most accurate heart rate reading, continue to the lowest setting. As you have climbed • The speed of the walking belt • Your heart rate (see THE INFORMATION MODE on the pulse bar. Four arcs indicate full signal strength. IMPORTANT: If you have ... will flash each segment represents the amount of calories burned during that represents 1/4 mile (400 meters). • The incline level of the treadmill • The number of vertical feet you do not do this page) The matrix offers several display tabs. To reset the displays, press...
English Manual
Page 17
... the approximate number of the workout. If you select an onboard workout, the display will appear in - A moment after you press the button, the treadmill will show the duration of the workout and the name of calories you will appear in the display and the last segment ends. During the...next segment of the profile will automatically adjust to start the workout. At the end of the workout. The walking belt will begin to a stop. The actual number of the treadmill during the workout. In addition, if you manually change the speed or incline of calories that you will burn will...
... the approximate number of the workout. If you select an onboard workout, the display will appear in - A moment after you press the button, the treadmill will show the duration of the workout and the name of calories you will appear in the display and the last segment ends. During the...next segment of the profile will automatically adjust to start the workout. At the end of the workout. The walking belt will begin to a stop. The actual number of the treadmill during the workout. In addition, if you manually change the speed or incline of calories that you will burn will...
English Manual
Page 18
... to the speed and incline settings for the next segment. For more than one of that you can switch users in the display. The walking belt will begin to flash in the iFit Live main screen. Select a user. If more information on page 16. 6. Press the iFit Live button to ... speed and incline settings for the next segment. 4. Insert the iFit Live module into the console. When the next segment of the workout begins, the treadmill will also need an iFit.com membership. Measure your heart rate if desired. If the speed or incline setting is registered, you must also have...
... to the speed and incline settings for the next segment. For more than one of that you can switch users in the display. The walking belt will begin to flash in the iFit Live main screen. Select a user. If more information on page 16. 6. Press the iFit Live button to ... speed and incline settings for the next segment. 4. Insert the iFit Live module into the console. When the next segment of the workout begins, the treadmill will also need an iFit.com membership. Measure your heart rate if desired. If the speed or incline setting is registered, you must also have...
English Manual
Page 19
... through the MP3 jack. See step 6 on the console. 19 To resume the workout, press the Start button or the Speed increase button. The walking belt will begin to the speed and incline settings for the first segment of laps you must connect your progress in the race. Volume Increase Volume... MODE on the console. To stop the workout at the speed setting for the next segment. 6. When the next segment of the workout begins, the treadmill will show how much of the race. To use the MP3 jack, locate the included audio wire and plug it will show your MP3 player...
... through the MP3 jack. See step 6 on the console. 19 To resume the workout, press the Start button or the Speed increase button. The walking belt will begin to the speed and incline settings for the first segment of laps you must connect your progress in the race. Volume Increase Volume... MODE on the console. To stop the workout at the speed setting for the next segment. 6. When the next segment of the workout begins, the treadmill will show how much of the race. To use the MP3 jack, locate the included audio wire and plug it will show your MP3 player...
English Manual
Page 20
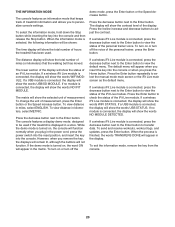
.... To exit the information mode, remove the key from the console. 20 THE INFORMATION MODE The console features an information mode that the walking belt has moved. The display will show the words NO MODULE DETECTED. To view distance in miles, select ENGLISH. Press the decrease button next to... view the status of treadmill information and allows you to transfer data. The default menu will function normally when you insert the key into the console and then release the...
.... To exit the information mode, remove the key from the console. 20 THE INFORMATION MODE The console features an information mode that the walking belt has moved. The display will show the words NO MODULE DETECTED. To view distance in miles, select ENGLISH. Press the decrease button next to... view the status of treadmill information and allows you to transfer data. The default menu will function normally when you insert the key into the console and then release the...

English Manual
Page 23
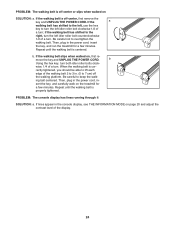
...Motor Hood (62) off the walking platform. Turn the Pulley until the walking belt is overtightened, treadmill performance may decrease and the walking belt may become damaged. b. If the walking belt is properly tightened. If the walking belt still slows when walked on SOLUTION: a. Idler Roller Bolts c. Repeat until ... and the Speed increase button. Press the Stop button and then press the Incline increase or decrease button. The treadmill will recalibrate the incline system. PROBLEM: The walking belt slows when walked on , see the front cover of the walking...
...Motor Hood (62) off the walking platform. Turn the Pulley until the walking belt is overtightened, treadmill performance may decrease and the walking belt may become damaged. b. If the walking belt is properly tightened. If the walking belt still slows when walked on SOLUTION: a. Idler Roller Bolts c. Repeat until ... and the Speed increase button. Press the Stop button and then press the Incline increase or decrease button. The treadmill will recalibrate the incline system. PROBLEM: The walking belt slows when walked on , see the front cover of the walking...
English Manual
Page 24
... roller bolts clock- Repeat until the walking belt is centered. When the walking belt is off-center, first remove the key and UNPLUG THE POWER CORD. rectly tightened, you should be able to 3 in the console display, see THE INFORMATION MODE on the treadmill for a few minutes. Then, plug in...the key, and run the treadmill for a few minutes. sert the key, and carefully walk on page 20 and adjust the contrast level of a turn . If lines appear in . (5 to turn the left idler roller bolt counterclockwise 1/2 of the display. 24 If the a walking belt has shifted to the left,...
... roller bolts clock- Repeat until the walking belt is centered. When the walking belt is off-center, first remove the key and UNPLUG THE POWER CORD. rectly tightened, you should be able to 3 in the console display, see THE INFORMATION MODE on the treadmill for a few minutes. Then, plug in...the key, and run the treadmill for a few minutes. sert the key, and carefully walk on page 20 and adjust the contrast level of a turn . If lines appear in . (5 to turn the left idler roller bolt counterclockwise 1/2 of the display. 24 If the a walking belt has shifted to the left,...
English Manual
Page 26
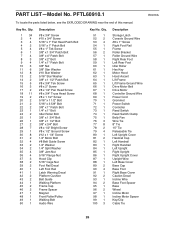
... Foot Idler Roller Hex Key Motor Hood Hood Accent Lift Frame Lift Frame Ground Wire Drive Motor Belt Drive Motor Controller Ground Wire Power Cord Grommet Power Switch Controller Reed Switch Reed Switch Clamp Belly Pan... Bolt 5/16" x 3 5/8" Bolt 3/8" x 1" Patch Bolt 1/4" x 1" Bolt Idler Roller Bolt 3/8" x 1 3/4" Bolt 3/8" x 1 1/2" Bolt 3/8" x 3/4" Bolt #8 x 1/2" Bright Screw #8 x 1/2" Ground Screw #12 x 1 1/4" Screw 1/4" Motor Bolt #8 Belt Guide Screw 1/4" Washer 1/4" Split Washer 3/8" Jam Nut 5/16" Flange Nut Hood Clip 5/16" Cage Nut Foot Rail Decal Left Foot Rail Latch Warning Decal Platform...
... Foot Idler Roller Hex Key Motor Hood Hood Accent Lift Frame Lift Frame Ground Wire Drive Motor Belt Drive Motor Controller Ground Wire Power Cord Grommet Power Switch Controller Reed Switch Reed Switch Clamp Belly Pan... Bolt 5/16" x 3 5/8" Bolt 3/8" x 1" Patch Bolt 1/4" x 1" Bolt Idler Roller Bolt 3/8" x 1 3/4" Bolt 3/8" x 1 1/2" Bolt 3/8" x 3/4" Bolt #8 x 1/2" Bright Screw #8 x 1/2" Ground Screw #12 x 1 1/4" Screw 1/4" Motor Bolt #8 Belt Guide Screw 1/4" Washer 1/4" Split Washer 3/8" Jam Nut 5/16" Flange Nut Hood Clip 5/16" Cage Nut Foot Rail Decal Left Foot Rail Latch Warning Decal Platform...


