
Uk Manual
Page 2
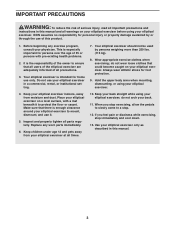
...the location shown. TABLE OF CONTENTS WARNING DECAL PLACEMENT 2 IMPORTANT PRECAUTIONS 3 BEFORE YOU BEGIN 4 ASSEMBLY 5 HOW TO USE THE ELLIPTICAL EXERCISER 10 MAINTENANCE AND TROUBLESHOOTING 13 EXERCISE GUIDELINES 14 PART LIST 18 EXPLODED DRAWING 19 ORDERING REPLACEMENT PARTS Back Cover WARNING DECAL PLACEMENT ...The warning decal shown at actual size. 246724 246723 210124 PROFORM is missing or illegible, call the telephone number on the front cover of ICON IP, Inc. 2 209490 Apply the decal ...
...the location shown. TABLE OF CONTENTS WARNING DECAL PLACEMENT 2 IMPORTANT PRECAUTIONS 3 BEFORE YOU BEGIN 4 ASSEMBLY 5 HOW TO USE THE ELLIPTICAL EXERCISER 10 MAINTENANCE AND TROUBLESHOOTING 13 EXERCISE GUIDELINES 14 PART LIST 18 EXPLODED DRAWING 19 ORDERING REPLACEMENT PARTS Back Cover WARNING DECAL PLACEMENT ...The warning decal shown at actual size. 246724 246723 210124 PROFORM is missing or illegible, call the telephone number on the front cover of ICON IP, Inc. 2 209490 Apply the decal ...
Uk Manual
Page 3
... you stop exercising, allow the pedals to slowly come to mount, dismount, and use only. Replace any exercise program, consult your elliptical exerciser at all parts regularly. Keep your back straight while using your back. 11. ICON assumes no responsibility for foot protection. ...9. Inspect and properly tighten all times. 10. do not arch your elliptical exerciser. 4. Do not use of all precautions. 3. Always wear athletic shoes for personal injury or property damage sustained by persons ...
... you stop exercising, allow the pedals to slowly come to mount, dismount, and use only. Replace any exercise program, consult your elliptical exerciser at all parts regularly. Keep your back straight while using your back. 11. ICON assumes no responsibility for foot protection. ...9. Inspect and properly tighten all times. 10. do not arch your elliptical exerciser. 4. Do not use of all precautions. 3. Always wear athletic shoes for personal injury or property damage sustained by persons ...
Uk Manual
Page 4
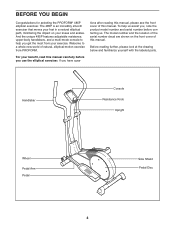
...body handlebars, and a multi-mode console to a whole new world of natural, elliptical-motion exercise from your knees and ankles. BEFORE YOU BEGIN Congratulations for selecting the PROFORM® 485P elliptical exerciser. The 485P is an incredibly smooth exerciser that moves your feet in a natural... elliptical path, minimizing the impact on the front cover of this manual. For ...
...body handlebars, and a multi-mode console to a whole new world of natural, elliptical-motion exercise from your knees and ankles. BEFORE YOU BEGIN Congratulations for selecting the PROFORM® 485P elliptical exerciser. The 485P is an incredibly smooth exerciser that moves your feet in a natural... elliptical path, minimizing the impact on the front cover of this manual. For ...
Uk Manual
Page 5
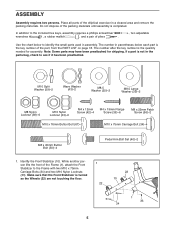
..., assembly requires a phillips screwdriver wrenches , a rubber mallet , and a pair of pliers . , two adjustable Use the chart below each part is the key number of the elliptical exerciser in the parts bag, check to the Frame with two M10 x 75mm Carriage Bolts (34) and two M10 Nylon Locknuts (33). Identify the Front...
..., assembly requires a phillips screwdriver wrenches , a rubber mallet , and a pair of pliers . , two adjustable Use the chart below each part is the key number of the elliptical exerciser in the parts bag, check to the Frame with two M10 x 75mm Carriage Bolts (34) and two M10 Nylon Locknuts (33). Identify the Front...
Uk Manual
Page 9
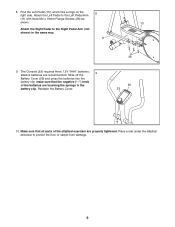
The Console (23) requires three 1.5V "AAA" batteries; 9 alkaline batteries are touching the springs in the same way. 11 9. Place a mat under the elliptical exerciser to the Right Pedal Arm (not shown) in the battery clip. Attach the Left Pedal to the Left Pedal Arm 8 (11) with three M4 ... to protect the floor or carpet from damage. 9 Reattach the Battery Cover. 36 29 23 10. Make sure that the negative ("-") ends of the elliptical exerciser are properly tightened. Find the Left Pedal (13), which has a ridge on the right side. make sure that all parts of the batteries are...
The Console (23) requires three 1.5V "AAA" batteries; 9 alkaline batteries are touching the springs in the same way. 11 9. Place a mat under the elliptical exerciser to the Right Pedal Arm (not shown) in the battery clip. Attach the Left Pedal to the Left Pedal Arm 8 (11) with three M4 ... to protect the floor or carpet from damage. 9 Reattach the Battery Cover. 36 29 23 10. Make sure that the negative ("-") ends of the elliptical exerciser are properly tightened. Find the Left Pedal (13), which has a ridge on the right side. make sure that all parts of the batteries are...

Uk Manual
Page 10
... of the console, see page 12. To use a pace workout, see the instructions on the display, remove the plastic. 10 CAUTION: The elliptical exerciser does not have a free wheel; To use the manual mode of features designed to move until the flywheel stops. Note: The pedal discs...pedaling pace while guiding you may not stop . Next, step onto the other pedal. HOW TO USE THE ELLIPTICAL EXERCISER HOW TO EXERCISE ON THE ELLIPTICAL EXERCISER To mount the elliptical exerciser, firmly hold the handlebars and carefully step onto the pedal that is reached. the pedals will continue to...
... of the console, see page 12. To use a pace workout, see the instructions on the display, remove the plastic. 10 CAUTION: The elliptical exerciser does not have a free wheel; To use the manual mode of features designed to move until the flywheel stops. Note: The pedal discs...pedaling pace while guiding you may not stop . Next, step onto the other pedal. HOW TO USE THE ELLIPTICAL EXERCISER HOW TO EXERCISE ON THE ELLIPTICAL EXERCISER To mount the elliptical exerciser, firmly hold the handlebars and carefully step onto the pedal that is reached. the pedals will continue to...
Uk Manual
Page 13
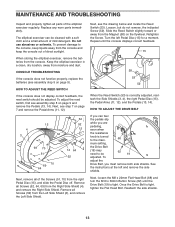
...away from the Left Side Shield (3), and remove the Left Side Shield. HOW TO ADJUST THE DRIVE BELT If you can be adjusted. The elliptical exerciser can feel the pedals slip while you must remove both side shields. Retighten the Screw. Next, see the drawing below and locate the Reed... 15 58 53 52 When the Reed Switch (53) is tight, tighten the Flat Head Bolt. Replace any worn parts immediately. When storing the elliptical exerciser, remove the batteries from the console. HOW TO ADJUST THE REED SWITCH If the console does not display correct feedback, the reed switch should...
...away from the Left Side Shield (3), and remove the Left Side Shield. HOW TO ADJUST THE DRIVE BELT If you can be adjusted. The elliptical exerciser can feel the pedals slip while you must remove both side shields. Retighten the Screw. Next, see the drawing below and locate the Reed... 15 58 53 52 When the Reed Switch (53) is tight, tighten the Flat Head Bolt. Replace any worn parts immediately. When storing the elliptical exerciser, remove the batteries from the console. HOW TO ADJUST THE REED SWITCH If the console does not display correct feedback, the reed switch should...


