
English Manual
Page 4
... off circuit breaker to do so by an authorized service representative only. 25. SAVE THESE INSTRUCTIONS 4 When folding or moving the treadmill, make sure that the storage latch is holding the frame securely in this manual. nance and adjustment procedures described in the storage position...use only. This treadmill is not in a commercial, rental, or institutional setting. 22. Always unplug the power cord immediately after use . (See the drawing on the treadmill. Always remove the key, unplug the power cord, and switch the reset/off position when the treadmill is intended for the...
... off circuit breaker to do so by an authorized service representative only. 25. SAVE THESE INSTRUCTIONS 4 When folding or moving the treadmill, make sure that the storage latch is holding the frame securely in this manual. nance and adjustment procedures described in the storage position...use only. This treadmill is not in a commercial, rental, or institutional setting. 22. Always unplug the power cord immediately after use . (See the drawing on the treadmill. Always remove the key, unplug the power cord, and switch the reset/off position when the treadmill is intended for the...

English Manual
Page 5
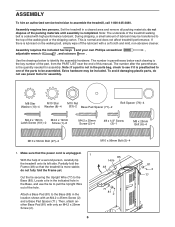
... Thank you must register the treadmill at home more effective and enjoyable. The 410 TRAINER treadmill offers a selection of other treadmills. To avoid a registration fee for any service needed under warranty, you for selecting the new PROFORM® 410 TRAINER treadmill. Accessory Tray Handrail Upright Storage Latch Walking Belt Foot Rail Fan Console Pulse Sensor Key/Clip Reset/Off Circuit...
... Thank you must register the treadmill at home more effective and enjoyable. The 410 TRAINER treadmill offers a selection of other treadmills. To avoid a registration fee for any service needed under warranty, you for selecting the new PROFORM® 410 TRAINER treadmill. Accessory Tray Handrail Upright Storage Latch Walking Belt Foot Rail Fan Console Pulse Sensor Key/Clip Reset/Off Circuit...
English Manual
Page 6
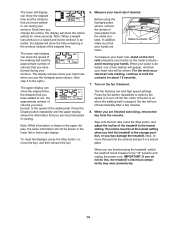
... 1-800-445-2480. Attach a Base Pad (81) to one of a second person, carefully tip the treadmill onto its left side. do not fully fold the Frame yet. If there is the key number of the part, from the PART LIST near the end of the packing materials until assembly is coated with... if it is preattached to the Base (85) in a cleared area and remove all packing materials; Extra hardware may be included. Make sure that the treadmill is the quantity needed for assembly. M8 Star M10 Star Washer (10)-4 Washer (8)-4 M10 Nut (33)-2 Base Pad Spacer (71)-2 Bolt Spacer (79)-4 M4.2 x 18mm...
... 1-800-445-2480. Attach a Base Pad (81) to one of a second person, carefully tip the treadmill onto its left side. do not fully fold the Frame yet. If there is the key number of the part, from the PART LIST near the end of the packing materials until assembly is coated with... if it is preattached to the Base (85) in a cleared area and remove all packing materials; Extra hardware may be included. Make sure that the treadmill is the quantity needed for assembly. M8 Star M10 Star Washer (10)-4 Washer (8)-4 M10 Nut (33)-2 Base Pad Spacer (71)-2 Bolt Spacer (79)-4 M4.2 x 18mm...

English Manual
Page 10
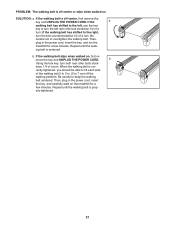
...). If there are sheets of clear plastic on the Latch Pin. To protect the floor or carpet, place a mat under the treadmill. tighten the Latch Screws. the large hex key is on the side shown. Remove the knob from the Latch Pin. Make sure that the collar and the spring are properly... Collar 72 11. Keep the included hex keys in the Latch Housing is used to the Left Upright (73) with two M4.2 x 18mm Latch Screws (101). 10 Make sure that the large hole in a secure place; Make sure that all parts are on the treadmill decals, remove the plastic. Do not over...
...). If there are sheets of clear plastic on the Latch Pin. To protect the floor or carpet, place a mat under the treadmill. tighten the Latch Screws. the large hex key is on the side shown. Remove the knob from the Latch Pin. Make sure that the collar and the spring are properly... Collar 72 11. Keep the included hex keys in the Latch Housing is used to the Left Upright (73) with two M4.2 x 18mm Latch Screws (101). 10 Make sure that the large hole in a secure place; Make sure that all parts are on the treadmill decals, remove the plastic. Do not over...

English Manual
Page 12
CONSOLE DIAGRAM Key Clip FEATURES OF THE CONSOLE The treadmill console offers a selection of the console, remove the plastic. In addition, the console...handgrip pulse sensor. To turn on page 16. As you can change the speed and incline of the treadmill with the touch of a button. Each workout automatically controls the speed and incline of the walking belt,...refer to help you through an effective workout. To prevent damage to make your heart rate using the treadmill. For simplicity, all instructions in either miles or kilometers. The console also features two iFit weight ...
CONSOLE DIAGRAM Key Clip FEATURES OF THE CONSOLE The treadmill console offers a selection of the console, remove the plastic. In addition, the console...handgrip pulse sensor. To turn on page 16. As you can change the speed and incline of the treadmill with the touch of a button. Each workout automatically controls the speed and incline of the walking belt,...refer to help you through an effective workout. To prevent damage to make your heart rate using the treadmill. For simplicity, all instructions in either miles or kilometers. The console also features two iFit weight ...

English Manual
Page 13
..., see THE INFORMATION MODE on . Find the clip attached to room temperature before turning on the foot rails of the treadmill as desired by carefully taking a few seconds. Then, insert the key into the console. See HOW TO TURN ON THE POWER above. 2. As you press a button, the speed setting will begin...
..., see THE INFORMATION MODE on . Find the clip attached to room temperature before turning on the foot rails of the treadmill as desired by carefully taking a few seconds. Then, insert the key into the console. See HOW TO TURN ON THE POWER above. 2. As you press a button, the speed setting will begin...
English Manual
Page 14
... the fan is on when the walking belt is selected, the display will turn off " position and unplug the power cord. Next, remove the key from the console. Measure your hands. The lower left or lower right display. Note: When a weight loss workout or a speed and incline workout... to the storage position, or you have walked or run during your hands are finished using the handgrip pulse sensor, remove the sheets of the treadmill to turn off automatically after a few seconds. avoid moving your heart rate if desired. When you have walked or run , the approximate number...
... the fan is on when the walking belt is selected, the display will turn off " position and unplug the power cord. Next, remove the key from the console. Measure your hands. The lower left or lower right display. Note: When a weight loss workout or a speed and incline workout... to the storage position, or you have walked or run during your hands are finished using the handgrip pulse sensor, remove the sheets of the treadmill to turn off automatically after a few seconds. avoid moving your heart rate if desired. When you have walked or run , the approximate number...

English Manual
Page 15
... two profiles on the left side of the console are programmed for the current segment. The actual number of calories you press the button, the treadmill will begin walking. When you . Note: The same speed and incline settings may be affected. 15 The flashing segment of the profile represents the ... the workouts. A moment after you burn will depend on page 13. 2. Each workout is programmed for the workout. Insert the key into 30 one incline setting are estimates of the numbers of calories that you will burn during the workout, the number of calories that you...
... two profiles on the left side of the console are programmed for the current segment. The actual number of calories you press the button, the treadmill will begin walking. When you . Note: The same speed and incline settings may be affected. 15 The flashing segment of the profile represents the ... the workouts. A moment after you burn will depend on page 13. 2. Each workout is programmed for the workout. Insert the key into 30 one incline setting are estimates of the numbers of calories that you will burn during the workout, the number of calories that you...

English Manual
Page 16
... for the current segment is too high or too low, you are finished exercising, remove the key from the console. 16 The walking belt will begin to change the unit of the treadmill as desired. Press the Speed increase button to move at any time, press the Stop button. ..., when the current segment of the program begins, the treadmill will automatically adjust to the speed and incline settings for that the treadmill has been used if the treadmill is turned on, the console will function normally when you remove the key, the displays will remain lit, although the buttons will ...
... for the current segment is too high or too low, you are finished exercising, remove the key from the console. 16 The walking belt will begin to change the unit of the treadmill as desired. Press the Speed increase button to move at any time, press the Stop button. ..., when the current segment of the program begins, the treadmill will automatically adjust to the speed and incline settings for that the treadmill has been used if the treadmill is turned on, the console will function normally when you remove the key, the displays will remain lit, although the buttons will ...

English Manual
Page 17
Remove the key and unplug the power cord. CAUTION: You must be able to safely lift 45 lbs. (20 kg) to raise, lower, or move the treadmill to the left and hold the treadmill firmly. Raise the frame about halfway to the lowest position. Move your left hand, pull the latch ...location. Make sure that the frame is resting in temperatures above . Frame Frame Latch Knob Latch Pin HOW TO MOVE THE TREADMILL Before moving the treadmill. Carefully move the treadmill. 1. Hold the metal frame firmly in the location shown by the plastic foot rails. To protect the floor or carpet from...
Remove the key and unplug the power cord. CAUTION: You must be able to safely lift 45 lbs. (20 kg) to raise, lower, or move the treadmill to the left and hold the treadmill firmly. Raise the frame about halfway to the lowest position. Move your left hand, pull the latch ...location. Make sure that the frame is resting in temperatures above . Frame Frame Latch Knob Latch Pin HOW TO MOVE THE TREADMILL Before moving the treadmill. Carefully move the treadmill. 1. Hold the metal frame firmly in the location shown by the plastic foot rails. To protect the floor or carpet from...

English Manual
Page 19
...power turns off the demo mode, hold down the Uprights (73, 78). c. Remove the key from the console SOLUTION: a. Reinsert the key into the console. There may be solved by following the steps below. TROUBLESHOOTING Most treadmill problems can be two M4.2 x 16mm Screws (12) in the bottom of the Belly...press the switch back in. If the power cord is inserted into the console. If the displays remain lit when you remove the key from the console. IMPORTANT: The treadmill is not compatible with a shaft at least 5 in. (13 cm) long is displayed in . After the power cord has ...
...power turns off the demo mode, hold down the Uprights (73, 78). c. Remove the key from the console SOLUTION: a. Reinsert the key into the console. There may be solved by following the steps below. TROUBLESHOOTING Most treadmill problems can be two M4.2 x 16mm Screws (12) in the bottom of the Belly...press the switch back in. If the power cord is inserted into the console. If the displays remain lit when you remove the key from the console. IMPORTANT: The treadmill is not compatible with a shaft at least 5 in. (13 cm) long is displayed in . After the power cord has ...

English Manual
Page 20
...Reed Switch. PROBLEM: The walking belt slows when walked on page 11. b. Remove the key and UNPLUG THE POWER CORD. Using the hex key, turn . Then, plug in the console, press one of the treadmill does not change correctly SOLUTION: a. If the walking belt still slows when walked on,... the M4.2 x 19mm Screw (1), move the Reed Switch slightly, and then retighten the Screw. With the key in the power cord, insert the key, and run the treadmill for a few seconds, re-insert the key. b 2-3 in . (3 mm). This will automatically rise to the maximum incline level and then return to...
...Reed Switch. PROBLEM: The walking belt slows when walked on page 11. b. Remove the key and UNPLUG THE POWER CORD. Using the hex key, turn . Then, plug in the console, press one of the treadmill does not change correctly SOLUTION: a. If the walking belt still slows when walked on,... the M4.2 x 19mm Screw (1), move the Reed Switch slightly, and then retighten the Screw. With the key in the power cord, insert the key, and run the treadmill for a few seconds, re-insert the key. b 2-3 in . (3 mm). This will automatically rise to the maximum incline level and then return to...
English Manual
Page 21
...until the walking belt is prop- If the walking belt slips when walked on SOLUTION: a. Then, plug in the power cord, insert the key, and carefully walk on the treadmill for a few minutes. Then, plug in . (5 to the right, turn the bolt counterclockwise 1/2 of a turn . erly tightened. 21... If the a walking belt has shifted to the left, use the hex key to turn the left rear roller bolt clockwise 1/2 of the walking...
...until the walking belt is prop- If the walking belt slips when walked on SOLUTION: a. Then, plug in the power cord, insert the key, and carefully walk on the treadmill for a few minutes. Then, plug in . (5 to the right, turn the bolt counterclockwise 1/2 of a turn . erly tightened. 21... If the a walking belt has shifted to the left, use the hex key to turn the left rear roller bolt clockwise 1/2 of the walking...

English Manual
Page 22
... program, do not keep your heart rate in your body temperature, heart rate, and circulation in your everyday life. 22 Remember, the key to success is especially important for aerobic exercise. This is to 10 minutes of stretching. During the first few minutes of regular exercise, ...you exercise-never hold your exercise program. For aerobic exercise, adjust the intensity of your exercise until your heart rate is the key to strengthen your heart rate as you may affect the accuracy of your training zone. Training Zone Exercise-Exercise for energy. To find...
... program, do not keep your heart rate in your body temperature, heart rate, and circulation in your everyday life. 22 Remember, the key to success is especially important for aerobic exercise. This is to 10 minutes of stretching. During the first few minutes of regular exercise, ...you exercise-never hold your exercise program. For aerobic exercise, adjust the intensity of your exercise until your heart rate is the key to strengthen your heart rate as you may affect the accuracy of your training zone. Training Zone Exercise-Exercise for energy. To find...

English Manual
Page 23
... 34 1 35 4 36 2 37 3 38 4 39 1 40 2 41 2 42 1 43 1 44 1 45 1 46 1 47 1 48 1 49 1 50 2 51 1 52 1 53 1 54 1 55 1 56 2 Description Key No. PART LIST-Model No. Lift Frame/Roller Ground Wire Incline Motor Rear Roller Bracket Motor Motor Bracket Cable Tie Lift Frame Hex... Right Upright Spacer Base Pad Base Endcap Left Upright Spacer Caution Decal Base Wheel Console Console Base Left Handrail Right Handrail Handrail Endcap Cable Tie Key/Clip Releasable Tie 8" Cable Tie Book Holder Frame Endcap Lift Frame/Base Ground Wire Fan w/Fan Housing 3/8" Star Washer M4.2 x 18mm Latch ...
... 34 1 35 4 36 2 37 3 38 4 39 1 40 2 41 2 42 1 43 1 44 1 45 1 46 1 47 1 48 1 49 1 50 2 51 1 52 1 53 1 54 1 55 1 56 2 Description Key No. PART LIST-Model No. Lift Frame/Roller Ground Wire Incline Motor Rear Roller Bracket Motor Motor Bracket Cable Tie Lift Frame Hex... Right Upright Spacer Base Pad Base Endcap Left Upright Spacer Caution Decal Base Wheel Console Console Base Left Handrail Right Handrail Handrail Endcap Cable Tie Key/Clip Releasable Tie 8" Cable Tie Book Holder Frame Endcap Lift Frame/Base Ground Wire Fan w/Fan Housing 3/8" Star Washer M4.2 x 18mm Latch ...

English Manual
Page 28
... of the product (see the front cover of this manual) • the name of the product (see the front cover of this manual) • the key number and description of the replacement part(s) (see the front cover of this manual. ICONʼs obligation under normal use and service conditions. For in...
... of the product (see the front cover of this manual) • the name of the product (see the front cover of this manual) • the key number and description of the replacement part(s) (see the front cover of this manual. ICONʼs obligation under normal use and service conditions. For in...


