

User Manual
Page 2
If a decal is missing, or if it is a registered trademark of this manual or on the included service card and order a free replacement decal. PROFORM is illegible, please see the dealer contact information on the back cover of ICON IP, Inc. 2 TABLE OF CONTENTS WARNING... DECAL PLACEMENT 2 IMPORTANT PRECAUTIONS 3 BEFORE YOU BEGIN 5 ASSEMBLY 6 OPERATION AND ADJUSTMENT 12 HOW TO FOLD AND MOVE THE TREADMILL 23 TROUBLESHOOTING 25...
If a decal is missing, or if it is a registered trademark of this manual or on the included service card and order a free replacement decal. PROFORM is illegible, please see the dealer contact information on the back cover of ICON IP, Inc. 2 TABLE OF CONTENTS WARNING... DECAL PLACEMENT 2 IMPORTANT PRECAUTIONS 3 BEFORE YOU BEGIN 5 ASSEMBLY 6 OPERATION AND ADJUSTMENT 12 HOW TO FOLD AND MOVE THE TREADMILL 23 TROUBLESHOOTING 25...
User Manual
Page 3
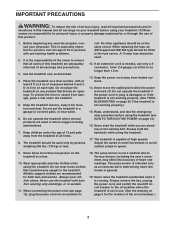
... 9. ICON assumes no longer than one person on each side. This is needed, use . (See the drawing on the walking belt. Place the treadmill on a level surface, with at least 8 ft. (2.4 m) of clearance behind it is intended only as described. 4. If an extension cord is ...Always remove the key, unplug the power cord, and switch the reset/off circuit breaker to avoid sudden jumps in this manual and all warnings on your treadmill before using your physician. Before beginning any surface that is not working properly. (See TROUBLESHOOTING on any exercise program, consult ...
... 9. ICON assumes no longer than one person on each side. This is needed, use . (See the drawing on the walking belt. Place the treadmill on a level surface, with at least 8 ft. (2.4 m) of clearance behind it is intended only as described. 4. If an extension cord is ...Always remove the key, unplug the power cord, and switch the reset/off circuit breaker to avoid sudden jumps in this manual and all warnings on your treadmill before using your physician. Before beginning any surface that is not working properly. (See TROUBLESHOOTING on any exercise program, consult ...

User Manual
Page 4
...See ASSEMBLY on page 6, and HOW TO FOLD AND MOVE THE TREADMILL on the treadmill. 23. Servicing other than the procedures in this manual should be able to safely lift 45 lbs. (20 kg) to raise, lower, or move the treadmill until it is fully closed. 22. Do not use only. ...Never remove the motor hood un- Always unplug the power cord immediately after use, before cleaning the treadmill, and before performing the mainte- nance and adjustment procedures described in this manual. Never insert any object into any opening on page 23.) You must be performed by an authorized ser...
...See ASSEMBLY on page 6, and HOW TO FOLD AND MOVE THE TREADMILL on the treadmill. 23. Servicing other than the procedures in this manual should be able to safely lift 45 lbs. (20 kg) to raise, lower, or move the treadmill until it is fully closed. 22. Do not use only. ...Never remove the motor hood un- Always unplug the power cord immediately after use, before cleaning the treadmill, and before performing the mainte- nance and adjustment procedures described in this manual. Never insert any object into any opening on page 23.) You must be performed by an authorized ser...

User Manual
Page 5
... the dealer contact information on the included service card. The PF 4.0 treadmill offers an impressive array of this manual or on the back cover of features designed to make your benefit, read - ing this manual). For your workouts at home more enjoyable and effective. Pulse Sensor Handrail... yourself with the labeled parts. To help us assist you 're not exercising, the unique PF 4.0 treadmill can be folded up, requiring less than half the floor space of this manual, please see the front cover of other treadmills. If you for selecting the revolutionary PROFORM® PF...
... the dealer contact information on the included service card. The PF 4.0 treadmill offers an impressive array of this manual or on the back cover of features designed to make your benefit, read - ing this manual). For your workouts at home more enjoyable and effective. Pulse Sensor Handrail... yourself with the labeled parts. To help us assist you 're not exercising, the unique PF 4.0 treadmill can be folded up, requiring less than half the floor space of this manual, please see the front cover of other treadmills. If you for selecting the revolutionary PROFORM® PF...

User Manual
Page 6
During shipping, a small amount of the treadmill walking belt is completed. Extra hardware may be transferred to identify the assembly hardware. Repeat this manual. Note: The underside of lubricant may be assembled. Assembly requires the included hex key and your own Phillips screwdriver , adjustable wrench ...side of the packing materials until assembly is coated with a soft cloth and a mild, non-abrasive cleaner. Do not dispose of the treadmill. Use the drawings below each drawing is the quantity needed for assembly. Note: If a part is not in a cleared area and ...
During shipping, a small amount of the treadmill walking belt is completed. Extra hardware may be transferred to identify the assembly hardware. Repeat this manual. Note: The underside of lubricant may be assembled. Assembly requires the included hex key and your own Phillips screwdriver , adjustable wrench ...side of the packing materials until assembly is coated with a soft cloth and a mild, non-abrasive cleaner. Do not dispose of the treadmill. Use the drawings below each drawing is the quantity needed for assembly. Note: If a part is not in a cleared area and ...

User Manual
Page 13
... the speed and incline of the treadmill as it guides you exercise, the console will display continuous exercise feedback. To use of dumbbells and an inflatable exercise ball (not included). Note: The strength exercises require the use the manual mode of the console, see page...enjoyable. CONSOLE DIAGRAM Key Clip FEATURES OF THE CONSOLE The revolutionary treadmill console offers a selection of features designed to the cross training workouts, the console features nine classic aerobic workouts. When you select the manual mode of the console, you to burn calories and enhance ...
... the speed and incline of the treadmill as it guides you exercise, the console will display continuous exercise feedback. To use of dumbbells and an inflatable exercise ball (not included). Note: The strength exercises require the use the manual mode of the console, see page...enjoyable. CONSOLE DIAGRAM Key Clip FEATURES OF THE CONSOLE The revolutionary treadmill console offers a selection of features designed to the cross training workouts, the console features nine classic aerobic workouts. When you select the manual mode of the console, you to burn calories and enhance ...

User Manual
Page 14
... repeatedly until it reaches the selected speed setting. Select the manual mode. IMPORTANT: If there is inserted, the manual mode will change by pressing the Speed increase and decrease buttons. The first time the treadmill is used if the treadmill is turned on the power. If you hold down a button...by pressing either kilometers or miles. Insert the key into the console. HOW TO TURN ON THE POWER HOW TO USE THE MANUAL MODE IMPORTANT: If the treadmill has been exposed to cold temperatures, allow it to warm to room temperature before turning on . To start the walking belt...
... repeatedly until it reaches the selected speed setting. Select the manual mode. IMPORTANT: If there is inserted, the manual mode will change by pressing the Speed increase and decrease buttons. The first time the treadmill is used if the treadmill is turned on the power. If you hold down a button...by pressing either kilometers or miles. Insert the key into the console. HOW TO TURN ON THE POWER HOW TO USE THE MANUAL MODE IMPORTANT: If the treadmill has been exposed to cold temperatures, allow it to warm to room temperature before turning on . To start the walking belt...

User Manual
Page 15
... towards your progress with the displays. Then select either user 1 or user 2 in the same way and the workout will continue. When the manual mode is shown. To restart the walking belt, press the Quick Start button, the Speed increase button, or one of the incline buttons numbered..., continue to 12. To stop the walking belt, press the Stop button. Once you use the handgrip pulse sensor (see step 6 on the treadmill, the displays can show the following workout information: • The elapsed time. • The distance that user each time you determine which workout ...
... towards your progress with the displays. Then select either user 1 or user 2 in the same way and the workout will continue. When the manual mode is shown. To restart the walking belt, press the Quick Start button, the Speed increase button, or one of the incline buttons numbered..., continue to 12. To stop the walking belt, press the Stop button. Once you use the handgrip pulse sensor (see step 6 on the treadmill, the displays can show the following workout information: • The elapsed time. • The distance that user each time you determine which workout ...

User Manual
Page 17
...one incline setting are programmed for the current segment. During other segments, the console will prompt you press the Quick Start button, the treadmill will automatically adjust to the speed and incline settings for two different users. The flashing segment of the profile Current Segment represents the ... TURN ON THE POWER on page 14. 2. After the walking belt starts moving, the right display will continue. Note: The console can manually override the setting by pressing the speed or incline buttons; If the speed or incline setting is divided into the console. To restart the ...
...one incline setting are programmed for the current segment. During other segments, the console will prompt you press the Quick Start button, the treadmill will automatically adjust to the speed and incline settings for two different users. The flashing segment of the profile Current Segment represents the ... TURN ON THE POWER on page 14. 2. After the walking belt starts moving, the right display will continue. Note: The console can manually override the setting by pressing the speed or incline buttons; If the speed or incline setting is divided into the console. To restart the ...

User Manual
Page 18
.... Note: Your heart rate can show a person demonstrating the exercise. Turn on page 16. 8. When you select will appear in this manual. 5. Measure your left display. The workout will automatically adjust to select the desired display mode. Remove the clip from the console. To purchase... the Continue button. The left display will slow to help you have performed the recommended number of repetitions, step onto the treadmill, slide the clip back onto the waistband of the first strength exercise will determine which workout information is selected, the console offers...
.... Note: Your heart rate can show a person demonstrating the exercise. Turn on page 16. 8. When you select will appear in this manual. 5. Measure your left display. The workout will automatically adjust to select the desired display mode. Remove the clip from the console. To purchase... the Continue button. The left display will slow to help you have performed the recommended number of repetitions, step onto the treadmill, slide the clip back onto the waistband of the first strength exercise will determine which workout information is selected, the console offers...

User Manual
Page 19
... your monthly challenge goal. The workout will then slow to the speed and incline settings for the remainder of the workout begins, the treadmill will automatically adjust to start the workout. The walking belt will continue in this way until the desired workout appears in the display. ... the workout will sound and the new speed setting, new incline setting, and the next segment of the workout. 3. Note: The console can manually override the setting by pressing the speed or incline buttons; Select a display mode and follow your heart rate if desired. HOW TO USE A CLASSIC...
... your monthly challenge goal. The workout will then slow to the speed and incline settings for the remainder of the workout begins, the treadmill will automatically adjust to start the workout. The walking belt will continue in this way until the desired workout appears in the display. ... the workout will sound and the new speed setting, new incline setting, and the next segment of the workout. 3. Note: The console can manually override the setting by pressing the speed or incline buttons; Select a display mode and follow your heart rate if desired. HOW TO USE A CLASSIC...

User Manual
Page 22
... (87) from the console and unplug the power cord. Attach the receiver to the plastic posts on the treadmill, or the more you run on the front cover of this manual. Make sure that both adjusters are pinched. Note: Make sure that no wires are set at the same ...CUSHIONING SYSTEM Remove the key from the Console Base (93). 2. To purchase the optional chest pulse sensor, call the telephone number on the treadmill. THE OPTIONAL CHEST PULSE SENSOR An optional chest pulse sensor offers hands-free operation as shown and is unplugged. Cushion Adjustor Increase Decrease Cushion ...
... (87) from the console and unplug the power cord. Attach the receiver to the plastic posts on the treadmill, or the more you run on the front cover of this manual. Make sure that both adjusters are pinched. Note: Make sure that no wires are set at the same ...CUSHIONING SYSTEM Remove the key from the Console Base (93). 2. To purchase the optional chest pulse sensor, call the telephone number on the treadmill. THE OPTIONAL CHEST PULSE SENSOR An optional chest pulse sensor offers hands-free operation as shown and is unplugged. Cushion Adjustor Increase Decrease Cushion ...

User Manual
Page 25
...shown, the circuit breaker has tripped. c Tripped Position Reset Position PROBLEM: The power turns off circuit breaker (see THE INFORMATION MODE on the treadmill frame near the power cord. Check the reset/off during use only a 3-conductor, 14-gauge (1 mm2) cord that the key is ...back in . d. To turn on . TROUBLESHOOTING Most treadmill problems can be used if the treadmill is displayed in , make sure that is no longer than 5 ft. (1.5 m). If the treadmill still will not run, please see the front cover of this manual. Check the reset/off the demo mode, hold ...
...shown, the circuit breaker has tripped. c Tripped Position Reset Position PROBLEM: The power turns off circuit breaker (see THE INFORMATION MODE on the treadmill frame near the power cord. Check the reset/off during use only a 3-conductor, 14-gauge (1 mm2) cord that the key is ...back in . d. To turn on . TROUBLESHOOTING Most treadmill problems can be used if the treadmill is displayed in , make sure that is no longer than 5 ft. (1.5 m). If the treadmill still will not run, please see the front cover of this manual. Check the reset/off the demo mode, hold ...

User Manual
Page 26
...), move 15 50 the Reed Switch slightly, and then retighten the 71 Screw. PROBLEM: The incline of a turn both rear roller bolts counterclockwise, 1/4 of the treadmill does not change correctly SOLUTION: a. b. Using the hex key, turn . If neces- 51 sary, tip down the Uprights (not shown), reattach the #8 x 2"... PROBLEM: The walking belt slows when walked on the left side of the walking belt 2 to 3 in the console, press one of this manual. 26 Be careful to check for a few seconds, re-insert the key. If the walking belt still slows when walked on, see the front...
...), move 15 50 the Reed Switch slightly, and then retighten the 71 Screw. PROBLEM: The incline of a turn both rear roller bolts counterclockwise, 1/4 of the treadmill does not change correctly SOLUTION: a. b. Using the hex key, turn . If neces- 51 sary, tip down the Uprights (not shown), reattach the #8 x 2"... PROBLEM: The walking belt slows when walked on the left side of the walking belt 2 to 3 in the console, press one of this manual. 26 Be careful to check for a few seconds, re-insert the key. If the walking belt still slows when walked on, see the front...

