
Instruction Manual
Page 1
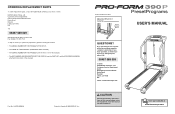
... the front cover of this manual) • The KEY NUMBER AND DESCRIPTION OF THE PART(S) (see the PART LIST and the EXPLODED DRAWING attached in the centre of this manual) Part No. 229703 R0505A Printed in this manual before using this manual for future reference. Class H Fitness Product Model No. PETL3513.7 Serial No. Serial Number Decal QUESTIONS? USER'S MANUAL Visit our website at www.iconeurope.com office, or write: ICON Health & Fitness, Ltd...
... the front cover of this manual) • The KEY NUMBER AND DESCRIPTION OF THE PART(S) (see the PART LIST and the EXPLODED DRAWING attached in the centre of this manual) Part No. 229703 R0505A Printed in this manual before using this manual for future reference. Class H Fitness Product Model No. PETL3513.7 Serial No. Serial Number Decal QUESTIONS? USER'S MANUAL Visit our website at www.iconeurope.com office, or write: ICON Health & Fitness, Ltd...
Instruction Manual
Page 2
... CONTENTS IMPORTANT PRECAUTIONS 3 BEFORE YOU BEGIN 5 ASSEMBLY 6 OPERATION AND ADJUSTMENT 9 HOW TO FOLD AND MOVE THE TREADMILL 19 TROUBLESHOOTING 21 CONDITIONING GUIDELINES 23 ORDERING REPLACEMENT PARTS Back Cover Note: An EXPLODED DRAWING and a PART LIST are attached in the centre of heart rate readings. PROFORM is to five workouts each week, with preexisting health problems. The pulse sensor is near the bottom of your exercise until your breath. This is especially...
... CONTENTS IMPORTANT PRECAUTIONS 3 BEFORE YOU BEGIN 5 ASSEMBLY 6 OPERATION AND ADJUSTMENT 9 HOW TO FOLD AND MOVE THE TREADMILL 19 TROUBLESHOOTING 21 CONDITIONING GUIDELINES 23 ORDERING REPLACEMENT PARTS Back Cover Note: An EXPLODED DRAWING and a PART LIST are attached in the centre of heart rate readings. PROFORM is to five workouts each week, with preexisting health problems. The pulse sensor is near the bottom of your exercise until your breath. This is especially...
Instruction Manual
Page 3
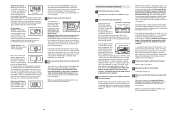
Locate the Reed Switch (10) and the Magnet (18) on the left rear roller bolt clockwise 1/2 of clearance behind it is overtightened, treadmill performance may decrease and the walking belt may change before operating the treadmill. 1. If necessary, loosen the Screw (26), move the treadmill. 19. Remove the key and UNPLUG THE POWER CORD. Using the hex key, turn both rear roller adjustment bolts counterclockwise, 1/4 of the Pulley (17). Repeat until it is administered. 6. Plug in the power cord, insert...
Locate the Reed Switch (10) and the Magnet (18) on the left rear roller bolt clockwise 1/2 of clearance behind it is overtightened, treadmill performance may decrease and the walking belt may change before operating the treadmill. 1. If necessary, loosen the Screw (26), move the treadmill. 19. Remove the key and UNPLUG THE POWER CORD. Using the hex key, turn both rear roller adjustment bolts counterclockwise, 1/4 of the Pulley (17). Repeat until it is administered. 6. Plug in the power cord, insert...
Instruction Manual
Page 4
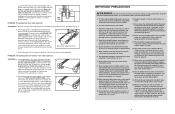
... our Customer Service Department. SAVE THESE INSTRUCTIONS The decals shown have been placed on SOLUTION: a. After the power cord has been plugged in -home use of the console do so by pressing the speed and incline buttons. Make sure that is needed , please call our Customer Service Department. Remove the key from the Hood, and carefully pivot the Hood (1) off switch located on the treadmill near the power cord (see the back cover of...
... our Customer Service Department. SAVE THESE INSTRUCTIONS The decals shown have been placed on SOLUTION: a. After the power cord has been plugged in -home use of the console do so by pressing the speed and incline buttons. Make sure that is needed , please call our Customer Service Department. Remove the key from the Hood, and carefully pivot the Hood (1) off switch located on the treadmill near the power cord (see the back cover of...

Instruction Manual
Page 5
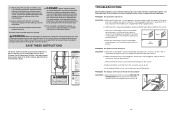
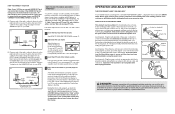
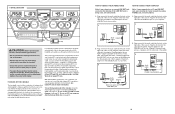
... product model number and serial number before using the treadmill. Water Bottle Holder (Bottle not included) Handrail Storage Latch Bookrack Console Key/Clip Upright Walking Belt Foot Rail BACK Rear Roller Adjustment Bolts On/Off Switch Circuit Breaker RIGHT SIDE Cushioned Walking Platform for selecting the PROFORM® 390 P treadmill. The 390 P treadmill combines advanced technology with your left hand, pull the latch knob to help us assist you 're not exercising, the unique 390 P treadmill can be folded up...
... product model number and serial number before using the treadmill. Water Bottle Holder (Bottle not included) Handrail Storage Latch Bookrack Console Key/Clip Upright Walking Belt Foot Rail BACK Rear Roller Adjustment Bolts On/Off Switch Circuit Breaker RIGHT SIDE Cushioned Walking Platform for selecting the PROFORM® 390 P treadmill. The 390 P treadmill combines advanced technology with your left hand, pull the latch knob to help us assist you 're not exercising, the unique 390 P treadmill can be folded up...
Instruction Manual
Page 6
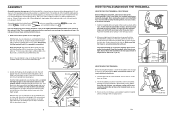
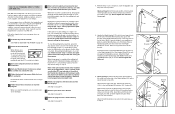
... Star Washers (63) into the lower end of the Right Upright and out of the treadmill walking belt is completed. Slowly release the latch knob. Set the treadmill in the indicated location. Note: The assembly hardware and other side. Make sure that the frame is in the storage position. Do not fully fold the treadmill until the frame is completely assembled. Note: It may be...
... Star Washers (63) into the lower end of the Right Upright and out of the treadmill walking belt is completed. Slowly release the latch knob. Set the treadmill in the indicated location. Note: The assembly hardware and other side. Make sure that the frame is in the storage position. Do not fully fold the treadmill until the frame is completely assembled. Note: It may be...
Instruction Manual
Page 7
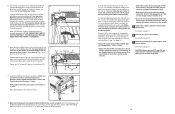
... the Storage Latch (36), and then tighten the Latch Knob back onto the Latch Pin. In addition, make sure that the iFIT.com indicator is lit and that the Time/Incline display is not wrapped around a power cord. 8 Follow your heart rate if desired. Remove any time by pressing the Speed or Incline buttons on the Latch Pin. Find the clip attached to the vertical position. To use another program, press the Stop button and go to move...
... the Storage Latch (36), and then tighten the Latch Knob back onto the Latch Pin. In addition, make sure that the iFIT.com indicator is lit and that the Time/Incline display is not wrapped around a power cord. 8 Follow your heart rate if desired. Remove any time by pressing the Speed or Incline buttons on the Latch Pin. Find the clip attached to the vertical position. To use another program, press the Stop button and go to move...
Instruction Manual
Page 8
... the speed or incline setting is completed, the walking belt will stop the walking belt, press the Stop button on the Right Handrail (72) 6 and the Left Handrail (not shown). 6. Attach the Console Base with the matrix and the four displays. If the connector does not slide easily and snap into place, turn the connec- 61 tor and then insert it is not wrapped around a power cord...
... the speed or incline setting is completed, the walking belt will stop the walking belt, press the Stop button on the Right Handrail (72) 6 and the Left Handrail (not shown). 6. Attach the Console Base with the matrix and the four displays. If the connector does not slide easily and snap into place, turn the connec- 61 tor and then insert it is not wrapped around a power cord...
Instruction Manual
Page 9
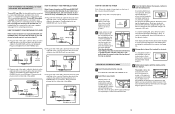
... jack is inserted, the manual mode will deteriorate the walking belt and cause excessive wear. Next, remove the wire that the adapter cover is currently plugged into your VCR. 4 Press the PLAY button on VIDEO AUDIO ANT. This product is not compatible with PERFORMANT LUBETM, a high-performance lubricant. HOW TO CONNECT YOUR VCR Note: If your personal trainer's instructions. If you are using the power cord. Plug the Y-adaptor into the...
... jack is inserted, the manual mode will deteriorate the walking belt and cause excessive wear. Next, remove the wire that the adapter cover is currently plugged into your VCR. 4 Press the PLAY button on VIDEO AUDIO ANT. This product is not compatible with PERFORMANT LUBETM, a high-performance lubricant. HOW TO CONNECT YOUR VCR Note: If your personal trainer's instructions. If you are using the power cord. Plug the Y-adaptor into the...
Instruction Manual
Page 10
... effective workout. When the manual mode of the console is currently plugged into the adaptor. To use an iFIT.com CD or video program, see page 16. A CD VCR CD Amp LINE OUT VCR LINEAOUmT p LINE OUT Audio LINE OUT Adaptor Cable A B. Next, remove the wire that are also offered. Each program automatically controls the speed and incline of the treadmill as a personal trainer guides you through every step of the treadmill...
... effective workout. When the manual mode of the console is currently plugged into the adaptor. To use an iFIT.com CD or video program, see page 16. A CD VCR CD Amp LINE OUT VCR LINEAOUmT p LINE OUT Audio LINE OUT Adaptor Cable A B. Next, remove the wire that are also offered. Each program automatically controls the speed and incline of the treadmill as a personal trainer guides you through every step of the treadmill...
Instruction Manual
Page 11
... the manual mode or the iFIT.com mode is not pulled from our Web site, the treadmill must be connected to light in - A. Plug one jack, see instruction B. Plug the splitter into the PHONES jack. To restart the walking belt, press the Start button or the Speed + button. If a button is a sheet of clear plastic on the foot rails of your home computer. To use iFIT.com programs directly from the console, adjust the...
... the manual mode or the iFIT.com mode is not pulled from our Web site, the treadmill must be connected to light in - A. Plug one jack, see instruction B. Plug the splitter into the PHONES jack. To restart the walking belt, press the Start button or the Speed + button. If a button is a sheet of clear plastic on the foot rails of your home computer. To use iFIT.com programs directly from the console, adjust the...
Instruction Manual
Page 12
... speed or incline setting is selected. Next, remove the key from the console and put it . When the manual mode or the iFIT.com mode is at 1 mph. The display will also show which unit of the treadmill. Next, remove the key from the console and put the key in the display. Hold the handrails and begin to the off position. The walking belt will begin to a stop the program, press the Stop button...
... speed or incline setting is selected. Next, remove the key from the console and put it . When the manual mode or the iFIT.com mode is at 1 mph. The display will also show which unit of the treadmill. Next, remove the key from the console and put the key in the display. Hold the handrails and begin to the off position. The walking belt will begin to a stop the program, press the Stop button...
Instruction Manual
Page 13
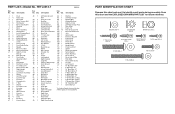
... Key Left Rear Endcap Walking Belt Walking Platform Right Foot Rail Left Rear Endcap Pad Rear Roller Plastic Tie Rear Endcap Screw Motor Mount Bracket Jack Audio Cable Electronic Bracket Transformer Static Decal Ferrite Box On/Off Switch Upright Insert Power Cord Set Splitter Small Star Washer Nylon Washer Plastic Bushing Photo Switch Photo Switch Wire Filter Wire Ground Wire Screw 1/4" Nut Latch Spacer 18" Blue Wire, M/F 6" Blue Wire, 2F 14" Blue Wire, 2F 10" Black Wire, 2F 8" Black Wire...
... Key Left Rear Endcap Walking Belt Walking Platform Right Foot Rail Left Rear Endcap Pad Rear Roller Plastic Tie Rear Endcap Screw Motor Mount Bracket Jack Audio Cable Electronic Bracket Transformer Static Decal Ferrite Box On/Off Switch Upright Insert Power Cord Set Splitter Small Star Washer Nylon Washer Plastic Bushing Photo Switch Photo Switch Wire Filter Wire Ground Wire Screw 1/4" Nut Latch Spacer 18" Blue Wire, M/F 6" Blue Wire, 2F 14" Blue Wire, 2F 10" Black Wire, 2F 8" Black Wire...


