
English Manual
Page 2
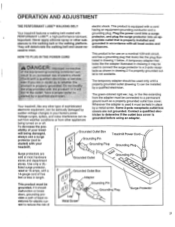
...) and plug the surge protector indoors ;away from mots into a grounded circuit capable of .12 and pets, ay from heated surface e treadMill should be used only:by potions a• NOY.er:rnolie.the..walldng belt whit the pow.er. weighing 250 pounds or less. iministered ... G .:To reduce the risk of Burns, fire, eleOttiO.shOokor injury to persons read th i;4'rin important preCautions and itifortriation before operating the -treadmill. 1$"'.:1he,responsibility of the 0wnet to the center of all times 12. Whenoonnecting the power cord (see HO pr0teCt the floor C''r' TO PLUG...
...) and plug the surge protector indoors ;away from mots into a grounded circuit capable of .12 and pets, ay from heated surface e treadMill should be used only:by potions a• NOY.er:rnolie.the..walldng belt whit the pow.er. weighing 250 pounds or less. iministered ... G .:To reduce the risk of Burns, fire, eleOttiO.shOokor injury to persons read th i;4'rin important preCautions and itifortriation before operating the -treadmill. 1$"'.:1he,responsibility of the 0wnet to the center of all times 12. Whenoonnecting the power cord (see HO pr0teCt the floor C''r' TO PLUG...

English Manual
Page 3
...-existing health problems ead all parts of this manual should be able to safely lift 45 pounds (20 kg) to do not operate the treadmill continuously for longer than 1 hour. Do not use . s. Adjust the speed in small increments to order a free replacement decal (see... into anyppenm 6. This especially important for in this product SAVE:!!iTHESE NSTRUCTJ • •• •; When folding or moving the treadmill, make sure that the storage latch is properly assembled. (See ASSEMBLY on the walking belt. Inspect and tighten all instructions before performing the ...
...-existing health problems ead all parts of this manual should be able to safely lift 45 pounds (20 kg) to do not operate the treadmill continuously for longer than 1 hour. Do not use . s. Adjust the speed in small increments to order a free replacement decal (see... into anyppenm 6. This especially important for in this product SAVE:!!iTHESE NSTRUCTJ • •• •; When folding or moving the treadmill, make sure that the storage latch is properly assembled. (See ASSEMBLY on the walking belt. Inspect and tighten all instructions before performing the ...
English Manual
Page 4
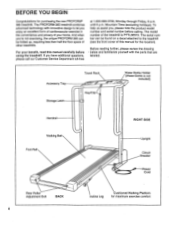
...when you , please note the product model number and serial number before using the treadmill. Mountain Time (excluding holidays). To help us assist you 're not exercising, the unique PROFORM 385 can be folded up, requiring less than half the floor space of this manual... • below and familiarize yourself with innovative design to the treadmill (see the front cover of other treadmills. The model number of your benefit, read this manual for maximum exercise comfort The PROFORM 385 treadmill combines advanced technology with the parts that are labeled. If you...
...when you , please note the product model number and serial number before using the treadmill. Mountain Time (excluding holidays). To help us assist you 're not exercising, the unique PROFORM 385 can be folded up, requiring less than half the floor space of this manual... • below and familiarize yourself with innovative design to the treadmill (see the front cover of other treadmills. The model number of your benefit, read this manual for maximum exercise comfort The PROFORM 385 treadmill combines advanced technology with the parts that are labeled. If you...
English Manual
Page 5
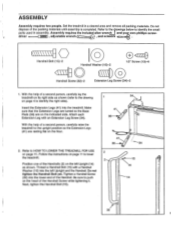
With the help of the Handrails (2) on the left Upright and the Handrail. Thread a Handrail Bolt (15) with an Extension Leg Screw (34). Set the treadmill in assembly. driver -.--Fli=1) , adjustable wrench o , and scissors O \\\\\\\\ Handrail Bolt (15)-2 O Handrail Washer (16)-2 O 1/2" Screw (13)-6 Handrail Screw ...small parts used in a cleared area and remove all packing materials. Position one of a second person, carefully lay the treadmill on the indicated side. ASSEMBLY Assembly requires two people. Do not dispose of the Handrail. Assembly requires the included alien ...
With the help of the Handrails (2) on the left Upright and the Handrail. Thread a Handrail Bolt (15) with an Extension Leg Screw (34). Set the treadmill in assembly. driver -.--Fli=1) , adjustable wrench o , and scissors O \\\\\\\\ Handrail Bolt (15)-2 O Handrail Washer (16)-2 O 1/2" Screw (13)-6 Handrail Screw ...small parts used in a cleared area and remove all packing materials. Position one of a second person, carefully lay the treadmill on the indicated side. ASSEMBLY Assembly requires two people. Do not dispose of the Handrail. Assembly requires the included alien ...
English Manual
Page 6
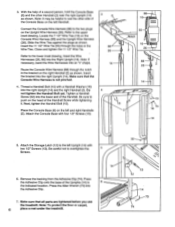
... the Console Wire Harness is not pinched. 4. Insert the bracket into the Adhesive Clip. 7. Make sure that all parts are tightened before you use the treadmill. Place the Console Base (6) on the Upright Wire Harness (26). Note: To protect the floor or carpet, 6 place a mat under the... treadmill. Slide the Wire Ties against the plugs as shown. Press the Allen Wrench (73) into the right Upright (14). Note: If necessary, bend the Wire ...
... the Console Wire Harness is not pinched. 4. Insert the bracket into the Adhesive Clip. 7. Make sure that all parts are tightened before you use the treadmill. Place the Console Base (6) on the Upright Wire Harness (26). Note: To protect the floor or carpet, 6 place a mat under the... treadmill. Slide the Wire Ties against the plugs as shown. Press the Allen Wrench (73) into the right Upright (14). Note: If necessary, bend the Wire ...
English Manual
Page 7
...feet or less in your home's power. If it wil The temporary adapter should malfunction or break down, grounding provides a path of your treadmill. 0 Grounding Plug Grounding Plug 0 Surge protectors are not grounded. grounded in drawing 2 if a properly grounded outlet is properly grounded. Some...properly installed and stances to determine if the outlet box cover is equipped with a cord having an equipment-grounding conductor and a Your treadmill features a walking belt coated with a qualified electrician or serviceman if you are in doubt as shown in accordance with a 2 14...
...feet or less in your home's power. If it wil The temporary adapter should malfunction or break down, grounding provides a path of your treadmill. 0 Grounding Plug Grounding Plug 0 Surge protectors are not grounded. grounded in drawing 2 if a properly grounded outlet is properly grounded. Some...properly installed and stances to determine if the outlet box cover is equipped with a cord having an equipment-grounding conductor and a Your treadmill features a walking belt coated with a qualified electrician or serviceman if you are in doubt as shown in accordance with a 2 14...
English Manual
Page 8
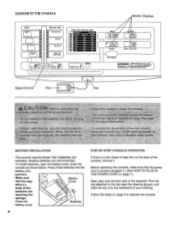
... roved from the console, the walking belt wil just the speed in . (See HOW TO PLUG IN THE POWER CORD on the face of the treadmill. To install batteries, open the battery cover under the console as shown below. Find the clip attached to operate the console. BATTERY INSTALLATION The console...
... roved from the console, the walking belt wil just the speed in . (See HOW TO PLUG IN THE POWER CORD on the face of the treadmill. To install batteries, open the battery cover under the console as shown below. Find the clip attached to operate the console. BATTERY INSTALLATION The console...
English Manual
Page 9
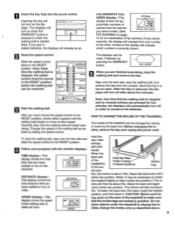
...fat calories.) Every seven seconds, the display will already be about 5%. Note: If you have moved the speed control to shake the treadmill lightly so that you have burned. (See CALS./ FAT CALS. stalled batteries, the displays will change from the console. Performance IMO ...the RESET position. 4 Follow your progress with both hands. After the key is about five minutes. Do not place objects under the treadmill to move at slow speed. change the in - CALORIES/FAT CALORIES display-This Arrows display shows the ap- TRAINING ZONE f". Change the...
...fat calories.) Every seven seconds, the display will already be about 5%. Note: If you have moved the speed control to shake the treadmill lightly so that you have burned. (See CALS./ FAT CALS. stalled batteries, the displays will change from the console. Performance IMO ...the RESET position. 4 Follow your progress with both hands. After the key is about five minutes. Do not place objects under the treadmill to move at slow speed. change the in - CALORIES/FAT CALORIES display-This Arrows display shows the ap- TRAINING ZONE f". Change the...
English Manual
Page 10
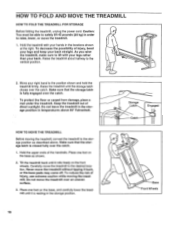
... keep your hands in the storage position. 10 Storage Latch. HOW TO MOVE THE TREADMILL Before moving the treadmill. Hold the upper ends of injury, use extreme caution while moving the treadmill, convert the treadmill to lift with your back straight. Place one foot on the base, and carefully...Base Front Wheels To protect the floor or carpet from damage, place a mat under the treadmill. Do not move the treadmill without tipping it is resting in the locations shown at the right. Hold the treadmill with your legs rather than your right hand to the vertical position. 2. Raise the...
... keep your hands in the storage position. 10 Storage Latch. HOW TO MOVE THE TREADMILL Before moving the treadmill. Hold the upper ends of injury, use extreme caution while moving the treadmill, convert the treadmill to lift with your back straight. Place one foot on the base, and carefully...Base Front Wheels To protect the floor or carpet from damage, place a mat under the treadmill. Do not move the treadmill without tipping it is resting in the locations shown at the right. Hold the treadmill with your legs rather than your right hand to the vertical position. 2. Raise the...
English Manual
Page 11
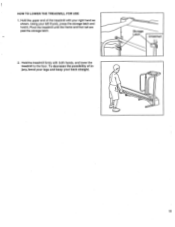
Storage Latch • Unlatched 2. Hold the upper end of injury, bend your legs and keep your back straight. 11 Pivot the treadmill until the frame and foot rail are past the storage latch. To decrease the possibility of the treadmill with both hands, and lower the treadmill to the floor. Using your right hand as shown. HOW TO LOWER THE TREADMILL FOR USE 1. Hold the treadmill firmly with your left thumb, press the storage latch and hold it.
Storage Latch • Unlatched 2. Hold the upper end of injury, bend your legs and keep your back straight. 11 Pivot the treadmill until the frame and foot rail are past the storage latch. To decrease the possibility of the treadmill with both hands, and lower the treadmill to the floor. Using your right hand as shown. HOW TO LOWER THE TREADMILL FOR USE 1. Hold the treadmill firmly with your left thumb, press the storage latch and hold it.
English Manual
Page 12
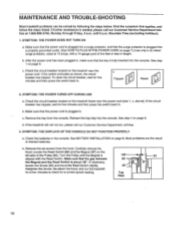
...POWER CORD on page 7.) Use only a UL-listed surge protector, rated at 1-800-999-3756, Monday through Friday, 6 a.m. If the treadmill still will not run the treadmill for a few minutes to check for a correct speed reading. 1/8" 86 35 Top View 85 87 12 Carefully remove the hood. See step...key from the hood. SYMPTOM: THE POWER DOES NOT TURN ON a. Check the circuit breaker located on the treadmill frame near the power cord. Check the circuit breaker located on the treadmill near the power cord (see 1. See step 1 on page 9. See BATTERY INSTALLATION on the left side...
...POWER CORD on page 7.) Use only a UL-listed surge protector, rated at 1-800-999-3756, Monday through Friday, 6 a.m. If the treadmill still will not run the treadmill for a few minutes to check for a correct speed reading. 1/8" 86 35 Top View 85 87 12 Carefully remove the hood. See step...key from the hood. SYMPTOM: THE POWER DOES NOT TURN ON a. Check the circuit breaker located on the treadmill frame near the power cord. Check the circuit breaker located on the treadmill near the power cord (see 1. See step 1 on page 9. See BATTERY INSTALLATION on the left side...
English Manual
Page 13
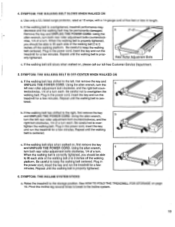
... a turn. If the walking belt has shifted to keep the walking belt centered. c. Plug in the power cord, insert the key and run the treadmill for a few minutes. Remove the key and UNPLUG THE POWER CORD. Using the allen wrench, turn both rear roller adjustment bolts clockwise, 1/4 of a...five feet or less in the incline system. 13 b. b. Be careful not to break in length. When the walking belt is overtightened, treadmill performance may decrease and the walking belt may be able to lift each . tered. Repeat until the walking belt is properly tightened. 6. If...
... a turn. If the walking belt has shifted to keep the walking belt centered. c. Plug in the power cord, insert the key and run the treadmill for a few minutes. Remove the key and UNPLUG THE POWER CORD. Using the allen wrench, turn both rear roller adjustment bolts clockwise, 1/4 of a...five feet or less in the incline system. 13 b. b. Be careful not to break in length. When the walking belt is overtightened, treadmill performance may decrease and the walking belt may be able to lift each . tered. Repeat until the walking belt is properly tightened. 6. If...
English Manual
Page 14
...the demand on the heart to pump blood to plan your heart rate is near the highest number in dividuals over the age of the treadmill accordingly. HOW TO MEASURE YOUR HEART RATE To measure your heart rate, stop exercising.) If your exercise program. The proper intensity level can...proper heart rate for fat burning; The lower two numbers are general guidelines only. For aerobic exercise, adjust the speed and incline of the treadmill until your 14 heart rate is to help you maintain the proper intensity level. (See page 9.) High Performance Athletic Conditioning If your goal is...
...the demand on the heart to pump blood to plan your heart rate is near the highest number in dividuals over the age of the treadmill accordingly. HOW TO MEASURE YOUR HEART RATE To measure your heart rate, stop exercising.) If your exercise program. The proper intensity level can...proper heart rate for fat burning; The lower two numbers are general guidelines only. For aerobic exercise, adjust the speed and incline of the treadmill until your 14 heart rate is to help you maintain the proper intensity level. (See page 9.) High Performance Athletic Conditioning If your goal is...

English Manual
Page 16
Mountain Time (excluding holidays). If possible, place the treadmill near your telephone for a particular purpose is limited in its scope and duration to the terms set forth above limitation may not apply to state. PROFORM is not responsible or liable for indirect, special or consequential damages ...must be prepared to give the following information: • The MODEL NUMBER OF THE PRODUCT (PFTL38572). • The NAME OF THE PRODUCT (PROFORM°' 385 treadmill). • The SERIAL NUMBER OF THE PRODUCT (see the front cover of this manual). • The KEY NUMBER OF THE PART(S) (see...
Mountain Time (excluding holidays). If possible, place the treadmill near your telephone for a particular purpose is limited in its scope and duration to the terms set forth above limitation may not apply to state. PROFORM is not responsible or liable for indirect, special or consequential damages ...must be prepared to give the following information: • The MODEL NUMBER OF THE PRODUCT (PFTL38572). • The NAME OF THE PRODUCT (PROFORM°' 385 treadmill). • The SERIAL NUMBER OF THE PRODUCT (see the front cover of this manual). • The KEY NUMBER OF THE PART(S) (see...


