
Uk Manual
Page 2
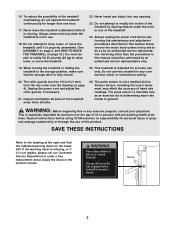
...it. When replacing the fuse, an ASTA approved BS1362 type should not be used by persons weighing more than 250 pounds (115 kg). 8. The treadmill should be on a surface that all users of all times. 7. Never allow more than one person on a level surface, with bare feet,... WARNING: To reduce the risk of the owner to persons, read the following important precautions and information before beginning assembly. Place the treadmill on the treadmill at all warnings and precautions. 2. To protect the floor or carpet from moisture and dust. When connecting the power cord (see ...
...it. When replacing the fuse, an ASTA approved BS1362 type should not be used by persons weighing more than 250 pounds (115 kg). 8. The treadmill should be on a surface that all users of all times. 7. Never allow more than one person on a level surface, with bare feet,... WARNING: To reduce the risk of the owner to persons, read the following important precautions and information before beginning assembly. Place the treadmill on the treadmill at all warnings and precautions. 2. To protect the floor or carpet from moisture and dust. When connecting the power cord (see ...
Uk Manual
Page 3
...parts of this product. Always unplug the power cord before using. Do not attempt to order a free replacement decal. When moving the treadmill or folding the treadmill to raise, lower, or move the treadmill. 22. The pulse sensor is not in this manual. SAVE THESE INSTRUCTIONS Refer to do not operate the... for personal injury or property damage sustained by an authorised service representative only. 19. Always remove the key when the treadmill is intended only as an exercise aid in determining heart rate trends in this manual should be 1/8 inch (3 mm) from the rear roller (see...
...parts of this product. Always unplug the power cord before using. Do not attempt to order a free replacement decal. When moving the treadmill or folding the treadmill to raise, lower, or move the treadmill. 22. The pulse sensor is not in this manual. SAVE THESE INSTRUCTIONS Refer to do not operate the... for personal injury or property damage sustained by an authorised service representative only. 19. Always remove the key when the treadmill is intended only as an exercise aid in determining heart rate trends in this manual should be 1/8 inch (3 mm) from the rear roller (see...
Uk Manual
Page 4
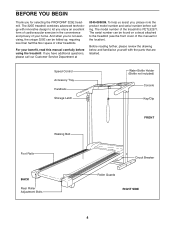
... PETL32571. Before reading further, please review the drawing below and familiarise yourself with innovative design to the treadmill (see the front cover of your benefit, read this manual for selecting the PROFORM¨ 325E treadmill. For your home. Speed Control Accessory Tray Handrails Storage Latch Water Bottle Holder (Bottle not included) Console Key...
... PETL32571. Before reading further, please review the drawing below and familiarise yourself with innovative design to the treadmill (see the front cover of your benefit, read this manual for selecting the PROFORM¨ 325E treadmill. For your home. Speed Control Accessory Tray Handrails Storage Latch Water Bottle Holder (Bottle not included) Console Key...
Uk Manual
Page 5
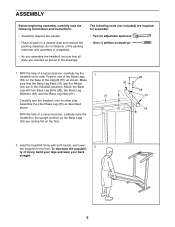
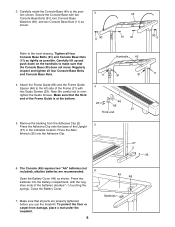
... one of the Base Legs (55) on its other Base Leg (55) as described above. Attach the Base Leg with both hands, and lower 2 the treadmill to the upright position so the Base Legs (55) are resting flat on the floor. 34 61 28 68 31 55 2. Make sure that all... parts in the drawings. To decrease the possibili- With the help of the packing materials until assembly is completed. ¥ As you assemble the treadmill, be sure that the Base Leg Pads (31) and the Wheel (34) are in the indicated positions. Assemble the other side. ASSEMBLY Before beginning assembly...
... one of the Base Legs (55) on its other Base Leg (55) as described above. Attach the Base Leg with both hands, and lower 2 the treadmill to the upright position so the Base Legs (55) are resting flat on the floor. 34 61 28 68 31 55 2. Make sure that all... parts in the drawings. To decrease the possibili- With the help of the packing materials until assembly is completed. ¥ As you assemble the treadmill, be sure that the Base Leg Pads (31) and the Wheel (34) are in the indicated positions. Assemble the other side. ASSEMBLY Before beginning assembly...
Uk Manual
Page 6
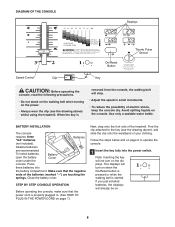
...91) and Console Base Nuts (11) as tightly as shown. tighten the Guide Screws. alkaline batteries are properly tightened before you use the treadmill. Make sure that the thick end of the batteries (marked ÒÐÓ) touching the springs. Handrails 45 11 91 91 11 4....Note: Be careful not to the left side of the Upright (37) in the indicated location. Remove the backing from damage, place a mat under the treadmill. 6 Batteries The Console (49) requires two "AA" batteries (not included); Press two batteries into the Adhesive Clip. 37 2 35 6. Attach the...
...91) and Console Base Nuts (11) as tightly as shown. tighten the Guide Screws. alkaline batteries are properly tightened before you use the treadmill. Make sure that the thick end of the batteries (marked ÒÐÓ) touching the springs. Handrails 45 11 91 91 11 4....Note: Be careful not to the left side of the Upright (37) in the indicated location. Remove the backing from damage, place a mat under the treadmill. 6 Batteries The Console (49) requires two "AA" batteries (not included); Press two batteries into the Adhesive Clip. 37 2 35 6. Attach the...
Uk Manual
Page 7
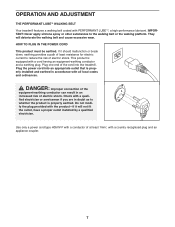
... THE POWER CORD This product must be earthed. If it will deteriorate the walking belt and cause excessive wear. Plug the power cord into the treadmill. Use only a power cord type H05VV-F with a conductor of at least 1mm2, with a cord having an equipment-earthing conductor and a earthing plug. They will not... with PERFORMANT LUBETM, a high-performance lubricant. fy the plug provided with all local codes and ordinances. OPERATION AND ADJUSTMENT THE PERFORMANT LUBETM WALKING BELT Your treadmill features a walking belt coated with a quali-
... THE POWER CORD This product must be earthed. If it will deteriorate the walking belt and cause excessive wear. Plug the power cord into the treadmill. Use only a power cord type H05VV-F with a conductor of at least 1mm2, with a cord having an equipment-earthing conductor and a earthing plug. They will not... with PERFORMANT LUBETM, a high-performance lubricant. fy the plug provided with all local codes and ordinances. OPERATION AND ADJUSTMENT THE PERFORMANT LUBETM WALKING BELT Your treadmill features a walking belt coated with a quali-
Uk Manual
Page 8
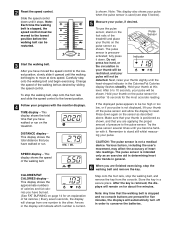
... ¥ Adjust the speed in . (See HOW TO PLUG IN THE POWER CORD on page 7.) Next, step onto the foot rails of the treadmill. BATTERY INSTALLATION The console requires three "AA" batteries Batteries (not included). Find the clip attached to operate the console. 1 Insert the key fully into...Do not stand on the walking belt when turning on the power. ¥ Always wear the clip (see the drawing above ) whilst using the treadmill. Use only a sealable water bottle. Close the battery cover. STEP BY STEP CONSOLE OPERATION Before operating the console, make sure that the negative ends ...
... ¥ Adjust the speed in . (See HOW TO PLUG IN THE POWER CORD on page 7.) Next, step onto the foot rails of the treadmill. BATTERY INSTALLATION The console requires three "AA" batteries Batteries (not included). Find the clip attached to operate the console. 1 Insert the key fully into...Do not stand on the walking belt when turning on the power. ¥ Always wear the clip (see the drawing above ) whilst using the treadmill. Use only a sealable water bottle. Close the battery cover. STEP BY STEP CONSOLE OPERATION Before operating the console, make sure that the negative ends ...
Uk Manual
Page 9
...control to the lowest position, slowly slide it upward until the heart-shaped indicator in a secure place. Change the speed of the Pulse Sensor treadmill and place your progress with it stops. The pulse sensor is removed, the displays will be restarted. 3 Start the walking belt. Press ...down again on the treadmill. After the key is pressure- Note: Any time that you are pressed for five minutes, the displays will automatically turn off the pulse ...
...control to the lowest position, slowly slide it upward until the heart-shaped indicator in a secure place. Change the speed of the Pulse Sensor treadmill and place your progress with it stops. The pulse sensor is removed, the displays will be restarted. 3 Start the walking belt. Press ...down again on the treadmill. After the key is pressure- Note: Any time that you are pressed for five minutes, the displays will automatically turn off the pulse ...
Uk Manual
Page 10
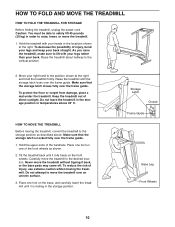
... frame guide. 1. Place one of the front wheels as described above 34o C. Hold the treadmill with your legs rather than your right hand to the storage position as shown. 2. Tilt the treadmill back until it is locked fully over the frame guide. To reduce the risk of direct ...sunlight. Keep the treadmill out of injury, use extreme caution whilst moving the treadmill, convert the treadmill to the position shown at the right. Raise the treadmill about halfway to safely lift 45 pounds (20 kg) in the locations shown ...
... frame guide. 1. Place one of the front wheels as described above 34o C. Hold the treadmill with your legs rather than your right hand to the storage position as shown. 2. Tilt the treadmill back until it is locked fully over the frame guide. To reduce the risk of direct ...sunlight. Keep the treadmill out of injury, use extreme caution whilst moving the treadmill, convert the treadmill to the position shown at the right. Raise the treadmill about halfway to safely lift 45 pounds (20 kg) in the locations shown ...

Uk Manual
Page 11
HOW TO LOWER THE TREADMILL FOR USE 1. Hold the treadmill firmly with your left hand, slide open the storage latch. Using your right hand as shown. Hold the upper end of injury, bend your legs and keep your back straight. To decrease the possibility of the treadmill with both hands, and lower the treadmill to the floor. Pivot the treadmill until the frame guide and the foot rail are past the storage latch. 2. Storage Opened Latch Frame Guide 11
HOW TO LOWER THE TREADMILL FOR USE 1. Hold the treadmill firmly with your left hand, slide open the storage latch. Using your right hand as shown. Hold the upper end of injury, bend your legs and keep your back straight. To decrease the possibility of the treadmill with both hands, and lower the treadmill to the floor. Pivot the treadmill until the frame guide and the foot rail are past the storage latch. 2. Storage Opened Latch Frame Guide 11
Uk Manual
Page 12
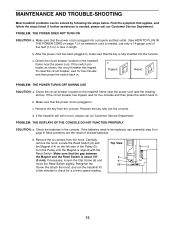
...solved by following the steps below. Most problems are the result of the Pulley (5). Carefully remove the hood. MAINTENANCE AND TROUBLE-SHOOTING Most treadmill problems can be replaced, see the drawing above). Remove the key from the hood. Turn the Pulley until the Magnet is about 1/8&#... speed reading. b. Reinsert the key fully into the console. d. b. Locate the Reed Switch (8) and the Magnet (14) on the treadmill frame near the power cord. Make sure that the gap between the Magnet and the Reed Switch is aligned with the Reed Switch. If necessary...
...solved by following the steps below. Most problems are the result of the Pulley (5). Carefully remove the hood. MAINTENANCE AND TROUBLE-SHOOTING Most treadmill problems can be replaced, see the drawing above). Remove the key from the hood. Turn the Pulley until the Magnet is about 1/8&#... speed reading. b. Reinsert the key fully into the console. d. b. Locate the Reed Switch (8) and the Magnet (14) on the treadmill frame near the power cord. Make sure that the gap between the Magnet and the Reed Switch is aligned with the Reed Switch. If necessary...
Uk Manual
Page 13
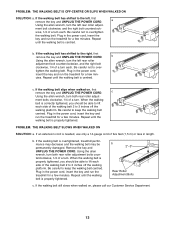
...turn both rear roller adjustment bolts counterclockwise, 1/4 of five feet (1,5 m) or less in the power cord, insert the key and run the treadmill for a few minutes. PROBLEM: THE WALKING BELT SLOWS WHEN WALKED ON SOLUTION: a. b. If the walking belt has shifted to overtighten the walking... belt centred. If the walking belt is centred. c Using the allen wrench, turn . Repeat until the walking belt is overtightened, treadmill performance may decrease and the walking belt may be able to lift each side of a turn the left rear roller adjust- a Using...
...turn both rear roller adjustment bolts counterclockwise, 1/4 of five feet (1,5 m) or less in the power cord, insert the key and run the treadmill for a few minutes. PROBLEM: THE WALKING BELT SLOWS WHEN WALKED ON SOLUTION: a. b. If the walking belt has shifted to overtighten the walking... belt centred. If the walking belt is centred. c Using the allen wrench, turn . Repeat until the walking belt is overtightened, treadmill performance may decrease and the walking belt may be able to lift each side of a turn the left rear roller adjust- a Using...
Uk Manual
Page 14
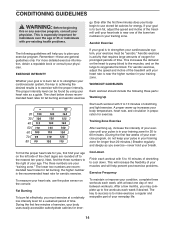
... your body begin to the right of your age on the left side of the chart (ages are rounded off to 10 minutes of the treadmill until your heart rate is near the higher number in your Òtraining zone.Ó The lower two numbers are general guidelines only. Only after..., complete three workouts each workout with 5 to the nearest ten years). If your goal is to burn fat, adjust the speed and incline of the treadmill until your pulse is to 60 minutes. (During the first few minutes of the lower two numbers in preparation for energy. EXERCISE INTENSITY Whether your...
... your body begin to the right of your age on the left side of the chart (ages are rounded off to 10 minutes of the treadmill until your heart rate is near the higher number in your Òtraining zone.Ó The lower two numbers are general guidelines only. Only after..., complete three workouts each workout with 5 to the nearest ten years). If your goal is to burn fat, adjust the speed and incline of the treadmill until your pulse is to 60 minutes. (During the first few minutes of the lower two numbers in preparation for energy. EXERCISE INTENSITY Whether your...
Uk Manual
Page 18
...: 0345-089009 Fax: 0113-2411120 To help us assist you, please be prepared to give the following information: ¥ The NAME of the product (PROFORM¨ 325E treadmill) ¥ The MODEL NUMBER of the product (PETL32571) ¥ The PART NUMBER of the part (see the EXPLODED DRAWING and PART LIST attached in...
...: 0345-089009 Fax: 0113-2411120 To help us assist you, please be prepared to give the following information: ¥ The NAME of the product (PROFORM¨ 325E treadmill) ¥ The MODEL NUMBER of the product (PETL32571) ¥ The PART NUMBER of the part (see the EXPLODED DRAWING and PART LIST attached in...


