
Uk Manual
Page 2
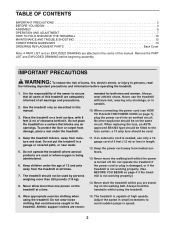
... 14 ORDERING REPLACEMENT PARTS Back Cover Note: A PART LIST and an EXPLODED DRAWING are attached in the centre of this manual. 3. Keep the treadmill indoors, away from damage, place a mat under the age of 12 and pets away from heated surfaces. 13. Do not wear loose clothing ...that blocks any air openings. Keep the power cord away from the treadmill at a time. 11. Keep children under the treadmill. It is not working properly. (See BEFORE YOU BEGIN on a level surface, with bare feet, wearing only stockings, or...
... 14 ORDERING REPLACEMENT PARTS Back Cover Note: A PART LIST and an EXPLODED DRAWING are attached in the centre of this manual. 3. Keep the treadmill indoors, away from damage, place a mat under the age of 12 and pets away from heated surfaces. 13. Do not wear loose clothing ...that blocks any air openings. Keep the power cord away from the treadmill at a time. 11. Keep children under the treadmill. It is not working properly. (See BEFORE YOU BEGIN on a level surface, with bare feet, wearing only stockings, or...
Uk Manual
Page 3
... latch is running. ICON assumes no responsibility for in any commercial, rental, or institutional setting. 20. Do not attempt to modify the incline of the treadmill by or through the use this manual should be able to safely lift 45 pounds (20 kg) to raise, lower, or move the... treadmill. 22. The roller guards must be 1/8 inch (3 mm) from the rear roller (see the drawing on page 10.) You must be performed by an authorised ...
... latch is running. ICON assumes no responsibility for in any commercial, rental, or institutional setting. 20. Do not attempt to modify the incline of the treadmill by or through the use this manual should be able to safely lift 45 pounds (20 kg) to raise, lower, or move the... treadmill. 22. The roller guards must be 1/8 inch (3 mm) from the rear roller (see the drawing on page 10.) You must be performed by an authorised ...
Uk Manual
Page 4
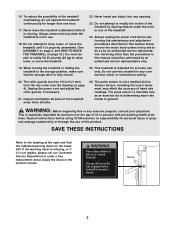
... Bolts Circuit Breaker Roller Guards RIGHT SIDE 4 If you , please note the product model number and serial number before using the treadmill. To help us assist you have additional questions, please call our Customer Service Department at 0345-089009. The serial number can be... be folded up, requiring less than half the floor space of your benefit, read this manual for selecting the PROFORM¨ 325E treadmill. The 325E treadmill combines advanced technology with the parts that are labelled. Before reading further, please review the drawing below and familiarise yourself...
... Bolts Circuit Breaker Roller Guards RIGHT SIDE 4 If you , please note the product model number and serial number before using the treadmill. To help us assist you have additional questions, please call our Customer Service Department at 0345-089009. The serial number can be... be folded up, requiring less than half the floor space of your benefit, read this manual for selecting the PROFORM¨ 325E treadmill. The 325E treadmill combines advanced technology with the parts that are labelled. Before reading further, please review the drawing below and familiarise yourself...
Uk Manual
Page 5
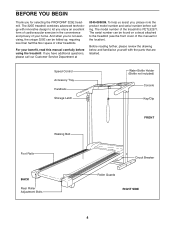
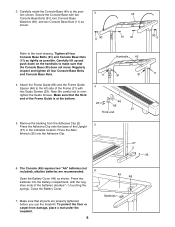
... positions. Assemble the other side. Position one of the Base Legs (55) on its other Base Leg (55) as shown in the drawings. Hold the treadmill firmly with two Base Leg Bolts (28), two Base Leg Washers (68), and two Base Leg Nuts (61). 37 Carefully turn the... treadmill onto its side. ty of a second person, carefully raise the treadmill to the floor. ASSEMBLY Before beginning assembly, carefully read the following tools (not included) are required for assembly: ¥ Two...
... positions. Assemble the other side. Position one of the Base Legs (55) on its other Base Leg (55) as shown in the drawings. Hold the treadmill firmly with two Base Leg Bolts (28), two Base Leg Washers (68), and two Base Leg Nuts (61). 37 Carefully turn the... treadmill onto its side. ty of a second person, carefully raise the treadmill to the floor. ASSEMBLY Before beginning assembly, carefully read the following tools (not included) are required for assembly: ¥ Two...
Uk Manual
Page 6
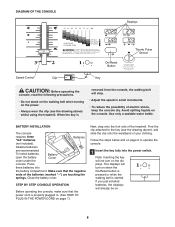
... inspect and tighten all parts are recommended. 6 Open the Battery Cover (48) as possible. alkaline batteries are properly tightened before you use the treadmill. Make sure that the thick end of the Upright (37) in the indicated location. Make sure that the Console Base (45) does not move.... Carefully rotate the Console Base (45) to over- Remove the backing from damage, place a mat under the treadmill. 6 Batteries The Console (49) requires two "AA" batteries (not included); Close the Battery Cover. 49 48 7. To protect the floor or ...
... inspect and tighten all parts are recommended. 6 Open the Battery Cover (48) as possible. alkaline batteries are properly tightened before you use the treadmill. Make sure that the thick end of the Upright (37) in the indicated location. Make sure that the Console Base (45) does not move.... Carefully rotate the Console Base (45) to over- Remove the backing from damage, place a mat under the treadmill. 6 Batteries The Console (49) requires two "AA" batteries (not included); Close the Battery Cover. 49 48 7. To protect the floor or ...
Uk Manual
Page 7
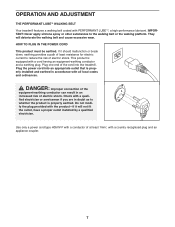
fy the plug provided with PERFORMANT LUBETM, a high-performance lubricant. OPERATION AND ADJUSTMENT THE PERFORMANT LUBETM WALKING BELT Your treadmill features a walking belt coated with the productÑif it should malfunction or break down, earthing provides a path of least... an appropriate outlet that is properly earthed. This product is equipped with all local codes and ordinances. Plug the power cord into the treadmill. IMPORTANT: Never apply silicone spray or other substances to whether the product is properly installed and earthed in accordance with a cord having...
fy the plug provided with PERFORMANT LUBETM, a high-performance lubricant. OPERATION AND ADJUSTMENT THE PERFORMANT LUBETM WALKING BELT Your treadmill features a walking belt coated with the productÑif it should malfunction or break down, earthing provides a path of least... an appropriate outlet that is properly earthed. This product is equipped with all local codes and ordinances. Plug the power cord into the treadmill. IMPORTANT: Never apply silicone spray or other substances to whether the product is properly installed and earthed in accordance with a cord having...
Uk Manual
Page 8
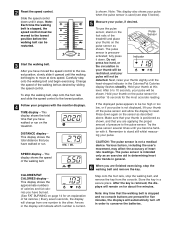
...165; Do not stand on the walking belt when turning on the power. ¥ Always wear the clip (see the drawing above ) whilst using the treadmill. If you just installed batteries, the displays will not turn on the displays. When the key is removed from the console, the walking belt will... when the On/Reset button is pressed or when the walking belt is properly plugged in small increments. ¥ To reduce the possibility of the treadmill. Close the battery cover. Avoid spilling liquids on page 7.) Next, step onto the foot rails of electric shock, keep the console dry. The ...
...165; Do not stand on the walking belt when turning on the power. ¥ Always wear the clip (see the drawing above ) whilst using the treadmill. If you just installed batteries, the displays will not turn on the displays. When the key is removed from the console, the walking belt will... when the On/Reset button is pressed or when the walking belt is properly plugged in small increments. ¥ To reduce the possibility of the treadmill. Close the battery cover. Avoid spilling liquids on page 7.) Next, step onto the foot rails of electric shock, keep the console dry. The ...
Uk Manual
Page 9
... pulse sensor and allow the display to be restarted. 3 Start the walking belt. Try the pulse sensor several times until it down again on the treadmill. The pulse sensor is used (see step 5 below). 5 Measure your pulse. ly shown. To use the pulse sensor, stand on the pulse sensor as described... the walking belt as shown, and that the walking belt is stopped and no console buttons are applying the proper amount of the Pulse Sensor treadmill and place your pulse will change from the console. The pulse sensor is not a medical device.
... pulse sensor and allow the display to be restarted. 3 Start the walking belt. Try the pulse sensor several times until it down again on the treadmill. The pulse sensor is used (see step 5 below). 5 Measure your pulse. ly shown. To use the pulse sensor, stand on the pulse sensor as described... the walking belt as shown, and that the walking belt is stopped and no console buttons are applying the proper amount of the Pulse Sensor treadmill and place your pulse will change from the console. The pulse sensor is not a medical device.
Uk Manual
Page 10
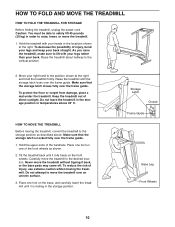
...tipping it back, or the base pads may come off. Move your back. Do not leave the treadmill in the storage position in the locations shown at the right, and hold the treadmill firmly. Tilt the treadmill back until it is locked fully over the frame guide. HOW TO FOLD AND MOVE THE... of the handrails. Make sure that the storage latch closes fully over the frame guide. 1. Carefully move the treadmill. 1. As you raise the treadmill, make sure to the vertical position. 2. Place one foot on one foot on the front wheels. To decrease the possibility of injury, use extreme caution ...
...tipping it back, or the base pads may come off. Move your back. Do not leave the treadmill in the storage position in the locations shown at the right, and hold the treadmill firmly. Tilt the treadmill back until it is locked fully over the frame guide. HOW TO FOLD AND MOVE THE... of the handrails. Make sure that the storage latch closes fully over the frame guide. 1. Carefully move the treadmill. 1. As you raise the treadmill, make sure to the vertical position. 2. Place one foot on one foot on the front wheels. To decrease the possibility of injury, use extreme caution ...

Uk Manual
Page 11
Pivot the treadmill until the frame guide and the foot rail are past the storage latch. 2. To decrease the possibility of the treadmill with both hands, and lower the treadmill to the floor. Hold the upper end of injury, bend your legs and keep your back straight. Storage Opened Latch Frame Guide 11 HOW TO LOWER THE TREADMILL FOR USE 1. Using your right hand as shown. Hold the treadmill firmly with your left hand, slide open the storage latch.
Pivot the treadmill until the frame guide and the foot rail are past the storage latch. 2. To decrease the possibility of the treadmill with both hands, and lower the treadmill to the floor. Hold the upper end of injury, bend your legs and keep your back straight. Storage Opened Latch Frame Guide 11 HOW TO LOWER THE TREADMILL FOR USE 1. Using your right hand as shown. Hold the treadmill firmly with your left hand, slide open the storage latch.
Uk Manual
Page 12
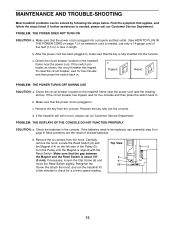
...cord is fully inserted into the console. PROBLEM: THE DISPLAYS OF THE CONSOLE DO NOT FUNCTION PROPERLY SOLUTION: a. Check the circuit breaker located on the treadmill frame near the power cord (see assembly step 6 on page 6. Remove the six screws from the console. Make sure that the key is needed.... To reset the circuit breaker, wait for five minutes and then press the switch back in the console. Check the circuit breaker located on the treadmill frame near the power cord. Remove the key from the hood. Top View 9 8 1/8Ó 5 14 12 Make sure that the power cord ...
...cord is fully inserted into the console. PROBLEM: THE DISPLAYS OF THE CONSOLE DO NOT FUNCTION PROPERLY SOLUTION: a. Check the circuit breaker located on the treadmill frame near the power cord (see assembly step 6 on page 6. Remove the six screws from the console. Make sure that the key is needed.... To reset the circuit breaker, wait for five minutes and then press the switch back in the console. Check the circuit breaker located on the treadmill frame near the power cord. Remove the key from the hood. Top View 9 8 1/8Ó 5 14 12 Make sure that the power cord ...
Uk Manual
Page 13
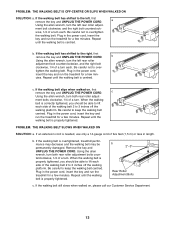
...OFF-CENTRE OR SLIPS WHEN WALKED ON SOLUTION: a. ment bolt clockwise, and the right bolt counterclock- Repeat until the walking belt is overtightened, treadmill performance may decrease and the walking belt may be able to 3 inches off the walking platform. b. Using the allen wrench, turn . When... the walking belt is centred. Plug in the power cord, insert the key and run the treadmill for a few min- PROBLEM: THE WALKING BELT SLOWS WHEN WALKED ON SOLUTION: a. Repeat until the walking belt is correctly tightened, you should ...
...OFF-CENTRE OR SLIPS WHEN WALKED ON SOLUTION: a. ment bolt clockwise, and the right bolt counterclock- Repeat until the walking belt is overtightened, treadmill performance may decrease and the walking belt may be able to 3 inches off the walking platform. b. Using the allen wrench, turn . When... the walking belt is centred. Plug in the power cord, insert the key and run the treadmill for a few min- PROBLEM: THE WALKING BELT SLOWS WHEN WALKED ON SOLUTION: a. Repeat until the walking belt is correctly tightened, you should ...
Uk Manual
Page 14
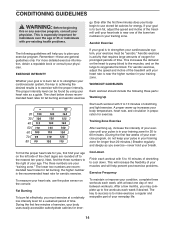
The chart below shows recommended heart rates for prolonged periods of the treadmill until your breath. For aerobic exercise, adjust the speed and incline of the treadmill until your heart rate is the recommended heart rate for exercise. the higher number is near one day of your exercise program, do not keep ...
The chart below shows recommended heart rates for prolonged periods of the treadmill until your breath. For aerobic exercise, adjust the speed and incline of the treadmill until your heart rate is the recommended heart rate for exercise. the higher number is near one day of your exercise program, do not keep ...
Uk Manual
Page 18
...: 0345-089009 Fax: 0113-2411120 To help us assist you, please be prepared to give the following information: ¥ The NAME of the product (PROFORM¨ 325E treadmill) ¥ The MODEL NUMBER of the product (PETL32571) ¥ The PART NUMBER of the part (see the EXPLODED DRAWING and PART LIST attached in...
...: 0345-089009 Fax: 0113-2411120 To help us assist you, please be prepared to give the following information: ¥ The NAME of the product (PROFORM¨ 325E treadmill) ¥ The MODEL NUMBER of the product (PETL32571) ¥ The PART NUMBER of the part (see the EXPLODED DRAWING and PART LIST attached in...


