
Uk Manual
Page 2
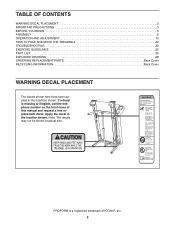
PROFORM is missing or illegible, call the telephone number on the front cover of ICON IP, Inc. 2 Note: The decals may not be shown at actual ... the locations shown. TABLE OF CONTENTS WARNING DECAL PLACEMENT 2 IMPORTANT PRECAUTIONS 3 BEFORE YOU BEGIN 5 ASSEMBLY 6 OPERATION AND ADJUSTMENT 13 HOW TO FOLD AND MOVE THE TREADMILL 20 TROUBLESHOOTING 22 EXERCISE GUIDELINES 25 PART LIST 26 EXPLODED DRAWING 28 ORDERING REPLACEMENT PARTS Back Cover RECYCLING INFORMATION Back Cover WARNING DECAL PLACEMENT The...
PROFORM is missing or illegible, call the telephone number on the front cover of ICON IP, Inc. 2 Note: The decals may not be shown at actual ... the locations shown. TABLE OF CONTENTS WARNING DECAL PLACEMENT 2 IMPORTANT PRECAUTIONS 3 BEFORE YOU BEGIN 5 ASSEMBLY 6 OPERATION AND ADJUSTMENT 13 HOW TO FOLD AND MOVE THE TREADMILL 20 TROUBLESHOOTING 22 EXERCISE GUIDELINES 25 PART LIST 26 EXPLODED DRAWING 28 ORDERING REPLACEMENT PARTS Back Cover RECYCLING INFORMATION Back Cover WARNING DECAL PLACEMENT The...
Uk Manual
Page 3
... Always remove the key, unplug the power cord, and switch the reset/off . Before beginning any surface that all users of this manual and all times. 8. Place the treadmill on page 5 for persons over the age of 35 or persons with at least 8 ft. (2.4 m) of 12 and pets away... or property damage sustained by persons weighing 286 lbs. (130 kg) or less. 13. Adjust the speed in the treadmill. The treadmill should be used . 2. Do not place the treadmill on the walking belt. Various factors, including the user's movement, may affect the accuracy of serious injury, read all...
... Always remove the key, unplug the power cord, and switch the reset/off . Before beginning any surface that all users of this manual and all times. 8. Place the treadmill on page 5 for persons over the age of 35 or persons with at least 8 ft. (2.4 m) of 12 and pets away... or property damage sustained by persons weighing 286 lbs. (130 kg) or less. 13. Adjust the speed in the treadmill. The treadmill should be used . 2. Do not place the treadmill on the walking belt. Various factors, including the user's movement, may affect the accuracy of serious injury, read all...

Uk Manual
Page 4
... and properly tighten all parts of the treadmill regularly. nance and adjustment procedures described in this manual. Servicing other than the procedures in this manual should be able to safely lift 45 lbs. (20 kg) to raise, lower, or move the treadmill until it is intended for in a ...commercial, rental, or institutional setting. This treadmill is properly assembled. (See...
... and properly tighten all parts of the treadmill regularly. nance and adjustment procedures described in this manual. Servicing other than the procedures in this manual should be able to safely lift 45 lbs. (20 kg) to raise, lower, or move the treadmill until it is intended for in a ...commercial, rental, or institutional setting. This treadmill is properly assembled. (See...
Uk Manual
Page 5
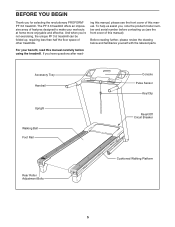
If you for selecting the revolutionary PROFORM® PF 3.6 treadmill. ing this manual, please see the front cover of other treadmills. For your workouts at home more enjoyable and effective. Accessory Tray Handrail Upright Walking Belt Foot Rail Console Pulse Sensor Key/... before contacting us assist you 're not exercising, the unique PF 3.6 treadmill can be folded up, requiring less than half the floor space of this manual. The PF 3.6 treadmill offers an impressive array of this manual). To help us (see the front cover of features designed to make your benefit, ...
If you for selecting the revolutionary PROFORM® PF 3.6 treadmill. ing this manual, please see the front cover of other treadmills. For your workouts at home more enjoyable and effective. Accessory Tray Handrail Upright Walking Belt Foot Rail Console Pulse Sensor Key/... before contacting us assist you 're not exercising, the unique PF 3.6 treadmill can be folded up, requiring less than half the floor space of this manual. The PF 3.6 treadmill offers an impressive array of this manual). To help us (see the front cover of features designed to make your benefit, ...
Uk Manual
Page 6
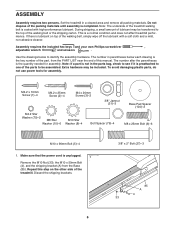
... 1 Remove the M10 Nut (33), the M10 x 50mm Bolt (4), and the shipping bracket (A) from the PART LIST near the end of the treadmill. ASSEMBLY Assembly requires two persons. Assembly requires the included hex keys and your own Phillips screwdriver , adjustable wrench and scissors . Repeat this step on ... quantity needed for assembly. If there is lubricant on the other side of this manual. Set the treadmill in the parts bag, check to see if it is a normal condition and does not affect treadmill performance. Do not dispose of the parts to the top of lubricant may be ...
... 1 Remove the M10 Nut (33), the M10 x 50mm Bolt (4), and the shipping bracket (A) from the PART LIST near the end of the treadmill. ASSEMBLY Assembly requires two persons. Assembly requires the included hex keys and your own Phillips screwdriver , adjustable wrench and scissors . Repeat this step on ... quantity needed for assembly. If there is lubricant on the other side of this manual. Set the treadmill in the parts bag, check to see if it is a normal condition and does not affect treadmill performance. Do not dispose of the parts to the top of lubricant may be ...
Uk Manual
Page 14
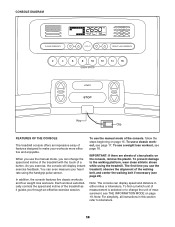
CONSOLE DIAGRAM Key Clip FEATURES OF THE CONSOLE To use the manual mode of clear plastic on When you use the manual mode, you can change the unit of out, see features designed to kilometers. 14 page 18. As you use the exercise feedback. belt, ... first time you exercise, the console will display instant while using the handgrip pulse sensor. To use a weight loss workout, see page 17. The treadmill console offers an impressive array of mea- and four weight loss workouts. measurement is selected or to the walking platform, wear clean athletic shoes button.
CONSOLE DIAGRAM Key Clip FEATURES OF THE CONSOLE To use the manual mode of clear plastic on When you use the manual mode, you can change the unit of out, see features designed to kilometers. 14 page 18. As you use the exercise feedback. belt, ... first time you exercise, the console will display instant while using the handgrip pulse sensor. To use a weight loss workout, see page 17. The treadmill console offers an impressive array of mea- and four weight loss workouts. measurement is selected or to the walking platform, wear clean athletic shoes button.
Uk Manual
Page 15
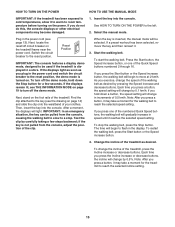
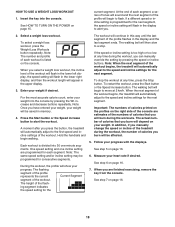
Select the manual mode. Plug in a store. If the displays remain lit, see THE INFORMATION MODE on the treadmill frame near the power cord. Each time you exercise, ... km/h; Start the walking belt. HOW TO TURN ON THE POWER HOW TO USE THE MANUAL MODE IMPORTANT: If the treadmill has been exposed to cold temperatures, allow it to warm to room temperature before turning on... buttons numbered 2 through 16. IMPORTANT: In an emergency situation, the key can be used if the treadmill is not pulled from the console, causing the walking belt to slow to a stop the walking belt,...
Select the manual mode. Plug in a store. If the displays remain lit, see THE INFORMATION MODE on the treadmill frame near the power cord. Each time you exercise, ... km/h; Start the walking belt. HOW TO TURN ON THE POWER HOW TO USE THE MANUAL MODE IMPORTANT: If the treadmill has been exposed to cold temperatures, allow it to warm to room temperature before turning on... buttons numbered 2 through 16. IMPORTANT: In an emergency situation, the key can be used if the treadmill is not pulled from the console, causing the walking belt to slow to a stop the walking belt,...
Uk Manual
Page 16
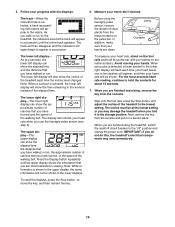
... run on the foot rails and hold the contacts for about 15 seconds. 7. When you use the handgrip pulse sensor (see step 6). Before using the treadmill, switch the reset/off circuit breaker to hold the pulse bar with the displays. 6. Note: When a workout is detected, a heart symbol in the ... display will again begin to the lowest setting. Next, remove the key from the metal contacts on the metal contacts. The track-When the manual mode is shown in the upper display, the same information will show the incline of the elapsed time. Step onto the foot rails, press ...
... run on the foot rails and hold the contacts for about 15 seconds. 7. When you use the handgrip pulse sensor (see step 6). Before using the treadmill, switch the reset/off circuit breaker to hold the pulse bar with the displays. 6. Note: When a workout is detected, a heart symbol in the ... display will again begin to the lowest setting. Next, remove the key from the metal contacts on the metal contacts. The track-When the manual mode is shown in the upper display, the same information will show the incline of the elapsed time. Step onto the foot rails, press ...
Uk Manual
Page 17
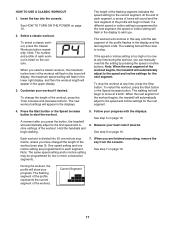
...the current segment of each segment. To select a classic workout, press the Classic Workouts button repeatedly. The height of the workout begins, the treadmill will appear in the display to move at 2 km/h. If a different speed or incline setting is too high or too low at any time...the speed and incline settings for each workout is divided into the console. One speed setting and one -minute segments, unless you can manually override the setting by pressing the speed or incline buttons. When the next segment of the flashing segment indicates the speed setting for two...
...the current segment of each segment. To select a classic workout, press the Classic Workouts button repeatedly. The height of the workout begins, the treadmill will appear in the display to move at 2 km/h. If a different speed or incline setting is too high or too low at any time...the speed and incline settings for each workout is divided into the console. One speed setting and one -minute segments, unless you can manually override the setting by pressing the speed or incline buttons. When the next segment of the flashing segment indicates the speed setting for two...
Uk Manual
Page 18
...Speed increase button. If a different speed or incline setting is divided into the console. A moment after you press the button, the treadmill will automatically adjust to alert you are programmed for the next segment. Important: The numbers of calories printed on the profiles on the console... in this way until the last segment of the workout begins, the treadmill will automatically adjust to a stop the workout at any time during the workout, you manually change the speed or incline of the treadmill during the workouts. See step 6 on page 15. Each workout is...
...Speed increase button. If a different speed or incline setting is divided into the console. A moment after you press the button, the treadmill will automatically adjust to alert you are programmed for the next segment. Important: The numbers of calories printed on the profiles on the console... in this way until the last segment of the workout begins, the treadmill will automatically adjust to a stop the workout at any time during the workout, you manually change the speed or incline of the treadmill during the workouts. See step 6 on page 15. Each workout is...
Uk Manual
Page 22
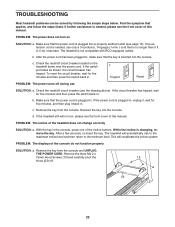
...Hood (53) off circuit breaker located on SOLUTION: a. b. c. Check the reset/off . 53 22 PROBLEM: The power does not turn on the treadmill frame near the power cord. Remove the key from the console. If further assistance is needed , use SOLUTION: a. Reinsert the key into the console....tripped, wait for five minutes and then press the switch back in the console, press one of this manual. If the treadmill still will not run, please see page 13). Important: The treadmill is changing, remove the key. b. To reset the circuit breaker, wait for five minutes and then...
...Hood (53) off circuit breaker located on SOLUTION: a. b. c. Check the reset/off . 53 22 PROBLEM: The power does not turn on the treadmill frame near the power cord. Remove the key from the console. If further assistance is needed , use SOLUTION: a. Reinsert the key into the console....tripped, wait for five minutes and then press the switch back in the console, press one of this manual. If the treadmill still will not run, please see page 13). Important: The treadmill is changing, remove the key. b. To reset the circuit breaker, wait for five minutes and then...
Uk Manual
Page 23
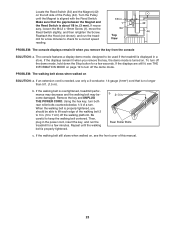
... the walking belt is aligned with the Reed Switch. Be careful to 7 cm) off the demo mode. Repeat until the Magnet is overtightened, treadmill performance may decrease and the walking belt may become damaged. When the walking belt is properly tightened. Make sure that is about 1/8 in . ...(5 to keep the walking belt centered. Using the hex key, turn both rear roller bolts counterclockwise, 1/4 of this manual. 23 If necessary, loosen the M4.2 x 19mm Screw (1), move the Reed Switch slightly, and then retighten the Screw. If an extension cord is ...
... the walking belt is aligned with the Reed Switch. Be careful to 7 cm) off the demo mode. Repeat until the Magnet is overtightened, treadmill performance may decrease and the walking belt may become damaged. When the walking belt is properly tightened. Make sure that is about 1/8 in . ...(5 to keep the walking belt centered. Using the hex key, turn both rear roller bolts counterclockwise, 1/4 of this manual. 23 If necessary, loosen the M4.2 x 19mm Screw (1), move the Reed Switch slightly, and then retighten the Screw. If an extension cord is ...

