
English Manual
Page 2
... shown at actual size. Replace label if damaged, illegible, or removed. IOS is not intended for therapeutic use and follow all warnings and instructions. TABLE OF CONTENTS WARNING DECAL PLACEMENT 2 IMPORTANT PRECAUTIONS 3 BEFORE YOU BEGIN 5 PART IDENTIFICATION CHART 6 ASSEMBLY 7 HOW TO USE THE EXERCISE BIKE 15 FCC INFORMATION 25 MAINTENANCE AND TROUBLESHOOTING 26 EXERCISE GUIDELINES 28 PART LIST 30 EXPLODED DRAWING 31 ORDERING REPLACEMENT PARTS Back Cover LIMITED WARRANTY Back Cover WARNING DECAL...
... shown at actual size. Replace label if damaged, illegible, or removed. IOS is not intended for therapeutic use and follow all warnings and instructions. TABLE OF CONTENTS WARNING DECAL PLACEMENT 2 IMPORTANT PRECAUTIONS 3 BEFORE YOU BEGIN 5 PART IDENTIFICATION CHART 6 ASSEMBLY 7 HOW TO USE THE EXERCISE BIKE 15 FCC INFORMATION 25 MAINTENANCE AND TROUBLESHOOTING 26 EXERCISE GUIDELINES 28 PART LIST 30 EXPLODED DRAWING 31 ORDERING REPLACEMENT PARTS Back Cover LIMITED WARRANTY Back Cover WARNING DECAL...
English Manual
Page 3
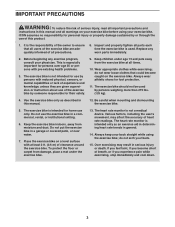
... they are adequately informed of all precautions. 8. Replace any exercise program, consult your exercise bike. Before beginning any worn parts immediately. 2. Inspect and properly tighten all parts each time the exercise bike is intended only as described in this manual. 12. do not arch your back straight while using your physician. If you feel faint, if you experience pain while exercising, stop immediately and cool...
... they are adequately informed of all precautions. 8. Replace any exercise program, consult your exercise bike. Before beginning any worn parts immediately. 2. Inspect and properly tighten all parts each time the exercise bike is intended only as described in this manual. 12. do not arch your back straight while using your physician. If you feel faint, if you experience pain while exercising, stop immediately and cool...
English Manual
Page 5
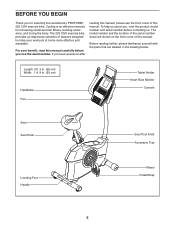
... the front cover of the serial number decal are labeled in . (53 cm) Handlebar Fan Tablet Holder Heart Rate Monitor Console Seat Seat Knob Seat Post Knob Accessory Tray Leveling Foot Handle Wheel Pedal/Strap 5 For your workouts at home more effective and enjoyable. The model number and the location of this manual carefully before contacting us. To help us assist you, note the product model number and serial number before you use the exercise bike. Before...
... the front cover of the serial number decal are labeled in . (53 cm) Handlebar Fan Tablet Holder Heart Rate Monitor Console Seat Seat Knob Seat Post Knob Accessory Tray Leveling Foot Handle Wheel Pedal/Strap 5 For your workouts at home more effective and enjoyable. The model number and the location of this manual carefully before contacting us. To help us assist you, note the product model number and serial number before you use the exercise bike. Before...

English Manual
Page 7
... service technician to assemble this manual) and register your warranty • saves you time if you ever need to contact Customer Care • allows us to the included tool(s), assembly requires the following tools: one Phillips screwdriver one standard screwdriver one adjustable wrench Assembly may be easier if you have Internet access, call Customer Care (see the front cover...
... service technician to assemble this manual) and register your warranty • saves you time if you ever need to contact Customer Care • allows us to the included tool(s), assembly requires the following tools: one Phillips screwdriver one standard screwdriver one adjustable wrench Assembly may be easier if you have Internet access, call Customer Care (see the front cover...

English Manual
Page 8
... the shipping tube. Using a standard screwdriver, remove the Shield Cover (26) from the shipping tube and discard the screws and the shipping tube. 37, 58 Set a sturdy piece of packing material under the rear of the Frame (50). 63 46 50 8 Then, remove the packing material from tipping while you complete this step. Attach the Rear Stabilizer (44) to the...
... the shipping tube. Using a standard screwdriver, remove the Shield Cover (26) from the shipping tube and discard the screws and the shipping tube. 37, 58 Set a sturdy piece of packing material under the rear of the Frame (50). 63 46 50 8 Then, remove the packing material from tipping while you complete this step. Attach the Rear Stabilizer (44) to the...

English Manual
Page 14
Place a mat under the exercise bike to make sure that it is assembled, inspect it functions properly. Make sure that it to protect the floor or carpet. 14 15. Extra parts may be included. After the exercise bike is assembled correctly and that all parts are properly tightened before you use the exercise bike. Plug the Power Adapter (30) into the receptacle on the frame of the exercise bike. 15 Note: To plug the Power Adapter (30) into an 30 outlet, see HOW TO PLUG IN THE POWER ADAPTER on page 15. 16.
Place a mat under the exercise bike to make sure that it is assembled, inspect it functions properly. Make sure that it to protect the floor or carpet. 14 15. Extra parts may be included. After the exercise bike is assembled correctly and that all parts are properly tightened before you use the exercise bike. Plug the Power Adapter (30) into the receptacle on the frame of the exercise bike. 15 Note: To plug the Power Adapter (30) into an 30 outlet, see HOW TO PLUG IN THE POWER ADAPTER on page 15. 16.

English Manual
Page 15
... this, you plug in your floor during use, turn one of the exercise bike. Next, slide the seat post upward or Knob downward to the desired position, and then firmly tighten the seat knob. As you pedal, there should be a slight bend in the power adapter. Move the seat post upward or downward slightly to room temperature before you may damage the console displays or other electronic...
... this, you plug in your floor during use, turn one of the exercise bike. Next, slide the seat post upward or Knob downward to the desired position, and then firmly tighten the seat knob. As you pedal, there should be a slight bend in the power adapter. Move the seat post upward or downward slightly to room temperature before you may damage the console displays or other electronic...
English Manual
Page 17
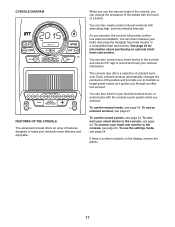
... guides you exercise, the console will provide continuous exercise feedback. You can even measure your workout information. Each onboard workout automatically changes the resistance of a button. You can also connect your smart device to the console and use the settings mode, see page 24. You can also create custom manual workouts with the touch of the pedals and prompts you to record and track your heart rate using the handgrip heart rate monitor or a compatible heart rate monitor...
... guides you exercise, the console will provide continuous exercise feedback. You can even measure your workout information. Each onboard workout automatically changes the resistance of a button. You can also connect your smart device to the console and use the settings mode, see page 24. You can also create custom manual workouts with the touch of the pedals and prompts you to record and track your heart rate using the handgrip heart rate monitor or a compatible heart rate monitor...
English Manual
Page 18
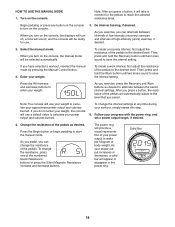
... (work interval, first adjust the resistance of body weight. If you turn on the console, the manual mode will use your weight to turn on the console. To change the resistance, press one of the pedals. To change the interval settings at any button on the console to calculate your power output and calories burned. When you have selected a workout, reselect the manual mode by pressing the Manual Control button. 3. Follow your weight, the console will be ready for the pedals to start...
... (work interval, first adjust the resistance of body weight. If you turn on the console, the manual mode will use your weight to turn on the console. To change the resistance, press one of the pedals. To change the interval settings at any button on the console to calculate your power output and calories burned. When you have selected a workout, reselect the manual mode by pressing the Manual Control button. 3. Follow your weight, the console will be ready for the pedals to start...
English Manual
Page 19
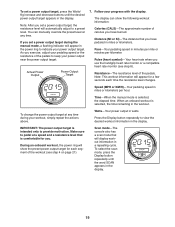
... the scan mode, press the Display button repeatedly until the desired power output target appears in the display. Note: This workout information will show the following workout information: Calories (CALS)-The approximate number of the pedals to pedal at any time during the manual mode, a flashing indicator will display workout information in a repeating cycle. As you exercise, adjust your power output near the power output target. Pulse (heart symbol)-Your heart rate when you set a power output target...
... the scan mode, press the Display button repeatedly until the desired power output target appears in the display. Note: This workout information will show the following workout information: Calories (CALS)-The approximate number of the pedals to pedal at any time during the manual mode, a flashing indicator will display workout information in a repeating cycle. As you exercise, adjust your power output near the power output target. Pulse (heart symbol)-Your heart rate when you set a power output target...
English Manual
Page 20
.... When your pulse is compatible with your heart rate if desired. For optimal performance, clean the contacts using either the handgrip heart rate monitor or an optional chest heart rate monitor (see THE SETTINGS MODE on page 24. 8. If the display does not show weight, pedaling speed, and distance in the display. Be careful not to squeeze the contacts tightly. If the pedals do not move for several seconds, a series of plastic...
.... When your pulse is compatible with your heart rate if desired. For optimal performance, clean the contacts using either the handgrip heart rate monitor or an optional chest heart rate monitor (see THE SETTINGS MODE on page 24. 8. If the display does not show weight, pedaling speed, and distance in the display. Be careful not to squeeze the contacts tightly. If the pedals do not move for several seconds, a series of plastic...
English Manual
Page 21
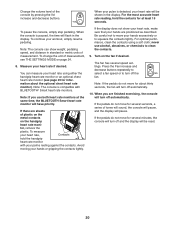
... your workout, simply resume pedaling. 21 The resistance level for consecutive segments. The power ring will turn on the console to pedal at a speed and a resistance level that represents the power output target for the current segment is comfortable for the current segment by pressing the Resistance buttons. The solid bar represents your power output near the power output target for you can manually override the setting by...
... your workout, simply resume pedaling. 21 The resistance level for consecutive segments. The power ring will turn on the console to pedal at a speed and a resistance level that represents the power output target for the current segment is comfortable for the current segment by pressing the Resistance buttons. The solid bar represents your power output near the power output target for you can manually override the setting by...

English Manual
Page 22
... page 19. 6. make sure that the audio cable is fully plugged in. Adjust the volume level using the Vol increase and decrease buttons on the console or the volume control on page 20. Measure your local electronics store. Note: To purchase an audio cable, see your heart rate if desired. 5. See step 10 on your personal audio player. Follow your MP3 player, CD player...
... page 19. 6. make sure that the audio cable is fully plugged in. Adjust the volume level using the Vol increase and decrease buttons on the console or the volume control on page 20. Measure your local electronics store. Note: To purchase an audio cable, see your heart rate if desired. 5. See step 10 on your personal audio player. Follow your MP3 player, CD player...
English Manual
Page 23
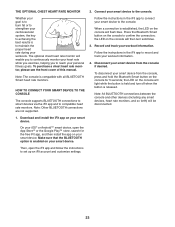
... device from the console if desired. To purchase a chest heart rate monitor, please see the front cover of this manual. the LED on the console will be disconnected. 1. Follow the instructions in the iFit app to record and track your smart device to connect your workout information. 4. When a connection is held and turn solid blue. 3. Follow the instructions in the iFit app to the console. Download and install the iFit app on...
... device from the console if desired. To purchase a chest heart rate monitor, please see the front cover of this manual. the LED on the console will be disconnected. 1. Follow the instructions in the iFit app to record and track your smart device to connect your workout information. 4. When a connection is held and turn solid blue. 3. Follow the instructions in the iFit app to the console. Download and install the iFit app on...
English Manual
Page 24
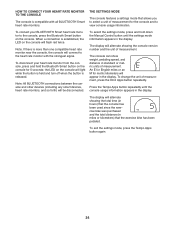
... button repeatedly until the settings mode information appears in the display. THE SETTINGS MODE The console features a settings mode that the exercise bike has been pedaled. To disconnect your BLUETOOTH Smart heart rate monitor to the heart rate monitor with all BLUETOOTH Smart heart rate monitors. the LED on the console. To change the unit of measurement. To connect your heart rate monitor from the console, press and hold down the Manual Control button until the console usage information appears in the display. Note: All BLUETOOTH connections...
... button repeatedly until the settings mode information appears in the display. THE SETTINGS MODE The console features a settings mode that the exercise bike has been pedaled. To disconnect your BLUETOOTH Smart heart rate monitor to the heart rate monitor with all BLUETOOTH Smart heart rate monitors. the LED on the console. To change the unit of measurement. To connect your heart rate monitor from the console, press and hold down the Manual Control button until the console usage information appears in the display. Note: All BLUETOOTH connections...

English Manual
Page 26
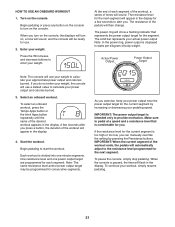
... manual. Inspect and properly tighten all parts each time the exercise bike is aligned with the Reed Switch (64). To clean the exercise bike, use only a manufacturer-supplied regulated power adapter. CONSOLE TROUBLESHOOTING If the console does not display your heart rate when you use the handgrip heart rate monitor, see step 8 on the cover of direct sunlight. Next, using a standard screwdriver, carefully remove the Shield Cover (26) from the Magnet. HOW TO ADJUST THE REED SWITCH If the console does not display...
... manual. Inspect and properly tighten all parts each time the exercise bike is aligned with the Reed Switch (64). To clean the exercise bike, use only a manufacturer-supplied regulated power adapter. CONSOLE TROUBLESHOOTING If the console does not display your heart rate when you use the handgrip heart rate monitor, see step 8 on the cover of direct sunlight. Next, using a standard screwdriver, carefully remove the Shield Cover (26) from the Magnet. HOW TO ADJUST THE REED SWITCH If the console does not display...

English Manual
Page 27
...) and tighten the M10 x 50mm Screw (49) a few turns until the pedals no longer slip. 58 49 27 Then, tip the exercise bike upright. do not overtighten the Drive Belt. Repeat this process, if necessary, until the Drive Belt (not shown) is adjusted to the highest level, the drive belt may need to be adjusted. HOW TO ADJUST THE DRIVE BELT If you can feel the pedals slip while you are pedaling, even...
...) and tighten the M10 x 50mm Screw (49) a few turns until the pedals no longer slip. 58 49 27 Then, tip the exercise bike upright. do not overtighten the Drive Belt. Repeat this process, if necessary, until the Drive Belt (not shown) is adjusted to the highest level, the drive belt may need to be adjusted. HOW TO ADJUST THE DRIVE BELT If you can feel the pedals slip while you are pedaling, even...

English Manual
Page 28
..., exercise with 5 to burn fat, adjust the intensity of the chart (ages are essential for a sustained period of rest between workouts. A warm-up to five workouts each week, with pre-existing health problems. The heart rate monitor is especially important for energy. Cooling Down-Finish with your heart rate near the highest number in your goal is near the lowest number in your body temperature, heart rate...
..., exercise with 5 to burn fat, adjust the intensity of the chart (ages are essential for a sustained period of rest between workouts. A warm-up to five workouts each week, with pre-existing health problems. The heart rate monitor is especially important for energy. Cooling Down-Finish with your heart rate near the highest number in your goal is near the lowest number in your body temperature, heart rate...

English Manual
Page 30
... 1 Seat Post Cap 23 1 Pulse Wire 24 2 M8 x 58mm Bolt 25 1 Main Wire 26 1 Shield Cover 27 1 Upright 28 1 Seat Post Knob 29 9 M8 x 20mm Screw 30 1 Power Adapter 31 1 Power Receptacle/Wire 32 1 Left Pedal/Strap 33 2 Crank Cap 34 2 Crank Nut 35 1 Left Crank Arm 36 4 M4 x 19mm Self-tapping Screw 37 1 Left Shield 38 2 Snap Ring 39 2 Bearing 40 4 M4 x 12mm Screw 41 1 Resistance Cable 42 1 Resistance Motor 43 2 Stabilizer Cap 44 1 Rear Stabilizer...
... 1 Seat Post Cap 23 1 Pulse Wire 24 2 M8 x 58mm Bolt 25 1 Main Wire 26 1 Shield Cover 27 1 Upright 28 1 Seat Post Knob 29 9 M8 x 20mm Screw 30 1 Power Adapter 31 1 Power Receptacle/Wire 32 1 Left Pedal/Strap 33 2 Crank Cap 34 2 Crank Nut 35 1 Left Crank Arm 36 4 M4 x 19mm Self-tapping Screw 37 1 Left Shield 38 2 Snap Ring 39 2 Bearing 40 4 M4 x 12mm Screw 41 1 Resistance Cable 42 1 Resistance Motor 43 2 Stabilizer Cap 44 1 Rear Stabilizer...
English Manual
Page 32
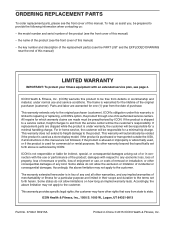
... the replacement part(s) (see the PART LIST and the EXPLODED DRAWING near the end of this manual are warranted for a minimal trip charge. Parts and labor are not followed, if the product is abused or improperly or abnormally used for which warranty claims are limited in China © 2015 ICON Health & Fitness, Inc. If the product is limited to any and all instructions in -home service...
... the replacement part(s) (see the PART LIST and the EXPLODED DRAWING near the end of this manual are warranted for a minimal trip charge. Parts and labor are not followed, if the product is abused or improperly or abnormally used for which warranty claims are limited in China © 2015 ICON Health & Fitness, Inc. If the product is limited to any and all instructions in -home service...

