
Uk Manual
Page 1
... and instructions in the space above for future reference. USER'S MANUAL www.iconeurope.com If you have questions, or if there are missing parts, please contact us: UK Call: 08457 089 009 From Ireland: 053 92 36102 Website: www.iconsupport.eu E-mail: [email protected] Write: ICON Health & Fitness, Ltd. Serial Number Decal QUESTIONS? Keep this equipment. Model No. Write the serial number...
... and instructions in the space above for future reference. USER'S MANUAL www.iconeurope.com If you have questions, or if there are missing parts, please contact us: UK Call: 08457 089 009 From Ireland: 053 92 36102 Website: www.iconsupport.eu E-mail: [email protected] Write: ICON Health & Fitness, Ltd. Serial Number Decal QUESTIONS? Keep this equipment. Model No. Write the serial number...
Uk Manual
Page 2
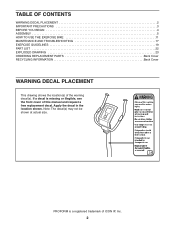
... PRECAUTIONS 3 BEFORE YOU BEGIN 4 ASSEMBLY 5 HOW TO USE THE EXERCISE BIKE 11 MAINTENANCE AND TROUBLESHOOTING 17 EXERCISE GUIDELINES 19 PART LIST 22 EXPLODED DRAWING 23 ORDERING REPLACEMENT PARTS Back Cover RECYCLING INFORMATION Back Cover WARNING DECAL PLACEMENT This drawing shows the location(s) of this manual and request a free replacement decal. Note: The decal(s) may not be shown at actual size. If a decal is a registered trademark of ICON IP, Inc. 2 Apply...
... PRECAUTIONS 3 BEFORE YOU BEGIN 4 ASSEMBLY 5 HOW TO USE THE EXERCISE BIKE 11 MAINTENANCE AND TROUBLESHOOTING 17 EXERCISE GUIDELINES 19 PART LIST 22 EXPLODED DRAWING 23 ORDERING REPLACEMENT PARTS Back Cover RECYCLING INFORMATION Back Cover WARNING DECAL PLACEMENT This drawing shows the location(s) of this manual and request a free replacement decal. Note: The decal(s) may not be shown at actual size. If a decal is a registered trademark of ICON IP, Inc. 2 Apply...
Uk Manual
Page 3
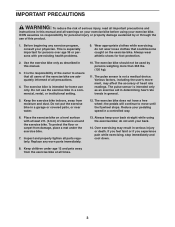
... warnings on the exercise bike. Keep the exercise bike indoors, away from the exercise bike at least 2 ft. (0.6 m) of heart rate readings. Place the exercise bike on a level surface with pre-existing health problems. 9. Keep children under the exercise bike. 7. IMPORTANT PRECAUTIONS WARNING: To reduce the risk of this product. 1. ICON assumes no responsibility for home use the exercise bike in this manual. 3. Before beginning any worn parts immediately. 13. do...
... warnings on the exercise bike. Keep the exercise bike indoors, away from the exercise bike at least 2 ft. (0.6 m) of heart rate readings. Place the exercise bike on a level surface with pre-existing health problems. 9. Keep children under the exercise bike. 7. IMPORTANT PRECAUTIONS WARNING: To reduce the risk of this product. 1. ICON assumes no responsibility for home use the exercise bike in this manual. 3. Before beginning any worn parts immediately. 13. do...
Uk Manual
Page 4
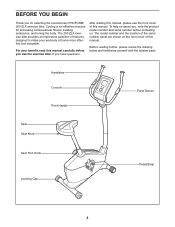
... the labeled parts. To help us . The 200 ZLX exercise bike provides an impressive selection of features designed to make your benefit, read this manual carefully before contacting us assist you for increasing cardiovascular fitness, building endurance, and toning the body. Handlebar Console Pivot Handle Pulse Sensor Seat Seat Knob Seat Post Knob Leveling Cap Pedal/Strap 4 BEFORE YOU BEGIN Thank you , note the product model number and serial number before you...
... the labeled parts. To help us . The 200 ZLX exercise bike provides an impressive selection of features designed to make your benefit, read this manual carefully before contacting us assist you for increasing cardiovascular fitness, building endurance, and toning the body. Handlebar Console Pivot Handle Pulse Sensor Seat Seat Knob Seat Post Knob Leveling Cap Pedal/Strap 4 BEFORE YOU BEGIN Thank you , note the product model number and serial number before you...
Uk Manual
Page 5
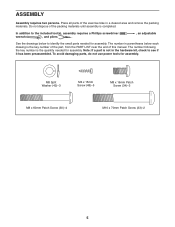
... use power tools for assembly. Note: If a part is completed. Place all parts of the exercise bike in the hardware kit, check to the included tool(s), assembly requires a Phillips screwdriver wrench , and pliers . , an adjustable See the drawings below each drawing is the quantity needed for assembly. Do not dispose of this manual. The number following the key number is the key number of the part, from the PART LIST...
... use power tools for assembly. Note: If a part is completed. Place all parts of the exercise bike in the hardware kit, check to the included tool(s), assembly requires a Phillips screwdriver wrench , and pliers . , an adjustable See the drawings below each drawing is the quantity needed for assembly. Do not dispose of this manual. The number following the key number is the key number of the part, from the PART LIST...

Uk Manual
Page 7
... person holds the Upright (13) near the Upright (13), insert the Pulse Wires 4 (59) into the Frame (1). Insert the Upright (13) into the Frame (1). While another person holds the Handlebar (50) near the Frame (1), connect the Upper Wire 3 Harness (23) to the Upright (13) with the Pivot Clamp (54), the Rear Cover (3), and the Pivot Handle (55). Turn the Pivot Handle...
... person holds the Upright (13) near the Upright (13), insert the Pulse Wires 4 (59) into the Frame (1). Insert the Upright (13) into the Frame (1). While another person holds the Handlebar (50) near the Frame (1), connect the Upper Wire 3 Harness (23) to the Upright (13) with the Pivot Clamp (54), the Rear Cover (3), and the Pivot Handle (55). Turn the Pivot Handle...

Uk Manual
Page 8
... by the diagram inside the battery compartment. Screw Battery Cover Batteries 6. 5. nents. Attach the Console (16) to room temperature before inserting batteries. alkaline batteries are recommended. 5 IMPORTANT: If the Console has been exposed to cold temperatures, allow it to warm to the Upright (13) with four M4 x 15mm Screws (48). 48 Pulse Wires 59 13 16 23 Console Wire 8 Remove the screw remove the battery cover, and insert the batteries into the Console (16...
... by the diagram inside the battery compartment. Screw Battery Cover Batteries 6. 5. nents. Attach the Console (16) to room temperature before inserting batteries. alkaline batteries are recommended. 5 IMPORTANT: If the Console has been exposed to cold temperatures, allow it to warm to the Upright (13) with four M4 x 15mm Screws (48). 48 Pulse Wires 59 13 16 23 Console Wire 8 Remove the screw remove the battery cover, and insert the batteries into the Console (16...

Uk Manual
Page 9
.... Loosen and remove the Seat Post Knob (9) from 7 the Seat Carriage (58), which is firmly engaged in one of the adjustment holes in 12 the Seat Block (57). Set the Seat Carriage (58) in the Seat Post (5). Make sure that the Seat Post Knob is located on the Seat Post ( 5) into one of the Seat (12). Tighten the Seat Post Knob (9). Adjustment Holes 5 1 Hole 9 9 Next, insert the Seat Knob (56...
.... Loosen and remove the Seat Post Knob (9) from 7 the Seat Carriage (58), which is firmly engaged in one of the adjustment holes in 12 the Seat Block (57). Set the Seat Carriage (58) in the Seat Post (5). Make sure that the Seat Post Knob is located on the Seat Post ( 5) into one of the Seat (12). Tighten the Seat Post Knob (9). Adjustment Holes 5 1 Hole 9 9 Next, insert the Seat Knob (56...
Uk Manual
Page 10
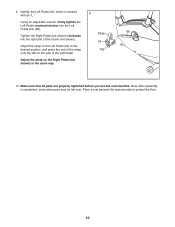
... press the end of the strap Tab onto the tab on the side of the Crank (not shown). 24 Adjust the strap on the Right Pedal (not shown) in the same way. 10. Make sure that all parts are properly tightened before you use the exercise bike. Strap 66 Tighten the Right Pedal (not shown) clockwise into the Left Crank Arm (66). Adjust the strap on the Left Pedal...
... press the end of the strap Tab onto the tab on the side of the Crank (not shown). 24 Adjust the strap on the Right Pedal (not shown) in the same way. 10. Make sure that all parts are properly tightened before you use the exercise bike. Strap 66 Tighten the Right Pedal (not shown) clockwise into the Left Crank Arm (66). Adjust the strap on the Left Pedal...
Uk Manual
Page 11
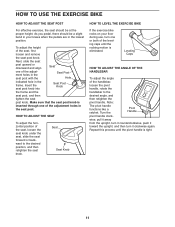
... handle. Seat Seat Knob HOW TO LEVEL THE EXERCISE BIKE If the exercise bike rocks on your knees when the pedals are in the lowest position. Repeat this process until the rocking motion is tight. 11 HOW TO USE THE EXERCISE BIKE HOW TO ADJUST THE SEAT POST For effective exercise, the seat should be at the proper height. HOW TO ADJUST THE SEAT To adjust the horizontal...
... handle. Seat Seat Knob HOW TO LEVEL THE EXERCISE BIKE If the exercise bike rocks on your knees when the pedals are in the lowest position. Repeat this process until the rocking motion is tight. 11 HOW TO USE THE EXERCISE BIKE HOW TO ADJUST THE SEAT POST For effective exercise, the seat should be at the proper height. HOW TO ADJUST THE SEAT To adjust the horizontal...
Uk Manual
Page 12
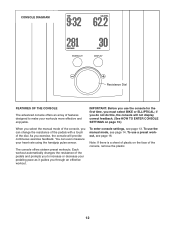
... your heart rate using the handgrip pulse sensor. To enter console settings, see page 16. As you can even measure your workouts more effective and enjoyable. Note: If there is a sheet of plastic on page 13.) When you select the manual mode of features designed to increase or decrease your pedaling pace as it guides you must select BIKE or ELLIPTICAL; To use the manual mode, see...
... your heart rate using the handgrip pulse sensor. To enter console settings, see page 16. As you can even measure your workouts more effective and enjoyable. Note: If there is a sheet of plastic on page 13.) When you select the manual mode of features designed to increase or decrease your pedaling pace as it guides you must select BIKE or ELLIPTICAL; To use the manual mode, see...
Uk Manual
Page 13
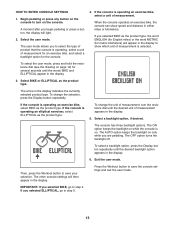
... console settings will appear in the display to turn the resistance dial until the desired backlight option appears in the display. 5. If you selected BIKE, go to step 4. IMPORTANT: If you selected BIKE as the product type. The arrow in either miles or kilometers. Then, press the Workout button to save your selection. Begin pedaling or press any button on the console to show speed and distance in the display...
... console settings will appear in the display to turn the resistance dial until the desired backlight option appears in the display. 5. If you selected BIKE, go to step 4. IMPORTANT: If you selected BIKE as the product type. The arrow in either miles or kilometers. Then, press the Workout button to save your selection. Begin pedaling or press any button on the console to show speed and distance in the display...
Uk Manual
Page 14
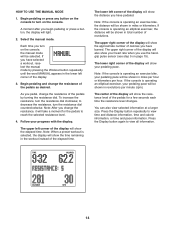
... resistance, turn on the console. A moment after you pedal, change the resistance of the pedals by pressing the Workout button repeatedly until the word MANUAL appears in the lower left corner of the pedals as desired. Select the manual mode. Each time you change the resistance of the display will be shown in miles or kilometers. HOW TO USE THE MANUAL MODE 1. If the console is operating an elliptical exerciser, the distance will light. 2. to turn the resistance...
... resistance, turn on the console. A moment after you pedal, change the resistance of the pedals by pressing the Workout button repeatedly until the word MANUAL appears in the lower left corner of the pedals as desired. Select the manual mode. Each time you change the resistance of the display will be shown in miles or kilometers. HOW TO USE THE MANUAL MODE 1. If the console is operating an elliptical exerciser, the distance will light. 2. to turn the resistance...

Uk Manual
Page 15
... will show your heart rate, make sure that your heart rate will turn off and the display will be shown. Contacts tacts on the metal con- 5. When you continue to 30 seconds. For optimal performance, clean the metal contacts using a soft cloth; If the pedals do not move for several minutes and the buttons are finished exercising, the console will turn off automatically...
... will show your heart rate, make sure that your heart rate will turn off and the display will be shown. Contacts tacts on the metal con- 5. When you continue to 30 seconds. For optimal performance, clean the metal contacts using a soft cloth; If the pedals do not move for several minutes and the buttons are finished exercising, the console will turn off automatically...
Uk Manual
Page 16
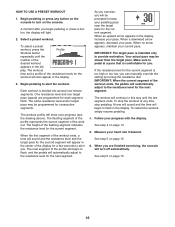
... the target pace. If the resistance level for the current segment is divided into several one target pace (speed) are finished exercising, the console will automatically adjust to flash in the display. 3. The workout will also appear in the display. See step 5 on the console. When you will begin pedaling or press a button, the display will show your pace. See step 6 on page 14. 5. The...
... the target pace. If the resistance level for the current segment is divided into several one target pace (speed) are finished exercising, the console will automatically adjust to flash in the display. 3. The workout will also appear in the display. See step 5 on the console. When you will begin pedaling or press a button, the display will show your pace. See step 6 on page 14. 5. The...
Uk Manual
Page 17
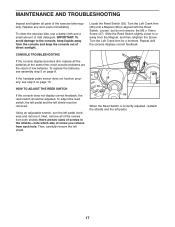
... Reed Switch. Slide the Reed Switch slightly closer to the console, keep the console out of mild detergent. most console problems are two sizes of screws in the shields-note which size of the screws from each hole. Using an adjustable wrench, turn the left pedal. 17 MAINTENANCE AND TROUBLESHOOTING Inspect and tighten all parts of low batteries. To clean the exercise bike, use a damp cloth and a small amount of direct sunlight. To replace the batteries, see step...
... Reed Switch. Slide the Reed Switch slightly closer to the console, keep the console out of mild detergent. most console problems are two sizes of screws in the shields-note which size of the screws from each hole. Using an adjustable wrench, turn the left pedal. 17 MAINTENANCE AND TROUBLESHOOTING Inspect and tighten all parts of low batteries. To clean the exercise bike, use a damp cloth and a small amount of direct sunlight. To replace the batteries, see step...

Uk Manual
Page 18
... TO ADJUST THE DRIVE BELT If you can feel the pedals slip while you are located on each side of screw you remove from each side of the screws from both shields; Then, tighten the M6 Locknuts (32), one on each hole. Use an adjustable wrench to remove the right pedal, turn the left pedal clockwise; there are two sizes of screws in the shields-note which are pedaling...
... TO ADJUST THE DRIVE BELT If you can feel the pedals slip while you are located on each side of screw you remove from each side of the screws from both shields; Then, tighten the M6 Locknuts (32), one on each hole. Use an adjustable wrench to remove the right pedal, turn the left pedal clockwise; there are two sizes of screws in the shields-note which are pedaling...
Uk Manual
Page 19
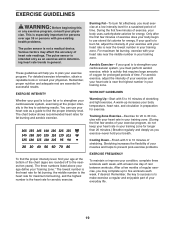
... to use your body temperature, heart rate, and circulation in your "training zone." Various factors may complete up increases your heart rate as a guide to five workouts each week, with at the bottom of the chart (ages are essential for a sustained period of time. You can use stored fat calories for persons over age 35 or persons with pre-existing health problems. The pulse sensor...
... to use your body temperature, heart rate, and circulation in your "training zone." Various factors may complete up increases your heart rate as a guide to five workouts each week, with at the bottom of the chart (ages are essential for a sustained period of time. You can use stored fat calories for persons over age 35 or persons with pre-existing health problems. The pulse sensor...
Uk Manual
Page 22
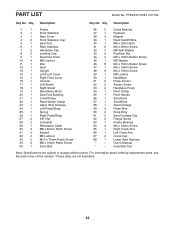
... 19 1 Resistance Motor 20 1 Seat Post Bushing 21 1 Crank/Pulley 22 1 Reed Switch Clamp 23 1 Upper Wire Harness 24 1 Left Pedal/Strap 25 1 Spring 26 1 Right Pedal/Strap 27 2 3/8" Nut 28 2 U-bracket 29 1 Resistance Cable 30 4 M8 x 60mm Patch Screw 31 2 Eyebolt 32 2 M6 Locknut 33 2 M10 x 70mm Patch Screw 34 3 M8 x 16mm Patch Screw 35 1 Drive Belt 36 2 Crank Bearing 37 1 Flywheel 38 2 Magnet 39 1 Reed Switch/Wire 40 1 M8 x 20mm Bolt 41...
... 19 1 Resistance Motor 20 1 Seat Post Bushing 21 1 Crank/Pulley 22 1 Reed Switch Clamp 23 1 Upper Wire Harness 24 1 Left Pedal/Strap 25 1 Spring 26 1 Right Pedal/Strap 27 2 3/8" Nut 28 2 U-bracket 29 1 Resistance Cable 30 4 M8 x 60mm Patch Screw 31 2 Eyebolt 32 2 M6 Locknut 33 2 M10 x 70mm Patch Screw 34 3 M8 x 16mm Patch Screw 35 1 Drive Belt 36 2 Crank Bearing 37 1 Flywheel 38 2 Magnet 39 1 Reed Switch/Wire 40 1 M8 x 20mm Bolt 41...
Uk Manual
Page 24
... us : • the model number and serial number of the product (see the front cover of this manual) • the name of the product (see the front cover of this manual) • the key number and description of the replacement part(s) (see the front cover of waste in your local city office or the establishment where you purchased this manual) RECYCLING INFORMATION This electronic product...
... us : • the model number and serial number of the product (see the front cover of this manual) • the name of the product (see the front cover of this manual) • the key number and description of the replacement part(s) (see the front cover of waste in your local city office or the establishment where you purchased this manual) RECYCLING INFORMATION This electronic product...

