

Uk Manual
Page 1
... Group PLC, Express Way Whitwood, West Yorkshire WF10 5QJ UK In Australia: Please contact the store where you have questions, or if there are missing parts, please contact us: Call: 08457 089 009 From Ireland: 053 92 36102 E-mail: Visit www.iconsupport.eu Write: ICON Health & Fitness, Ltd...
... Group PLC, Express Way Whitwood, West Yorkshire WF10 5QJ UK In Australia: Please contact the store where you have questions, or if there are missing parts, please contact us: Call: 08457 089 009 From Ireland: 053 92 36102 E-mail: Visit www.iconsupport.eu Write: ICON Health & Fitness, Ltd...
Uk Manual
Page 2
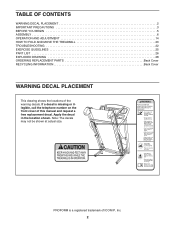
...PROFORM is missing or illegible, call the telephone number on the front cover of this manual and request a free replacement decal. TABLE OF CONTENTS WARNING DECAL PLACEMENT 2 IMPORTANT PRECAUTIONS 3 BEFORE YOU BEGIN 5 ASSEMBLY 6 OPERATION AND ADJUSTMENT 14 HOW TO FOLD AND MOVE THE TREADMILL 20 TROUBLESHOOTING 22 EXERCISE GUIDELINES 25 PART... LIST 26 EXPLODED DRAWING 28 ORDERING REPLACEMENT PARTS Back Cover RECYCLING INFORMATION Back Cover WARNING DECAL PLACEMENT This ...
...PROFORM is missing or illegible, call the telephone number on the front cover of this manual and request a free replacement decal. TABLE OF CONTENTS WARNING DECAL PLACEMENT 2 IMPORTANT PRECAUTIONS 3 BEFORE YOU BEGIN 5 ASSEMBLY 6 OPERATION AND ADJUSTMENT 14 HOW TO FOLD AND MOVE THE TREADMILL 20 TROUBLESHOOTING 22 EXERCISE GUIDELINES 25 PART... LIST 26 EXPLODED DRAWING 28 ORDERING REPLACEMENT PARTS Back Cover RECYCLING INFORMATION Back Cover WARNING DECAL PLACEMENT This ...

Uk Manual
Page 4
...ser- Over exercising may result in the storage position. 22. Do not use , before cleaning the treadmill, and before performing the mainte- Inspect and properly tighten all parts of the circuit breaker.) 20. Servicing other than the procedures in a commercial, rental, or institutional... setting. 26. nance and adjustment procedures described in this treadmill in this manual should be able to safely lift ...
...ser- Over exercising may result in the storage position. 22. Do not use , before cleaning the treadmill, and before performing the mainte- Inspect and properly tighten all parts of the circuit breaker.) 20. Servicing other than the procedures in a commercial, rental, or institutional... setting. 26. nance and adjustment procedures described in this treadmill in this manual should be able to safely lift ...
Uk Manual
Page 5
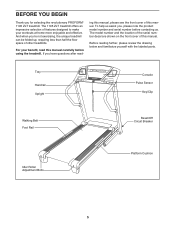
And when you for selecting the revolutionary PROFORM® 1195 ZLT treadmill. The model number and the location of the serial number ...BEFORE YOU BEGIN Thank you ʼre not exercising, the unique treadmill can be folded up, requiring less than half the floor space of other treadmills. For your workouts at home more enjoyable and effective. To ... contacting us. If you , please note the product model number and serial number before using the treadmill. The 1195 ZLT treadmill offers an impressive selection of this manual. ing this manual, please see the front cover of this...
And when you for selecting the revolutionary PROFORM® 1195 ZLT treadmill. The model number and the location of the serial number ...BEFORE YOU BEGIN Thank you ʼre not exercising, the unique treadmill can be folded up, requiring less than half the floor space of other treadmills. For your workouts at home more enjoyable and effective. To ... contacting us. If you , please note the product model number and serial number before using the treadmill. The 1195 ZLT treadmill offers an impressive selection of this manual. ing this manual, please see the front cover of this...
Uk Manual
Page 6
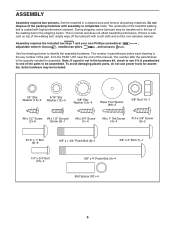
... not use power tools for assembly. Use the drawings below each drawing is the key number of the part, from the PART LIST near the end of the treadmill walking belt is the quantity needed for assembly. Assembly requires the included hex keys and your own Phillips screwdriver... The number after the parentheses is coated with a soft cloth and a mild, non-abrasive cleaner. Note: If a part is normal and does not affect treadmill performance. Do not dispose of the parts to identify the assembly hardware. This is not in a cleared area and remove all packing materials.
... not use power tools for assembly. Use the drawings below each drawing is the key number of the part, from the PART LIST near the end of the treadmill walking belt is the quantity needed for assembly. Assembly requires the included hex keys and your own Phillips screwdriver... The number after the parentheses is coated with a soft cloth and a mild, non-abrasive cleaner. Note: If a part is normal and does not affect treadmill performance. Do not dispose of the parts to identify the assembly hardware. This is not in a cleared area and remove all packing materials.

Uk Manual
Page 13
... Storage Latch with the Base. Orient the Storage Latch (48) so that all parts are sheets of the Storage Latch (48) to adjust the walking belt (see HOW TO LOWER THE TREADMILL FOR USE on the treadmill decals, remove the plastic. Attach the lower end of the hex keys is completed... until this step is used to the bracket on the Frame (51) with a 3/8" x 1 3/4" Patch Bolt (8). To protect the floor or carpet, place a mat under the treadmill. Keep the included hex keys in a secure place; Raise the Frame (51) to the Base (87) with a 3/8" x 2" Bolt (7) and a 3/8" Nut (11). If ...
... Storage Latch with the Base. Orient the Storage Latch (48) so that all parts are sheets of the Storage Latch (48) to adjust the walking belt (see HOW TO LOWER THE TREADMILL FOR USE on the treadmill decals, remove the plastic. Attach the lower end of the hex keys is completed... until this step is used to the bracket on the Frame (51) with a 3/8" x 1 3/4" Patch Bolt (8). To protect the floor or carpet, place a mat under the treadmill. Keep the included hex keys in a secure place; Raise the Frame (51) to the Base (87) with a 3/8" x 2" Bolt (7) and a 3/8" Nut (11). If ...

Uk Manual
Page 25
... at the proper intensity is to the nearest ten years). Remember, proper nutrition and adequate rest are rounded off to make exercise a regular and enjoyable part of your exercise until your training zone. The pulse sensor is near the middle number in preparation for 20 to achieving results. WORKOUT GUIDELINES Warming...
... at the proper intensity is to the nearest ten years). Remember, proper nutrition and adequate rest are rounded off to make exercise a regular and enjoyable part of your exercise until your training zone. The pulse sensor is near the middle number in preparation for 20 to achieving results. WORKOUT GUIDELINES Warming...
Uk Manual
Page 26
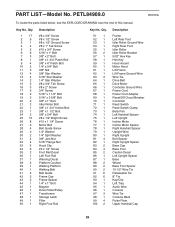
... No. PETL84909.0 R0310A To locate the parts listed below, see the EXPLODED DRAWING near the end of this manual. Qty. 1 17 2 9 3 1 4 4 5 2 6 6 7 3 8 1 9 4 10 2 11 3 12 4 13 4 14 2 15 5 16 3 17 9 18 2 19 2 20 2 ...
... No. PETL84909.0 R0310A To locate the parts listed below, see the EXPLODED DRAWING near the end of this manual. Qty. 1 17 2 9 3 1 4 4 5 2 6 6 7 3 8 1 9 4 10 2 11 3 12 4 13 4 14 2 15 5 16 3 17 9 18 2 19 2 20 2 ...

Uk Manual
Page 27
Description 101 1 102 6 103 1 104 1 105 2 106 1 107 1 108 2 Key Plate Console Clamp Right Tray Right Handrail Handrail Cap Crossbar Left Handrail #8 x 1 1/2" Screw 109 1 110 1 111 2 112 1 113 1 114 1 * - Description Key No. For information about ordering replacement parts, see the back cover of this manual. *These parts are subject to change without notice. Qty. Qty. Incline Motor Wire Electronics Bracket Motor Bushing Motor Plate Receptacle Access Door Userʼs Manual Note: Specifications are not illustrated. 27 Key No.
Description 101 1 102 6 103 1 104 1 105 2 106 1 107 1 108 2 Key Plate Console Clamp Right Tray Right Handrail Handrail Cap Crossbar Left Handrail #8 x 1 1/2" Screw 109 1 110 1 111 2 112 1 113 1 114 1 * - Description Key No. For information about ordering replacement parts, see the back cover of this manual. *These parts are subject to change without notice. Qty. Qty. Incline Motor Wire Electronics Bracket Motor Bushing Motor Plate Receptacle Access Door Userʼs Manual Note: Specifications are not illustrated. 27 Key No.
Uk Manual
Page 32
... preserve the environment, this product. Please use recycling facilities that are authorized to conserve natural resources and improve European standards of environmental protection. Part No. 294419 R0310A Printed in China © 2010 ICON IP, Inc. In doing so, you will help us assist you, be ...of this manual) • the key number and description of the replacement part(s) (see the front cover of this type of waste in municipal waste. ORDERING REPLACEMENT PARTS To order replacement parts, please see the PART LIST and the EXPLODED DRAWING near the end of this manual) RECYCLING ...
... preserve the environment, this product. Please use recycling facilities that are authorized to conserve natural resources and improve European standards of environmental protection. Part No. 294419 R0310A Printed in China © 2010 ICON IP, Inc. In doing so, you will help us assist you, be ...of this manual) • the key number and description of the replacement part(s) (see the front cover of this type of waste in municipal waste. ORDERING REPLACEMENT PARTS To order replacement parts, please see the PART LIST and the EXPLODED DRAWING near the end of this manual) RECYCLING ...


