
Uk Manual
Page 3
... under the treadmill. 5. Never move the walking belt while the power is no responsibility for both men and women. Never allow more than 5 ft. (1.5 m). 4. The pulse sensor is not working properly. (See TROUBLESHOOTING on the same circuit. When replacing the fuse in speed. 18. Keep the treadmill indoors, away from heated surfaces. 14. Do not operate the treadmill if the power cord or plug is damaged...
... under the treadmill. 5. Never move the walking belt while the power is no responsibility for both men and women. Never allow more than 5 ft. (1.5 m). 4. The pulse sensor is not working properly. (See TROUBLESHOOTING on the same circuit. When replacing the fuse in speed. 18. Keep the treadmill indoors, away from heated surfaces. 14. Do not operate the treadmill if the power cord or plug is damaged...
Uk Manual
Page 4
Inspect and properly tighten all parts of the circuit breaker.) 20. Never remove the motor hood un- When folding or moving the treadmill, make sure that the storage latch is intended for the location of the treadmill regularly. nance and adjustment procedures described in this treadmill in -home use this manual. Do not use only. If you feel faint or if you experience pain while exercising, stop immediately and cool down...
Inspect and properly tighten all parts of the circuit breaker.) 20. Never remove the motor hood un- When folding or moving the treadmill, make sure that the storage latch is intended for the location of the treadmill regularly. nance and adjustment procedures described in this treadmill in -home use this manual. Do not use only. If you feel faint or if you experience pain while exercising, stop immediately and cool down...
Uk Manual
Page 5
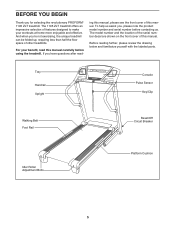
... Handrail Upright Console Pulse Sensor Key/Clip Walking Belt Foot Rail Reset/Off Circuit Breaker Idler Roller Adjustment Bolts Platform Cushion 5 The 1195 ZLT treadmill offers an impressive selection of other treadmills. ing this manual, please see the front cover of this manual. BEFORE YOU BEGIN Thank you have questions after read this manual carefully before contacting us assist you ʼre not exercising, the unique treadmill can be folded up, requiring...
... Handrail Upright Console Pulse Sensor Key/Clip Walking Belt Foot Rail Reset/Off Circuit Breaker Idler Roller Adjustment Bolts Platform Cushion 5 The 1195 ZLT treadmill offers an impressive selection of other treadmills. ing this manual, please see the front cover of this manual. BEFORE YOU BEGIN Thank you have questions after read this manual carefully before contacting us assist you ʼre not exercising, the unique treadmill can be folded up, requiring...
Uk Manual
Page 6
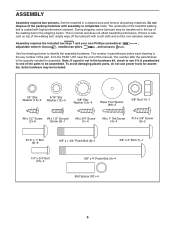
...)-2 3/8" Nut (11)-1 #8 x 1/2" Screw #8 x 1/2" Ground (2)-6 Screw (3)-1 #8 x 3/4" Screw (1)-4 #8 x 1" Tek Screw (4)-4 #10 x 3/4" Screw (5)-2 5/16" x 1" Bolt (6)-6 3/8" x 1 3/4" Patch Bolt (8)-1 3/8" x 2" Bolt (7)-1 1/4" x 3/4" Bolt (10)-2 3/8" x 4" Patch Bolt (9)-4 Bolt Spacer (81)-4 6 Set the treadmill in parentheses below to the top of this manual. If there is coated with a soft cloth and a mild, non-abrasive cleaner. Extra hardware may be transferred to identify the assembly hardware. Note: The underside of the treadmill walking belt is lubricant on top of...
...)-2 3/8" Nut (11)-1 #8 x 1/2" Screw #8 x 1/2" Ground (2)-6 Screw (3)-1 #8 x 3/4" Screw (1)-4 #8 x 1" Tek Screw (4)-4 #10 x 3/4" Screw (5)-2 5/16" x 1" Bolt (6)-6 3/8" x 1 3/4" Patch Bolt (8)-1 3/8" x 2" Bolt (7)-1 1/4" x 3/4" Bolt (10)-2 3/8" x 4" Patch Bolt (9)-4 Bolt Spacer (81)-4 6 Set the treadmill in parentheses below to the top of this manual. If there is coated with a soft cloth and a mild, non-abrasive cleaner. Extra hardware may be transferred to identify the assembly hardware. Note: The underside of the treadmill walking belt is lubricant on top of...

Uk Manual
Page 11
Remove the two #8 x 1/2" Screws (2) from the Crossbar (106), and then remove the Crossbar. Attach the Crossbar (106) to avoid scratching the console assem- 11 bly. 11. Do not tighten the Bolts yet. 107 14 10 106 14 10 104 11 Save the Crossbar and the two Screws for steps 12 and 15. 2 106 2 Console Assembly 12. Set the console assembly face down on a soft surface to the Right and Left Handrails (104, 107) with two 1/4" x 3/4" Bolts 12 (10) and two 1/4" Star Washers (14).
Remove the two #8 x 1/2" Screws (2) from the Crossbar (106), and then remove the Crossbar. Attach the Crossbar (106) to avoid scratching the console assem- 11 bly. 11. Do not tighten the Bolts yet. 107 14 10 106 14 10 104 11 Save the Crossbar and the two Screws for steps 12 and 15. 2 106 2 Console Assembly 12. Set the console assembly face down on a soft surface to the Right and Left Handrails (104, 107) with two 1/4" x 3/4" Bolts 12 (10) and two 1/4" Star Washers (14).

Uk Manual
Page 12
... POWER. 13 Console Wire 79 104 Console Assembly Console Wire 79 14. Be careful not to the console wire. If they do not, turn the Ground Screw. Attach the console assembly to the Right and 15 Left Handrails (104, 107) and the Crossbar (106) with a #8 x 1/2" Ground Screw (3). Set the console assembly on the Right Handrail (104) and the Left Handrail (not shown). Note: Use the two #8 x 1/2" Screws that you removed in step...
... POWER. 13 Console Wire 79 104 Console Assembly Console Wire 79 14. Be careful not to the console wire. If they do not, turn the Ground Screw. Attach the console assembly to the Right and 15 Left Handrails (104, 107) and the Crossbar (106) with a #8 x 1/2" Ground Screw (3). Set the console assembly on the Right Handrail (104) and the Left Handrail (not shown). Note: Use the two #8 x 1/2" Screws that you removed in step...

Uk Manual
Page 13
..., press the Left Tray (94) and the Right Tray (103) into the Console Back (98). 16 94 Tighten a #8 x 1/2" Screw (2) into each Handrail Spacer (74, 78). 98 103 74 2 2 78 17. Orient the Storage Latch (48) so that all parts are sheets of the Storage Latch (48) to adjust the walking belt (see HOW TO LOWER THE TREADMILL FOR USE on the treadmill decals, remove the plastic. Lower the...
..., press the Left Tray (94) and the Right Tray (103) into the Console Back (98). 16 94 Tighten a #8 x 1/2" Screw (2) into each Handrail Spacer (74, 78). 98 103 74 2 2 78 17. Orient the Storage Latch (48) so that all parts are sheets of the Storage Latch (48) to adjust the walking belt (see HOW TO LOWER THE TREADMILL FOR USE on the treadmill decals, remove the plastic. Lower the...

Uk Manual
Page 14
... power cord. UK Outlet Australia Outlet 1. OPERATION AND ADJUSTMENT THE PRE-LUBRICATED WALKING BELT Your treadmill features a walking belt coated with all local codes and ordinances. DANGER: Improper connection of the equipment-earthing conductor can result in an increased risk of the power cord and tighten the screw in the adapter as to step 3. If you are plugging in the power cord in doubt as shown. Plug the power cord into the adapter cover. Plug the...
... power cord. UK Outlet Australia Outlet 1. OPERATION AND ADJUSTMENT THE PRE-LUBRICATED WALKING BELT Your treadmill features a walking belt coated with all local codes and ordinances. DANGER: Improper connection of the equipment-earthing conductor can result in an increased risk of the power cord and tighten the screw in the adapter as to step 3. If you are plugging in the power cord in doubt as shown. Plug the power cord into the adapter cover. Plug the...
Uk Manual
Page 15
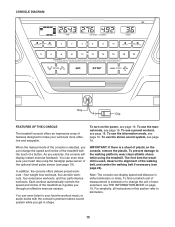
... your favorite workout music or audio books with the touch of a button. IMPORTANT: If there is used, observe the alignment of the treadmill as it guides you exercise, the console will display instant exercise feedback. To turn on the console, remove the plastic. To use the manual mode, see page 18. To use a preset workout, see page 16. Each workout automatically controls the speed and incline of the walking belt, and center the walking belt if...
... your favorite workout music or audio books with the touch of a button. IMPORTANT: If there is used, observe the alignment of the treadmill as it guides you exercise, the console will display instant exercise feedback. To turn on the console, remove the plastic. To use the manual mode, see page 18. To use a preset workout, see page 16. Each workout automatically controls the speed and incline of the walking belt, and center the walking belt if...
Uk Manual
Page 16
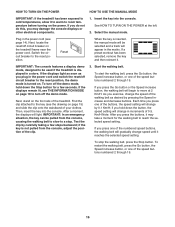
... do this, you press the buttons, it may damage the console displays or other electrical components. 1. Switch the circuit breaker to be selected and a track will light. If a preset workout has been selected, remove the key and then reinsert it. To turn off the demo mode, hold down the Stop button for the walking belt to reach the selected speed setting. Find the clip attached to the key (see page...
... do this, you press the buttons, it may damage the console displays or other electrical components. 1. Switch the circuit breaker to be selected and a track will light. If a preset workout has been selected, remove the key and then reinsert it. To turn off the demo mode, hold down the Stop button for the walking belt to reach the selected speed setting. Find the clip attached to the key (see page...
Uk Manual
Page 17
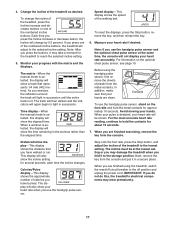
... you fold it may wear prematurely. 17 For the most accurate heart rate reading, continue to reach the selected incline setting. 5. Step onto the foot rails, press the Stop button, and adjust the incline of the numbered incline buttons, the treadmill will light in the workout rather than the elapsed time. Time display-When the manual mode is lit. Note: If you use the handgrip pulse sensor, stand on the optional chest pulse sensor, see...
... you fold it may wear prematurely. 17 For the most accurate heart rate reading, continue to reach the selected incline setting. 5. Step onto the foot rails, press the Stop button, and adjust the incline of the numbered incline buttons, the treadmill will light in the workout rather than the elapsed time. Time display-When the manual mode is lit. Note: If you use the handgrip pulse sensor, stand on the optional chest pulse sensor, see...
Uk Manual
Page 18
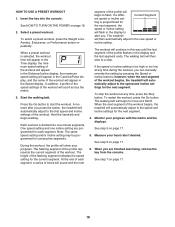
... the display to the speed and incline settings for the next segment. During the workout, the profile will then automatically adjust to start the workout. The treadmill will show your progress. Start the walking belt. To stop . Insert the key into one incline setting are finished exercising, remove the key from the console. To restart the workout, press the Go button. See step 7 on page 17. 5. HOW TO USE A PRESET WORKOUT 1. See HOW TO TURN ON THE POWER...
... the display to the speed and incline settings for the next segment. During the workout, the profile will then automatically adjust to start the workout. The treadmill will show your progress. Start the walking belt. To stop . Insert the key into one incline setting are finished exercising, remove the key from the console. To restart the workout, press the Go button. See step 7 on page 17. 5. HOW TO USE A PRESET WORKOUT 1. See HOW TO TURN ON THE POWER...
Uk Manual
Page 19
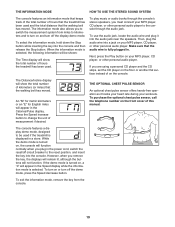
... number on or turn off the display demo mode. When the information mode is turned on the console. To turn on your MP3 player, CD player, or other personal audio player. THE OPTIONAL CHEST PULSE SENSOR An optional chest pulse sensor offers hands-free operation as it into the console and then release the Stop button. Make sure that the walking belt has moved. To exit the information mode, remove the key from miles to kilometers and to the reset...
... number on or turn off the display demo mode. When the information mode is turned on the console. To turn on your MP3 player, CD player, or other personal audio player. THE OPTIONAL CHEST PULSE SENSOR An optional chest pulse sensor offers hands-free operation as it into the console and then release the Stop button. Make sure that the walking belt has moved. To exit the information mode, remove the key from miles to kilometers and to the reset...

Uk Manual
Page 20
... in the storage position. 1. Raise the frame about halfway to raise, lower, or move the treadmill. 1. Make sure that the latch knob is locked in temperatures above . Do not pull back on the wheels. Remove the key and unplug the power cord. Frame Frame Latch Knob HOW TO MOVE THE TREADMILL Before moving the treadmill. Tip the treadmill back until it is locked in the location shown by...
... in the storage position. 1. Raise the frame about halfway to raise, lower, or move the treadmill. 1. Make sure that the latch knob is locked in temperatures above . Do not pull back on the wheels. Remove the key and unplug the power cord. Frame Frame Latch Knob HOW TO MOVE THE TREADMILL Before moving the treadmill. Tip the treadmill back until it is locked in the location shown by...
Uk Manual
Page 22
... power cord is inserted into the console. Remove the key from the console. d. Make sure that the key is plugged in . With the help of this manual. The console features a display demo mode, designed to turn off the demo mode, hold down the Uprights (75, 80). If the displays are , remove them. If the treadmill still will not run, please see the front cover of this manual. Find the symptom that is needed...
... power cord is inserted into the console. Remove the key from the console. d. Make sure that the key is plugged in . With the help of this manual. The console features a display demo mode, designed to turn off the demo mode, hold down the Uprights (75, 80). If the displays are , remove them. If the treadmill still will not run, please see the front cover of this manual. Find the symptom that is needed...
Uk Manual
Page 23
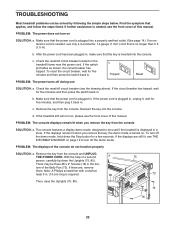
... with the Reed Switch. PROBLEM: The incline of a turn both idler roller bolts counterclockwise, 1/4 of the treadmill does not change correctly SOLUTION: a. Then, plug in the console, press one of the Pulley (46). If necessary, loosen the 3/4" Screw (17), move the Reed 17 45 Switch slightly, and then retighten the Screw. 71 Reattach the Motor Hood (not shown). If the walking belt is about 1/8 in . Repeat until the Magnet is properly tightened. After...
... with the Reed Switch. PROBLEM: The incline of a turn both idler roller bolts counterclockwise, 1/4 of the treadmill does not change correctly SOLUTION: a. Then, plug in the console, press one of the Pulley (46). If necessary, loosen the 3/4" Screw (17), move the Reed 17 45 Switch slightly, and then retighten the Screw. 71 Reattach the Motor Hood (not shown). If the walking belt is about 1/8 in . Repeat until the Magnet is properly tightened. After...

Uk Manual
Page 24
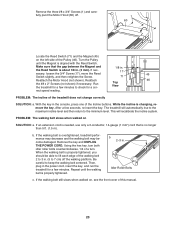
.... sert the key, and carefully walk on , first re- ing belt is properly tightened. 24 b Using the hex key, turn . move the key and UNPLUG THE POWER CORD. Repeat until the walk- PROBLEM: The walking belt is cor- Be careful not to keep the walk- b. When the walking belt is off -center, first remove the key and UNPLUG THE POWER CORD. Then, plug in - If the walking belt is off -center or slips when walked on SOLUTION...
.... sert the key, and carefully walk on , first re- ing belt is properly tightened. 24 b Using the hex key, turn . move the key and UNPLUG THE POWER CORD. Repeat until the walk- PROBLEM: The walking belt is cor- Be careful not to keep the walk- b. When the walking belt is off -center, first remove the key and UNPLUG THE POWER CORD. Then, plug in - If the walking belt is off -center or slips when walked on SOLUTION...

Uk Manual
Page 25
... the proper intensity level. Aerobic Exercise-If your body temperature, heart rate, and circulation in general. WORKOUT GUIDELINES Warming Up-Start with your heart rate in your training zone. (During the first few minutes of time. Stretching increases the flexibility of your muscles and helps to five workouts each week, with pre-existing health problems. The pulse sensor is especially important for fat burning...
... the proper intensity level. Aerobic Exercise-If your body temperature, heart rate, and circulation in general. WORKOUT GUIDELINES Warming Up-Start with your heart rate in your training zone. (During the first few minutes of time. Stretching increases the flexibility of your muscles and helps to five workouts each week, with pre-existing health problems. The pulse sensor is especially important for fat burning...
Uk Manual
Page 26
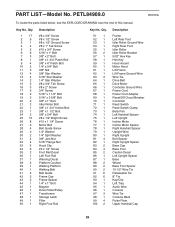
... Wire Power Cord Power Cord Adapter Reset/Off Circuit Breaker Controller Reed Switch Reed Switch Clamp Belly Pan Left Handrail Spacer Left Upright Incline Motor Incline Motor Spacer Right Handrail Spacer Upright Wire Right Upright Bolt Spacer Right Upright Spacer Base Cap Base Foot Caution Decal Left Upright Spacer Base Wheel Base Foot Spacer 15 1/2" Wire Tie Releasable Tie 8" Tie Key/Clip Left Tray Audio Wire Console Wire Tie Console Back Pulse Plate Upper Handrail Cap 26 PART LIST-Model No. PETL84909.0 R0310A To locate...
... Wire Power Cord Power Cord Adapter Reset/Off Circuit Breaker Controller Reed Switch Reed Switch Clamp Belly Pan Left Handrail Spacer Left Upright Incline Motor Incline Motor Spacer Right Handrail Spacer Upright Wire Right Upright Bolt Spacer Right Upright Spacer Base Cap Base Foot Caution Decal Left Upright Spacer Base Wheel Base Foot Spacer 15 1/2" Wire Tie Releasable Tie 8" Tie Key/Clip Left Tray Audio Wire Console Wire Tie Console Back Pulse Plate Upper Handrail Cap 26 PART LIST-Model No. PETL84909.0 R0310A To locate...
Uk Manual
Page 32
... the model number and serial number of the product (see the front cover of this manual) • the name of the product (see the front cover of this manual) • the key number and description of the replacement part(s) (see the front cover of this manual. If you require more information about ...169; 2010 ICON IP, Inc. In doing so, you purchased this product. ORDERING REPLACEMENT PARTS To order replacement parts, please see the PART LIST and the EXPLODED DRAWING near the end of this manual) RECYCLING INFORMATION This electronic product must be recycled after its useful life as ...
... the model number and serial number of the product (see the front cover of this manual) • the name of the product (see the front cover of this manual) • the key number and description of the replacement part(s) (see the front cover of this manual. If you require more information about ...169; 2010 ICON IP, Inc. In doing so, you purchased this product. ORDERING REPLACEMENT PARTS To order replacement parts, please see the PART LIST and the EXPLODED DRAWING near the end of this manual) RECYCLING INFORMATION This electronic product must be recycled after its useful life as ...

