

English Manual
Page 1
... Customer Hot Line will guarantee you . Serial Number Decal a QUESTIONS?- Read all safety precautions and Instructions in this manual carefully before using this manual for future reference. -Aw e OWNER'S MANUAL MST AWARNING! PRO•FORM® ••..t>fsat, ,,,,PferNtwo. PFTL10340 Serial No. TO AVOID UNNECESSARY DELAYS, PLEASE CALL DIRECT TO OUR TOLL-FREE CUSTOMER HOT LINE. Model No. Save this equipment. If you...
... Customer Hot Line will guarantee you . Serial Number Decal a QUESTIONS?- Read all safety precautions and Instructions in this manual carefully before using this manual for future reference. -Aw e OWNER'S MANUAL MST AWARNING! PRO•FORM® ••..t>fsat, ,,,,PferNtwo. PFTL10340 Serial No. TO AVOID UNNECESSARY DELAYS, PLEASE CALL DIRECT TO OUR TOLL-FREE CUSTOMER HOT LINE. Model No. Save this equipment. If you...
English Manual
Page 2
... move the walking belt while the power is running. Never use . 10. Never remove the motor hood unless instructed to do not operate the treadmill continuously for persons over the age of clearance behind the treadmill. Never allow more amps. The treadmill should be performed by an authorized service representative. Keep the power cord away from the rear roller. Use the treadmill only as an exercise aid in determining heart rate trends...
... move the walking belt while the power is running. Never use . 10. Never remove the motor hood unless instructed to do not operate the treadmill continuously for persons over the age of clearance behind the treadmill. Never allow more amps. The treadmill should be performed by an authorized service representative. Keep the power cord away from the rear roller. Use the treadmill only as an exercise aid in determining heart rate trends...
English Manual
Page 3
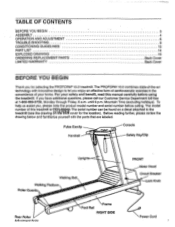
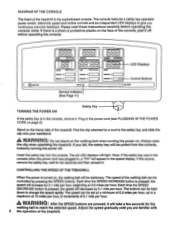
... the treadmill (see the drawing briThLeMli cover for selecting the PROFORM6 10.0 treadmill. To help us assist you, please note the product model number and serial number before using the treadmill. Pulse Earclip Console Handrail Safety Key/Clip Uprights Walking Belt Walking Platform Roller Guards ctikk Foot Rail Frame Prowr RIGHT SIDE Rear Roller AM,ictmartf RnIte FRONT Motor Hood Circuit Breaker Lock Knob Power Cord The model number of -the-art technology with the parts that...
... the treadmill (see the drawing briThLeMli cover for selecting the PROFORM6 10.0 treadmill. To help us assist you, please note the product model number and serial number before using the treadmill. Pulse Earclip Console Handrail Safety Key/Clip Uprights Walking Belt Walking Platform Roller Guards ctikk Foot Rail Frame Prowr RIGHT SIDE Rear Roller AM,ictmartf RnIte FRONT Motor Hood Circuit Breaker Lock Knob Power Cord The model number of -the-art technology with the parts that...
English Manual
Page 4
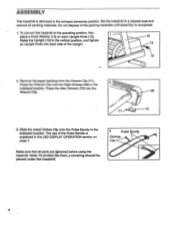
... 2. Note: To protect the floor, a covering should be placed under the treadmill. 4 Press the Allen Wrench (70) into each Upright Knob (12). The use of the packing materials until assembly is completed. 1. ASSEMBLY The treadmill is explained in the indicated location. Raise the Upright (10) to the operating position, first place a Knob Washer (13) on page 7. 3 Pulse Earclip Clothes Clip Make sure that...
... 2. Note: To protect the floor, a covering should be placed under the treadmill. 4 Press the Allen Wrench (70) into each Upright Knob (12). The use of the packing materials until assembly is completed. 1. ASSEMBLY The treadmill is explained in the indicated location. Raise the Upright (10) to the operating position, first place a Knob Washer (13) on page 7. 3 Pulse Earclip Clothes Clip Make sure that...
English Manual
Page 5
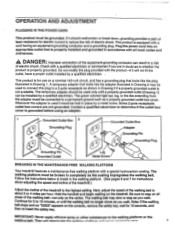
... before using an adapter. 1 Grounded Outlet Box 2 Grounding Plug O Grounding Pin Grounded Outlet Grounded Outlet Box 0 •• Adapter Grounding Pin 0•° • 6 Grounding Plug Lug Metal Screw BREAKING IN THE MAINTENANCE-FREE WALKING PLATFORM Your treadmill features a maintenance-free walking platform with a special hydrocarbon coating. OPERATION AND ADJUSTMENT PLUGGING IN THE POWER CORD This product must be held in place by a metal screw. Continue for instructions about 3 or 4 miles per...
... before using an adapter. 1 Grounded Outlet Box 2 Grounding Plug O Grounding Pin Grounded Outlet Grounded Outlet Box 0 •• Adapter Grounding Pin 0•° • 6 Grounding Plug Lug Metal Screw BREAKING IN THE MAINTENANCE-FREE WALKING PLATFORM Your treadmill features a maintenance-free walking platform with a special hydrocarbon coating. OPERATION AND ADJUSTMENT PLUGGING IN THE POWER CORD This product must be held in place by a metal screw. Continue for instructions about 3 or 4 miles per...
English Manual
Page 6
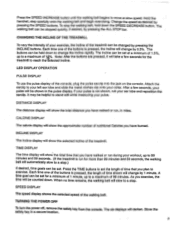
... Displays Control Buttons ALLSTOP Service Indicator (See Page 11) TURNING THE POWER ON Safety Key If the safety key is turned on the frame rails of the walking belt can be set at 0.5 miles per hour. A WARNING: Do not stand on the walking belt when turning the power on page 5). Always wear the clip when operating the treadmill. If you continuous exercise feedback. The buttons can be controlled by a cord to change the speed...
... Displays Control Buttons ALLSTOP Service Indicator (See Page 11) TURNING THE POWER ON Safety Key If the safety key is turned on the frame rails of the walking belt can be set at 0.5 miles per hour. A WARNING: Do not stand on the walking belt when turning the power on page 5). Always wear the clip when operating the treadmill. If you continuous exercise feedback. The buttons can be controlled by a cord to change the speed...
English Manual
Page 7
... collar. TURNING THE POWER OFF To turn the power off, remove the safety key from the console. Store the safety key in miles. The buttons can be shown in the pulse display. It may be held down to change by pressing the SPEED buttons. To stop the walking belt, hold down . After a few seconds for a minimum of 1 minute, up to a maximum of 1%%. Press the TIME buttons to set for the treadmill to a stop .) If...
... collar. TURNING THE POWER OFF To turn the power off, remove the safety key from the console. Store the safety key in miles. The buttons can be shown in the pulse display. It may be held down to change by pressing the SPEED buttons. To stop the walking belt, hold down . After a few seconds for a minimum of 1 minute, up to a maximum of 1%%. Press the TIME buttons to set for the treadmill to a stop .) If...
English Manual
Page 8
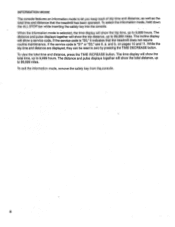
... information mode, remove the safety key from the..console. 8 If the service code is selected, the time display will show the total time, up to 9,999 hours. INFORMATION.MODE The console features an information mode to zero by pressing the TIME DECREASE button. To select the information mode, hold down the ALL STOP bar while inserting the safety key into the console. _ When the information mode is "S1" or "S3," see 6. The distance and pulse displays...
... information mode, remove the safety key from the..console. 8 If the service code is selected, the time display will show the total time, up to 9,999 hours. INFORMATION.MODE The console features an information mode to zero by pressing the TIME DECREASE button. To select the information mode, hold down the ALL STOP bar while inserting the safety key into the console. _ When the information mode is "S1" or "S3," see 6. The distance and pulse displays...
English Manual
Page 9
... exercise aid in determining heart rate trends in . Make sure the power cord is intended only as shown. Various factors, including the user's movement while exercising, may need to protect the electrical system. The earclip is plugged in general. 9 Make sure the safety key is needed , please call our Customer Service Department. SYMPTOM: THE POWER TURNS OFF DURING USE a. If an error code appears, 1.emove the safety key...
... exercise aid in determining heart rate trends in . Make sure the power cord is intended only as shown. Various factors, including the user's movement while exercising, may need to protect the electrical system. The earclip is plugged in general. 9 Make sure the safety key is needed , please call our Customer Service Department. SYMPTOM: THE POWER TURNS OFF DURING USE a. If an error code appears, 1.emove the safety key...
English Manual
Page 10
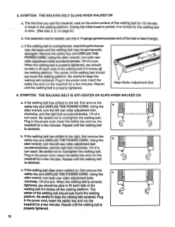
... power cord, insert the safety key and run the treadmill for a few minutes. Repeat until the walking belt is properly tightened. 3"-4" Rear Roller Adjustment Bolt 6. c. The center of the walking belt should be permanently damaged. Repeat until the walking belt is properly tightened, you should just touch the walking platform. Repeat until the walking belt is overtightened, treadmill performance may decrease and the walking belt may be able to overtighten the walking belt. • Plug...
... power cord, insert the safety key and run the treadmill for a few minutes. Repeat until the walking belt is properly tightened. 3"-4" Rear Roller Adjustment Bolt 6. c. The center of the walking belt should be permanently damaged. Repeat until the walking belt is properly tightened, you should just touch the walking platform. Repeat until the walking belt is overtightened, treadmill performance may decrease and the walking belt may be able to overtighten the walking belt. • Plug...

English Manual
Page 11
... that the treadmill be covered during extended periods of the walking belt should be checked (see 5. The service indicator on the console is designed to alert you when routine maintenance is not in the INCLINE display. STORAGE Unplug the power cord when the treadmill is needed. When the service indicator lights, the bolts attaching the uprights and thehandrail should be checked (see 5. A service code ("S1") will appear in use. c. To extinguish...
... that the treadmill be covered during extended periods of the walking belt should be checked (see 5. The service indicator on the console is designed to alert you when routine maintenance is not in the INCLINE display. STORAGE Unplug the power cord when the treadmill is needed. When the service indicator lights, the bolts attaching the uprights and thehandrail should be checked (see 5. A service code ("S1") will appear in use. c. To extinguish...
English Manual
Page 12
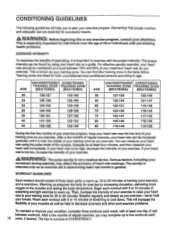
... as a guide. If your heart rate is important to five workouts each workout with 5 to 10 minutes of stretching and light exercise to 30 minutes of training zone exercise, and a cool-down . WORKOUT GUIDELINES Each workout should be increased gradually until it is too high, decrease the intensity of your exercise. Warming up prepares the body for exercise by using the pulse mode of the console. This...
... as a guide. If your heart rate is important to five workouts each workout with 5 to 10 minutes of stretching and light exercise to 30 minutes of training zone exercise, and a cool-down . WORKOUT GUIDELINES Each workout should be increased gradually until it is too high, decrease the intensity of your exercise. Warming up prepares the body for exercise by using the pulse mode of the console. This...

English Manual
Page 13
...QUADRICEPS STRETCH With one foot with one leg in the drawings below. Repeat 3 times for both legs. Repeat 3 times. Reach toward your hands against a wall for 15 counts, then relax. Stretches: Hamstrings, lower back and groin. Repeat 3 times for both legs. Stretches: Hamstrings, back of the other... The following stretches can provide a good warm-up or cool-down toward you stretch-never bounce. Correct form for both legs. CALF/ACHILLES STRETCH With one leg extended. Bend your front leg, lean forward and move your back leg as possible. Stretches: Quadriceps and hip muscles.
...QUADRICEPS STRETCH With one foot with one leg in the drawings below. Repeat 3 times for both legs. Repeat 3 times. Reach toward your hands against a wall for 15 counts, then relax. Stretches: Hamstrings, lower back and groin. Repeat 3 times for both legs. Stretches: Hamstrings, back of the other... The following stretches can provide a good warm-up or cool-down toward you stretch-never bounce. Correct form for both legs. CALF/ACHILLES STRETCH With one leg extended. Bend your front leg, lean forward and move your back leg as possible. Stretches: Quadriceps and hip muscles.
English Manual
Page 14
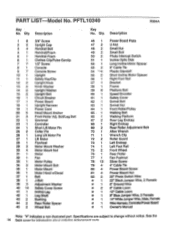
... Bolt Swivel Nut Front Roller/Pulley Walking Belt Walking Platform Rear Leg Endcap Right Endcap Rear Roller Adjustment Bolt Allen Wrench Wrench Clip Roller Guard Left Endcap Left Foot Rail Front Wheel Rear Roller Fan Pushnut Silver Screw 4" Cable Tie Power Board Screw Power Board Nut 20" Photo Switch Wire 20" Black Jumper Wire, 2 Female 8" Ground Wire 8" Cable Loom 12" Cable Loom 8" Blue Jumper Wire, 2 Female 14" White Jumper Wire, Male, Female Wire Harness, Controller/Power Board Owner's Manual Note: "#" indicates a non-illustrated part. PART LIST Model...
... Bolt Swivel Nut Front Roller/Pulley Walking Belt Walking Platform Rear Leg Endcap Right Endcap Rear Roller Adjustment Bolt Allen Wrench Wrench Clip Roller Guard Left Endcap Left Foot Rail Front Wheel Rear Roller Fan Pushnut Silver Screw 4" Cable Tie Power Board Screw Power Board Nut 20" Photo Switch Wire 20" Black Jumper Wire, 2 Female 8" Ground Wire 8" Cable Loom 12" Cable Loom 8" Blue Jumper Wire, 2 Female 14" White Jumper Wire, Male, Female Wire Harness, Controller/Power Board Owner's Manual Note: "#" indicates a non-illustrated part. PART LIST Model...
English Manual
Page 15
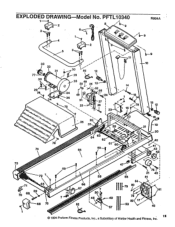
... 82 % %1 47 56 F79 8054 49 III_ 78 80 17 53 57 75 21 45 81 . •••• do, I S. , 81 46 © 1994 Proform Fitness Products, Inc., a Subsidiary of Weider Health and Fitness, Inc. 15 EXPLODED DRAWING Model No.
... 82 % %1 47 56 F79 8054 49 III_ 78 80 17 53 57 75 21 45 81 . •••• do, I S. , 81 46 © 1994 Proform Fitness Products, Inc., a Subsidiary of Weider Health and Fitness, Inc. 15 EXPLODED DRAWING Model No.
English Manual
Page 16
... of this manual. 5. The KEY NUMBER of the part(s) from state to replacing or repairing, at PROFORM's option, the product at one of its authorized service centers. LIMITED WARRANTY' Proform Fitness Products, Inc. ("PROFORM"), warrants this product to be prepared to the original purchaser. PROFORM IS NOT RESPONSIBLE OR LIABLE FOR INDIRECT, SPECIAL OR CONSEQUENTIAL DAMAGES ARISING OUT OF OR IN CONNECTION WITH THE USE OR...
... of this manual. 5. The KEY NUMBER of the part(s) from state to replacing or repairing, at PROFORM's option, the product at one of its authorized service centers. LIMITED WARRANTY' Proform Fitness Products, Inc. ("PROFORM"), warrants this product to be prepared to the original purchaser. PROFORM IS NOT RESPONSIBLE OR LIABLE FOR INDIRECT, SPECIAL OR CONSEQUENTIAL DAMAGES ARISING OUT OF OR IN CONNECTION WITH THE USE OR...

