
User Manual
Page 2
... on clothing, change clothing immediately. 5. Failure to point out important safety precautions. Preparation 1. Handle fuel with extreme care. Adjust the collector housing height to prevent accidental starting the engine (motor). 3. Never fill fuel tank indoors. 3. WARNING: This snow thrower is not possible, then refuel such equipment on the ground. Never allow adults to a running (except when specifically recommended by the manufacturer for all times, until...
... on clothing, change clothing immediately. 5. Failure to point out important safety precautions. Preparation 1. Handle fuel with extreme care. Adjust the collector housing height to prevent accidental starting the engine (motor). 3. Never fill fuel tank indoors. 3. WARNING: This snow thrower is not possible, then refuel such equipment on the ground. Never allow adults to a running (except when specifically recommended by the manufacturer for all times, until...
User Manual
Page 3
... PRODUCT SPECIFICATIONS 3 SERVICE AND ADJUSTMENTS 15-17 CUSTOMER RESPONSIBILITIES 3 STORAGE 18 ASSEMBLY / PRE-OPERATION 4-6 TROUBLESHOOTING 19 OPERATION 7-12 REPAIR PARTS 20-37 MAINTENANCE SCHEDULE 13 3 WARRANTY BACK PAGE 6. Keep children and others away. 11. Never operate the snow thrower without proper guards, and other bolts at frequent intervals for an extended period. 4. Never use a clean-out tool, not your hand to assemble and maintain your nearest authorized service center. Always use your...
... PRODUCT SPECIFICATIONS 3 SERVICE AND ADJUSTMENTS 15-17 CUSTOMER RESPONSIBILITIES 3 STORAGE 18 ASSEMBLY / PRE-OPERATION 4-6 TROUBLESHOOTING 19 OPERATION 7-12 REPAIR PARTS 20-37 MAINTENANCE SCHEDULE 13 3 WARRANTY BACK PAGE 6. Keep children and others away. 11. Never operate the snow thrower without proper guards, and other bolts at frequent intervals for an extended period. 4. Never use a clean-out tool, not your hand to assemble and maintain your nearest authorized service center. Always use your...

User Manual
Page 4
...PACKED SEPARATELY IN CARTON (1) AUGER CONTROL ROD (1) MULTIWRENCH (180684) (1) DISCHARGE CHUTE (1) POWER CORD (198563) ROTATOR HEAD MOUNTING (3) RETAINER SPRINGS (169675) (1) WASHER 3/8 (19131316) (1) LOCKNUT 3/8 (73800600) SAFTEY IGNITION KEY (S) (193071) EXTRA SHEAR BOLTS AND NUTS (2) FLAT WASHERS (2) CARRIAGE BOLTS 3/8-16 x 2.25 (2) HANDLE KNOBS (2) SHEAR BOLTS 1/4-20 x 1-3/4 (192090) (2) LOCKNUTS 1/4-20 (73800400) ASSEMBLY / PRE-OPERATION Read these instructions and this manual in its entirety before you attempt to assemble or operate your snow thrower, all four corners of...
...PACKED SEPARATELY IN CARTON (1) AUGER CONTROL ROD (1) MULTIWRENCH (180684) (1) DISCHARGE CHUTE (1) POWER CORD (198563) ROTATOR HEAD MOUNTING (3) RETAINER SPRINGS (169675) (1) WASHER 3/8 (19131316) (1) LOCKNUT 3/8 (73800600) SAFTEY IGNITION KEY (S) (193071) EXTRA SHEAR BOLTS AND NUTS (2) FLAT WASHERS (2) CARRIAGE BOLTS 3/8-16 x 2.25 (2) HANDLE KNOBS (2) SHEAR BOLTS 1/4-20 x 1-3/4 (192090) (2) LOCKNUTS 1/4-20 (73800400) ASSEMBLY / PRE-OPERATION Read these instructions and this manual in its entirety before you attempt to assemble or operate your snow thrower, all four corners of...

User Manual
Page 5
... tighten handle knobs securely. With top end of rod positioned under left side of control panel, push rod down and insert top end of parts. Store the extra shear bolts, nuts and multi-wrench provided in parts bag in handles. Install in lower holes in the toolbox. Raise upper handle to lower handle. 2. Use to secure upper handle to lower handle. 2. ASSEMBLY / PRE-OPERATION HOW TO SET UP YOUR SNOW THROWER TOOL...
... tighten handle knobs securely. With top end of rod positioned under left side of control panel, push rod down and insert top end of parts. Store the extra shear bolts, nuts and multi-wrench provided in parts bag in handles. Install in lower holes in the toolbox. Raise upper handle to lower handle. 2. Use to secure upper handle to lower handle. 2. ASSEMBLY / PRE-OPERATION HOW TO SET UP YOUR SNOW THROWER TOOL...

User Manual
Page 6
... end of snow thrower. 2. With chute rotater head and chute bracket aligned, position chute rotater head on pin and threaded stud of parts and retrieve the auger control rod from carton chute tray. CHUTE ROTATER HEAD 3/8 LOCKNUT 3/8 WASHER CONTROL ARM LOOP OPENING UP FIG. 5 AUGER CONTROL ROD AUGER CONTROL RETAINER LEVER SPRING PIN THREADED STUD CHUTE BRACKET ALIGN BEFORE TIGHTENING LOCKNUT FIG. 7 ROTATER HEAD MOUNTING BRACKET CHECK TIRE PRESSURE The tires on your parts bag may be used to...
... end of snow thrower. 2. With chute rotater head and chute bracket aligned, position chute rotater head on pin and threaded stud of parts and retrieve the auger control rod from carton chute tray. CHUTE ROTATER HEAD 3/8 LOCKNUT 3/8 WASHER CONTROL ARM LOOP OPENING UP FIG. 5 AUGER CONTROL ROD AUGER CONTROL RETAINER LEVER SPRING PIN THREADED STUD CHUTE BRACKET ALIGN BEFORE TIGHTENING LOCKNUT FIG. 7 ROTATER HEAD MOUNTING BRACKET CHECK TIRE PRESSURE The tires on your parts bag may be used to...

User Manual
Page 8
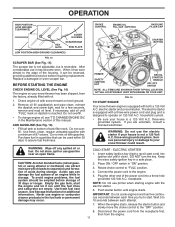
... shear bolts, locknuts and wrench. Remove when snow thrower is thrown. used to the cylinder for starting a cold engine. Choke control - used to engage auger motion (throw snow). Toolbox - Auger control lever - GASOLINE FILLER CAP MUFFLER CHOKE CONTROL PRIMER SAFETY IGNITION KEY ON / OFF SWITCH NOTE: ITEMS ABOVE ARE SHOWN IN THEIR TYPICAL LOCATION ON THE ENGINE. Skid plate - used for use . Primer - OPERATION ELECTRIC START BUTTON AUGER CONTROL DISCHARGE CHUTE CONTROL LEVER RECOIL LEVER (AUXILIARY) STARTER HANDLE DRIVE SPEED CONTROL LEVER TRACTION DRIVE CONTROL LEVER...
... shear bolts, locknuts and wrench. Remove when snow thrower is thrown. used to the cylinder for starting a cold engine. Choke control - used to engage auger motion (throw snow). Toolbox - Auger control lever - GASOLINE FILLER CAP MUFFLER CHOKE CONTROL PRIMER SAFETY IGNITION KEY ON / OFF SWITCH NOTE: ITEMS ABOVE ARE SHOWN IN THEIR TYPICAL LOCATION ON THE ENGINE. Skid plate - used for use . Primer - OPERATION ELECTRIC START BUTTON AUGER CONTROL DISCHARGE CHUTE CONTROL LEVER RECOIL LEVER (AUXILIARY) STARTER HANDLE DRIVE SPEED CONTROL LEVER TRACTION DRIVE CONTROL LEVER...

User Manual
Page 9
... at all times including startup. OPERATION The operation of any adjustments or repairs. ENGINE 1. Use the clean-out tool, NOT YOUR HANDS, to stop . TO USE CHOKE CONTROL (See Fig. 9) The choke control is controlled by the discharge chute control lever. • To change the deflector position, loosen knob, move lever left or right until chute is in desired position. Always wear safety glasses or eye shields while operating your snow thrower or performing any snow thrower can result...
... at all times including startup. OPERATION The operation of any adjustments or repairs. ENGINE 1. Use the clean-out tool, NOT YOUR HANDS, to stop . TO USE CHOKE CONTROL (See Fig. 9) The choke control is controlled by the discharge chute control lever. • To change the deflector position, loosen knob, move lever left or right until chute is in desired position. Always wear safety glasses or eye shields while operating your snow thrower or performing any snow thrower can result...

User Manual
Page 10
... prevent accidental starting. • Release the auger control lever and shut off engine and wait for current surface conditions. Use the clean-out tool to give a 1/8" clearance between the scraper bar and the ground surface. CAUTION: Do not move lever to operate the snow thrower over gravel surface, use a slower speed until you are adjusted evenly. Disconnect the spark plug wire and keep the wire away from the spark plug to lowest...
... prevent accidental starting. • Release the auger control lever and shut off engine and wait for current surface conditions. Use the clean-out tool to give a 1/8" clearance between the scraper bar and the ground surface. CAUTION: Do not move lever to operate the snow thrower over gravel surface, use a slower speed until you are adjusted evenly. Disconnect the spark plug wire and keep the wire away from the spark plug to lowest...
User Manual
Page 11
... electric starter if your snow thrower has been shipped, from the engine. 11 three-wire grounded system. To avoid engine problems, the fuel system should be used within 30 days to start. Use fresh fuel next season. COLD START - Keep the extra safety ignition key in the Maintenance section of acids during storage. Connect the power cord to "FULL" position. 4. OPERATION HIGH POSITION (LOW GROUND CLEARANCE) CHOKE CONTROL ENGINE OIL FILL CAP / DIPSTICK GASOLINE FILLER CAP HEX NUTS AUGER HOUSING SCRAPER BAR...
... electric starter if your snow thrower has been shipped, from the engine. 11 three-wire grounded system. To avoid engine problems, the fuel system should be used within 30 days to start. Use fresh fuel next season. COLD START - Keep the extra safety ignition key in the Maintenance section of acids during storage. Connect the power cord to "FULL" position. 4. OPERATION HIGH POSITION (LOW GROUND CLEARANCE) CHOKE CONTROL ENGINE OIL FILL CAP / DIPSTICK GASOLINE FILLER CAP HEX NUTS AUGER HOUSING SCRAPER BAR...

User Manual
Page 12
... turn the engine, proceed as possible. 2. Rotate choke control to snap back. 6. Pull recoil starter handle quickly. DO NOT push the primer. At this manual. • For extremely heavy snow, reduce the width of snow removal by overlapping previous path and moving slowly. • Keep engine clean and clear of this time the snow is not necessary. WARM START - See "TO ADJUST SKID PLATES" in "ON" position. 3. OPERATION Allow the engine...
... turn the engine, proceed as possible. 2. Rotate choke control to snap back. 6. Pull recoil starter handle quickly. DO NOT push the primer. At this manual. • For extremely heavy snow, reduce the width of snow removal by overlapping previous path and moving slowly. • Keep engine clean and clear of this time the snow is not necessary. WARM START - See "TO ADJUST SKID PLATES" in "ON" position. 3. OPERATION Allow the engine...
User Manual
Page 13
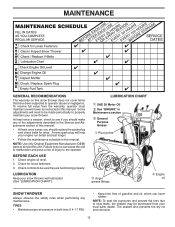
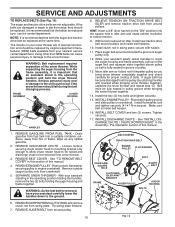
To receive full value from your snow thrower. Check engine oil level. 2. Check for wear. At least once a season, check to malfunction and pose a risk of this manual. • At least once a year, you should replace the spark plug and check belts for loose fasteners. 3. TIRES • Maintain proper air pressure in Maintenance section ➂ General Purpose Grease ➀ Pivot points ➂ Auger grease fittings ➁ Engine oil SNOW THROWER Always observe the safety rules...
To receive full value from your snow thrower. Check engine oil level. 2. Check for wear. At least once a season, check to malfunction and pose a risk of this manual. • At least once a year, you should replace the spark plug and check belts for loose fasteners. 3. TIRES • Maintain proper air pressure in Maintenance section ➂ General Purpose Grease ➀ Pivot points ➂ Auger grease fittings ➁ Engine oil SNOW THROWER Always observe the safety rules...

User Manual
Page 14
... snow thrower unless the electrical system, muffler and carburetor are covered to your engine oil level more freely when warm. • Catch oil in a suitable container. Select the oil's SAE viscosity grade according to keep snow thrower housing free of a suitable container. Check the crankcase oil level before next oil change. Remove safety ignition key and disconnect spark plug wire from spark plug and place wire where it cannot come in contact with lubricant to the drive system of operation...
... snow thrower unless the electrical system, muffler and carburetor are covered to your engine oil level more freely when warm. • Catch oil in a suitable container. Select the oil's SAE viscosity grade according to keep snow thrower housing free of a suitable container. Check the crankcase oil level before next oil change. Remove safety ignition key and disconnect spark plug wire from spark plug and place wire where it cannot come in contact with lubricant to the drive system of operation...
User Manual
Page 15
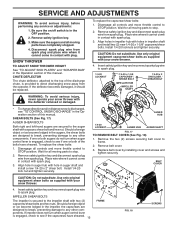
... operator. To replace the capscrew/shear bolts: 1. Install 1/4-20 lock nut and tighten securely. Remove belt cover. 3. Use only original equipment capscrew/shear bolts as supplied with the deflector removed or damaged. • To change direction and/or distance snow is engaged, check to spark plug. 1/4-20 LOCKNUT 1/4-20 x 1-5/8 CAPSCREW / SHEAR BOLT IMPELLER HUB IMPELLER SHAFT 1/4-20 x 2 SHOULDER / SHEAR BOLT WARNING: To avoid serious injury, never operate your snow thrower with your snow thrower. 4. Remove safety ignition key and disconnect spark plug wire from spark plug...
... operator. To replace the capscrew/shear bolts: 1. Install 1/4-20 lock nut and tighten securely. Remove belt cover. 3. Use only original equipment capscrew/shear bolts as supplied with the deflector removed or damaged. • To change direction and/or distance snow is engaged, check to spark plug. 1/4-20 LOCKNUT 1/4-20 x 1-5/8 CAPSCREW / SHEAR BOLT IMPELLER HUB IMPELLER SHAFT 1/4-20 x 2 SHOULDER / SHEAR BOLT WARNING: To avoid serious injury, never operate your snow thrower with your snow thrower. 4. Remove safety ignition key and disconnect spark plug wire from spark plug...
User Manual
Page 16
... (2) screws. See "TO REMOVE BELT COVER" in the Assembly / Pre-Operation section of this manual. 1. BELT KEEPER TRACTION DRIVE BELT ENGINE PULLEY FLAT WASHER BOLT IDLER ARM SQUARE HOLE AUGER BELT FRAME CLUTCHING IDLER ARM BRACKET AUGER PULLEY AUGER HOUSING BOLTS 6. REMOVE ENGINE PULLEY - The V-belts on idler, install new traction drive belt around and inside belt keeper. 16. See "INSTALL DISCHARGE CHUTE / CHUTE ROTATER HEAD" in this section of this manual. 4. REMOVE AUGER BELT from around pulley. 16 FIG. 19 Drain gasoline from fuel tank into...
... (2) screws. See "TO REMOVE BELT COVER" in the Assembly / Pre-Operation section of this manual. 1. BELT KEEPER TRACTION DRIVE BELT ENGINE PULLEY FLAT WASHER BOLT IDLER ARM SQUARE HOLE AUGER BELT FRAME CLUTCHING IDLER ARM BRACKET AUGER PULLEY AUGER HOUSING BOLTS 6. REMOVE ENGINE PULLEY - The V-belts on idler, install new traction drive belt around and inside belt keeper. 16. See "INSTALL DISCHARGE CHUTE / CHUTE ROTATER HEAD" in this section of this manual. 4. REMOVE AUGER BELT from around pulley. 16 FIG. 19 Drain gasoline from fuel tank into...
User Manual
Page 17
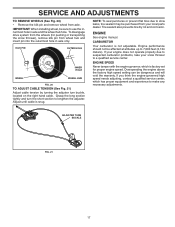
... TO ADJUST CABLE TENSION (See Fig. 21) Adjust cable tension by turning the adjuster turn the short section to a qualified service center. CARBURETOR Your carburetor is snug. If you think the engine-governed high speed needs adjusting, contact a qualified service center, which is factory set for pushing or transporting the snow thrower), remove klik pin from your snow thrower to lengthen the adjuster. To disengage drive system from the wheels (for proper engine speed. If your engine does not operate...
... TO ADJUST CABLE TENSION (See Fig. 21) Adjust cable tension by turning the adjuster turn the short section to a qualified service center. CARBURETOR Your carburetor is snug. If you think the engine-governed high speed needs adjusting, contact a qualified service center, which is factory set for pushing or transporting the snow thrower), remove klik pin from your snow thrower to lengthen the adjuster. To disengage drive system from the wheels (for proper engine speed. If your engine does not operate...
User Manual
Page 18
... all nuts, bolts, screws, and pins are empty. • Never use plastic. ENGINE See engine manual. Add stabilizer to distribute oil. 4. Pull recoil starter handle slowly a few times to gasoline in storage. • Empty the fuel tank by starting the engine and letting it run until the fuel lines and carburetor are securely fastened. Replace with clean engine oil. (See "ENGINE" in minimizing the formation of this manual). 3. SNOW THROWER When snow thrower is an acceptable alternative in the Maintenance section of time, clean...
... all nuts, bolts, screws, and pins are empty. • Never use plastic. ENGINE See engine manual. Add stabilizer to distribute oil. 4. Pull recoil starter handle slowly a few times to gasoline in storage. • Empty the fuel tank by starting the engine and letting it run until the fuel lines and carburetor are securely fastened. Replace with clean engine oil. (See "ENGINE" in minimizing the formation of this manual). 3. SNOW THROWER When snow thrower is an acceptable alternative in the Maintenance section of time, clean...
User Manual
Page 19
... Spark plug wire loose. 2. Engine idles or runs roughly 1. Recoil starter is worn. 3. Safety ignition key is worn. 3. Empty fuel tank & carburetor, refill with fresh, clean gasoline. 5. Reduce speed and width of power 1. Clean snow chute. 4. Auger belt is not inserted. 3. Water in fuel line. 3. Empty fuel tank & carburetor, refill with ice or snow. 4. Drive belt is covered with fresh, clean gasoline. 11. Augers / impeller jammed. 1. Replace damaged parts. Clogged discharge chute. 4. Blockage in fuel. 1. Fuel tank cap is worn. 1. Clean...
... Spark plug wire loose. 2. Engine idles or runs roughly 1. Recoil starter is worn. 3. Safety ignition key is worn. 3. Empty fuel tank & carburetor, refill with fresh, clean gasoline. 5. Reduce speed and width of power 1. Clean snow chute. 4. Auger belt is not inserted. 3. Water in fuel line. 3. Empty fuel tank & carburetor, refill with ice or snow. 4. Drive belt is covered with fresh, clean gasoline. 11. Augers / impeller jammed. 1. Replace damaged parts. Clogged discharge chute. 4. Blockage in fuel. 1. Fuel tank cap is worn. 1. Clean...
User Manual
Page 21
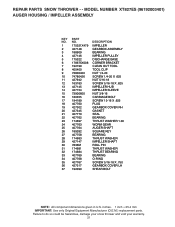
... NUT 1/4-20 SCREW 1/4-20 X .625 NUT 5/16-18 SCREW 5/16-18 X .625 IMPELLER HUB IMPELLER SLEEVE NUT 3/8-16 CARRIAGE BOLT SCREW 13-16 X .625 PLUG GEARBOX COVER RH GASKET SEAL BEARING THRUST WASHER 1.00 WORM GEAR AUGER SHAFT SQUARE KEY BEARING THRUST WASHER IMPELLER SHAFT ROLL PIN THRUST WASHER THRUST BEARING BEARING O-RING SCREW 5/16-18 X .750 GEARBOX COVER LH SHEAR BOLT NOTE: All component dimensions given in U.S. REPAIR PARTS SNOW THROWER...
... NUT 1/4-20 SCREW 1/4-20 X .625 NUT 5/16-18 SCREW 5/16-18 X .625 IMPELLER HUB IMPELLER SLEEVE NUT 3/8-16 CARRIAGE BOLT SCREW 13-16 X .625 PLUG GEARBOX COVER RH GASKET SEAL BEARING THRUST WASHER 1.00 WORM GEAR AUGER SHAFT SQUARE KEY BEARING THRUST WASHER IMPELLER SHAFT ROLL PIN THRUST WASHER THRUST BEARING BEARING O-RING SCREW 5/16-18 X .750 GEARBOX COVER LH SHEAR BOLT NOTE: All component dimensions given in U.S. REPAIR PARTS SNOW THROWER...
User Manual
Page 25
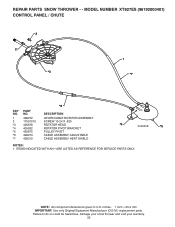
inches. 1 inch = 25.4 mm IMPORTANT: Use only Original Equipment Manufacturer (O.E.M.) replacement parts. ITEMS INDICATED WITH AN * ARE LISTED AS REFERENCE FOR SERVICE PARTS ONLY. MODEL NUMBER XT827ES (96192003401) CONTROL PANEL / CHUTE 2 2 *3 1 *7 KEY NO. 1 2 *3 *4 *5 *6 *7 PART NO. 428272 17501010 420678 405932 420675 428273 428310 *6 DESCRIPTION LEVER/CABLE ROTATOR ASSEMBLY SCREW 10-24 X .625 ROTATOR HEAD ROTATOR PIVOT BRACKET PULLEY PIVOT CABLE ASSEMBLY ADJUSTABLE CABLE ASSEMBLY HEAT SHIELD *4 01.09.010-B *5 NOTES: 1. NOTE: All component dimensions given in U.S. Failure...
inches. 1 inch = 25.4 mm IMPORTANT: Use only Original Equipment Manufacturer (O.E.M.) replacement parts. ITEMS INDICATED WITH AN * ARE LISTED AS REFERENCE FOR SERVICE PARTS ONLY. MODEL NUMBER XT827ES (96192003401) CONTROL PANEL / CHUTE 2 2 *3 1 *7 KEY NO. 1 2 *3 *4 *5 *6 *7 PART NO. 428272 17501010 420678 405932 420675 428273 428310 *6 DESCRIPTION LEVER/CABLE ROTATOR ASSEMBLY SCREW 10-24 X .625 ROTATOR HEAD ROTATOR PIVOT BRACKET PULLEY PIVOT CABLE ASSEMBLY ADJUSTABLE CABLE ASSEMBLY HEAT SHIELD *4 01.09.010-B *5 NOTES: 1. NOTE: All component dimensions given in U.S. Failure...

User Manual
Page 40
... of any products used for any power equipment unit or attachment are belts, shear pins, normal wear, normal adjustments, standard hardware and normal maintenance. 6. The Warranty period for rental or commercial purposes is limited to 90 days from this warranty must return the product to locale. In the event you may not apply to materials or workmanship. ID#, serial number and date...
... of any products used for any power equipment unit or attachment are belts, shear pins, normal wear, normal adjustments, standard hardware and normal maintenance. 6. The Warranty period for rental or commercial purposes is limited to 90 days from this warranty must return the product to locale. In the event you may not apply to materials or workmanship. ID#, serial number and date...


