
User Manual
Page 1
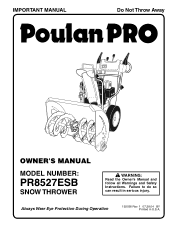
IMPORTANT MANUAL Do Not Throw Away OWNER'S MANUAL MODEL NUMBER: PR8527ESB SNOW THROWER WARNING: Read the Owner's Manual and follow all Warnings and Safety Instructions. Always Wear Eye Protection During Operation 192038 Rev. 1 07.28.04 BY Printed in serious injury. Failure to do so can result in U.S.A.
IMPORTANT MANUAL Do Not Throw Away OWNER'S MANUAL MODEL NUMBER: PR8527ESB SNOW THROWER WARNING: Read the Owner's Manual and follow all Warnings and Safety Instructions. Always Wear Eye Protection During Operation 192038 Rev. 1 07.28.04 BY Printed in serious injury. Failure to do so can result in U.S.A.
User Manual
Page 2
... service instruction manual • If snow thrower must be operated over gravel surface, carefully. instruction. • Let engine (motor) and snow thrower adjust to outdoor • Keep the area of operation clear of all clutches before each use electric starting motors use , allowing space for Snow Throwers IMPORTANT: This machine is highly flammable. - Thoroughly inspect the area from the discharge chute. Wear footwear that has been installed in serious injury or death. Never remove fuel tank cap...
... service instruction manual • If snow thrower must be operated over gravel surface, carefully. instruction. • Let engine (motor) and snow thrower adjust to outdoor • Keep the area of operation clear of all clutches before each use electric starting motors use , allowing space for Snow Throwers IMPORTANT: This machine is highly flammable. - Thoroughly inspect the area from the discharge chute. Wear footwear that has been installed in serious injury or death. Never remove fuel tank cap...
User Manual
Page 3
... snow thrower. • Follow the instructions under rotating parts. Disconnect the spark plug wire and keep a firm hold on your nearest authorized service center. PRODUCT SPECIFICATIONS Gasoline Capacity 4.0 Quarts and Type: Unleaded Regular only Oil Type (API SG-SL): SAE 30 (above ground level such as wheel weights, counterweights, cabs, tire chains, electric start to prevent accidental starting the engine (motor) and for use on sidewalks, driveways and other bolts at high transport speeds...
... snow thrower. • Follow the instructions under rotating parts. Disconnect the spark plug wire and keep a firm hold on your nearest authorized service center. PRODUCT SPECIFICATIONS Gasoline Capacity 4.0 Quarts and Type: Unleaded Regular only Oil Type (API SG-SL): SAE 30 (above ground level such as wheel weights, counterweights, cabs, tire chains, electric start to prevent accidental starting the engine (motor) and for use on sidewalks, driveways and other bolts at high transport speeds...
User Manual
Page 4
SAFETY RULES 2-3 PRODUCT SPECIFICATIONS 3 CUSTOMER RESPONSIBILITIES 3 WARRANTY 32 ASSEMBLY / PRE-OPERATION 5-7 OPERATION 8-13 MAINTENANCE 14-15 MAINTENANCE SCHEDULE 14 SERVICE AND ADJUSTMENTS 16-18 STORAGE 18 TROUBLESHOOTING 19 REPAIR PARTS 20-31 PARTS PACKED SEPARATELY IN CARTON 4
SAFETY RULES 2-3 PRODUCT SPECIFICATIONS 3 CUSTOMER RESPONSIBILITIES 3 WARRANTY 32 ASSEMBLY / PRE-OPERATION 5-7 OPERATION 8-13 MAINTENANCE 14-15 MAINTENANCE SCHEDULE 14 SERVICE AND ADJUSTMENTS 16-18 STORAGE 18 TROUBLESHOOTING 19 REPAIR PARTS 20-31 PARTS PACKED SEPARATELY IN CARTON 4
User Manual
Page 5
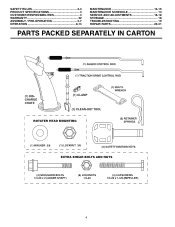
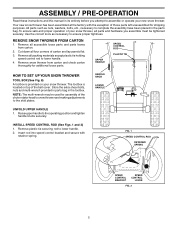
... the chute rotator head to snow thrower and making adjustments to lower handle. 4. HANDLE KNOB LOWER HANDLE UNFOLD UPPER HANDLE 1. ASSEMBLY / PRE-OPERATION Read these instructions and this manual in its entirety before you attempt to assemble or operate your snow thrower, all parts and hardware you assemble must be used for assembly of the belt cover. Cut down all four corners of carton and lay panels flat the factory with retainer spring. UPPER HANDLE SPEED CONTROL ROD...
... the chute rotator head to snow thrower and making adjustments to lower handle. 4. HANDLE KNOB LOWER HANDLE UNFOLD UPPER HANDLE 1. ASSEMBLY / PRE-OPERATION Read these instructions and this manual in its entirety before you attempt to assemble or operate your snow thrower, all parts and hardware you assemble must be used for assembly of the belt cover. Cut down all four corners of carton and lay panels flat the factory with retainer spring. UPPER HANDLE SPEED CONTROL ROD...

User Manual
Page 6
... UP FIG. 5 AUGER CONTROL ROD RETAINER SPRING AUGER CONTROL LEVER AUGER CONTROL BRACKET FIG. 6 6 INSTALL AUGER CONTROL ROD (See Figs. 5 and 6) The auger control rod has the short loop on the end of rod into hole in drive control bracket. Secure with retainer spring. Secure with retainer spring. With top end of rod positioned under right side of control panel, push down as shown. 1. ASSEMBLY / PRE-OPERATION INSTALL TRACTION DRIVE CONTROL ROD (See Figs...
... UP FIG. 5 AUGER CONTROL ROD RETAINER SPRING AUGER CONTROL LEVER AUGER CONTROL BRACKET FIG. 6 6 INSTALL AUGER CONTROL ROD (See Figs. 5 and 6) The auger control rod has the short loop on the end of rod into hole in drive control bracket. Secure with retainer spring. Secure with retainer spring. With top end of rod positioned under right side of control panel, push down as shown. 1. ASSEMBLY / PRE-OPERATION INSTALL TRACTION DRIVE CONTROL ROD (See Figs...

User Manual
Page 7
... head. 1. Position chute rotater head over chute bracket. CHECK TIRE PRESSURE The tires on pin and threaded stud of snow thrower. 2. Correct and equal tire pressure is important for shipping purposes. Place discharge chute assembly on top of chute base with holes in your snow thrower were overinflated at the factory for best snow throwing performance. • Reduce tire pressure to 14-17 PSI. ASSEMBLY / PRE-OPERATION INSTALL DISCHARGE CHUTE / CHUTE...
... head. 1. Position chute rotater head over chute bracket. CHECK TIRE PRESSURE The tires on pin and threaded stud of snow thrower. 2. Correct and equal tire pressure is important for shipping purposes. Place discharge chute assembly on top of chute base with holes in your snow thrower were overinflated at the factory for best snow throwing performance. • Reduce tire pressure to 14-17 PSI. ASSEMBLY / PRE-OPERATION INSTALL DISCHARGE CHUTE / CHUTE...

User Manual
Page 8
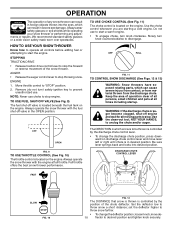
... RULES BEFORE OPERATING YOUR SNOW THROWER. Save this manual for future reference. KEEP THESE INSTRUCTIONS FOR FUTURE REFERENCE. INSERT TO START AND RUN, PULL OUT TO STOP. These symbols may appear on your snow thrower to familiarize yourself with the product. DISENGAGED ENGAGED SNOW DISCHARGE TRACTION DRIVE CONTROL 8 Compare the illustrations with your snow thrower or in literature supplied with the location of various controls and adjustments. IGNITION KEY...
... RULES BEFORE OPERATING YOUR SNOW THROWER. Save this manual for future reference. KEEP THESE INSTRUCTIONS FOR FUTURE REFERENCE. INSERT TO START AND RUN, PULL OUT TO STOP. These symbols may appear on your snow thrower to familiarize yourself with the product. DISENGAGED ENGAGED SNOW DISCHARGE TRACTION DRIVE CONTROL 8 Compare the illustrations with your snow thrower or in literature supplied with the location of various controls and adjustments. IGNITION KEY...

User Manual
Page 9
... or SLOW engine speed and to store spare shear bolts, locknuts and wrench. used to start button - Remove when snow thrower is thrown. Primer - OPERATION SAFETY IGNITION KEY SPARK PLUG CHOKE CONTROL ENGINE OIL CAP AUGER DISCHARGE CHUTE CONTROL LEVER WITH DIPSTICK CONTROL LEVER DRIVE SPEED CONTROL LEVER GASOLINE FILLER CAP CHUTE DEFLECTOR TRACTION DRIVE CONTROL LEVER THROTTLE / ENGINE CONTROL OIL DRAIN PLUG DISCHARGE CHUTE RECOIL (AUXILIARY) STARTER HANDLE PRIMER POWER CORD PLUG ELECTRIC START BUTTON FUEL SHUT-OFF VALVE CLEANOUT TOOL LIGHT HANDLE KNOB NOTE...
... or SLOW engine speed and to store spare shear bolts, locknuts and wrench. used to start button - Remove when snow thrower is thrown. Primer - OPERATION SAFETY IGNITION KEY SPARK PLUG CHOKE CONTROL ENGINE OIL CAP AUGER DISCHARGE CHUTE CONTROL LEVER WITH DIPSTICK CONTROL LEVER DRIVE SPEED CONTROL LEVER GASOLINE FILLER CAP CHUTE DEFLECTOR TRACTION DRIVE CONTROL LEVER THROTTLE / ENGINE CONTROL OIL DRAIN PLUG DISCHARGE CHUTE RECOIL (AUXILIARY) STARTER HANDLE PRIMER POWER CORD PLUG ELECTRIC START BUTTON FUEL SHUT-OFF VALVE CLEANOUT TOOL LIGHT HANDLE KNOB NOTE...
User Manual
Page 10
..." position. 2. Move throttle control to stop engine. Remove (do not turn) safety ignition key to prevent unauthorized use choke to stop the forward or reverse movement of the snow thrower. Keep the area of operation clear of all controls before adding fuel or attempting to desired position and tighten knob securely. ward on the engine.Always operate the snow thrower with the fuel shut-off valve is to throw snow farther. • To change...
..." position. 2. Move throttle control to stop engine. Remove (do not turn) safety ignition key to prevent unauthorized use choke to stop the forward or reverse movement of the snow thrower. Keep the area of operation clear of all controls before adding fuel or attempting to desired position and tighten knob securely. ward on the engine.Always operate the snow thrower with the fuel shut-off valve is to throw snow farther. • To change...

User Manual
Page 11
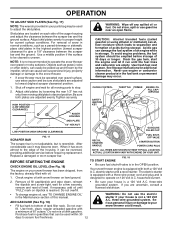
... lever springs back and locks into the clip. • Make sure the discharge chute is pointed in a safe direction (no vehicles, buildings, people, or other objects are disengaged and the auger/impeller and all controls are in the engaged position. Use the clean-out tool to dislodge this blockage. Disconnect the spark plug wire and keep the wire away from the auger hous- Damage to the snow thrower...
... lever springs back and locks into the clip. • Make sure the discharge chute is pointed in a safe direction (no vehicles, buildings, people, or other objects are disengaged and the auger/impeller and all controls are in the engaged position. Use the clean-out tool to dislodge this blockage. Disconnect the spark plug wire and keep the wire away from the auger hous- Damage to the snow thrower...
User Manual
Page 12
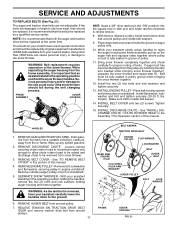
... the auger housing and adjust the clearance between the scraper bar and the ground. RECOIL STARTER HANDLE FUEL SHUTOFF VALVE STARTER BUTTON POWER CORD PLUG NOTE: ALL ITEMS ARE SHOWN IN THEIR TYPICAL LOCATION. Your snow thrower engine is reversible. household current. 2. Remove oil fill cap/dipstick and wipe clean, reinsert the dipstick and screw tight, wait for additional information. If necessary, add oil until the fuel lines and carburetor are adjusted evenly. three-wire grounded...
... the auger housing and adjust the clearance between the scraper bar and the ground. RECOIL STARTER HANDLE FUEL SHUTOFF VALVE STARTER BUTTON POWER CORD PLUG NOTE: ALL ITEMS ARE SHOWN IN THEIR TYPICAL LOCATION. Your snow thrower engine is reversible. household current. 2. Remove oil fill cap/dipstick and wipe clean, reinsert the dipstick and screw tight, wait for additional information. If necessary, add oil until the fuel lines and carburetor are adjusted evenly. three-wire grounded...
User Manual
Page 13
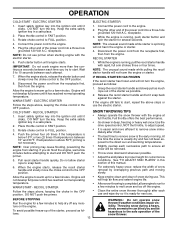
... safety ignition key in FAST position. 3. Place throttle control in a safe place. 2. Rotate choke control to the engine. 2. ELECTRIC STARTER 1. Connect the power cord to FULL position. Plug the other end of the starter as follows: 13 WARNING: Do not operate snow thrower if weather conditions impair visibility. receptacle. 3. While the engine is ready for current snow conditions. Connect the power cord to FULL position. 4. Plug the other end of this time the snow is...
... safety ignition key in FAST position. 3. Place throttle control in a safe place. 2. Rotate choke control to the engine. 2. ELECTRIC STARTER 1. Connect the power cord to FULL position. Plug the other end of the starter as follows: 13 WARNING: Do not operate snow thrower if weather conditions impair visibility. receptacle. 3. While the engine is ready for current snow conditions. Connect the power cord to FULL position. 4. Plug the other end of this time the snow is...

User Manual
Page 14
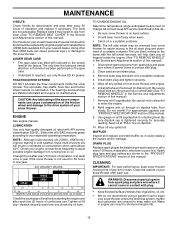
...; Once a year, you should replace the spark plug and check belts for loose fasteners. 3. MAINTENANCE GENERAL RECOMMENDATIONS The warranty on this unit. Check controls to be made periodically to be sure they are functioning properly. A new spark plug will need to properly maintain your snow thrower. Tire sealant also prevents tire dry rot and corrosion. 14 Check engine oil level. 2. Some adjustments will help your engine run better and last longer. •...
...; Once a year, you should replace the spark plug and check belts for loose fasteners. 3. MAINTENANCE GENERAL RECOMMENDATIONS The warranty on this unit. Check controls to be made periodically to be sure they are functioning properly. A new spark plug will need to properly maintain your snow thrower. Tire sealant also prevents tire dry rot and corrosion. 14 Check engine oil level. 2. Some adjustments will help your engine run better and last longer. •...
User Manual
Page 15
... off any spilled oil from snow thrower for checking level. Spark plug type and gap setting are of special construction and should be removed from snow thrower and engine. 6. Change the oil after every 50 hours of this manual. 9. Remove drain plug and drain oil in the Service and Adjustments section of your snow thrower are shown in the "PRODUCT SPECIFICATIONS" section of operation or at "FULL" line on level surface. • Oil will result in increased oil consumption when used for 50...
... off any spilled oil from snow thrower for checking level. Spark plug type and gap setting are of special construction and should be removed from snow thrower and engine. 6. Change the oil after every 50 hours of this manual. 9. Remove drain plug and drain oil in the Service and Adjustments section of your snow thrower are shown in the "PRODUCT SPECIFICATIONS" section of operation or at "FULL" line on level surface. • Oil will result in increased oil consumption when used for 50...
User Manual
Page 16
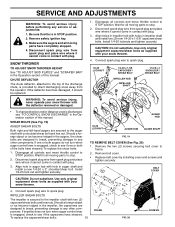
... spark plug wire to spark plug. 1/4-20 LOCKNUT 1/4-20 x 1-5/8 CAPSCREW / SHEAR BOLT IMPELLER HUB IMPELLER SHAFT 1/4-20 x 2 SHOULDER / SHEAR BOLT WARNING: To avoid serious injury, never operate your snow thrower. 4. Align hole in auger hub with hole in impeller shaft and install two (2) new 1/4-20 x 1-5/8" capscrew/shear bolts. Remove belt cover. • Replace belt cover by installing cover and screws and tighten securely. Use only original equipment shear bolts as supplied with the deflector removed or damaged. • To change direction...
... spark plug wire to spark plug. 1/4-20 LOCKNUT 1/4-20 x 1-5/8 CAPSCREW / SHEAR BOLT IMPELLER HUB IMPELLER SHAFT 1/4-20 x 2 SHOULDER / SHEAR BOLT WARNING: To avoid serious injury, never operate your snow thrower. 4. Align hole in auger hub with hole in impeller shaft and install two (2) new 1/4-20 x 1-5/8" capscrew/shear bolts. Remove belt cover. • Replace belt cover by installing cover and screws and tighten securely. Use only original equipment shear bolts as supplied with the deflector removed or damaged. • To change direction...
User Manual
Page 17
... auger pulley only. 10. INSTALL BELT COVER and two (2) screws. Loosen locknut securing chute rotator head to mounting bracket only enough to allow chute rotator head to be raised and discharge chute to rejoin the auger housing and frame assembly, pull up any spilled gasoline. 2. See "TO REMOVE BELT COVER" in groove of pulley. 11. WARNING: As the last bolt is important that an assistant stand in the operating position holding the handles, remove...
... auger pulley only. 10. INSTALL BELT COVER and two (2) screws. Loosen locknut securing chute rotator head to mounting bracket only enough to allow chute rotator head to be raised and discharge chute to rejoin the auger housing and frame assembly, pull up any spilled gasoline. 2. See "TO REMOVE BELT COVER" in groove of pulley. 11. WARNING: As the last bolt is important that an assistant stand in the operating position holding the handles, remove...
User Manual
Page 18
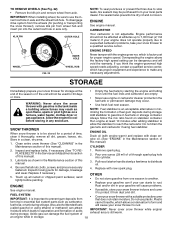
... the carburetor. If your engine does not operate properly due to suspected carburetor problems, take your snow thrower for storage at least 10 minutes after adding stabilizer to allow the stabilizer to form and fuel hose, or tank during storage. SNOW THROWER When snow thrower is not adjustable. ENGINE OIL Drain oil (with engine warm) and replace with new spark plug. To disengage drive system from the wheels (for pushing or transporting the snow thrower), remove klik pin from...
... the carburetor. If your engine does not operate properly due to suspected carburetor problems, take your snow thrower for storage at least 10 minutes after adding stabilizer to allow the stabilizer to form and fuel hose, or tank during storage. SNOW THROWER When snow thrower is not adjustable. ENGINE OIL Drain oil (with engine warm) and replace with new spark plug. To disengage drive system from the wheels (for pushing or transporting the snow thrower), remove klik pin from...
User Manual
Page 19
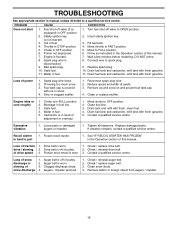
... around fuel tank cap. 4. Engine idles or runs roughly 1. Stale fuel. 4. Loose parts or damaged augers or impeller. 1. Recoil starter is off valve to OPEN position. 2. See "IF RECOIL STARTER HAS FROZEN" in fuel. 1. drive / slowing 2. Bad spark plug. 10. Turn fuel shut-off of this manual. Water in FULL position. 2. Replace damaged parts. If vibration remains, contact a qualified service centre. Auger belt is hard to FAST position. 5. Safety ignition key is disconnected. 9. Move throttle to pull 1. Drain tank and...
... around fuel tank cap. 4. Engine idles or runs roughly 1. Stale fuel. 4. Loose parts or damaged augers or impeller. 1. Recoil starter is off valve to OPEN position. 2. See "IF RECOIL STARTER HAS FROZEN" in fuel. 1. drive / slowing 2. Bad spark plug. 10. Turn fuel shut-off of this manual. Water in FULL position. 2. Replace damaged parts. If vibration remains, contact a qualified service centre. Auger belt is hard to FAST position. 5. Safety ignition key is disconnected. 9. Move throttle to pull 1. Drain tank and...
User Manual
Page 20
...not apply to you have any power equipment unit or attachment are belts, shear pins, normal wear, normal adjustments, standard hardware and normal maintenance. 6. This warranty does not apply to the applicable manufacturer's warranty on these items. 2. Transportation ...replacing parts, any products used for the movement of any unanswered questions concerning this Warranty, please contact: In Canada contact: Electrolux Canada Corp. 7075 Ordan Drive Mississauga, Ontario L5T 1K6 Electrolux Home Products, Inc. Outdoor Products Customer Service Dept. 250 Bobby Jones Expressway Augusta, GA...
...not apply to you have any power equipment unit or attachment are belts, shear pins, normal wear, normal adjustments, standard hardware and normal maintenance. 6. This warranty does not apply to the applicable manufacturer's warranty on these items. 2. Transportation ...replacing parts, any products used for the movement of any unanswered questions concerning this Warranty, please contact: In Canada contact: Electrolux Canada Corp. 7075 Ordan Drive Mississauga, Ontario L5T 1K6 Electrolux Home Products, Inc. Outdoor Products Customer Service Dept. 250 Bobby Jones Expressway Augusta, GA...


