

User Manual
Page 2
...II. Slopes are a major factor related to loss-of-control and • Never tamper with manufacturer's recommended parts, when necessary. • Mower blades are subject to protect themselves and others from serious injury. • Keep machine free of grass , leaves or other debris build-up and...or wear gloves, and use grass catcher on the machine before operating or storing the machine. SAFETY RULES SAFE OPERATION PRACTICES FOR RIDE-ON MOWERS IMPORTANT: THIS CUTTING MACHINE IS CAPABLE OF AMPUTATING HANDS AND FEET AND THROWING OBJECTS. If tires lose trac- • Read, understand,...
...II. Slopes are a major factor related to loss-of-control and • Never tamper with manufacturer's recommended parts, when necessary. • Mower blades are subject to protect themselves and others from serious injury. • Keep machine free of grass , leaves or other debris build-up and...or wear gloves, and use grass catcher on the machine before operating or storing the machine. SAFETY RULES SAFE OPERATION PRACTICES FOR RIDE-ON MOWERS IMPORTANT: THIS CUTTING MACHINE IS CAPABLE OF AMPUTATING HANDS AND FEET AND THROWING OBJECTS. If tires lose trac- • Read, understand,...

User Manual
Page 3
... emit chemicals known to cause cancer and birth defects or other reproductive harm. Wash hands after handling. 3 SAFETY RULES SAFE OPERATION PRACTICES FOR RIDE-ON MOWERS • Be sure the area is dangerous.
... emit chemicals known to cause cancer and birth defects or other reproductive harm. Wash hands after handling. 3 SAFETY RULES SAFE OPERATION PRACTICES FOR RIDE-ON MOWERS • Be sure the area is dangerous.

User Manual
Page 7
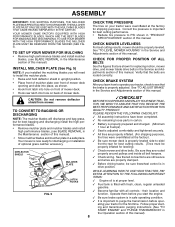
...gauge wheels before tightening adjustment knob. • Remove adjustment knob and flat washer loosely. Follow the appropriate instruction below to ensure optimum mower performance. • Slide gauge wheel bar down on top. NOTE: You may now roll or drive your tractor off skid. • Remove... clear of this manual). • Roll tractor forward off the skid. See "TO ADJUST GAUGE WHEELS" in proper position when operating mower. SEAT SEAT PAN 02466 FLAT WASHER SHOULDER BOLT ADJUSTMENT 02464 KNOB FIG. 3 TO DRIVE TRACTOR OFF SKID (See Operation section for assembly...
...gauge wheels before tightening adjustment knob. • Remove adjustment knob and flat washer loosely. Follow the appropriate instruction below to ensure optimum mower performance. • Slide gauge wheel bar down on top. NOTE: You may now roll or drive your tractor off skid. • Remove... clear of this manual). • Roll tractor forward off the skid. See "TO ADJUST GAUGE WHEELS" in proper position when operating mower. SEAT SEAT PAN 02466 FLAT WASHER SHOULDER BOLT ADJUSTMENT 02464 KNOB FIG. 3 TO DRIVE TRACTOR OFF SKID (See Operation section for assembly...
User Manual
Page 8
.... ✓ Before driving tractor, be sure freewheel control is properly adjusted. CAUTION: Do not remove deflector shield from mower. See "TO LEVEL MOWER HOUSING" in the Service and Adjustments section of this manual. See "TO ADJUST BRAKE" in the Service and Adjustments section of ...the belts are properly inflated. (For shipping purposes, the tires were overinflated at the factory for replacing motion, mower drive, and mower blade drive belts in the Operation section of this manual. Operate them before you will discharge and bag grass, but for the ...
.... ✓ Before driving tractor, be sure freewheel control is properly adjusted. CAUTION: Do not remove deflector shield from mower. See "TO LEVEL MOWER HOUSING" in the Service and Adjustments section of this manual. See "TO ADJUST BRAKE" in the Service and Adjustments section of ...the belts are properly inflated. (For shipping purposes, the tires were overinflated at the factory for replacing motion, mower drive, and mower blade drive belts in the Operation section of this manual. Operate them before you will discharge and bag grass, but for the ...

User Manual
Page 9
... OFF LIGHTS ON P ENGINE ON ENGINE START PARKING BRAKE PARKING BRAKE PARKING BRAKE LOCKED UNLOCKED OVER TEMP LIGHT FUEL OIL PRESSURE BATTERY REVERSE FORWARD MOWER HEIGHT 15 MOWER LIFT 15 ATTACHMENT ATTACHMENT CLUTCH ENGAGED CLUTCH DISENGAGED DANGER, KEEP HANDS AND FEET AWAY KEEP AREA CLEAR SLOPE HAZARDS (SEE SAFETY RULES SECTION) FREE...
... OFF LIGHTS ON P ENGINE ON ENGINE START PARKING BRAKE PARKING BRAKE PARKING BRAKE LOCKED UNLOCKED OVER TEMP LIGHT FUEL OIL PRESSURE BATTERY REVERSE FORWARD MOWER HEIGHT 15 MOWER LIFT 15 ATTACHMENT ATTACHMENT CLUTCH ENGAGED CLUTCH DISENGAGED DANGER, KEEP HANDS AND FEET AWAY KEEP AREA CLEAR SLOPE HAZARDS (SEE SAFETY RULES SECTION) FREE...

User Manual
Page 10
Used to engage the mower blades, or other attachments mounted to your tractor. LIGHT SWITCH POSITION - Used when starting the engine. Disengages transmission for starting and stopping the engine. ATTACHMENT ... the safety standards of tractor. ATTACHMENT CLUTCH SWITCH - Turns the headlights on. Used to adjust the mower cutting height. CHOKE CONTROL - HEIGHT ADJUSTMENT KNOB - Used to control engine speed. Used to raise and lower the mower deck or other attachments mounted to your tractor to release attachment lift lever when changing its...
Used to engage the mower blades, or other attachments mounted to your tractor. LIGHT SWITCH POSITION - Used when starting the engine. Disengages transmission for starting and stopping the engine. ATTACHMENT ... the safety standards of tractor. ATTACHMENT CLUTCH SWITCH - Turns the headlights on. Used to adjust the mower cutting height. CHOKE CONTROL - HEIGHT ADJUSTMENT KNOB - Used to control engine speed. Used to raise and lower the mower deck or other attachments mounted to your tractor to release attachment lift lever when changing its...

User Manual
Page 11
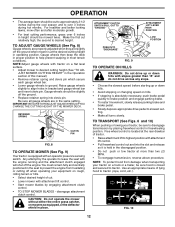
...or transporting on relatively smooth, straight surfaces. to "DISENGAGED" position. FIG. 7 SYSTEM CHARACTERISTICS STOPPING (See Fig. 7) MOWER BLADES - • To stop mower blades,move attachment clutch switch to empty grass catcher, etc. NOTE: Failure to move cruise control lever forward to disengage....,as trimming at less than full throttle reduces the battery charging rate. • Full throttle offers the best bagging and mower perfor- TO MOVE FORWARD AND BACKWARD The direction and speed of grass being mowed. IMPORTANT: LEAVING THE IGNITION SWITCH IN ANY...
...or transporting on relatively smooth, straight surfaces. to "DISENGAGED" position. FIG. 7 SYSTEM CHARACTERISTICS STOPPING (See Fig. 7) MOWER BLADES - • To stop mower blades,move attachment clutch switch to empty grass catcher, etc. NOTE: Failure to move cruise control lever forward to disengage....,as trimming at less than full throttle reduces the battery charging rate. • Full throttle offers the best bagging and mower perfor- TO MOVE FORWARD AND BACKWARD The direction and speed of grass being mowed. IMPORTANT: LEAVING THE IGNITION SWITCH IN ANY...
User Manual
Page 12
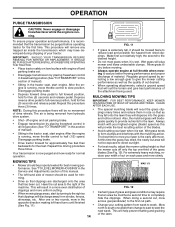
... cord, etc.). 02219 FIG. 10 12 Be sure all turns slowly. IMPORTANT:BE SURETO READJUST GAUGEWHEELS IFYOU CHANGE THE CUTTING HEIGHT OF THE MOWER DECK. disengage attachment clutch control. TO TRANSPORT (See Figs. 6 and 10) When pushing or towing your tractor, be sure to disengage ...two (2) MPH. • To reengage transmission, reverse above procedure. Make the first cut relatively high; CAUTION: Do not operate the mower without either the entire grass catcher, on a flat the desired cutting height in operating position. the second to highest position with an ...
... cord, etc.). 02219 FIG. 10 12 Be sure all turns slowly. IMPORTANT:BE SURETO READJUST GAUGEWHEELS IFYOU CHANGE THE CUTTING HEIGHT OF THE MOWER DECK. disengage attachment clutch control. TO TRANSPORT (See Figs. 6 and 10) When pushing or towing your tractor, be sure to disengage ...two (2) MPH. • To reengage transmission, reverse above procedure. Make the first cut relatively high; CAUTION: Do not operate the mower without either the entire grass catcher, on a flat the desired cutting height in operating position. the second to highest position with an ...
User Manual
Page 14
... so that clippings are discharged onto the area that will result in the opposite direction making left hand side of cut . This will plug mower and leave undesirable clumps. ning. NOTE: During this procedure three (3) times. Disengage parking brake. • Drive tractor forward for approximately &#... drive pedal to assure better mowing performance and proper discharge of the grass blades (See Fig. 12). The air is recommended that the mower cuts off engine and set . • Disengage transmission by selecting a low enough gear to give best performance of drive wheels. off ...
... so that clippings are discharged onto the area that will result in the opposite direction making left hand side of cut . This will plug mower and leave undesirable clumps. ning. NOTE: During this procedure three (3) times. Disengage parking brake. • Drive tractor forward for approximately &#... drive pedal to assure better mowing performance and proper discharge of the grass blades (See Fig. 12). The air is recommended that the mower cuts off engine and set . • Disengage transmission by selecting a low enough gear to give best performance of drive wheels. off ...

User Manual
Page 15
... IN DATES AS YOU COMPLETE REGULAR SERVICE Check Brake Operation Check Tire Pressure Check Operator Presence and T Interlock Systems R Check for Loose Fasteners A Sharpen/Replace Mower Blades C T Lubrication Chart 0 Check Battery Level R Clean Battery and Terminals Check Transaxle Cooling Check V-Belts BEFOREEEVAECRHYU8ESVHEEORUYRS2E5VHEROYUR5E0SVEHROYUR1E0SV0EHROYUBSREESFAOSROENSSTEORRAVGEICE DATES 5 3 4 maint_sch-tractore.new1 Check Engine Oil Level Change...
... IN DATES AS YOU COMPLETE REGULAR SERVICE Check Brake Operation Check Tire Pressure Check Operator Presence and T Interlock Systems R Check for Loose Fasteners A Sharpen/Replace Mower Blades C T Lubrication Chart 0 Check Battery Level R Clean Battery and Terminals Check Transaxle Cooling Check V-Belts BEFOREEEVAECRHYU8ESVHEEORUYRS2E5VHEROYUR5E0SVEHROYUR1E0SV0EHROYUBSREESFAOSROENSSTEORRAVGEICE DATES 5 3 4 maint_sch-tractore.new1 Check Engine Oil Level Change...
User Manual
Page 16
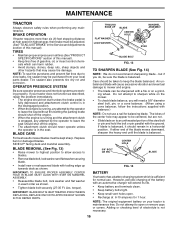
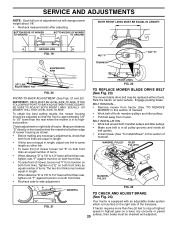
...BATTERY Your tractor has a battery charging system which can be purchased from your local parts dealer. BLADE REMOVAL (See Fig. 13) • Raise mower to highest position to allow access to blades. • Remove blade bolt, lock washer and flat washer securing blade. • Install new ... HEAT TREATED. If blade is sufficient for balancing blade. NOTE: The original equipment battery on a grind- BLADE CARE For best results mower blades must be adjusted. (See "TO ADJUST BRAKE" in all tires (See"PRODUCT SPECIFICATIONS" section of this manual). SIDE UP" facing deck...
...BATTERY Your tractor has a battery charging system which can be purchased from your local parts dealer. BLADE REMOVAL (See Fig. 13) • Raise mower to highest position to allow access to blades. • Remove blade bolt, lock washer and flat washer securing blade. • Install new ... HEAT TREATED. If blade is sufficient for balancing blade. NOTE: The original equipment battery on a grind- BLADE CARE For best results mower blades must be adjusted. (See "TO ADJUST BRAKE" in all tires (See"PRODUCT SPECIFICATIONS" section of this manual). SIDE UP" facing deck...
User Manual
Page 18
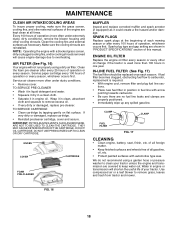
...;rst. tions. • Place new fuel filter in position in clean, absorbent cloth and squeeze to remove grass, leaves and trash from tractor and mower.
...;rst. tions. • Place new fuel filter in position in clean, absorbent cloth and squeeze to remove grass, leaves and trash from tractor and mower.
User Manual
Page 19
... • Place attachment clutch switch in "DISENGAGED" position. • Move attachment lift lever forward to lower mower to its lowest position. • Connect front links to mower deck and secure with retainer springs.. • Connect suspension arms to rear deck brackets and secure with retainer ... "PRODUCT SPECIFICATIONS" section of this manual). Distance "A" on that side. TRACTOR TO REMOVE MOWER (See Fig. 18) Mower will not properly adjust your mower. IMPORTANT: If an attachment other than the mower deck is to be the same or within 1/4" of each other. • If adjustment...
... • Place attachment clutch switch in "DISENGAGED" position. • Move attachment lift lever forward to lower mower to its lowest position. • Connect front links to mower deck and secure with retainer springs.. • Connect suspension arms to rear deck brackets and secure with retainer ... "PRODUCT SPECIFICATIONS" section of this manual). Distance "A" on that side. TRACTOR TO REMOVE MOWER (See Fig. 18) Mower will not properly adjust your mower. IMPORTANT: If an attachment other than the mower deck is to be the same or within 1/4" of each other. • If adjustment...
User Manual
Page 20
... (See Fig. 24) Your tractor is equipped with an adjustable brake system which is 1/8" to same length as other link. • To lower front of mower loosen nut "E" on both front links an equal number of manual). IF THE FOLLOWING FRONT-TO-BACK ADJUSTMENT IS NECESSARY, BE SURE TO ADJUST BOTH... FRONT LINKS EQUALLY SO MOWER WILL STAY LEVEL SIDE-TO-SIDE. If tractor requires more than five (5) feet to stop at front than rear, tighten nut "F" against trunnion on...
... (See Fig. 24) Your tractor is equipped with an adjustable brake system which is 1/8" to same length as other link. • To lower front of mower loosen nut "E" on both front links an equal number of manual). IF THE FOLLOWING FRONT-TO-BACK ADJUSTMENT IS NECESSARY, BE SURE TO ADJUST BOTH... FRONT LINKS EQUALLY SO MOWER WILL STAY LEVEL SIDE-TO-SIDE. If tractor requires more than five (5) feet to stop at front than rear, tighten nut "F" against trunnion on...

User Manual
Page 21
...8226; Reconnect clutch harness. • Make sure belt is in all pulley grooves and inside all belt guides and keepers. • Install mower (See "TO INSTALL MOWER" in this section of tractor. BELT REMOVAL - Pull freewheel control out and into the center span keeper. • Pull belt toward ... are positioned straight forward, remove steering wheel and reassemble per instructions in the Assembly section of this manual. • Remove mower (See "TO REMOVE MOWER" in this manual. TO ADJUST STEERING WHEEL ALIGNMENT Park the tractor on brake rod. • If distance is necessary.
...8226; Reconnect clutch harness. • Make sure belt is in all pulley grooves and inside all belt guides and keepers. • Install mower (See "TO INSTALL MOWER" in this section of tractor. BELT REMOVAL - Pull freewheel control out and into the center span keeper. • Pull belt toward ... are positioned straight forward, remove steering wheel and reassemble per instructions in the Assembly section of this manual. • Remove mower (See "TO REMOVE MOWER" in this manual. TO ADJUST STEERING WHEEL ALIGNMENT Park the tractor on brake rod. • If distance is necessary.
User Manual
Page 24
... another. • Replace your gasoline can if your can starts to rust. Allow the engine to cool before painting. TRACTOR Remove mower from one ounce of this manual). When mower is removed from dust and dirt. • Cover your tractor with new spark plug(s). nance section of oil through spark plug hole...
... another. • Replace your gasoline can if your can starts to rust. Allow the engine to cool before painting. TRACTOR Remove mower from one ounce of this manual). When mower is removed from dust and dirt. • Cover your tractor with new spark plug(s). nance section of oil through spark plug hole...

User Manual
Page 25
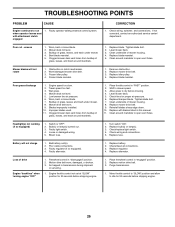
...;er. 13. See "To Adjust Carburetor" in fuel. 8. Replace blade. Water in Service Adjustments section. 15. Engine valves out of mower housing. 4. Replace fuel filter. 7. See "To Adjust Carburetor" in Service Adjustments section. 8. Bad spark plug. 3. See "To... clean gasoline. 6. Recharge or replace battery. 4. Contact an authorized service center/department. Carburetor out of grass, leaves and trash under mower. 4. Check all wiring. 14. Loose or damaged wiring. 9. CORRECTION 1. Contact an authorized service center/department. Contact an authorized service...
...;er. 13. See "To Adjust Carburetor" in fuel. 8. Replace blade. Water in Service Adjustments section. 15. Engine valves out of mower housing. 4. Replace fuel filter. 7. See "To Adjust Carburetor" in Service Adjustments section. 8. Bad spark plug. 3. See "To... clean gasoline. 6. Recharge or replace battery. 4. Contact an authorized service center/department. Carburetor out of grass, leaves and trash under mower. 4. Check all wiring. 14. Loose or damaged wiring. 9. CORRECTION 1. Contact an authorized service center/department. Contact an authorized service...
User Manual
Page 26
...obstruction. 2. Wet grass. 4. Buildup of grass, leaves, and trash around mandrels. 1. Place throttle control in clutch mechanism. 2. Level mower deck. 5. Tighten blade bolt. 7. Switch is "OFF". 2. Loss of grass, leaves, and trash around mandrels. 1. Faulty operator-...;res" when turning engine "OFF" 1. Low/uneven tire air pressure. 6. Replace motion drive belt. 3. Purge transmission. 1. Level mower deck. 3. Worn, bent or loose blade. 2. Replace with attachment clutch engaged 1. Frozen idler pulley. 4. Headlight(s) not working (...
...obstruction. 2. Wet grass. 4. Buildup of grass, leaves, and trash around mandrels. 1. Place throttle control in clutch mechanism. 2. Level mower deck. 5. Tighten blade bolt. 7. Switch is "OFF". 2. Loss of grass, leaves, and trash around mandrels. 1. Faulty operator-...;res" when turning engine "OFF" 1. Low/uneven tire air pressure. 6. Replace motion drive belt. 3. Purge transmission. 1. Level mower deck. 3. Worn, bent or loose blade. 2. Replace with attachment clutch engaged 1. Frozen idler pulley. 4. Headlight(s) not working (...

User Manual
Page 31
NO. Pivot Mower Rear 54 161464 Screw Hex Wshd 8-18 x 7/8 58 175351 Duct Hood 59 177579 Bushing Snap 60 72140606 Bolt RdHd Sqnk 3/8-16 Unc x 3/4 64 174997 Dash ... 179761 Light Box Asm W/Lens 30 175692X428 Fender 31 139976 Bracket Fender 37 17490508 Screw Thdrol 6/16-18 x 1/2 TYT 38 175710 Bracket, Asm. MODEL NUMBER PR20PH42STD, PRODUCT NO. 954 56 78-33 CHASSIS AND ENCLOSURES KEY PART NO.
NO. Pivot Mower Rear 54 161464 Screw Hex Wshd 8-18 x 7/8 58 175351 Duct Hood 59 177579 Bushing Snap 60 72140606 Bolt RdHd Sqnk 3/8-16 Unc x 3/4 64 174997 Dash ... 179761 Light Box Asm W/Lens 30 175692X428 Fender 31 139976 Bracket Fender 37 17490508 Screw Thdrol 6/16-18 x 1/2 TYT 38 175710 Bracket, Asm. MODEL NUMBER PR20PH42STD, PRODUCT NO. 954 56 78-33 CHASSIS AND ENCLOSURES KEY PART NO.

User Manual
Page 39
... x 1 00 - - 144334 Sealant, Tire ( 10 oz. inches 1 inch = 25.4 mm wheel_1 39 Tube) NOTE: All component dimensions given in U.S. REPAIR PARTS TRACTOR - NO. MODEL NUMBER PR20PH42STD, PRODUCT NO. 954 56 78-33 DECALS 11 2 12 16 4 4 3 13 10 2 9 1 8 15 20 6 5 14 KEY PART NO. NO. NO. 1 164095 2 176303 3 176273 4 177020 5 170851... Dash Decal Fender Auto Decal Hood LH Decal Side Panel Decal HP Engine Decal Reflector Rh Decal Reflector Lh Decal Warning Mower Decal Fender Logo Decal Fender Danger E/F Decal Ins Strg Whl 7 KEY PART NO.
... x 1 00 - - 144334 Sealant, Tire ( 10 oz. inches 1 inch = 25.4 mm wheel_1 39 Tube) NOTE: All component dimensions given in U.S. REPAIR PARTS TRACTOR - NO. MODEL NUMBER PR20PH42STD, PRODUCT NO. 954 56 78-33 DECALS 11 2 12 16 4 4 3 13 10 2 9 1 8 15 20 6 5 14 KEY PART NO. NO. NO. 1 164095 2 176303 3 176273 4 177020 5 170851... Dash Decal Fender Auto Decal Hood LH Decal Side Panel Decal HP Engine Decal Reflector Rh Decal Reflector Lh Decal Warning Mower Decal Fender Logo Decal Fender Danger E/F Decal Ins Strg Whl 7 KEY PART NO.


