

User Manual
Page 2
... the engine running. SLOPE OPERATION • Keep nuts and bolts, especially blade attachment bolts, tight and keep equipment in severe injury or death. Check their ability to operate the riding mower safely enough to the machine and the mowing activity. Repair, if necessary, before turning. • Never leave a running . Uneven terrain could suddenly turn slowly and gradually downhill, if possible. Frequently check components and replace with grass catchers or...
... the engine running. SLOPE OPERATION • Keep nuts and bolts, especially blade attachment bolts, tight and keep equipment in severe injury or death. Check their ability to operate the riding mower safely enough to the machine and the mowing activity. Repair, if necessary, before turning. • Never leave a running . Uneven terrain could suddenly turn slowly and gradually downhill, if possible. Frequently check components and replace with grass catchers or...
User Manual
Page 4
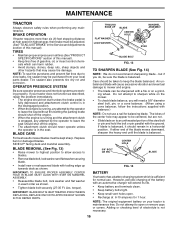
... above 32°F) SAE 5W-30(below 32°F) Oil Capacity: Spark Plug: (Gap: .040") Ground Speed(MPH): W/ Filter: 4.0 Pints W/O Filter: 3.75 Pints Champion RC12YC Forward: Reverse: 0 - 5.5 0 - 2.4 Tire Pressure: Front: Rear: 14 PSI 10 PSI Charging System: Battery: Blade Bolt Torque: 16 AMPS @ 3600 RPM AMP/HR: MIN. PRODUCT SPECIFICATIONS Gasoline Capacity and Type: 3.5 Gallons Unleaded Regular Oil Type(API-SF-SJ): SAE 30 (above is available through...
... above 32°F) SAE 5W-30(below 32°F) Oil Capacity: Spark Plug: (Gap: .040") Ground Speed(MPH): W/ Filter: 4.0 Pints W/O Filter: 3.75 Pints Champion RC12YC Forward: Reverse: 0 - 5.5 0 - 2.4 Tire Pressure: Front: Rear: 14 PSI 10 PSI Charging System: Battery: Blade Bolt Torque: 16 AMPS @ 3600 RPM AMP/HR: MIN. PRODUCT SPECIFICATIONS Gasoline Capacity and Type: 3.5 Gallons Unleaded Regular Oil Type(API-SF-SJ): SAE 30 (above is available through...

User Manual
Page 7
...; Check engine oil level and fill fuel tank with the instructions that gauge wheel bar aligning holes are on seat in operating position, depress brake pedal and set the parking brake. • Place motion control lever in neutral (N) position. • Press lift lever plunger and raise attachment lift lever to its highest position. • Start the engine.After engine has started, move throttle control to idle position. • Release parking brake. • Slowly move the motion control lever forward and slowly drive tractor off...
...; Check engine oil level and fill fuel tank with the instructions that gauge wheel bar aligning holes are on seat in operating position, depress brake pedal and set the parking brake. • Place motion control lever in neutral (N) position. • Press lift lever plunger and raise attachment lift lever to its highest position. • Start the engine.After engine has started, move throttle control to idle position. • Release parking brake. • Slowly move the motion control lever forward and slowly drive tractor off...
User Manual
Page 8
... Service and Adjustments section of this manual). INSTALL MULCHER PLATE (See Fig. 5) NOTE: If you installed the mulching blades you start the engine. ✓ Be sure brake system is now ready for the first time. Operate them before you will discharge and bag grass, but for replacing motion, mower drive, and mower blade drive belts in drive position. Your mower is in the Maintenance section of mower deck. Follow proper starting and transmission purging instructions (See "TO START ENGINE...
... Service and Adjustments section of this manual). INSTALL MULCHER PLATE (See Fig. 5) NOTE: If you installed the mulching blades you start the engine. ✓ Be sure brake system is now ready for the first time. Operate them before you will discharge and bag grass, but for replacing motion, mower drive, and mower blade drive belts in drive position. Your mower is in the Maintenance section of mower deck. Follow proper starting and transmission purging instructions (See "TO START ENGINE...

User Manual
Page 10
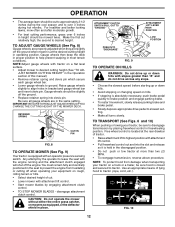
... ADJUSTMENT KNOB FREEWHEEL CONTROL REVERSE DRIVE PEDAL FORWARD DRIVE PEDAL PARKING BRAKE CRUISE CONTROL LEVER FIG. 6 02636 Our tractors conform to the safety standards of tractor. Used to engage the mower blades, or other attachments mounted to adjust the mower cutting height. CHOKE CONTROL - Disengages transmission for reverse movement of various controls and adjustments. IGNITION SWITCH - REVERSE DRIVE PEDAL - BRAKE PEDAL - PARKING BRAKE - Locks clutch/brake pedal into the brake position. Save this manual for starting and stopping the engine. ATTACHMENT CLUTCH...
... ADJUSTMENT KNOB FREEWHEEL CONTROL REVERSE DRIVE PEDAL FORWARD DRIVE PEDAL PARKING BRAKE CRUISE CONTROL LEVER FIG. 6 02636 Our tractors conform to the safety standards of tractor. Used to engage the mower blades, or other attachments mounted to adjust the mower cutting height. CHOKE CONTROL - Disengages transmission for reverse movement of various controls and adjustments. IGNITION SWITCH - REVERSE DRIVE PEDAL - BRAKE PEDAL - PARKING BRAKE - Locks clutch/brake pedal into the brake position. Save this manual for starting and stopping the engine. ATTACHMENT CLUTCH...
User Manual
Page 12
... control. • Start mower blades by engaging attachment clutch control. • TO STOP MOWER BLADES - TO ADJUST GAUGE WHEELS (See Fig. 8) Gauge wheels are properly adjusted when they are in operating position. For healthier and better looking lawns, mow often and after moderate growth. • For best cutting performance, grass over 3 inches during the cool season and to tractor (rope, cord, etc.). 02219 FIG. 10 12 ATTACHMENT CLUTCH SWITCH PULL OUT TO "ENGAGE" PUSH IN TO "DISENGAGE" ATTACHMENT LIFT LEVER HIGH POSITION...
... control. • Start mower blades by engaging attachment clutch control. • TO STOP MOWER BLADES - TO ADJUST GAUGE WHEELS (See Fig. 8) Gauge wheels are properly adjusted when they are in operating position. For healthier and better looking lawns, mow often and after moderate growth. • For best cutting performance, grass over 3 inches during the cool season and to tractor (rope, cord, etc.). 02219 FIG. 10 12 ATTACHMENT CLUTCH SWITCH PULL OUT TO "ENGAGE" PUSH IN TO "DISENGAGE" ATTACHMENT LIFT LEVER HIGH POSITION...

User Manual
Page 13
...; When engine starts, slowly push choke control in operating position, depress brake pedal and set parking brake. • Move attachment clutch to "DISENGAGED" position. • Move throttle control to run smoothly. Continue to push the choke control in slowly. Use common sense when towing. Do not over fill. • For cold weather operation you to separation and formation of your tractor. Use fresh fuel next season. Do not run roughly, pull the choke control out...
...; When engine starts, slowly push choke control in operating position, depress brake pedal and set parking brake. • Move attachment clutch to "DISENGAGED" position. • Move throttle control to run smoothly. Continue to push the choke control in slowly. Use common sense when towing. Do not over fill. • For cold weather operation you to separation and formation of your tractor. Use fresh fuel next season. Do not run roughly, pull the choke control out...
User Manual
Page 14
... the engine is running , move throttle control to half (1/2) speed. Regulate ground speed by turning to the right of the lawn. CLEAN AFTER EACH USE. • The special mulching blade will recut the grass clippings many times and reduce them in a more even distribution of clippings and more uniform cutting. • When mowing large areas, start engine. MOWING TIPS • Mower should be used . Change your lawn when it is run-
... the engine is running , move throttle control to half (1/2) speed. Regulate ground speed by turning to the right of the lawn. CLEAN AFTER EACH USE. • The special mulching blade will recut the grass clippings many times and reduce them in a more even distribution of clippings and more uniform cutting. • When mowing large areas, start engine. MOWING TIPS • Mower should be used . Change your lawn when it is run-

User Manual
Page 15
... SCHEDULE FILL IN DATES AS YOU COMPLETE REGULAR SERVICE Check Brake Operation Check Tire Pressure Check Operator Presence and T Interlock Systems R Check for Loose Fasteners A Sharpen/Replace Mower Blades C T Lubrication Chart 0 Check Battery Level R Clean Battery and Terminals Check Transaxle Cooling Check V-Belts BEFOREEEVAECRHYU8ESVHEEORUYRS2E5VHEROYUR5E0SVEHROYUR1E0SV0EHROYUBSREESFAOSROENSSTEORRAVGEICE DATES 5 3 4 maint_sch-tractore.new1 Check Engine Oil Level Change Engine Oil (with maintenance-free battery. 5 - VISCOUS LUBRICANTS WILL ATTRACT DUST AND DIRT THAT...
... SCHEDULE FILL IN DATES AS YOU COMPLETE REGULAR SERVICE Check Brake Operation Check Tire Pressure Check Operator Presence and T Interlock Systems R Check for Loose Fasteners A Sharpen/Replace Mower Blades C T Lubrication Chart 0 Check Battery Level R Clean Battery and Terminals Check Transaxle Cooling Check V-Belts BEFOREEEVAECRHYU8ESVHEEORUYRS2E5VHEROYUR5E0SVEHROYUR1E0SV0EHROYUBSREESFAOSROENSSTEORRAVGEICE DATES 5 3 4 maint_sch-tractore.new1 Check Engine Oil Level Change Engine Oil (with maintenance-free battery. 5 - VISCOUS LUBRICANTS WILL ATTRACT DUST AND DIRT THAT...
User Manual
Page 16
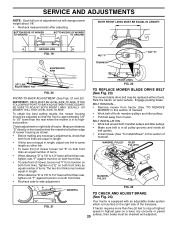
... proper air pressure in the Service and Adjustments section of this manual). • Keep tires free of electrolyte is sufficient for normal use a nail for 1 hour. Lbs. IF BOLT NEEDS REPLACING, REPLACE ONLY WITH APPROVE BOLT SHOWN IN THE REPAIR PARTS. The lobes of the blade moves downward, sharpen the heavy end until the blade is balanced. 5/8" BOLT OR PIN CENTER HOLE BLADE FIG. 14 BATTERY Your tractor has a battery...
... proper air pressure in the Service and Adjustments section of this manual). • Keep tires free of electrolyte is sufficient for normal use a nail for 1 hour. Lbs. IF BOLT NEEDS REPLACING, REPLACE ONLY WITH APPROVE BOLT SHOWN IN THE REPAIR PARTS. The lobes of the blade moves downward, sharpen the heavy end until the blade is balanced. 5/8" BOLT OR PIN CENTER HOLE BLADE FIG. 14 BATTERY Your tractor has a battery...

User Manual
Page 17
...; Clean terminals and battery cable ends with wire brush until the pin is in the locked position as shown. • Remove the drain tube and replace the cap onto to the bottom fitting of this manual. • Use gauge on oil fill cap/dipstick for checking level. TO CHANGE ENGINE OIL (See Fig. 15) Determine temperature range expected before starting in the SERVICE AND ADJUSTMENTS section of the drain valve. • Refill engine with oil...
...; Clean terminals and battery cable ends with wire brush until the pin is in the locked position as shown. • Remove the drain tube and replace the cap onto to the bottom fitting of this manual. • Use gauge on oil fill cap/dipstick for checking level. TO CHANGE ENGINE OIL (See Fig. 15) Determine temperature range expected before starting in the SERVICE AND ADJUSTMENTS section of the drain valve. • Refill engine with oil...
User Manual
Page 18
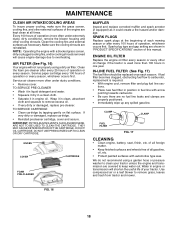
... from tractor and mower. Service air cleaner more often under extremely dusty, dirty conditions), remove the blower housing and other oil change if the tractor is required. • With engine cool, remove filter and plug fuel line sec- DO NOT OIL CARTRIDGE. SPARK PLUGS Replace spark plugs at surface. If very dirty or damaged, replace cartridge. • Reinstall precleaner cartridge, cover and secure. DO NOT USE PRESSURIZED AIR TO CLEAN OR DRY CARTRIDGE. Use compressed air or a leaf blower to...
... from tractor and mower. Service air cleaner more often under extremely dusty, dirty conditions), remove the blower housing and other oil change if the tractor is required. • With engine cool, remove filter and plug fuel line sec- DO NOT OIL CARTRIDGE. SPARK PLUGS Replace spark plugs at surface. If very dirty or damaged, replace cartridge. • Reinstall precleaner cartridge, cover and secure. DO NOT USE PRESSURIZED AIR TO CLEAN OR DRY CARTRIDGE. Use compressed air or a leaf blower to...
User Manual
Page 19
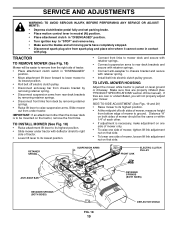
... side of mower to ground. RETAINER SPRING SUSPENSION ARMS FRONT LINK ELECTRIC CLUTCH PULLEY ANTI-SWAY BAR RETAINER SPRINGS (BOTH SIDES) 01698 FIG. 18 19 RETAINER SPRINGS (BOTH SIDES) DEFLECTOR SHIELD SERVICE AND ADJUSTMENTS WARNING: TO AVOID SERIOUS INJURY, BEFORE PERFORMING ANY SERVICE OR ADJUSTMENTS: • Depress clutch/brake pedal fully and set parking brake. • Place motion control lever in neutral (N) position. • Place attachment clutch in "DISENGAGED" position. • Turn ignition key...
... side of mower to ground. RETAINER SPRING SUSPENSION ARMS FRONT LINK ELECTRIC CLUTCH PULLEY ANTI-SWAY BAR RETAINER SPRINGS (BOTH SIDES) 01698 FIG. 18 19 RETAINER SPRINGS (BOTH SIDES) DEFLECTOR SHIELD SERVICE AND ADJUSTMENTS WARNING: TO AVOID SERIOUS INJURY, BEFORE PERFORMING ANY SERVICE OR ADJUSTMENTS: • Depress clutch/brake pedal fully and set parking brake. • Place motion control lever in neutral (N) position. • Place attachment clutch in "DISENGAGED" position. • Turn ignition key...
User Manual
Page 20
... belt around both front links an equal number of tractor. SERVICE AND ADJUSTMENTS NOTE: Each full turn of manual). If tractor requires more than the rear when the mower is in all pulley grooves and inside all belt guides. • Install mower (See "To Install Mower" in this section of adjustment nut will change mower height about 1/8". • Recheck measurements after adjusting. To obtain the best cutting results, the mower housing should be replaced without tools...
... belt around both front links an equal number of tractor. SERVICE AND ADJUSTMENTS NOTE: Each full turn of manual). If tractor requires more than the rear when the mower is in all pulley grooves and inside all belt guides. • Install mower (See "To Install Mower" in this section of adjustment nut will change mower height about 1/8". • Recheck measurements after adjusting. To obtain the best cutting results, the mower housing should be replaced without tools...

User Manual
Page 21
... camber are not adjustable on your tractor. BELT REMOVAL - NOTE: Observe entire motion drive belt and position of left to affect the front wheel toe-in "transmission engaged" position. • Road test tractor for service or replacement, it is held in highest gear, further maintenance is other than five (5) feet in the disengaged position. ELECTRIC CLUTCH CLUTCH LOCATOR CLUTCHING IDLER STATIONARY IDLER JAM NUT CENTER SPAN KEEPER TRANSMISSION INPUT PULLEY CLUTCH WIRE HARNESS OPERATING ARM 01511...
... camber are not adjustable on your tractor. BELT REMOVAL - NOTE: Observe entire motion drive belt and position of left to affect the front wheel toe-in "transmission engaged" position. • Road test tractor for service or replacement, it is held in highest gear, further maintenance is other than five (5) feet in the disengaged position. ELECTRIC CLUTCH CLUTCH LOCATOR CLUTCHING IDLER STATIONARY IDLER JAM NUT CENTER SPAN KEEPER TRANSMISSION INPUT PULLEY CLUTCH WIRE HARNESS OPERATING ARM 01511...
User Manual
Page 23
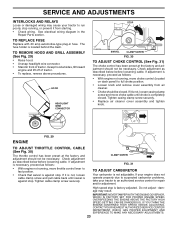
... throttle control lever to full choke position. • Loosen knob and remove cover assembly from starting. • Check wiring. If adjustment is necessary, proceed as described below before loosening cable. If it is not, loosen cable clamp screw and pull cable back until choke is completely closed . IMPORTANT: NEVERTAMPER WITHTHE ENGINE GOVERNOR, WHICH IS FACTORY SET FOR PROPER ENGINE SPEED. SERVICE AND ADJUSTMENTS INTERLOCKS AND RELAYS Loose or damaged wiring may result. See electrical wiring diagram in front of tractor...
... throttle control lever to full choke position. • Loosen knob and remove cover assembly from starting. • Check wiring. If adjustment is necessary, proceed as described below before loosening cable. If it is not, loosen cable clamp screw and pull cable back until choke is completely closed . IMPORTANT: NEVERTAMPER WITHTHE ENGINE GOVERNOR, WHICH IS FACTORY SET FOR PROPER ENGINE SPEED. SERVICE AND ADJUSTMENTS INTERLOCKS AND RELAYS Loose or damaged wiring may result. See electrical wiring diagram in front of tractor...
User Manual
Page 24
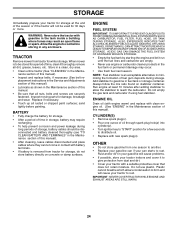
... cover that all nuts, bolts and screws are empty. • Never use plastic. Rust and/or dirt in your gasoline will cause problems. • If possible, store your tractor for a period of oil through spark plug hole(s) into cylinder(s). • Turn ignition key to "START" position for 30 days or more. Allow the engine to be disconnected and battery cleaned thoroughly (see "TO CLEAN BATTERY AND TERMINALS" in the Maintenance...
... cover that all nuts, bolts and screws are empty. • Never use plastic. Rust and/or dirt in your gasoline will cause problems. • If possible, store your tractor for a period of oil through spark plug hole(s) into cylinder(s). • Turn ignition key to "START" position for 30 days or more. Allow the engine to be disconnected and battery cleaned thoroughly (see "TO CLEAN BATTERY AND TERMINALS" in the Maintenance...

User Manual
Page 25
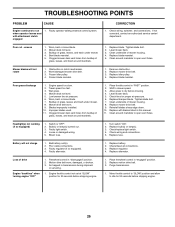
... in "CHOKE" position. 3. Spark plug wire loose. 11. Loose or damaged wiring. 14. Engine valves out of adjustment. 10. Check oil level/change spark plug. 7. Clean/replace muffler. 13. Tighten loose part(s). Bad spark plug. 5. Hard to start 1. Dirty air filter. 2. Stale or dirty fuel. 6. Loose or damaged wiring. 7. Brake pedal not depressed. 2. Faulty ignition switch. 8. Check/replace solenoid or starter. 9. Clean battery terminals. 3. Dirty/clogged muffler. 13. Raise cutting height/reduce speed. 2. Clean underside of power...
... in "CHOKE" position. 3. Spark plug wire loose. 11. Loose or damaged wiring. 14. Engine valves out of adjustment. 10. Check oil level/change spark plug. 7. Clean/replace muffler. 13. Tighten loose part(s). Bad spark plug. 5. Hard to start 1. Dirty air filter. 2. Stale or dirty fuel. 6. Loose or damaged wiring. 7. Brake pedal not depressed. 2. Faulty ignition switch. 8. Check/replace solenoid or starter. 9. Clean battery terminals. 3. Dirty/clogged muffler. 13. Raise cutting height/reduce speed. 2. Clean underside of power...
User Manual
Page 26
...transmission during shipment or servicing. 1. TROUBLESHOOTING POINTS PROBLEM CAUSE Engine continues to run when operator leaves seat with blades listed in this manual. 11. If not corrected, contact an authorized service center/ department. Replace blade mandrel. 5. Remove obstruction. 2. Engine speed too slow. 2. Improper blades used. 11. Replace mower drive belt. 9. Faulty light switch. 4. Turn switch "ON". 2. Faulty alternator. 1. Worn, bent or loose blade. 2. Travel speed too fast. 3. Tighten blade bolt. 7. Check/clean all connections. 3. Mower deck not level...
...transmission during shipment or servicing. 1. TROUBLESHOOTING POINTS PROBLEM CAUSE Engine continues to run when operator leaves seat with blades listed in this manual. 11. If not corrected, contact an authorized service center/ department. Replace blade mandrel. 5. Remove obstruction. 2. Engine speed too slow. 2. Improper blades used. 11. Replace mower drive belt. 9. Faulty light switch. 4. Turn switch "ON". 2. Faulty alternator. 1. Worn, bent or loose blade. 2. Travel speed too fast. 3. Tighten blade bolt. 7. Check/clean all connections. 3. Mower deck not level...
User Manual
Page 43
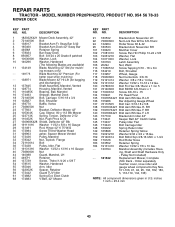
... Whl Ga. ing, Shaft and Shaft Hardware Only - REPAIR PARTS TRACTOR - NO. ing mowers only) - - 139775 Blade Mulching 42" Premium (For better wear when mulching) - - 138971 Blade Mower 42" Hi-Lift (for mulch- R.LH 136 155986 Bar Adjusting Gauge Wheel 137 72110505 Bolt Carr. 5/16-18 x 5/8 138 159763X421 Brkt Asm Whl Ga. LH 143 157109 Bracket Arm Idler 42" 144 173441 Keeper Belt 42" Clutch Cable 145 173437 Pulley Idler...
... Whl Ga. ing, Shaft and Shaft Hardware Only - REPAIR PARTS TRACTOR - NO. ing mowers only) - - 139775 Blade Mulching 42" Premium (For better wear when mulching) - - 138971 Blade Mower 42" Hi-Lift (for mulch- R.LH 136 155986 Bar Adjusting Gauge Wheel 137 72110505 Bolt Carr. 5/16-18 x 5/8 138 159763X421 Brkt Asm Whl Ga. LH 143 157109 Bracket Arm Idler 42" 144 173441 Keeper Belt 42" Clutch Cable 145 173437 Pulley Idler...


