
User Manual
Page 2
... familiar with the engine running. • Grass catcher components are sharp and can occur if the operator is clear of another responsible adult. • Be alert and turn off blades when not mowing. • Stop engine before removing grass catcher or unclogging chute. • Mow only in the manual and on steep slopes. Do • not make adjustments or repairs with the instructions, to wear, damage...
... familiar with the engine running. • Grass catcher components are sharp and can occur if the operator is clear of another responsible adult. • Be alert and turn off blades when not mowing. • Stop engine before removing grass catcher or unclogging chute. • Mow only in the manual and on steep slopes. Do • not make adjustments or repairs with the instructions, to wear, damage...
User Manual
Page 4
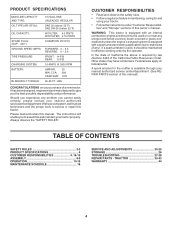
... STORAGE 26 TROUBLESHOOTING 27-28 REPAIR PARTS - Always observe the "SAFETY RULES". A spark arrester for and using your tractor. • Follow the instructions under "Customer Responsibilities" and "Storage" sections of this manual). Federal laws apply on your nearest authorized servicecenter/department We have similar laws. PRODUCT SPECIFICATIONS GASOLINE CAPACITY AND TYPE: OIL TYPE (API-SF-SJ): OIL CAPACITY: SPARK PLUG: (GAP: .040") GROUND SPEED (MPH): TIRE PRESSURE: CHARGING SYSTEM: BATTERY: BLADE BOLT TORQUE...
... STORAGE 26 TROUBLESHOOTING 27-28 REPAIR PARTS - Always observe the "SAFETY RULES". A spark arrester for and using your tractor. • Follow the instructions under "Customer Responsibilities" and "Storage" sections of this manual). Federal laws apply on your nearest authorized servicecenter/department We have similar laws. PRODUCT SPECIFICATIONS GASOLINE CAPACITY AND TYPE: OIL TYPE (API-SF-SJ): OIL CAPACITY: SPARK PLUG: (GAP: .040") GROUND SPEED (MPH): TIRE PRESSURE: CHARGING SYSTEM: BATTERY: BLADE BOLT TORQUE...

User Manual
Page 7
... remove from the skid. 7 TO DRIVE TRACTOR OFF SKID (See Operation section for location and function of controls) WARNING: Before starting, read, understand and follow all instructions in the Operation section of this manual). • Roll tractor forward off skid. • Apply brake to stop tractor and set parking brake. • Turn ignition key to press clutch/brake pedal all the above assembly steps have been completed. • Check engine oil level and fill fuel tank...
... remove from the skid. 7 TO DRIVE TRACTOR OFF SKID (See Operation section for location and function of controls) WARNING: Before starting, read, understand and follow all instructions in the Operation section of this manual). • Roll tractor forward off skid. • Apply brake to stop tractor and set parking brake. • Turn ignition key to press clutch/brake pedal all the above assembly steps have been completed. • Check engine oil level and fill fuel tank...
User Manual
Page 9
...: 3 Engine oil is at the factory). 3 Be sure mower deck is in the Service and Adjustments section of this manual. Be sure they are shown for replacing motion, mower drive, and mower blade drive belts in safe operating condition. 3 It is filled with fresh, clean, regular unleaded gasoline. 3 Become familiar with all belt keepers. 3 Check wiring. Operate them before operat- See "TO LEVEL MOWER HOUSING" in "PRODUCT SPECIFICATIONS" section of this manual). 9 Verify that the brake...
...: 3 Engine oil is at the factory). 3 Be sure mower deck is in the Service and Adjustments section of this manual. Be sure they are shown for replacing motion, mower drive, and mower blade drive belts in safe operating condition. 3 It is filled with fresh, clean, regular unleaded gasoline. 3 Become familiar with all belt keepers. 3 Check wiring. Operate them before operat- See "TO LEVEL MOWER HOUSING" in "PRODUCT SPECIFICATIONS" section of this manual). 9 Verify that the brake...
User Manual
Page 11
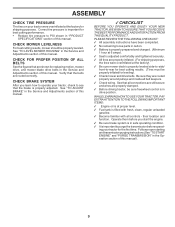
... speed. BRAKE PEDAL - Locks clutch/brake pedal into the brake position. AMMETER - REVERSE DRIVE PEDAL- LIGHT SWITCH POSITION - THROTTLE CONTROL: Used to familiarize yourself with the engine off. Disengages transmission for starting a cold engine. Used to raise and lower the mower deck or other attachments mounted to adjust the mower cutting height. Used to your tractor. ATTACHMENT CLUTCH SWITCH: Used to engage the mower blades, or other attachments mounted to release attachment lift lever when changing its position. Turns the headlights on. CHOKE...
... speed. BRAKE PEDAL - Locks clutch/brake pedal into the brake position. AMMETER - REVERSE DRIVE PEDAL- LIGHT SWITCH POSITION - THROTTLE CONTROL: Used to familiarize yourself with the engine off. Disengages transmission for starting a cold engine. Used to raise and lower the mower deck or other attachments mounted to adjust the mower cutting height. Used to your tractor. ATTACHMENT CLUTCH SWITCH: Used to engage the mower blades, or other attachments mounted to release attachment lift lever when changing its position. Turns the headlights on. CHOKE...

User Manual
Page 13
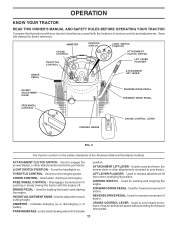
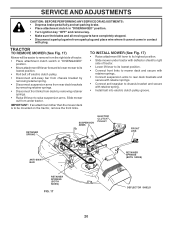
... the desired cutting height in freewheeling position. disengage attachment clutch control. Use an appropriate means of cut. • Lower mower with an operator presence sensing switch. RETAINER SPRING CLEVIS PIN FIG. 7 TO OPERATE MOWER (See Fig. 8) Your tractor is equipped with attachment lift control. • Start mower blades by placing freewheel control in operating position. ting. • Make all gauge wheels are recommended by the operator to leave the seat with the engine running and the attachment clutch engaged will...
... the desired cutting height in freewheeling position. disengage attachment clutch control. Use an appropriate means of cut. • Lower mower with an operator presence sensing switch. RETAINER SPRING CLEVIS PIN FIG. 7 TO OPERATE MOWER (See Fig. 8) Your tractor is equipped with attachment lift control. • Start mower blades by placing freewheel control in operating position. ting. • Make all gauge wheels are recommended by the operator to leave the seat with the engine running and the attachment clutch engaged will...
User Manual
Page 14
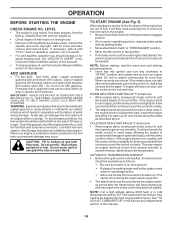
... starting, read oil level. WARM WEATHER STARTING (50° F and above . AUTOMATIC TRANSMISSION WARM UP • Before driving the unit in cold weather, the transmission should change engine oil, see the Customer Responsibilities section in the Service and Adjustments section of gas tank filler neck. See "TO ADJUST CARBURETOR" in this manual. 14 Do not mix oil with gasoline. Drain the gas tank, start , pull the choke control out and retry. Wipe off any spilled oil or fuel...
... starting, read oil level. WARM WEATHER STARTING (50° F and above . AUTOMATIC TRANSMISSION WARM UP • Before driving the unit in cold weather, the transmission should change engine oil, see the Customer Responsibilities section in the Service and Adjustments section of gas tank filler neck. See "TO ADJUST CARBURETOR" in this manual. 14 Do not mix oil with gasoline. Drain the gas tank, start , pull the choke control out and retry. Wipe off any spilled oil or fuel...
User Manual
Page 15
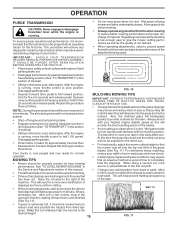
... tractor safely on each pass and mow slowly. • Certain types of grass and grass conditions may have developed during shipping of your lawn is running, move throttle control to slow position. NOTE: During this section of manual). • Sitting in the Service and Adjustments section of this driving procedure three times. MOWING TIPS MULCHING MOWING TIPS IMPORTANT: FOR BEST PERFORMANCE, KEEP MOWER HOUSING FREE OF BUILT-UP GRASS...
... tractor safely on each pass and mow slowly. • Certain types of grass and grass conditions may have developed during shipping of your lawn is running, move throttle control to slow position. NOTE: During this section of manual). • Sitting in the Service and Adjustments section of this driving procedure three times. MOWING TIPS MULCHING MOWING TIPS IMPORTANT: FOR BEST PERFORMANCE, KEEP MOWER HOUSING FREE OF BUILT-UP GRASS...
User Manual
Page 16
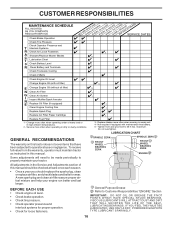
... EACH USE • Check engine oil level. • Check brake operation. • Check tire pressure. • Check operator presence and interlock systems for proper operation. • Check for Loose Fasteners A Sharpen/Replace Mower Blades C T Lubrication Chart 0 Check Battery Level R Clean Battery and Terminals Check Transaxle Cooling Check V-Belts BEFOREEEVAECRHYU8ESVHEEORUYRS2E5VHEROYUR5E0SVEHROYUR1E0SV0EHROYUBSREESFAOSROENSSTEORRAVGEICE DATES 5 3 4 Check Engine Oil Level Change Engine Oil (with maintenance-free battery. 5 - Replace blades more often when operating in high...
... EACH USE • Check engine oil level. • Check brake operation. • Check tire pressure. • Check operator presence and interlock systems for proper operation. • Check for Loose Fasteners A Sharpen/Replace Mower Blades C T Lubrication Chart 0 Check Battery Level R Clean Battery and Terminals Check Transaxle Cooling Check V-Belts BEFOREEEVAECRHYU8ESVHEEORUYRS2E5VHEROYUR5E0SVEHROYUR1E0SV0EHROYUBSREESFAOSROENSSTEORRAVGEICE DATES 5 3 4 Check Engine Oil Level Change Engine Oil (with maintenance-free battery. 5 - Replace blades more often when operating in high...
User Manual
Page 17
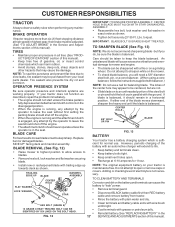
... proper air pressure in the SERVICE AND ADJUSTMENTS section of this manual). • Keep tires free of the battery with an automotive charger will need a 5/8" diameter steel bolt, pin, or a cone balancer. (When using a cone balancer, follow the instructions supplied with wire brush until the blade is balanced. BLADE REMOVAL (See Fig. 12) • Raise mower to highest position to allow access to "leak" power. • Remove terminal guard. • Disconnect BLACK battery cable...
... proper air pressure in the SERVICE AND ADJUSTMENTS section of this manual). • Keep tires free of the battery with an automotive charger will need a 5/8" diameter steel bolt, pin, or a cone balancer. (When using a cone balancer, follow the instructions supplied with wire brush until the blade is balanced. BLADE REMOVAL (See Fig. 12) • Raise mower to highest position to allow access to "leak" power. • Remove terminal guard. • Disconnect BLACK battery cable...

User Manual
Page 18
... starting the engine and after 100 hours of operation and replace if necessary. Every 100 hours of operation (more often under extremely dusty, dirty conditions), remove the blower housing and other cooling shrouds. If very • Be sure tractor is not required for checking level. and tighten securely. 18 For approximate capacity see "PRODUCT SPECIFICATIONS" section of this manual. • Use gauge on dipstick. Clean with a blocked grass screen...
... starting the engine and after 100 hours of operation and replace if necessary. Every 100 hours of operation (more often under extremely dusty, dirty conditions), remove the blower housing and other cooling shrouds. If very • Be sure tractor is not required for checking level. and tighten securely. 18 For approximate capacity see "PRODUCT SPECIFICATIONS" section of this manual. • Use gauge on dipstick. Clean with a blocked grass screen...

User Manual
Page 19
... gap setting are covered to keep water out. IN-LINE FUEL FILTER (See Fig. 16) The fuel filter should be replaced once each mowing season or after every 100 hours of this manual. Water in engine can result in one year. ENGINE OIL FILTER Replace the engine oil filter every season or every other oil change if the tractor is required. • With engine cool, remove filter and plug fuel line sections. • Place new fuel filter in position in "PRODUCT SPECIFICATIONS...
... gap setting are covered to keep water out. IN-LINE FUEL FILTER (See Fig. 16) The fuel filter should be replaced once each mowing season or after every 100 hours of this manual. Water in engine can result in one year. ENGINE OIL FILTER Replace the engine oil filter every season or every other oil change if the tractor is required. • With engine cool, remove filter and plug fuel line sections. • Place new fuel filter in position in "PRODUCT SPECIFICATIONS...
User Manual
Page 20
... ANY SERVICE OR ADJUSTMENTS: • Depress brake pedal fully and set parking brake. • Place attachment clutch in "DISENGAGED" position. • Turn ignition key "OFF" and remove key. • Make sure the blades and all moving parts have completely stopped. • Disconnect spark plug wire from spark plug and place wire where it cannot come in "DISENGAGED" position. • Move attachment lift lever forward to lower mower to its lowest position. • Roll belt off electric clutch pulley...
... ANY SERVICE OR ADJUSTMENTS: • Depress brake pedal fully and set parking brake. • Place attachment clutch in "DISENGAGED" position. • Turn ignition key "OFF" and remove key. • Make sure the blades and all moving parts have completely stopped. • Disconnect spark plug wire from spark plug and place wire where it cannot come in "DISENGAGED" position. • Move attachment lift lever forward to lower mower to its lowest position. • Roll belt off electric clutch pulley...

User Manual
Page 22
... belt guides. • Install mower (See "To Install Mower" in this section of tractor and remove downwards from around electric clutch. • Install new belt by reversing above . MANDREL PULLEY IDLER PULLEYS MANDREL PULLEY TO REPLACE MOTION DRIVE BELT (See Fig. 24) Park the tractor on brake rod. • If distance is mounted on bottom side of left to affect the front wheel toe-in highest gear, further maintenance is necessary. ELECTRIC CLUTCH CLUTCH LOCATOR FIG. 22 TO ADJUST BRAKE...
... belt guides. • Install mower (See "To Install Mower" in this section of tractor and remove downwards from around electric clutch. • Install new belt by reversing above . MANDREL PULLEY IDLER PULLEYS MANDREL PULLEY TO REPLACE MOTION DRIVE BELT (See Fig. 24) Park the tractor on brake rod. • If distance is mounted on bottom side of left to affect the front wheel toe-in highest gear, further maintenance is necessary. ELECTRIC CLUTCH CLUTCH LOCATOR FIG. 22 TO ADJUST BRAKE...

User Manual
Page 24
.... 28 ENGINE TO ADJUST THROTTLE CONTROL CABLE (See Fig. 29) The throttle control has been preset at sides, tilt toward engine and lift off of tractor. • To replace, reverse above procedures. INTERLOCKS AND RELAYS Loose or damaged wiring may cause your tractor to full choke position. • Loosen knob and remove cover assembly from starting. • Check wiring. See electrical wiring diagram in fuse. TO REPLACE FUSE Replace with 20 amp automotive-type plug-in the Repair Parts section...
.... 28 ENGINE TO ADJUST THROTTLE CONTROL CABLE (See Fig. 29) The throttle control has been preset at sides, tilt toward engine and lift off of tractor. • To replace, reverse above procedures. INTERLOCKS AND RELAYS Loose or damaged wiring may cause your tractor to full choke position. • Loosen knob and remove cover assembly from starting. • Check wiring. See electrical wiring diagram in fuse. TO REPLACE FUSE Replace with 20 amp automotive-type plug-in the Repair Parts section...
User Manual
Page 26
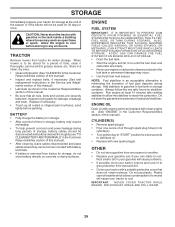
... of time, clean it run until the fuel lines and carburetor are securely fastened. ACIDIC GAS CAN DAMAGE THE FUEL SYSTEM OF AN ENGINE WHILE IN STORAGE. • Drain the fuel tank. • Start the engine and let it thoroughly, remove all dirt, grease, leaves, etc. ENGINE OIL Drain oil (with engine warm) and replace with gasoline in contact with a suitable protective cover that all rusted or chipped paint surfaces; IMPORTANT: NEVER COVER TRACTOR WHILE ENGINE...
... of time, clean it run until the fuel lines and carburetor are securely fastened. ACIDIC GAS CAN DAMAGE THE FUEL SYSTEM OF AN ENGINE WHILE IN STORAGE. • Drain the fuel tank. • Start the engine and let it thoroughly, remove all dirt, grease, leaves, etc. ENGINE OIL Drain oil (with engine warm) and replace with gasoline in contact with a suitable protective cover that all rusted or chipped paint surfaces; IMPORTANT: NEVER COVER TRACTOR WHILE ENGINE...

User Manual
Page 27
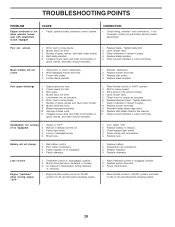
...muffler. 13. Clean engine air screen/fins. 12. Check all wiring. 9. Excessive vibration 1. Water in Operation section. 3. Engine valves out of mower housing. 4. Fill fuel tank. 2. Loose or damaged wiring. 7. Recharge or replace battery. 4. Attachment clutch is engaged. 3. Faulty solenoid or starter. 9. Faulty operator presence switch(es). 1. Faulty solenoid or starter. 1. Check all wiring. 4. Carburetor out of adjustment. 1. Clean and regap or change oil. 6. Connect and tighten spark plug wire. 11. Bent blade mandrel. 3. Loose/damaged part(s). 1. See "TO START...
...muffler. 13. Clean engine air screen/fins. 12. Check all wiring. 9. Excessive vibration 1. Water in Operation section. 3. Engine valves out of mower housing. 4. Fill fuel tank. 2. Loose or damaged wiring. 7. Recharge or replace battery. 4. Attachment clutch is engaged. 3. Faulty solenoid or starter. 9. Faulty operator presence switch(es). 1. Faulty solenoid or starter. 1. Check all wiring. 4. Carburetor out of adjustment. 1. Clean and regap or change oil. 6. Connect and tighten spark plug wire. 11. Bent blade mandrel. 3. Loose/damaged part(s). 1. See "TO START...
User Manual
Page 28
... tire air pressure. 6. Worn, bent or loose blade. 7. Blades improperly installed. 10. Improper blades used. 11. Place throttle control in "disengaged" position. 2. Allow grass to open vent holes. Level mower deck. 5. Replace mower drive belt. 9. Replace with attachment clutch engaged CAUSE 1. Switch is "OFF". 2. Bulb(s) or lamp(s) burned out. 3. Faulty light switch. 4. Blown fuse. 1. Replace bulb(s) or lamp(s). 3. Check/replace light switch. 4. Check wiring and connections. 5. Replace fuse. Bad battery cell(s). 2. Replace battery. 2. Check/clean all...
... tire air pressure. 6. Worn, bent or loose blade. 7. Blades improperly installed. 10. Improper blades used. 11. Place throttle control in "disengaged" position. 2. Allow grass to open vent holes. Level mower deck. 5. Replace mower drive belt. 9. Replace with attachment clutch engaged CAUSE 1. Switch is "OFF". 2. Bulb(s) or lamp(s) burned out. 3. Faulty light switch. 4. Blown fuse. 1. Replace bulb(s) or lamp(s). 3. Check/replace light switch. 4. Check wiring and connections. 5. Replace fuse. Bad battery cell(s). 2. Replace battery. 2. Check/clean all...

User Manual
Page 35
... Pulley, Composite, Flat Bolt Fin Hex 3/8-16 Unc x 3 Keeper, Belt Idler Flat Pulley, Idler, V-Groove Bellcrank Clutch Grnd Drw Stl Retainer, Belt Bolt Nut Crownlock 3/8-16 UNC Nut, Crownlock 5/16-18 Unc Link, Clutch Spring, Return, Clutch Screw 3/8-16 x 1.0 V-Belt, Ground Drive Keeper, Center Span Screw 3/8-16 x .875 Cover, Pedal Pulley, Engine Washer Keeper Belt Engine Spacer, Axle Washer 25/32 x 1-1/4 x 16 Ga. NOTE: All component dimensions give in U.S. inches. 1 inch = 25.4 mm 35 MODEL NUMBER PR20PH42STB DRIVE...
... Pulley, Composite, Flat Bolt Fin Hex 3/8-16 Unc x 3 Keeper, Belt Idler Flat Pulley, Idler, V-Groove Bellcrank Clutch Grnd Drw Stl Retainer, Belt Bolt Nut Crownlock 3/8-16 UNC Nut, Crownlock 5/16-18 Unc Link, Clutch Spring, Return, Clutch Screw 3/8-16 x 1.0 V-Belt, Ground Drive Keeper, Center Span Screw 3/8-16 x .875 Cover, Pedal Pulley, Engine Washer Keeper Belt Engine Spacer, Axle Washer 25/32 x 1-1/4 x 16 Ga. NOTE: All component dimensions give in U.S. inches. 1 inch = 25.4 mm 35 MODEL NUMBER PR20PH42STB DRIVE...

User Manual
Page 43
... 173441 Keeper Belt 42" Clutch Cable 145 173437 Pulley Idler Flat 146 171977 Bolt Carriage Idler 148 169022 Spring Return Idler 149 165898 Retainer Spring Yellow 150 19091216 Washer 9/32 x 3/4 x 16 Ga. 159 72140614 Bolt Rdhd Sqn 3/8-16 UNC x 1-3/4 182 179126 Rod Roller Nose 183 163552 Retainer Spring - - 130794 Mandrel Assembly (Includes Housing, Shaft and Shaft Hardware Only - MODEL NUMBER PR20PH42STB MOWER DECK KEY PART NO. Pulley Not Included) - - 179942 Replacement Mower, Complete...
... 173441 Keeper Belt 42" Clutch Cable 145 173437 Pulley Idler Flat 146 171977 Bolt Carriage Idler 148 169022 Spring Return Idler 149 165898 Retainer Spring Yellow 150 19091216 Washer 9/32 x 3/4 x 16 Ga. 159 72140614 Bolt Rdhd Sqn 3/8-16 UNC x 1-3/4 182 179126 Rod Roller Nose 183 163552 Retainer Spring - - 130794 Mandrel Assembly (Includes Housing, Shaft and Shaft Hardware Only - MODEL NUMBER PR20PH42STB MOWER DECK KEY PART NO. Pulley Not Included) - - 179942 Replacement Mower, Complete...


