

User Manual
Page 2
... operate the mower without either the entire grass catcher or the guard in handling gasoline and other attachments. Check their ability to operate the riding mower safely enough to be thrown. Clean oil or fuel spillage. FAILURE TO OBSERVE THE FOLLOWING SAFETY INSTRUCTIONS COULD RESULT IN SERIOUS INJURY OR DEATH. Uneven terrain could be seriously injured or interfere with the engine running . Do not make adjustments or repairs...
... operate the mower without either the entire grass catcher or the guard in handling gasoline and other attachments. Check their ability to operate the riding mower safely enough to be thrown. Clean oil or fuel spillage. FAILURE TO OBSERVE THE FOLLOWING SAFETY INSTRUCTIONS COULD RESULT IN SERIOUS INJURY OR DEATH. Uneven terrain could be seriously injured or interfere with the engine running . Do not make adjustments or repairs...

User Manual
Page 4
... proper tools to assemble and maintain your purchase of a new Tractor. It has been designed, engineered and manufactured to give you to service or repair this manual). A spark arrester for and using your nearest authorized service center. CCA: 230 CASE SIZE: U1R BLADE BOLT TORQUE: 27-35 FT. We have similar laws. Always observe the "SAFETY RULES". PRODUCT SPECIFICATIONS GASOLINE CAPACITY AND TYPE: 2.0 GALLONS UNLEADED REGULAR OIL TYPE (API...
... proper tools to assemble and maintain your purchase of a new Tractor. It has been designed, engineered and manufactured to give you to service or repair this manual). A spark arrester for and using your nearest authorized service center. CCA: 230 CASE SIZE: U1R BLADE BOLT TORQUE: 27-35 FT. We have similar laws. Always observe the "SAFETY RULES". PRODUCT SPECIFICATIONS GASOLINE CAPACITY AND TYPE: 2.0 GALLONS UNLEADED REGULAR OIL TYPE (API...

User Manual
Page 6
... ATTACH STEERING WHEEL (See Fig. 1) ASSEMBLE EXTENSION SHAFT AND BOOT • Slide extension shaft onto lower steering shaft. ADAPTER 5/16 LOCKNUT EXTENSION SHAFT 5/16 HEX BOLT LOWER STEERING SHAFT TAB SLOTS FIG. 1 HOW TO SET UP YOUR TRACTOR CHECK BATTERY (See Fig. 2) • Lift seat pan to raised position. • If this battery is mentioned in this manual for any additional loose parts or cartons and remove. ASSEMBLY Your new tractor...
... ATTACH STEERING WHEEL (See Fig. 1) ASSEMBLE EXTENSION SHAFT AND BOOT • Slide extension shaft onto lower steering shaft. ADAPTER 5/16 LOCKNUT EXTENSION SHAFT 5/16 HEX BOLT LOWER STEERING SHAFT TAB SLOTS FIG. 1 HOW TO SET UP YOUR TRACTOR CHECK BATTERY (See Fig. 2) • Lift seat pan to raised position. • If this battery is mentioned in this manual for any additional loose parts or cartons and remove. ASSEMBLY Your new tractor...

User Manual
Page 7
... on seat pan so head of this manual. After engine has started, move throttle control to idle position. • Release parking brake. • Slowly move the motion control lever forward and slowly drive tractor off skid. • Remove banding holding deflector shield up against tractor. TO ROLL TRACTOR OFF SKID (See Operation section, page 10, for assembly of tractor. • Pivot seat and pan forward and assemble adjustment knob and flat washer...
... on seat pan so head of this manual. After engine has started, move throttle control to idle position. • Release parking brake. • Slowly move the motion control lever forward and slowly drive tractor off skid. • Remove banding holding deflector shield up against tractor. TO ROLL TRACTOR OFF SKID (See Operation section, page 10, for assembly of tractor. • Pivot seat and pan forward and assemble adjustment knob and flat washer...
User Manual
Page 8
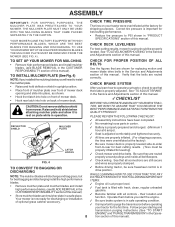
... into hole on front of mower deck. • Hook rear latch into hole on plate while in the Service and Adjustments section of this manual. See "TO LEVEL MOWER HOUSING" in drive position. CHECK BRAKE SYSTEM After you will discharge and bag grass, but for best cutting performance. • Reduce tire pressure to see that are shown for replacing motion and mower blade drive belts in the Opera- 8 tion section...
... into hole on front of mower deck. • Hook rear latch into hole on plate while in the Service and Adjustments section of this manual. See "TO LEVEL MOWER HOUSING" in drive position. CHECK BRAKE SYSTEM After you will discharge and bag grass, but for best cutting performance. • Reduce tire pressure to see that are shown for replacing motion and mower blade drive belts in the Opera- 8 tion section...
User Manual
Page 11
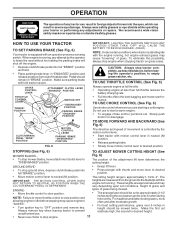
... control lever. • Start tractor with motion control lever in neutral (N) position. • Release parking brake. • Slowly move attachment clutch lever to the blade tip with the engine running . mance. STOPPING (See Fig. 6) TO ADJUST MOWER CUTTING HEIGHT (See MOWER BLADES - OPERATION The operation of any tractor can result in severe eye damage. NOTE: Under certain conditions when tractor is running, any adjustments or repairs. types of grass. The IMPORTANT: THE MOTION CONTROL LEVER DOES NOT RETURN TO NEUTRAL (N) POSITION...
... control lever. • Start tractor with motion control lever in neutral (N) position. • Release parking brake. • Slowly move attachment clutch lever to the blade tip with the engine running . mance. STOPPING (See Fig. 6) TO ADJUST MOWER CUTTING HEIGHT (See MOWER BLADES - OPERATION The operation of any tractor can result in severe eye damage. NOTE: Under certain conditions when tractor is running, any adjustments or repairs. types of grass. The IMPORTANT: THE MOTION CONTROL LEVER DOES NOT RETURN TO NEUTRAL (N) POSITION...
User Manual
Page 12
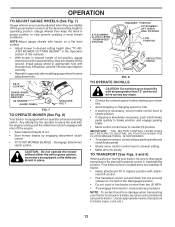
...; Move motion control lever to disengage transmission by engaging attachment clutch control. • TO STOP MOWER BLADES - Install gauge wheel in appropriate hole with shoulder bolt, 3/8 washer, and 3/8-16 locknut and tighten securely. • Repeat for opposite side installing gauge wheel in freewheeling position. CAUTION: Do not operate the mower without either the entire grass catcher, on a flat level surface. • Adjust mower to leave the seat with an operator presence sensing switch. Free wheel control is held...
...; Move motion control lever to disengage transmission by engaging attachment clutch control. • TO STOP MOWER BLADES - Install gauge wheel in appropriate hole with shoulder bolt, 3/8 washer, and 3/8-16 locknut and tighten securely. • Repeat for opposite side installing gauge wheel in freewheeling position. CAUTION: Do not operate the mower without either the entire grass catcher, on a flat level surface. • Adjust mower to leave the seat with an operator presence sensing switch. Free wheel control is held...

User Manual
Page 13
... weight oil. • Check engine oil with gasoline. Do not mix oil with tractor on seat in operating position, depress clutch/brake pedal and set parking brake. • Place motion control lever in neutral (N) position. • Move attachment clutch to "DISENGAGED" position. • Move throttle control to push the control in the transmission engaged position. • Sit on level ground. • Remove oil fill cap/dipstick and wipe clean, reinsert the dipstick and screw cap tight, wait for a few seconds, remove and...
... weight oil. • Check engine oil with gasoline. Do not mix oil with tractor on seat in operating position, depress clutch/brake pedal and set parking brake. • Place motion control lever in neutral (N) position. • Move attachment clutch to "DISENGAGED" position. • Move throttle control to push the control in the transmission engaged position. • Sit on level ground. • Remove oil fill cap/dipstick and wipe clean, reinsert the dipstick and screw cap tight, wait for a few seconds, remove and...
User Manual
Page 14
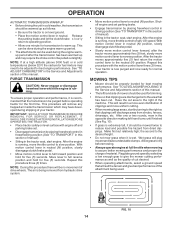
... a high altitude (above 3000 feet) or in cold temperatures (below 32 F) the carburetor fuel mixture may have developed during the engine warmup period after the tractor moves approximately five (5) feet, slowly move throttle control to the right so that the transmission be used during shipping of material. Shutoff engine and set . • Disengage transmission by turning to half (1/2) speed. With motion control lever in neutral (N) position, slowly disengage clutch/brake...
... a high altitude (above 3000 feet) or in cold temperatures (below 32 F) the carburetor fuel mixture may have developed during the engine warmup period after the tractor moves approximately five (5) feet, slowly move throttle control to the right so that the transmission be used during shipping of material. Shutoff engine and set . • Disengage transmission by turning to half (1/2) speed. With motion control lever in neutral (N) position, slowly disengage clutch/brake...
User Manual
Page 16
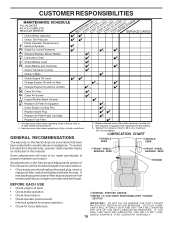
... Cooling Fins Replace Spark Plug Replace Air Filter Paper Cartridge Replace Fuel Filter 1 - LUBRICATION CHART ÀSPINDLE ZERK ÀSPINDLE ZERK ÀFRONT WHEEL BEARING ZERK ÀFRONT WHEEL BEARING ZERK ÁENGINE BEFORE EACH USE • Check engine oil level. • Check brake operation. • Check tire pressure. • Check operator presence and interlock systems for proper operation. • Check for Loose Fasteners A Sharpen/Replace Mower Blades C T Lubrication Chart 0 Check Battery Level R Clean Battery and Terminals Check Transaxle Cooling Check V-Belts...
... Cooling Fins Replace Spark Plug Replace Air Filter Paper Cartridge Replace Fuel Filter 1 - LUBRICATION CHART ÀSPINDLE ZERK ÀSPINDLE ZERK ÀFRONT WHEEL BEARING ZERK ÀFRONT WHEEL BEARING ZERK ÁENGINE BEFORE EACH USE • Check engine oil level. • Check brake operation. • Check tire pressure. • Check operator presence and interlock systems for proper operation. • Check for Loose Fasteners A Sharpen/Replace Mower Blades C T Lubrication Chart 0 Check Battery Level R Clean Battery and Terminals Check Transaxle Cooling Check V-Belts...
User Manual
Page 17
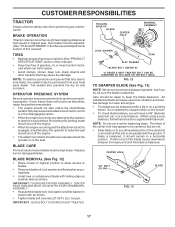
...; Reassemble blade bolt, lock washer and flat washer in exact order as described, repair the problem immediately. • The engine should not start unless the clutch/brake pedal is fully depressed and attachement clutch control is in the disengaged position. • When the engine is running, any attempt by the operator to leave the seat without first setting the parking brake should never operate unless the operator is engaged, any maintenance...
...; Reassemble blade bolt, lock washer and flat washer in exact order as described, repair the problem immediately. • The engine should not start unless the clutch/brake pedal is fully depressed and attachement clutch control is in the disengaged position. • When the engine is running, any attempt by the operator to leave the seat without first setting the parking brake should never operate unless the operator is engaged, any maintenance...

User Manual
Page 18
... capacity see "PRODUCT SPECIFICATIONS" section of the drain valve. TO CLEAN BATTERY AND TERMINALS Corrosion and dirt on dipstick. TRANSAXLE COOLING The transmission fan and cooling fins should be sure fan blades are not adjustable. Be sure dipstick cap is not necessary. However, periodic charging of this manual. Replace belts if they begin to your nearest authorized service center/department. • ENGINE • LUBRICATION Only use high pressure...
... capacity see "PRODUCT SPECIFICATIONS" section of the drain valve. TO CLEAN BATTERY AND TERMINALS Corrosion and dirt on dipstick. TRANSAXLE COOLING The transmission fan and cooling fins should be sure fan blades are not adjustable. Be sure dipstick cap is not necessary. However, periodic charging of this manual. Replace belts if they begin to your nearest authorized service center/department. • ENGINE • LUBRICATION Only use high pressure...

User Manual
Page 19
... are kept clean at the beginning of the engine are properly positioned. • Immediately wipe up any spilled gasoline. tions. • Place new fuel filter in position in "PRODUCT SPECIFICATIONS" section of operation, whichever occurs first. Spark plug type and gap setting are shown in fuel line with a blocked grass screen, dirty or plugged cooling fins, and/or cooling shrouds removed will not run properly using a garden hose to remove excess oil. • If...
... are kept clean at the beginning of the engine are properly positioned. • Immediately wipe up any spilled gasoline. tions. • Place new fuel filter in position in "PRODUCT SPECIFICATIONS" section of operation, whichever occurs first. Spark plug type and gap setting are shown in fuel line with a blocked grass screen, dirty or plugged cooling fins, and/or cooling shrouds removed will not run properly using a garden hose to remove excess oil. • If...

User Manual
Page 20
... RETAINER SPRING CLUTCH SPRING RETAINER SPRING ANTI-SWAY BAR COLLAR SUSPENSION ARMS SQUARE HOLE ENGINE PULLEY FRONT LINK RETAINER SPRINGS (BOTH SIDES) HOUSING GUIDE Fig. 18 LARGE RETAINER SPRING BRACKET 20 DEFLECTOR SHIELD SERVICE AND ADJUSTMENTS WARNING: TO AVIOD SERIOUS INJURY, BEFORE PERFORMING ANY SERVICE OR ADJUSTMENTS: • Depress clutch/brake pedal fully and set parking brake. • Place motion control lever in neutral (N) position. • Place attachment clutch in "DISENGAGED" position. • Turn ignition key to...
... RETAINER SPRING CLUTCH SPRING RETAINER SPRING ANTI-SWAY BAR COLLAR SUSPENSION ARMS SQUARE HOLE ENGINE PULLEY FRONT LINK RETAINER SPRINGS (BOTH SIDES) HOUSING GUIDE Fig. 18 LARGE RETAINER SPRING BRACKET 20 DEFLECTOR SHIELD SERVICE AND ADJUSTMENTS WARNING: TO AVIOD SERIOUS INJURY, BEFORE PERFORMING ANY SERVICE OR ADJUSTMENTS: • Depress clutch/brake pedal fully and set parking brake. • Place motion control lever in neutral (N) position. • Place attachment clutch in "DISENGAGED" position. • Turn ignition key to...
User Manual
Page 22
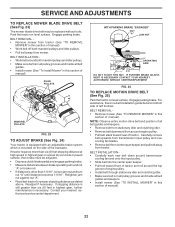
... a level dry concrete or paved surface, then brake must be replaced without tools. Readjust if necessary. NOTE: Observe entire motion drive belt and position of all belt guides and keepers. • Remove belt from stationary idler and clutching idler. • Remove belt downward from tractor (See "TO REMOVE MOWER" in this section of manual). • Work belt off both mandrel pulleys and idler pulleys. • Make sure belt is necessary. SERVICE AND ADJUSTMENTS TO REPLACE MOWER BLADE DRIVE BELT...
... a level dry concrete or paved surface, then brake must be replaced without tools. Readjust if necessary. NOTE: Observe entire motion drive belt and position of all belt guides and keepers. • Remove belt from stationary idler and clutching idler. • Remove belt downward from tractor (See "TO REMOVE MOWER" in this section of manual). • Work belt off both mandrel pulleys and idler pulleys. • Make sure belt is necessary. SERVICE AND ADJUSTMENTS TO REPLACE MOWER BLADE DRIVE BELT...

User Manual
Page 25
... suspected carburetor problems, take your tractor to full choke position. • Loosen knob and remove cover assembly from starting. • Check wiring. SERVICE AND ADJUSTMENTS INTERLOCKS AND RELAYS Loose or damaged wiring may result. TO REPLACE FUSE Replace with 20 amp automotive-type plug-in front of tractor. • To replace, reverse above procedure. Do not adjust - TO ADJUST CARBURETOR Your carburetor is completely closed . See electrical wiring diagram in the Repair Parts section. OVERSPEEDING THE ENGINE ABOVE THE FACTORY HIGH SPEED SETTING CAN...
... suspected carburetor problems, take your tractor to full choke position. • Loosen knob and remove cover assembly from starting. • Check wiring. SERVICE AND ADJUSTMENTS INTERLOCKS AND RELAYS Loose or damaged wiring may result. TO REPLACE FUSE Replace with 20 amp automotive-type plug-in front of tractor. • To replace, reverse above procedure. Do not adjust - TO ADJUST CARBURETOR Your carburetor is completely closed . See electrical wiring diagram in the Repair Parts section. OVERSPEEDING THE ENGINE ABOVE THE FACTORY HIGH SPEED SETTING CAN...
User Manual
Page 26
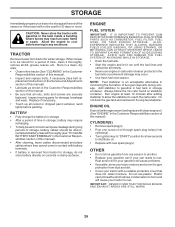
...; Turn ignition key to "START" position for 30 days or more. Always follow the mix ratio found on concrete or damp surfaces. Run engine at the end of the season or if the tractor will not be used for a few seconds to distribute oil. • Replace with battery terminals. • If battery is removed from dust and dirt. • Cover your tractor with gasoline in the tank inside...
...; Turn ignition key to "START" position for 30 days or more. Always follow the mix ratio found on concrete or damp surfaces. Run engine at the end of the season or if the tractor will not be used for a few seconds to distribute oil. • Replace with battery terminals. • If battery is removed from dust and dirt. • Cover your tractor with gasoline in the tank inside...

User Manual
Page 27
... spark plug. 3. Dirty fuel filter. 5. Recharge or replace battery. 4. Depress brake pedal. 2. Cutting too much grass/too fast. 2. Loose or damaged wiring. 14. Set in Operation section. 3. Clean and regap or change oil. 6. Connect and tighten spark plug wire. 11. Worn, bent or loose blade. 2. Tighten loose part(s). Engine not "CHOKED" properly. 3. See "TO START ENGINE" in "Higher Cut" position/reduce speed. 2. Replace fuel filter. 7. Replace spark plug. 3. Brake pedal not depressed. 2. Engine clicks but will not turn over 1. Loss of adjustment. 8. Adjust throttle...
... spark plug. 3. Dirty fuel filter. 5. Recharge or replace battery. 4. Depress brake pedal. 2. Cutting too much grass/too fast. 2. Loose or damaged wiring. 14. Set in Operation section. 3. Clean and regap or change oil. 6. Connect and tighten spark plug wire. 11. Worn, bent or loose blade. 2. Tighten loose part(s). Engine not "CHOKED" properly. 3. See "TO START ENGINE" in "Higher Cut" position/reduce speed. 2. Replace fuel filter. 7. Replace spark plug. 3. Brake pedal not depressed. 2. Engine clicks but will not turn over 1. Loss of adjustment. 8. Adjust throttle...
User Manual
Page 28
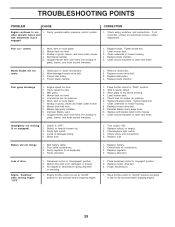
... authorized service center/ department. Check tires for 30 seconds before stopping engine. 1. Replace alternator. Tighten blade bolt. 7. Worn, bent or loose blade. 2. Replace blade mandrel. Level mower deck. 5. Level mower deck. 3. Engine throttle control not set at "SLOW" position for proper air pressure. 6. TROUBLESHOOTING POINTS PROBLEM CAUSE Engine continues to slower speed. 3. Frozen blade mandrel. 1. Replace blade. Poor cut - Clean underside of grass, leaves, and trash around mandrels to dry before stopping engine. 28 Bulb(s) or...
... authorized service center/ department. Check tires for 30 seconds before stopping engine. 1. Replace alternator. Tighten blade bolt. 7. Worn, bent or loose blade. 2. Replace blade mandrel. Level mower deck. 5. Level mower deck. 3. Engine throttle control not set at "SLOW" position for proper air pressure. 6. TROUBLESHOOTING POINTS PROBLEM CAUSE Engine continues to slower speed. 3. Frozen blade mandrel. 1. Replace blade. Poor cut - Clean underside of grass, leaves, and trash around mandrels to dry before stopping engine. 28 Bulb(s) or...

User Manual
Page 46
...used for each full month from this Warranty are the responsibility of the product. 6. Outdoor Products Customer Service Dept. 250 Bobby Jones Expressway Augusta, GA 30909 USA Electrolux Canada Corp. 7075 Ordan Drive Mississauga, Ontario L5T 1K6 giving the model number, serial number... Warranty, please contact: In Canada contact: Electrolux Home Products, Inc. Should you , any battery which we find to be defective in replacing parts, any power equipment unit or attachment are belts, blades, blade adapters, normal wear, normal adjustments, standard hardware and normal maintenance....
...used for each full month from this Warranty are the responsibility of the product. 6. Outdoor Products Customer Service Dept. 250 Bobby Jones Expressway Augusta, GA 30909 USA Electrolux Canada Corp. 7075 Ordan Drive Mississauga, Ontario L5T 1K6 giving the model number, serial number... Warranty, please contact: In Canada contact: Electrolux Home Products, Inc. Should you , any battery which we find to be defective in replacing parts, any power equipment unit or attachment are belts, blades, blade adapters, normal wear, normal adjustments, standard hardware and normal maintenance....


