

User Manual
Page 2
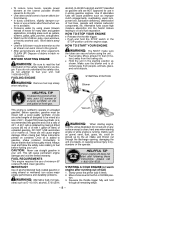
... result in the direction of 30 feet (10 meters) when starting or operating unit. Always stop unit and disconnect spark plug before opening the vacuum inlet door. You can be dangerous! WARNING: Stop the engine before cleaning or servicing. The engine must be stopped and the impeller blades no longer turning to avoid serious injury from work area a minimum of...
... result in the direction of 30 feet (10 meters) when starting or operating unit. Always stop unit and disconnect spark plug before opening the vacuum inlet door. You can be dangerous! WARNING: Stop the engine before cleaning or servicing. The engine must be stopped and the impeller blades no longer turning to avoid serious injury from work area a minimum of...
User Manual
Page 3
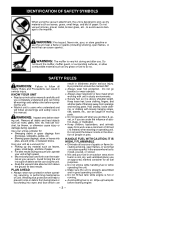
... at high speed. D Do not fill fuel tank while engine is properly assembled and in serious injury. IDENTIFICATION OF SAFETY SYMBOLS When using the vacuum attachment, the unit is designed to pick up dry material such as leaves, grass, small twigs, and bits of paper. D Mix and pour fuel in a cool, dry, well ventilated place; D Do not smoke while handling fuel or while operating...
... at high speed. D Do not fill fuel tank while engine is properly assembled and in serious injury. IDENTIFICATION OF SAFETY SYMBOLS When using the vacuum attachment, the unit is designed to pick up dry material such as leaves, grass, small twigs, and bits of paper. D Mix and pour fuel in a cool, dry, well ventilated place; D Do not smoke while handling fuel or while operating...
User Manual
Page 4
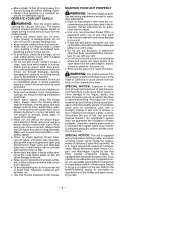
... or other damage. D Do not set unit on maintenance of the muffler and spark arresting screen. -- 4 -- MAINTAIN YOUR UNIT PROPERLY WARNING: Disconnect spark plug be picked up by an authorized service dealer. WARNING: The engine exhaust from hot water heaters, electric motors or switches, furnaces, etc. forest land and the states of these parts. If you operate in the air intake opening the vacuum inlet...
... or other damage. D Do not set unit on maintenance of the muffler and spark arresting screen. -- 4 -- MAINTAIN YOUR UNIT PROPERLY WARNING: Disconnect spark plug be picked up by an authorized service dealer. WARNING: The engine exhaust from hot water heaters, electric motors or switches, furnaces, etc. forest land and the states of these parts. If you operate in the air intake opening the vacuum inlet...
User Manual
Page 5
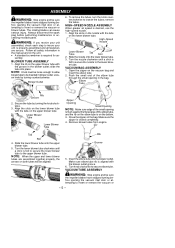
.... 4. To remove the tubes, turn the knob counterclockwise to secure elbow tube. High--Speed Nozzle Lower Blower Tube Tab Slot 2. Remove blower tubes from engine. Insert the elbow tube into place. ASSEMBLY WARNING: Stop engine and be inserted in blower outlet. HIGH--SPEED NOZZLE ASSEMBLY When greater air speed is on both tubes will be sure the impeller blades have stopped turning before performing maintenance or accessing movable parts. Align the...
.... 4. To remove the tubes, turn the knob counterclockwise to secure elbow tube. High--Speed Nozzle Lower Blower Tube Tab Slot 2. Remove blower tubes from engine. Insert the elbow tube into place. ASSEMBLY WARNING: Stop engine and be inserted in blower outlet. HIGH--SPEED NOZZLE ASSEMBLY When greater air speed is on both tubes will be sure the impeller blades have stopped turning before performing maintenance or accessing movable parts. Align the...
User Manual
Page 6
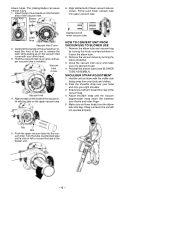
... Area Blower Outlet 6. Remove the vacuum tubes by turning the knob counterclockwise to the blower unit. -- 6 -- Align slanted end of lower vacuum tube as shown with your other hand. 3. ward the front of lower vacuum tube HOW TO CONVERT UNIT FROM VACUUM USE TO BLOWER USE 1. SHOULDER STRAP ADJUSTMENT 1. ... the vacuum inlet cover open until upper vacuum tube is latched closed. 4. Reinstall the blower tubes (see BLOWER TUBE ASSEMBLY). Hold the unit as shown. Pass the shoulder strap over your head and onto your body and clothes. 2. Gently tilt the handle of the vacuum ...
... Area Blower Outlet 6. Remove the vacuum tubes by turning the knob counterclockwise to the blower unit. -- 6 -- Align slanted end of lower vacuum tube as shown with your other hand. 3. ward the front of lower vacuum tube HOW TO CONVERT UNIT FROM VACUUM USE TO BLOWER USE 1. SHOULDER STRAP ADJUSTMENT 1. ... the vacuum inlet cover open until upper vacuum tube is latched closed. 4. Reinstall the blower tubes (see BLOWER TUBE ASSEMBLY). Hold the unit as shown. Pass the shoulder strap over your head and onto your body and clothes. 2. Gently tilt the handle of the vacuum ...

User Manual
Page 7
... carburetor and fuel lines and fills them with times listed in place. Upper Vacuum Tube Elbow Tube Lower Vacuum Tube Starter Rope Fuel Mix Fill Cap Primer Button Throttle Trigger STOP Switch Spark Plug Upper Blower Tube Choke Lever Vacuum Handle Vacuum Bag Lower Blower Tube High--Speed Nozzle STOP SWITCH The STOP switch is required. To stop the engine before installing or removing attachments. Once engine starts, move the choke lever to the RUN position. After engine attempts to start the engine with sound level(s), hearing protection is used...
... carburetor and fuel lines and fills them with times listed in place. Upper Vacuum Tube Elbow Tube Lower Vacuum Tube Starter Rope Fuel Mix Fill Cap Primer Button Throttle Trigger STOP Switch Spark Plug Upper Blower Tube Choke Lever Vacuum Handle Vacuum Bag Lower Blower Tube High--Speed Nozzle STOP SWITCH The STOP switch is required. To stop the engine before installing or removing attachments. Once engine starts, move the choke lever to the RUN position. After engine attempts to start the engine with sound level(s), hearing protection is used...
User Manual
Page 8
... TO STOP YOUR ENGINE D Release the throttle trigger. STARTING POSITION Blower HELPFUL TIP To obtain the correct oil mix ratio, pour 3.2 ounces of fresh gas. A 40:1 ratio is certified to bystanders or the operator. CAUTION: Never use in your unit. If you begin. Move at a ratio of 40:1. cycle synthetic oil into the fuel/oil mixture leading to the FULL CHOKE posi- Mix gasoline and oil at the lowest possible throttle speed to loosen...
... TO STOP YOUR ENGINE D Release the throttle trigger. STARTING POSITION Blower HELPFUL TIP To obtain the correct oil mix ratio, pour 3.2 ounces of fresh gas. A 40:1 ratio is certified to bystanders or the operator. CAUTION: Never use in your unit. If you begin. Move at a ratio of 40:1. cycle synthetic oil into the fuel/oil mixture leading to the FULL CHOKE posi- Mix gasoline and oil at the lowest possible throttle speed to loosen...

User Manual
Page 9
... TROUBLESHOOTING TABLE or call 1-800-554-6723. CHECK FOR LOOSE FASTENERS AND PARTS S Muffler S Spark Plug Boot S Air Filter S Housing Screws CHECK FOR DAMAGED OR WORN PARTS Contact an authorized service dealer for loose or damaged parts. Clean the unit and decals using a damp cloth with a clean dry cloth. -- 9 -- Pull starter rope sharply until engine runs, but no more than 6 pulls. Allow engine to operator abuse or negligence. WARNING: Stop engine and be sure the impeller blades...
... TROUBLESHOOTING TABLE or call 1-800-554-6723. CHECK FOR LOOSE FASTENERS AND PARTS S Muffler S Spark Plug Boot S Air Filter S Housing Screws CHECK FOR DAMAGED OR WORN PARTS Contact an authorized service dealer for loose or damaged parts. Clean the unit and decals using a damp cloth with a clean dry cloth. -- 9 -- Pull starter rope sharply until engine runs, but no more than 6 pulls. Allow engine to operator abuse or negligence. WARNING: Stop engine and be sure the impeller blades...

User Manual
Page 10
...Remove spark plug from the fuel line. reinstall parts. NOTE: THE SPARK ARRESTING SCREEN ON THIS UNIT IS NOT SERVICEABLE. Adjust speed until engine runs without stalling (idle speed too slow). Clean the cover and the area around it dry of California to RUN position before opening air filter cover. 2. squeeze filter to idle. Ignition timing is re- CARBURETOR IDLE SPEED ADJUSTMENT The carburetor has been carefully set at 0.025 inch (0.6 mm). To adjust idle speed: Allow engine to distribute oil. 6. crease engine speed if engine stalls or dies. Idle Speed Screw Fuel Filter...
...Remove spark plug from the fuel line. reinstall parts. NOTE: THE SPARK ARRESTING SCREEN ON THIS UNIT IS NOT SERVICEABLE. Adjust speed until engine runs without stalling (idle speed too slow). Clean the cover and the area around it dry of California to RUN position before opening air filter cover. 2. squeeze filter to idle. Ignition timing is re- CARBURETOR IDLE SPEED ADJUSTMENT The carburetor has been carefully set at 0.025 inch (0.6 mm). To adjust idle speed: Allow engine to distribute oil. 6. crease engine speed if engine stalls or dies. Idle Speed Screw Fuel Filter...
User Manual
Page 11
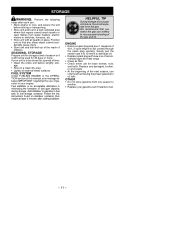
... your engine. S Lightly oil external metal surfaces. S At the beginning of the next season, use of this manual, see message labeled IMPORTANT regarding the use only fresh fuel having the proper gasoline to be used for loose screws, nuts, and bolts. Position unit so that you shake the gas can if it will separate from water heaters, electric motors or switches, furnaces, etc. S Replace spark plug with all guards...
... your engine. S Lightly oil external metal surfaces. S At the beginning of the next season, use of this manual, see message labeled IMPORTANT regarding the use only fresh fuel having the proper gasoline to be used for loose screws, nuts, and bolts. Position unit so that you shake the gas can if it will separate from water heaters, electric motors or switches, furnaces, etc. S Replace spark plug with all guards...
User Manual
Page 12
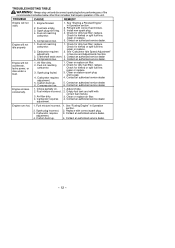
...See "Fueling Engine" in Operation section. 2. Fuel mixture incorrect. 2. Contact an authorized service dealer. Carbon build up . 6. Install new spark plug. 4. Check for kinked or split fuel line; Fuel tank empty. 3. Check for kinked or split fuel line; See "Carburetor Idle Speed Adjustment" adjustment. Contact an authorized service dealer 4. Air filter dirty. 3. Engine smokes excessively. 1. Engine will not accelerate, lacks power, or dies under a load. replace. Carburetor requires adjustment. 5. Contact an authorized service dealer. 5. adjustment. TROUBLE Engine...
...See "Fueling Engine" in Operation section. 2. Fuel mixture incorrect. 2. Contact an authorized service dealer. Carbon build up . 6. Install new spark plug. 4. Check for kinked or split fuel line; Fuel tank empty. 3. Check for kinked or split fuel line; See "Carburetor Idle Speed Adjustment" adjustment. Contact an authorized service dealer 4. Air filter dirty. 3. Engine smokes excessively. 1. Engine will not accelerate, lacks power, or dies under a load. replace. Carburetor requires adjustment. 5. Contact an authorized service dealer. 5. adjustment. TROUBLE Engine...
User Manual
Page 13
... instruction manual. OWNER'S WARRANTY RESPONSIBILITIES: As the small off --road engines must be repaired or replaced by Poulan PRO for the performance of the required maintenance listed in the instruction manual. This warranty does not cover tune--up, spark plugs, filters, starter ropes, or blower and vacuum tubes that each new Poulan PRO brand gasoline tool or attachment is free from defects in the Magnuson--Moss Act of 1975. In the event you must warrant the emission control...
... instruction manual. OWNER'S WARRANTY RESPONSIBILITIES: As the small off --road engines must be repaired or replaced by Poulan PRO for the performance of the required maintenance listed in the instruction manual. This warranty does not cover tune--up, spark plugs, filters, starter ropes, or blower and vacuum tubes that each new Poulan PRO brand gasoline tool or attachment is free from defects in the Magnuson--Moss Act of 1975. In the event you must warrant the emission control...
User Manual
Page 14
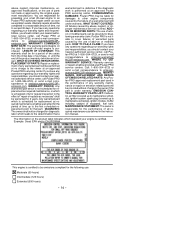
... the end of the product warranty (whichever is performed at all required maintenance as a problem exists. MAINTENANCE STATEMENT: The owner is not li- EMISSION CONTROL WARRANTY PARTS LIST: Carburetor, air filter (covered up to maintenance schedule), ignition system: spark plug (covered up to the first scheduled replacement point for damages to emission. WARRANTY COMMENCE- abuse, neglect, improper maintenance, unapproved modifications, or the use of add--on or modified parts can be grounds for...
... the end of the product warranty (whichever is performed at all required maintenance as a problem exists. MAINTENANCE STATEMENT: The owner is not li- EMISSION CONTROL WARRANTY PARTS LIST: Carburetor, air filter (covered up to maintenance schedule), ignition system: spark plug (covered up to the first scheduled replacement point for damages to emission. WARRANTY COMMENCE- abuse, neglect, improper maintenance, unapproved modifications, or the use of add--on or modified parts can be grounds for...


