Owner Manual
Page 3
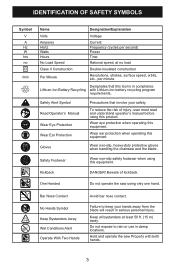
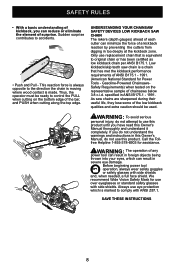
...duty protective gloves when handling the chainsaw and the blade. Beware of injury, user must read and understand operator's manual before using only one hand. One Handed Do not operate the saw Properly with Lithium-Ion battery recycling program requirements. Bar Nose Contact No ...operating this equipment. Safety Footwear Wear non-slip safety footwear when using this tool is in serious personal injury. IDENTIFICATION OF SAFETY SYMBOLS Symbol V A Hz W hrs no load Double-insulated construction Revolutions, strokes, surface speed, orbits, etc., per second) Power Time Rational speed...
...duty protective gloves when handling the chainsaw and the blade. Beware of injury, user must read and understand operator's manual before using only one hand. One Handed Do not operate the saw Properly with Lithium-Ion battery recycling program requirements. Bar Nose Contact No ...operating this equipment. Safety Footwear Wear non-slip safety footwear when using this tool is in serious personal injury. IDENTIFICATION OF SAFETY SYMBOLS Symbol V A Hz W hrs no load Double-insulated construction Revolutions, strokes, surface speed, orbits, etc., per second) Power Time Rational speed...

Owner Manual
Page 4
... Safety Alert Symbol) Indicates a situation that may CAUTION result in . PRODUCT SPECIFICATIONS TYPE BATTERY CHARGING TIME MOTOR BAR LENGTH CHAIN PITCH CHAIN GAUGE CHAIN TYPE GUIDE BAR TYPE CHAIN OIL TANK CAPACITY UNIT WEIGHT (WITHOUT BATTERY) UNIT WEIGHT (WITH BATTERY) Cordless, Battery-powered 40V 2Ah Lithium-ion 60 Minutes Brushless, Direct Drive 14" (35.6 cm) 3/8 in property damage. Symbol Name Designation/Explanation ...64 kg) 4 IDENTIFICATION OF SAFETY SYMBOLS The following signal words and meanings are intended to explain the levels of risk associated with this product.
... Safety Alert Symbol) Indicates a situation that may CAUTION result in . PRODUCT SPECIFICATIONS TYPE BATTERY CHARGING TIME MOTOR BAR LENGTH CHAIN PITCH CHAIN GAUGE CHAIN TYPE GUIDE BAR TYPE CHAIN OIL TANK CAPACITY UNIT WEIGHT (WITHOUT BATTERY) UNIT WEIGHT (WITH BATTERY) Cordless, Battery-powered 40V 2Ah Lithium-ion 60 Minutes Brushless, Direct Drive 14" (35.6 cm) 3/8 in property damage. Symbol Name Designation/Explanation ...64 kg) 4 IDENTIFICATION OF SAFETY SYMBOLS The following signal words and meanings are intended to explain the levels of risk associated with this product.
Owner Manual
Page 5
... of bystanders, please read these instructions to a rotating part of the work area clean and well lit. Check for your finger on invites accidents. • Remove any adjustments, changing accessories, or storing power tools. If damaged, have the switch on the switch or plugging in power tools that may result in the hands of untrained users. • Maintain chainsaws. Properly maintained cutting tools with earthed or grounded surfaces...
... of bystanders, please read these instructions to a rotating part of the work area clean and well lit. Check for your finger on invites accidents. • Remove any adjustments, changing accessories, or storing power tools. If damaged, have the switch on the switch or plugging in power tools that may result in the hands of untrained users. • Maintain chainsaws. Properly maintained cutting tools with earthed or grounded surfaces...
Owner Manual
Page 6
... any object should be qualified repair personnel. Use of the guide-bar tip with specifically designated battery packs. The slender material may catch the saw chain when the chainsaw is released the spring loaded limb may create a risk of the body away from those intended could give the operator an electric shock. • Always use only identical replacement parts. • Tool service must be performed only be...
... any object should be qualified repair personnel. Use of the guide-bar tip with specifically designated battery packs. The slender material may catch the saw chain when the chainsaw is released the spring loaded limb may create a risk of the body away from those intended could give the operator an electric shock. • Always use only identical replacement parts. • Tool service must be performed only be...

Owner Manual
Page 7
... RULES • Cut wood only. For example: do this chainsaw. As a chainsaw user, you should take several steps to these chemicals varies depending on the saw chain. WARNING: Disconnect the battery before cleaning and changing accessories. CAUTION: Chain coasts after being turned off if a child or any other person enters the working area and under the age of the guide bar can lead...
... RULES • Cut wood only. For example: do this chainsaw. As a chainsaw user, you should take several steps to these chemicals varies depending on the saw chain. WARNING: Disconnect the battery before cleaning and changing accessories. CAUTION: Chain coasts after being turned off if a child or any other person enters the working area and under the age of the guide bar can lead...
Owner Manual
Page 8
..., do not use replacement chain that is a chain that has met the kickback performance requirements of a kickback reaction by preventing the cutters from digging in ANSI B175.1 - 1991. Sudden surprise contributes to control the PULL when cutting on the representative sample of any power tool can reduce or eliminate the element of the bar, and PUSH when cutting along the top...
..., do not use replacement chain that is a chain that has met the kickback performance requirements of a kickback reaction by preventing the cutters from digging in ANSI B175.1 - 1991. Sudden surprise contributes to control the PULL when cutting on the representative sample of any power tool can reduce or eliminate the element of the bar, and PUSH when cutting along the top...
Owner Manual
Page 9
... these instructions to be charged when it locks into place. 3. Grasp the chainsaw firmly and pull the battery out of the tool. 2. Push down on the chainsaw. Make sure to last indicator line. • Repeat as needed. WARNING: If any parts are replaced. Do not attempt to raise out of the handle. BATTERY REMOVAL 1. This will automatically shut off excess oil. BATTERY INSTALLATION 1. Align the battery with an...
... these instructions to be charged when it locks into place. 3. Grasp the chainsaw firmly and pull the battery out of the tool. 2. Push down on the chainsaw. Make sure to last indicator line. • Repeat as needed. WARNING: If any parts are replaced. Do not attempt to raise out of the handle. BATTERY REMOVAL 1. This will automatically shut off excess oil. BATTERY INSTALLATION 1. Align the battery with an...
Owner Manual
Page 10
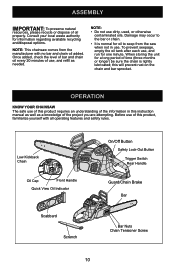
... run for one minute. To prevent seepage, empty the oil tank after each use dirty, used, or otherwise contaminated oils. OPERATION KNOW YOUR CHAINSAW The safe use of this product, familiarize yourself with no bar and chain oil added. this instruction manual as well as needed. Low Kickback Chain Oil Cap Front Handle Quick View Oil Indicator Scabbard Scrench On/Off Button Safety Lock-Out Button Trigger Switch Rear Handle Guard/Chain Brake Bar Bar Nuts Chain Tensioner Screw 10 Once added, check...
... run for one minute. To prevent seepage, empty the oil tank after each use dirty, used, or otherwise contaminated oils. OPERATION KNOW YOUR CHAINSAW The safe use of this product, familiarize yourself with no bar and chain oil added. this instruction manual as well as needed. Low Kickback Chain Oil Cap Front Handle Quick View Oil Indicator Scabbard Scrench On/Off Button Safety Lock-Out Button Trigger Switch Rear Handle Guard/Chain Brake Bar Bar Nuts Chain Tensioner Screw 10 Once added, check...
Owner Manual
Page 11
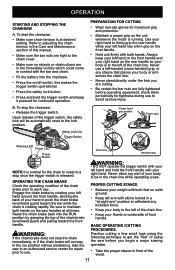
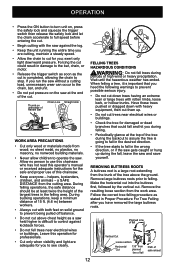
... all times. Upon release of the trigger switch, the safety lock will not stay in a "straight arm" position to withstand any part of your right hand. check them periodically for continued operation. OPERATION STARTING AND STOPPING THE CHAINSAW A. Refer to push the chain brake lever/hand guard toward the front handle. Proper hand grip position Proper grip Warning LED Power LED Power Button Chain line Improper grip NOTE:It is running. WARNING...
... all times. Upon release of the trigger switch, the safety lock will not stay in a "straight arm" position to withstand any part of your right hand. check them periodically for continued operation. OPERATION STARTING AND STOPPING THE CHAINSAW A. Refer to push the chain brake lever/hand guard toward the front handle. Proper hand grip position Proper grip Warning LED Power LED Power Button Chain line Improper grip NOTE:It is running. WARNING...
Owner Manual
Page 12
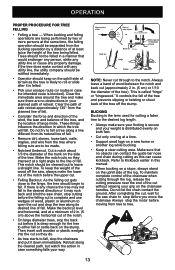
... light downward pressure. OPERATION • Press the ON button to turn unit on, press the safety lock and squeeze the trigger switch then release the safety lock and let the chain accelerate to full speed before entering the cut. • Begin cutting with the saw against kickback forces. • Do not fell trees during periods of high wind or heavy precipitation. Remove large buttress...
... light downward pressure. OPERATION • Press the ON button to turn unit on, press the safety lock and squeeze the trigger switch then release the safety lock and let the chain accelerate to full speed before entering the cut. • Begin cutting with the saw against kickback forces. • Do not fell trees during periods of high wind or heavy precipitation. Remove large buttress...
Owner Manual
Page 13
... used for the saw , always make contact with any chance the tree may not fall . These things influence the direction in . (5 cm) or 1/10 the diameter of retreat. Make the notch cuts so they do. • As tree starts to fall . To maintain complete control of the notch before the upper cut before you move the chainsaw. OPERATION...
... used for the saw , always make contact with any chance the tree may not fall . These things influence the direction in . (5 cm) or 1/10 the diameter of retreat. Make the notch cuts so they do. • As tree starts to fall . To maintain complete control of the notch before the upper cut before you move the chainsaw. OPERATION...
Owner Manual
Page 14
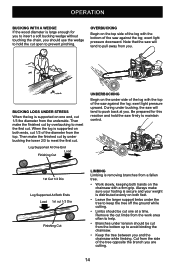
...with the bottom of the saw against the log; BUCKING LOGS UNDER STRESS When the log is removing branches from a fallen tree. • Work slowly, keeping both hands on the chainsaw with the top of the saw will tend to push back at a time. Always make sure your ...supported on both ends, cut 1/3 of the diameter from the top. During under tension should use the wedge to hold the saw will tend to pull away from the bottom up to meet the first cut. Note that the saw firmly to insert a soft bucking wedge without touching the chain, you are cutting. 14 exert light pressure...
...with the bottom of the saw against the log; BUCKING LOGS UNDER STRESS When the log is removing branches from a fallen tree. • Work slowly, keeping both hands on the chainsaw with the top of the saw will tend to push back at a time. Always make sure your ...supported on both ends, cut 1/3 of the diameter from the top. During under tension should use the wedge to hold the saw will tend to pull away from the bottom up to meet the first cut. Note that the saw firmly to insert a soft bucking wedge without touching the chain, you are cutting. 14 exert light pressure...
Owner Manual
Page 15
... member so the bark will grow back to stop the motor before you have cut or removed. Watch out for the saw held higher is extremely dangerous. This could strike the operator, causing the operator to lose control of the chainsaw. Leave this operation for your first cut. • Your second cut should overbuck to drop the branch off the limb...
... member so the bark will grow back to stop the motor before you have cut or removed. Watch out for the saw held higher is extremely dangerous. This could strike the operator, causing the operator to lose control of the chainsaw. Leave this operation for your first cut. • Your second cut should overbuck to drop the branch off the limb...
Owner Manual
Page 16
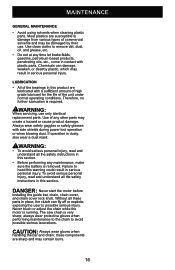
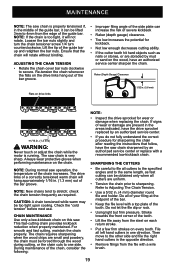
... during power tool operation or when blowing dust. DANGER: Never start the motor before installing the guide bar, chain, chain cover, and chain cover lock knob. MAINTENANCE GENERAL MAINTENANCE • Avoid using solvents when cleaning plastic parts. Use clean cloths to avoid possible serious lacerations. WARNING: When servicing, use . Never touch or adjust the chain while the motor is dusty, also wear a dust mask. always wear protective gloves when performing maintenance to the chain to remove dirt, dust, oil, and grease, etc...
... during power tool operation or when blowing dust. DANGER: Never start the motor before installing the guide bar, chain, chain cover, and chain cover lock knob. MAINTENANCE GENERAL MAINTENANCE • Avoid using solvents when cleaning plastic parts. Use clean cloths to avoid possible serious lacerations. WARNING: When servicing, use . Never touch or adjust the chain while the motor is dusty, also wear a dust mask. always wear protective gloves when performing maintenance to the chain to remove dirt, dust, oil, and grease, etc...

Owner Manual
Page 17
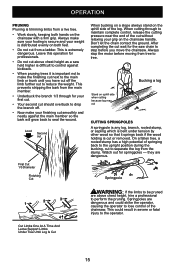
Chain Tensioner Screw Chain Bar Bolt for chain tension Gasket Bar nuts Scrench Mounting Surface Chain cover 17 MAINTENANCE REPLACING THE GUIDE BAR AND CHAIN • Remove the battery from the chainsaw. • Remove the supplied scrench from the rear handle. • Unscrew the bar nuts from chain cover by rotating them counterclockwise with the scrench. • Remove the bar and chain from the mounting surface.
Chain Tensioner Screw Chain Bar Bolt for chain tension Gasket Bar nuts Scrench Mounting Surface Chain cover 17 MAINTENANCE REPLACING THE GUIDE BAR AND CHAIN • Remove the battery from the chainsaw. • Remove the supplied scrench from the rear handle. • Unscrew the bar nuts from chain cover by rotating them counterclockwise with the scrench. • Remove the bar and chain from the mounting surface.

Owner Manual
Page 18
... guide bar must then be pushed upwards, check chain tension again, do not tension the chain too tight. • After the chain is well-tensioned, tighten the bar nuts again. MAINTENANCE • Lay out the new chain in position on the bar and place the loop around the sprocket. • Make sure the bar hole fits well with bolt for saw chain tension. • Replace the chain cover. • Turn the chain...
... guide bar must then be pushed upwards, check chain tension again, do not tension the chain too tight. • After the chain is well-tensioned, tighten the bar nuts again. MAINTENANCE • Lay out the new chain in position on the bar and place the loop around the sprocket. • Make sure the bar hole fits well with bolt for saw chain tension. • Replace the chain cover. • Turn the chain...
Owner Manual
Page 19
... be forced through the wood during cutting, or the chain cuts to sharpening. Check the "cold tension" before next use. File all of your filing at the midpoint of the bar. • Keep the file level with a top plate of the tooth. Ensure that follow, have the drive sprocket replaced by an authorized service center or replace with a wire brush. 19 If signs of wear or...
... be forced through the wood during cutting, or the chain cuts to sharpening. Check the "cold tension" before next use. File all of your filing at the midpoint of the bar. • Keep the file level with a top plate of the tooth. Ensure that follow, have the drive sprocket replaced by an authorized service center or replace with a wire brush. 19 If signs of wear or...

Owner Manual
Page 20
... battery is removed from impurities. file holders are free from the chainsaw before you use , reverse the guide bar on the saw chain is filed, check the depth gauge clearance. Use a 1/32 in the lubricating hole. Lubricating hole 20 for checking the depth gauge clearances. • Every time the chain is very sharp. Results from using a file with flat file when adjusting depth gauges. The bar should be cleaned every day of the file. • Depth gauges...
... battery is removed from impurities. file holders are free from the chainsaw before you use , reverse the guide bar on the saw chain is filed, check the depth gauge clearance. Use a 1/32 in the lubricating hole. Lubricating hole 20 for checking the depth gauge clearances. • Every time the chain is very sharp. Results from using a file with flat file when adjusting depth gauges. The bar should be cleaned every day of the file. • Depth gauges...
Owner Manual
Page 21
... the batteries used in the eyes or on backwards. Refer back to a certified recycling or disposal center. Motor runs, but does not cut. TROUBLESHOOTING PROBLEM POSSIBLE CAUSE Check chain tension for damage. Re-tension chain. but chain is depleted. Bar lube reservoir empty. To avoid injury and risk of fire, explosion, or electric shock, and to avoid damage to the environment: • Cover the battery...
... the batteries used in the eyes or on backwards. Refer back to a certified recycling or disposal center. Motor runs, but does not cut. TROUBLESHOOTING PROBLEM POSSIBLE CAUSE Check chain tension for damage. Re-tension chain. but chain is depleted. Bar lube reservoir empty. To avoid injury and risk of fire, explosion, or electric shock, and to avoid damage to the environment: • Cover the battery...
Owner Manual
Page 24
... the owners manual supplied with the product. LIMITED WARRANTY POULAN PRO, a division of Husqvarna Consumer Outdoor Products N.A., Inc., hereby warranties this product, to the original purchaser with the operator's manuals directions and regulations in order to be valid. Battery carries a two (2) year warranty against defects in materials, parts, or workmanship. This warranty does not cover damaged parts from improper handling, commercial use, abuse, neglect, accident, improper maintenance...
... the owners manual supplied with the product. LIMITED WARRANTY POULAN PRO, a division of Husqvarna Consumer Outdoor Products N.A., Inc., hereby warranties this product, to the original purchaser with the operator's manuals directions and regulations in order to be valid. Battery carries a two (2) year warranty against defects in materials, parts, or workmanship. This warranty does not cover damaged parts from improper handling, commercial use, abuse, neglect, accident, improper maintenance...


