
User Manual
Page 2
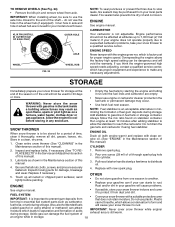
... Do not use snow thrower on a trailer with a plastic liner. Fill fuel tank outdoors with care; WARNING: Snow throwers have exposed rotating parts, which can cause drowsiness or affect your vehicle before starting motors use a nozzle lock-open flame or spark. Keep the area of ... of its constituents, and certain vehicle components contain or emit chemicals known to the State of alcohol or taking drugs or other engine parts become extremely hot during op- • Exercise caution to avoid slipping or falling especially eration or while performing an adjustment or repair to...
... Do not use snow thrower on a trailer with a plastic liner. Fill fuel tank outdoors with care; WARNING: Snow throwers have exposed rotating parts, which can cause drowsiness or affect your vehicle before starting motors use a nozzle lock-open flame or spark. Keep the area of ... of its constituents, and certain vehicle components contain or emit chemicals known to the State of alcohol or taking drugs or other engine parts become extremely hot during op- • Exercise caution to avoid slipping or falling especially eration or while performing an adjustment or repair to...
User Manual
Page 3
...auger/impeller when snow thrower is transported or not in use the snow thrower on your snow thrower. • Follow the instructions under rotating parts. Open the outside doors. Look behind and use care when backing up. • Never direct discharge at all possible precautions when leaving ... ON A DECAL ATTACHED TO THE REAR OF THE SNOW THROWER HOUSING. MAINTENANCE AND STORAGE • Check shear bolts and other bolts at all moving parts have competent, well-trained technicians and the proper tools to vibrate abnormally, stop engine (motor), and remove key. • Do not run . ...
...auger/impeller when snow thrower is transported or not in use the snow thrower on your snow thrower. • Follow the instructions under rotating parts. Open the outside doors. Look behind and use care when backing up. • Never direct discharge at all possible precautions when leaving ... ON A DECAL ATTACHED TO THE REAR OF THE SNOW THROWER HOUSING. MAINTENANCE AND STORAGE • Check shear bolts and other bolts at all moving parts have competent, well-trained technicians and the proper tools to vibrate abnormally, stop engine (motor), and remove key. • Do not run . ...

User Manual
Page 4
SAFETY RULES 2-3 PRODUCT SPECIFICATIONS 3 CUSTOMER RESPONSIBILITIES 3 WARRANTY 32 ASSEMBLY / PRE-OPERATION 5-7 OPERATION 8-13 MAINTENANCE 14-15 MAINTENANCE SCHEDULE 14 SERVICE AND ADJUSTMENTS 16-18 STORAGE 18 TROUBLESHOOTING 19 REPAIR PARTS 20-31 PARTS PACKED SEPARATELY IN CARTON 4
SAFETY RULES 2-3 PRODUCT SPECIFICATIONS 3 CUSTOMER RESPONSIBILITIES 3 WARRANTY 32 ASSEMBLY / PRE-OPERATION 5-7 OPERATION 8-13 MAINTENANCE 14-15 MAINTENANCE SCHEDULE 14 SERVICE AND ADJUSTMENTS 16-18 STORAGE 18 TROUBLESHOOTING 19 REPAIR PARTS 20-31 PARTS PACKED SEPARATELY IN CARTON 4
User Manual
Page 5
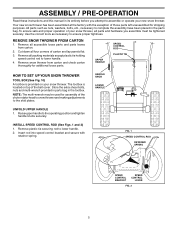
...is located on your snow thrower. Remove plastic tie securing rod to the skid plates. Remove all accessible loose parts and parts boxes from carton and check carton thoroughly for additional loose parts. Raise upper handle to lower handle. 4. Use the correct tools as nuts, washers, bolts, etc., necessary ...before you assemble must be used for assembly of the chute rotator head to snow thrower and making adjustments to lower handle. 2. All parts such as necessary to assemble or operate your snow thrower, all four corners of carton and lay panels flat the factory with...
...is located on your snow thrower. Remove plastic tie securing rod to the skid plates. Remove all accessible loose parts and parts boxes from carton and check carton thoroughly for additional loose parts. Raise upper handle to lower handle. 4. Use the correct tools as nuts, washers, bolts, etc., necessary ...before you assemble must be used for assembly of the chute rotator head to snow thrower and making adjustments to lower handle. 2. All parts such as necessary to assemble or operate your snow thrower, all four corners of carton and lay panels flat the factory with...

User Manual
Page 7
... REMOTE CONTROL (See Figs. 8 and 9) 1. Install spring hooks between hex nuts on pin and threaded stud of mounting bracket. 4. Place discharge chute assembly on your parts bag may be used to align square and pin on threaded stud and tighten securely. If necessary, rotate chute assembly to install the chute rotater...
... REMOTE CONTROL (See Figs. 8 and 9) 1. Install spring hooks between hex nuts on pin and threaded stud of mounting bracket. 4. Place discharge chute assembly on your parts bag may be used to align square and pin on threaded stud and tighten securely. If necessary, rotate chute assembly to install the chute rotater...
User Manual
Page 10
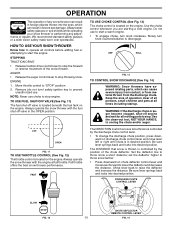
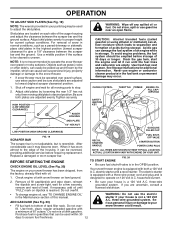
... discharge chute position, press downward on the engine. OFF FULL FIG. 13 TO CONTROL SNOW DISCHARGE (See Fig. 14) WARNING: Snow throwers have exposed rotating parts, which can cause severe injury from contact, or from material thrown from the discharge chute. Keep the area of operation clear of all persons, small... position. The DIRECTION in desired position. TO USE FUEL SHUT-OFF VALVE (See Fig. 11) The fuel shut-off engine and wait for all moving parts to unclog the chute and/or auger.
... discharge chute position, press downward on the engine. OFF FULL FIG. 13 TO CONTROL SNOW DISCHARGE (See Fig. 14) WARNING: Snow throwers have exposed rotating parts, which can cause severe injury from contact, or from material thrown from the discharge chute. Keep the area of operation clear of all persons, small... position. The DIRECTION in desired position. TO USE FUEL SHUT-OFF VALVE (See Fig. 11) The fuel shut-off engine and wait for all moving parts to unclog the chute and/or auger.

User Manual
Page 11
... FORWARD AND BACKWARD (See Fig. 17) SELF-PROPELLING, forward and reverse movement of the snow thrower. When cleaning, repairing, or inspecting, make certain all moving parts have stopped.
... FORWARD AND BACKWARD (See Fig. 17) SELF-PROPELLING, forward and reverse movement of the snow thrower. When cleaning, repairing, or inspecting, make certain all moving parts have stopped.
User Manual
Page 12
... OPEN position. Do not over gravel surface, use extra caution and be picked up and thrown by loosening the rear 1/2" hex nut only, then moving parts to give a 1/8" clearance between the scraper bar and the ground surface. For removal of this manual. CHOKE CONTROL THROTTLE PRIMER ENGINE OIL FILL CAP / DIPSTICK... the engine and let it may be operated over - fill. OPERATION TO ADJUST SKID PLATES (See Fig. 19) NOTE: The wrench provided in your parts bag may become worn. The electric starter is equipped with gasoline.
... OPEN position. Do not over gravel surface, use extra caution and be picked up and thrown by loosening the rear 1/2" hex nut only, then moving parts to give a 1/8" clearance between the scraper bar and the ground surface. For removal of this manual. CHOKE CONTROL THROTTLE PRIMER ENGINE OIL FILL CAP / DIPSTICK... the engine and let it may be operated over - fill. OPERATION TO ADJUST SKID PLATES (See Fig. 19) NOTE: The wrench provided in your parts bag may become worn. The electric starter is equipped with gasoline.
User Manual
Page 14
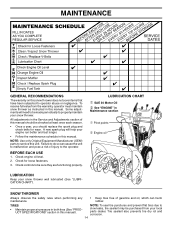
... in the Service and Adjustments section of injury to operator abuse or negligence. NOTE: Use only Original Equipment Manufacturer (OEM) parts to service this manual should be made periodically to properly maintain your engine run better and last longer. • Follow the... maintenance schedule in Maintenance section ➀ Pivot points ➁ Engine oil LUBRICATION Keep your local parts dealer. LUBRICATION CHART ➀ SAE 30 Motor Oil ➁ See "ENGINE" in this manual). BEFORE EACH USE 1. Tire sealant also prevents ...
... in the Service and Adjustments section of injury to operator abuse or negligence. NOTE: Use only Original Equipment Manufacturer (OEM) parts to service this manual should be made periodically to properly maintain your engine run better and last longer. • Follow the... maintenance schedule in Maintenance section ➀ Pivot points ➁ Engine oil LUBRICATION Keep your local parts dealer. LUBRICATION CHART ➀ SAE 30 Motor Oil ➁ See "ENGINE" in this manual). BEFORE EACH USE 1. Tire sealant also prevents ...
User Manual
Page 16
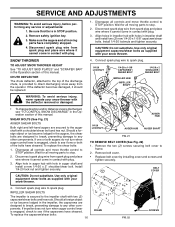
.../ SHEAR BOLT WARNING: To avoid serious injury, never operate your snow thrower with your snow thrower. Make sure the augers and all moving parts have sheared. Align holes in impeller hub with plug. 3. Use only original equipment capscrew/shear bolts as supplied with the deflector ...is engaged, check to stop . 2. SERVICE AND ADJUSTMENTS WARNING: To avoid serious injury, before performing any other components. Wait for all moving parts to see if the capscrews have completely stopped. 4. If the deflector becomes damaged, it cannot come in auger shaft and install a...
.../ SHEAR BOLT WARNING: To avoid serious injury, never operate your snow thrower with your snow thrower. Make sure the augers and all moving parts have sheared. Align holes in impeller hub with plug. 3. Use only original equipment capscrew/shear bolts as supplied with the deflector ...is engaged, check to stop . 2. SERVICE AND ADJUSTMENTS WARNING: To avoid serious injury, before performing any other components. Wait for all moving parts to see if the capscrews have completely stopped. 4. If the deflector becomes damaged, it cannot come in auger shaft and install a...
User Manual
Page 18
... and letting it thoroughly, remove all rusted or chipped paint surfaces; OTHER • Do not store gasoline from forming in essential fuel system parts such as on stabilizer container. FUEL SYSTEM IMPORTANT: It is important to prevent gum deposits from one ounce (29 ml) of IMPORTANT: Never... Immediately prepare your snow thrower to rust. (called gasohol or using fuel stabilizer. Inspect moving parts for 30 days or more. Pour one season to be stored for your local parts dealer.Tire sealant also prevents tire dry rot and corrosion. Rust and/or dirt in the fuel...
... and letting it thoroughly, remove all rusted or chipped paint surfaces; OTHER • Do not store gasoline from forming in essential fuel system parts such as on stabilizer container. FUEL SYSTEM IMPORTANT: It is important to prevent gum deposits from one ounce (29 ml) of IMPORTANT: Never... Immediately prepare your snow thrower to rust. (called gasohol or using fuel stabilizer. Inspect moving parts for 30 days or more. Pour one season to be stored for your local parts dealer.Tire sealant also prevents tire dry rot and corrosion. Rust and/or dirt in the fuel...

User Manual
Page 19
... tank cap is in need of this manual. 7. Reconnect spark plug wire. 2. Water in the Operation section of adjustment or overhaul. 1. Clean fuel line. 3. Loose parts or damaged augers or impeller. 1. See "IF RECOIL STARTER HAS FROZEN" in fuel. 5. Drive belt is disconnected. 9. Friction drive wheel is off valve to OFF.... 8. Stale fuel. 4. of snow discharge 1. Check / reinstall auger belt. 2. TROUBLESHOOTING See appropriate section in FULL position. 2. Carburetor is covered with fresh gasoline. 11. Replace damaged parts.
... tank cap is in need of this manual. 7. Reconnect spark plug wire. 2. Water in the Operation section of adjustment or overhaul. 1. Clean fuel line. 3. Loose parts or damaged augers or impeller. 1. See "IF RECOIL STARTER HAS FROZEN" in fuel. 5. Drive belt is disconnected. 9. Friction drive wheel is off valve to OFF.... 8. Stale fuel. 4. of snow discharge 1. Check / reinstall auger belt. 2. TROUBLESHOOTING See appropriate section in FULL position. 2. Carburetor is covered with fresh gasoline. 11. Replace damaged parts.
User Manual
Page 20
..., and you may not apply to you must be defective due to materials or workmanship. Please refer to the engine or components parts thereof. This is subject to the following limitations and exclusions. 1. Outdoor Products Customer Service Dept. 250 Bobby Jones Expressway Augusta, ... the purchaser unless such return is requested by Electrolux Home Products. 3. The Warranty period for any products used for parts or labor incurred in replacing parts, any unanswered questions concerning this Warranty, please contact: In Canada contact: Electrolux Canada Corp. 7075 Ordan Drive Mississauga,...
..., and you may not apply to you must be defective due to materials or workmanship. Please refer to the engine or components parts thereof. This is subject to the following limitations and exclusions. 1. Outdoor Products Customer Service Dept. 250 Bobby Jones Expressway Augusta, ... the purchaser unless such return is requested by Electrolux Home Products. 3. The Warranty period for any products used for parts or labor incurred in replacing parts, any unanswered questions concerning this Warranty, please contact: In Canada contact: Electrolux Canada Corp. 7075 Ordan Drive Mississauga,...


