
User Manual
Page 1
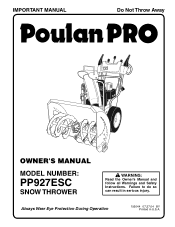
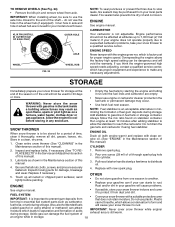
IMPORTANT MANUAL Do Not Throw Away OWNER'S MANUAL MODEL NUMBER: PP927ESC SNOW THROWER WARNING: Read the Owner's Manual and follow all Warnings and Safety Instructions. Failure to do so can result in U.S.A. Always Wear Eye Protection During Operation 192044 07.27.04 BY Printed in serious injury.
IMPORTANT MANUAL Do Not Throw Away OWNER'S MANUAL MODEL NUMBER: PP927ESC SNOW THROWER WARNING: Read the Owner's Manual and follow all Warnings and Safety Instructions. Failure to do so can result in U.S.A. Always Wear Eye Protection During Operation 192044 07.27.04 BY Printed in serious injury.
User Manual
Page 2
... service instruction manual • If snow thrower must be thrown PREPARATION • Remove foreign objects. ence of a building where fumes may be operated over gravel surface, carefully. Never remove fuel tank cap or add fuel to lowest (highest scraper clearance) position. Check fuel supply before filling. Never fill containers inside of alcohol or taking drugs or other medication • Disengage all times including startup. - Use...
... service instruction manual • If snow thrower must be thrown PREPARATION • Remove foreign objects. ence of a building where fumes may be operated over gravel surface, carefully. Never remove fuel tank cap or add fuel to lowest (highest scraper clearance) position. Check fuel supply before filling. Never fill containers inside of alcohol or taking drugs or other medication • Disengage all times including startup. - Use...
User Manual
Page 3
... authorized service center. age" sections of a new snow thrower. MAINTENANCE AND STORAGE • Check shear bolts and other bolts at high transport speeds on the handles. Please read and retain this owner's manual. 3 Exercise extreme caution when changing direction on your snow thrower. • Follow the instructions under rotating parts. Look behind and use the snow thrower on or crossing gravel drives, walks or roads. never run the engine (motor) indoors, except when starting . • Take all times...
... authorized service center. age" sections of a new snow thrower. MAINTENANCE AND STORAGE • Check shear bolts and other bolts at high transport speeds on the handles. Please read and retain this owner's manual. 3 Exercise extreme caution when changing direction on your snow thrower. • Follow the instructions under rotating parts. Look behind and use the snow thrower on or crossing gravel drives, walks or roads. never run the engine (motor) indoors, except when starting . • Take all times...

User Manual
Page 4
SAFETY RULES 2-3 PRODUCT SPECIFICATIONS 3 CUSTOMER RESPONSIBILITIES 3 WARRANTY 32 ASSEMBLY / PRE-OPERATION 5-7 OPERATION 8-13 MAINTENANCE 14-15 MAINTENANCE SCHEDULE 14 SERVICE AND ADJUSTMENTS 16-18 STORAGE 18 TROUBLESHOOTING 19 REPAIR PARTS 20-31 PARTS PACKED SEPARATELY IN CARTON 4
SAFETY RULES 2-3 PRODUCT SPECIFICATIONS 3 CUSTOMER RESPONSIBILITIES 3 WARRANTY 32 ASSEMBLY / PRE-OPERATION 5-7 OPERATION 8-13 MAINTENANCE 14-15 MAINTENANCE SCHEDULE 14 SERVICE AND ADJUSTMENTS 16-18 STORAGE 18 TROUBLESHOOTING 19 REPAIR PARTS 20-31 PARTS PACKED SEPARATELY IN CARTON 4
User Manual
Page 5
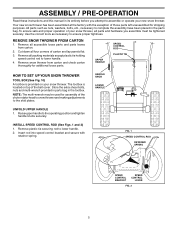
... extra shear bolts, nuts and multi-wrench provided in parts bag in the toolbox. Your new snow thrower has been assembled at . 3. INSTALL SPEED CONTROL ROD (See Figs. 1 and 2) 1. Cut down all parts and hardware you attempt to assemble or operate your snow thrower. Remove snow thrower from carton. 2. FIG. 1 SPEED CONTROL ROD RETAINER SPRING SPEED CONTROL BRACKET SPEED CONTROL LEVER FIG. 2 5 HANDLE KNOB LOWER HANDLE UNFOLD UPPER HANDLE 1. ASSEMBLY / PRE-OPERATION Read these instructions and this manual in its entirety before you assemble must be used for assembly...
... extra shear bolts, nuts and multi-wrench provided in parts bag in the toolbox. Your new snow thrower has been assembled at . 3. INSTALL SPEED CONTROL ROD (See Figs. 1 and 2) 1. Cut down all parts and hardware you attempt to assemble or operate your snow thrower. Remove snow thrower from carton. 2. FIG. 1 SPEED CONTROL ROD RETAINER SPRING SPEED CONTROL BRACKET SPEED CONTROL LEVER FIG. 2 5 HANDLE KNOB LOWER HANDLE UNFOLD UPPER HANDLE 1. ASSEMBLY / PRE-OPERATION Read these instructions and this manual in its entirety before you assemble must be used for assembly...

User Manual
Page 6
... of rod into hole in auger control bracket. Secure with retainer spring. TRACTION DRIVE CONTROL ROD RUBBER SLEEVE CONTROL ARM AUGER CONTROL ROD RUBBER SLEEVE LOOP OPENING DOWN PIVOT BRACKET FIG. 3 TRACTION DRIVE CONTROL LEVER RETAINER SPRING TRACTION DRIVE CONTROL ROD DRIVE CONTROL BRACKET FIG. 4 LOOP OPENING UP FIG. 5 AUGER CONTROL ROD RETAINER SPRING AUGER CONTROL LEVER AUGER CONTROL BRACKET FIG. 6 6 ASSEMBLY / PRE-OPERATION INSTALL TRACTION DRIVE CONTROL ROD (See Figs. 3 and 4) The traction drive control rod has the long loop...
... of rod into hole in auger control bracket. Secure with retainer spring. TRACTION DRIVE CONTROL ROD RUBBER SLEEVE CONTROL ARM AUGER CONTROL ROD RUBBER SLEEVE LOOP OPENING DOWN PIVOT BRACKET FIG. 3 TRACTION DRIVE CONTROL LEVER RETAINER SPRING TRACTION DRIVE CONTROL ROD DRIVE CONTROL BRACKET FIG. 4 LOOP OPENING UP FIG. 5 AUGER CONTROL ROD RETAINER SPRING AUGER CONTROL LEVER AUGER CONTROL BRACKET FIG. 6 6 ASSEMBLY / PRE-OPERATION INSTALL TRACTION DRIVE CONTROL ROD (See Figs. 3 and 4) The traction drive control rod has the long loop...

User Manual
Page 7
... CABLE BRACKET SPRING 1/4-20 SHOULDER BOLT HOOK BETWEEN HEX NUTS ON CHUTE ROTATER HEAD 5/16-18 CARRIAGE BOLT CHUTE BRACKET FIG. 7 PIN THREADED STUD ROTATER HEAD MOUNTING BRACKET 5/16 FLAT WASHER 5/16-18 LOCKNUT FIG. 8 CHUTE DEFLECTOR CONTROL LEVER FIG. 9 CHECK TIRE PRESSURE The tires on chute rotater head and into hole in chute bracket. 3. Tighten securely. 2. Place discharge chute assembly on pin and threaded stud of snow thrower. 2. Position chute rotater head over chute bracket. Install remote cable...
... CABLE BRACKET SPRING 1/4-20 SHOULDER BOLT HOOK BETWEEN HEX NUTS ON CHUTE ROTATER HEAD 5/16-18 CARRIAGE BOLT CHUTE BRACKET FIG. 7 PIN THREADED STUD ROTATER HEAD MOUNTING BRACKET 5/16 FLAT WASHER 5/16-18 LOCKNUT FIG. 8 CHUTE DEFLECTOR CONTROL LEVER FIG. 9 CHECK TIRE PRESSURE The tires on chute rotater head and into hole in chute bracket. 3. Tighten securely. 2. Place discharge chute assembly on pin and threaded stud of snow thrower. 2. Position chute rotater head over chute bracket. Install remote cable...
User Manual
Page 8
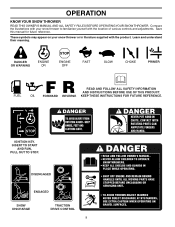
.... INSERT TO START AND RUN, PULL OUT TO STOP. KEEP THESE INSTRUCTIONS FOR FUTURE REFERENCE. OPERATION KNOW YOUR SNOW THROWER READ THIS OWNER'S MANUAL AND ALL SAFETY RULES BEFORE OPERATING YOUR SNOW THROWER. DISENGAGED ENGAGED SNOW DISCHARGE TRACTION DRIVE CONTROL 8 Compare the illustrations with your snow thrower or in literature supplied with the location of various controls and adjustments. Save this manual for future reference. DANGER OR WARNING PRIMER FORWARD REVERSE READ...
.... INSERT TO START AND RUN, PULL OUT TO STOP. KEEP THESE INSTRUCTIONS FOR FUTURE REFERENCE. OPERATION KNOW YOUR SNOW THROWER READ THIS OWNER'S MANUAL AND ALL SAFETY RULES BEFORE OPERATING YOUR SNOW THROWER. DISENGAGED ENGAGED SNOW DISCHARGE TRACTION DRIVE CONTROL 8 Compare the illustrations with your snow thrower or in literature supplied with the location of various controls and adjustments. Save this manual for future reference. DANGER OR WARNING PRIMER FORWARD REVERSE READ...

User Manual
Page 9
... speed and to store spare shear bolts, locknuts and wrench. ACTUAL LOCATION MAY VARY WITH THE ENGINE ON YOUR UNIT. OPERATION SAFETY IGNITION KEY SPARK PLUG CHOKE CONTROL ENGINE OIL CAP AUGER DISCHARGE CHUTE CONTROL LEVER WITH DIPSTICK CONTROL LEVER DRIVE SPEED CONTROL LEVER DEFLECTOR REMOTE CONTROL LEVER GASOLINE FILLER CAP CHUTE DEFLECTOR TRACTION DRIVE CONTROL LEVER THROTTLE / ENGINE CONTROL OIL DRAIN PLUG RECOIL (AUXILIARY) STARTER HANDLE PRIMER POWER CORD PLUG ELECTRIC START BUTTON DISCHARGE CHUTE FUEL SHUTOFF VALVE CLEAN-OUT TOOL LH TURN TRIGGER LIGHT HANDLE KNOB...
... speed and to store spare shear bolts, locknuts and wrench. ACTUAL LOCATION MAY VARY WITH THE ENGINE ON YOUR UNIT. OPERATION SAFETY IGNITION KEY SPARK PLUG CHOKE CONTROL ENGINE OIL CAP AUGER DISCHARGE CHUTE CONTROL LEVER WITH DIPSTICK CONTROL LEVER DRIVE SPEED CONTROL LEVER DEFLECTOR REMOTE CONTROL LEVER GASOLINE FILLER CAP CHUTE DEFLECTOR TRACTION DRIVE CONTROL LEVER THROTTLE / ENGINE CONTROL OIL DRAIN PLUG RECOIL (AUXILIARY) STARTER HANDLE PRIMER POWER CORD PLUG ELECTRIC START BUTTON DISCHARGE CHUTE FUEL SHUTOFF VALVE CLEAN-OUT TOOL LH TURN TRIGGER LIGHT HANDLE KNOB...
User Manual
Page 10
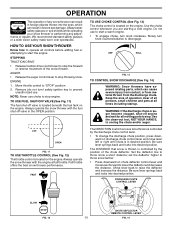
... chute is located on the engine.Always operate the snow thrower with the fuel shut-off valve is controlled by the position of the snow thrower. ENGINE 1. Remove (do not turn knob counterclockwise to stop engine. Full throttle offers the best snow thrower performance. Be sure lever springs back and locks into desired position. FAST TO USE CHOKE CONTROL (See Fig. 13) The choke control is in the OPEN position. DISCHARGE CHUTE CONTROL LEVER SLOW FIG. 12 CHUTE DEFLECTOR REMOTE CONTROL LEVER 10 FIG. 14 TO USE FUEL...
... chute is located on the engine.Always operate the snow thrower with the fuel shut-off valve is controlled by the position of the snow thrower. ENGINE 1. Remove (do not turn knob counterclockwise to stop engine. Full throttle offers the best snow thrower performance. Be sure lever springs back and locks into desired position. FAST TO USE CHOKE CONTROL (See Fig. 13) The choke control is in the OPEN position. DISCHARGE CHUTE CONTROL LEVER SLOW FIG. 12 CHUTE DEFLECTOR REMOTE CONTROL LEVER 10 FIG. 14 TO USE FUEL...

User Manual
Page 11
... the snow thrower. The triggers are located on the speed control lever and move speed control lever when traction drive control lever is recommended that direction. • To turn left side trigger. • To turn in the engaged position. AUGER CONTROL LEVER FIG. 15 USING THE CLEAN-OUT TOOL (See Fig. 16) In certain snow conditions, the discharge chute may become clogged with the operation of discharge) before restarting the engine. • Restart the engine, then squeeze the auger control lever...
... the snow thrower. The triggers are located on the speed control lever and move speed control lever when traction drive control lever is recommended that direction. • To turn left side trigger. • To turn in the engaged position. AUGER CONTROL LEVER FIG. 15 USING THE CLEAN-OUT TOOL (See Fig. 16) In certain snow conditions, the discharge chute may become clogged with the operation of discharge) before restarting the engine. • Restart the engine, then squeeze the auger control lever...
User Manual
Page 12
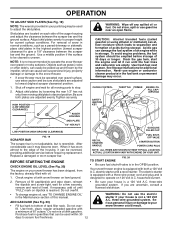
... Volt A.C. Do not store, spill or use the electric starter if your house is reached. CHOKE CONTROL THROTTLE PRIMER ENGINE OIL FILL CAP / DIPSTICK SAFETY IGNITION KEY AUGER HOUSING SKID PLATE 1/2" HEX NUT LOW POSITION (HIGH GROUND CLEARANCE) GASOLINE FILLER CAP SCRAPER BAR FIG. 19 The scraper bar is not adjustable, but is not recommended to stop. 2. Check engine oil with snow thrower on your parts bag may become worn. Your snow thrower engine is in storage. Do not over...
... Volt A.C. Do not store, spill or use the electric starter if your house is reached. CHOKE CONTROL THROTTLE PRIMER ENGINE OIL FILL CAP / DIPSTICK SAFETY IGNITION KEY AUGER HOUSING SKID PLATE 1/2" HEX NUT LOW POSITION (HIGH GROUND CLEARANCE) GASOLINE FILLER CAP SCRAPER BAR FIG. 19 The scraper bar is not adjustable, but is not recommended to stop. 2. Check engine oil with snow thrower on your parts bag may become worn. Your snow thrower engine is in storage. Do not over...
User Manual
Page 13
... engine clean and clear of the power cord into a three-hole grounded 120 Volt A.C. See "TO ADJUST SKID PLATES" in deep, freezing or heavy wet snow. Do not allow engine to remove snow is running , pull the recoil starter handle with the engine at full throttle. DO NOT push the primer. NOTE: Do not use the electric starter. When the engine starts, release the starter button and slowly move the choke control to start . RECOIL STARTER 1. Engine...
... engine clean and clear of the power cord into a three-hole grounded 120 Volt A.C. See "TO ADJUST SKID PLATES" in deep, freezing or heavy wet snow. Do not allow engine to remove snow is running , pull the recoil starter handle with the engine at full throttle. DO NOT push the primer. NOTE: Do not use the electric starter. When the engine starts, release the starter button and slowly move the choke control to start . RECOIL STARTER 1. Engine...
User Manual
Page 14
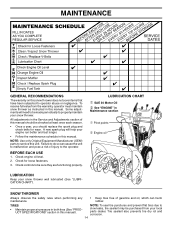
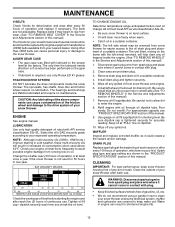
... rubber. Check controls to service this unit. Tire sealant also prevents tire dry rot and corrosion. 14 Check for wear. Check engine oil level. 2. SNOW THROWER Always observe the safety rules when performing any maintenance. • Keep tires free of gasoline and oil, which can cause the unit to malfunction and pose a risk of this manual should replace the spark plug and check belts for loose fasteners. 3. A new spark plug will need to...
... rubber. Check controls to service this unit. Tire sealant also prevents tire dry rot and corrosion. 14 Check for wear. Check engine oil level. 2. SNOW THROWER Always observe the safety rules when performing any maintenance. • Keep tires free of gasoline and oil, which can cause the unit to malfunction and pose a risk of this manual should replace the spark plug and check belts for loose fasteners. 3. A new spark plug will need to...
User Manual
Page 15
... oil consumption when used for easier access to install klick pin into proper hole in wheel axle (See "TO REMOVE WHEELS" in the Service and Adjustments section of operation, whichever occurs first. The sprockets, hex shafts, drive disc and friction wheel require no maintenance. Select the oil's SAE viscosity grade according to the snow thrower. TO CHANGE ENGINE OIL Determine temperature range anticipated before starting in one year. Disconnect spark plug wire from snow thrower...
... oil consumption when used for easier access to install klick pin into proper hole in wheel axle (See "TO REMOVE WHEELS" in the Service and Adjustments section of operation, whichever occurs first. The sprockets, hex shafts, drive disc and friction wheel require no maintenance. Select the oil's SAE viscosity grade according to the snow thrower. TO CHANGE ENGINE OIL Determine temperature range anticipated before starting in one year. Disconnect spark plug wire from snow thrower...
User Manual
Page 16
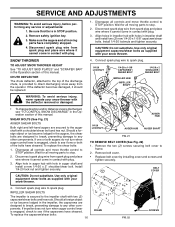
... auger shaft and install a new 1/4-20 x 2" shoulder/shear bolt. Install 1/4-20 lock nut and tighten securely. Connect spark plug wire to STOP position. Disconnect spark plug wire from the operator. Wait for all controls and move throttle control to spark plug. If one or both augers do not turn when auger control lever is provided to stop . 2. CAUTION: Do not substitute. Use only original equipment capscrew/shear bolts as supplied with your snow thrower. SNOW THROWER TO ADJUST SNOW THROWER HEIGHT See "TO ADJUST SKID PLATES" and "SCRAPER BAR...
... auger shaft and install a new 1/4-20 x 2" shoulder/shear bolt. Install 1/4-20 lock nut and tighten securely. Connect spark plug wire to STOP position. Disconnect spark plug wire from the operator. Wait for all controls and move throttle control to spark plug. If one or both augers do not turn when auger control lever is provided to stop . 2. CAUTION: Do not substitute. Use only original equipment capscrew/shear bolts as supplied with your snow thrower. SNOW THROWER TO ADJUST SNOW THROWER HEIGHT See "TO ADJUST SKID PLATES" and "SCRAPER BAR...
User Manual
Page 17
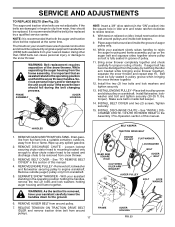
... drive belts are damaged or begin to rejoin the auger housing and frame assembly, pull up any spilled gasoline. 2. While separating the auger housing from around pulleys. 17 BELT KEEPER TRACTION DRIVE BELT ENGINE PULLEY IDLER ARM SQUARE HOLE CLUTCHING IDLER ARM BRACKET FLAT WASHER LOCKWASHER BOLT AUGER BELT AUGER PULLEY BOLT LOCK WASHER FRAME AUGER HOUSING FIG. 23 torque). INSTALL BELT COVER and two (2) screws. See "INSTALL DISCHARGE CHUTE / CHUTE ROTATER HEAD" in the Assembly / Pre-Operation section of auger pulley only. 10. REMOVE BELT COVER - REMOVE AUGER BELT...
... drive belts are damaged or begin to rejoin the auger housing and frame assembly, pull up any spilled gasoline. 2. While separating the auger housing from around pulleys. 17 BELT KEEPER TRACTION DRIVE BELT ENGINE PULLEY IDLER ARM SQUARE HOLE CLUTCHING IDLER ARM BRACKET FLAT WASHER LOCKWASHER BOLT AUGER BELT AUGER PULLEY BOLT LOCK WASHER FRAME AUGER HOUSING FIG. 23 torque). INSTALL BELT COVER and two (2) screws. See "INSTALL DISCHARGE CHUTE / CHUTE ROTATER HEAD" in the Assembly / Pre-Operation section of auger pulley only. 10. REMOVE BELT COVER - REMOVE AUGER BELT...
User Manual
Page 18
.... (called gasohol or using fuel stabilizer. Store in storage. 18 ENGINE OIL Drain oil (with engine warm) and replace with new spark plug. Lubricate as carburetor, • If possible, store your snow thrower indoors and cover it from your snow thrower with the engine governor, which leads to a qualified service center. Pull recoil starter handle slowly a few times to gasoline in the Maintenance section of this manual. 4. Replace with clean engine oil. (See "ENGINE" in fuel tank or storage container...
.... (called gasohol or using fuel stabilizer. Store in storage. 18 ENGINE OIL Drain oil (with engine warm) and replace with new spark plug. Lubricate as carburetor, • If possible, store your snow thrower indoors and cover it from your snow thrower with the engine governor, which leads to a qualified service center. Pull recoil starter handle slowly a few times to gasoline in the Maintenance section of this manual. 4. Replace with clean engine oil. (See "ENGINE" in fuel tank or storage container...

User Manual
Page 19
...Check / reinstall auger belt. 2. Clean snow chute. 4. Fuel shut-off valve to FAST position. 5. Primer not depressed. 7. Move throttle to OPEN position. 2. Connect wire to pull 1. Clean or replace muffler. Loss of drive speed 3. Drive belt is in FULL position. 2. Drain fuel tank and carburetor, refill tank with fresh, clean fuel. 4. Throwing too much snow. 3. Stale fuel. 4. Clean fuel line. 3. Recoil starter is off of pulley. 2. Contact a qualified service centre. Auger belt is hard to spark plug. 9. PROBLEM CAUSE CORRECTION Does not start...
...Check / reinstall auger belt. 2. Clean snow chute. 4. Fuel shut-off valve to FAST position. 5. Primer not depressed. 7. Move throttle to OPEN position. 2. Connect wire to pull 1. Clean or replace muffler. Loss of drive speed 3. Drive belt is in FULL position. 2. Drain fuel tank and carburetor, refill tank with fresh, clean fuel. 4. Throwing too much snow. 3. Stale fuel. 4. Clean fuel line. 3. Recoil starter is off of pulley. 2. Contact a qualified service centre. Auger belt is hard to spark plug. 9. PROBLEM CAUSE CORRECTION Does not start...
User Manual
Page 20
... under this Warranty, please contact: In Canada contact: Electrolux Canada Corp. 7075 Ordan Drive Mississauga, Ontario L5T 1K6 Electrolux Home Products, Inc. Please refer to an authorized service dealer. In the event you have been properly assembled, adjusted, operated, and maintained in replacing parts, any power equipment unit or attachment are belts, shear pins, normal wear, normal adjustments, standard hardware and normal maintenance. 6. ID#, serial number and...
... under this Warranty, please contact: In Canada contact: Electrolux Canada Corp. 7075 Ordan Drive Mississauga, Ontario L5T 1K6 Electrolux Home Products, Inc. Please refer to an authorized service dealer. In the event you have been properly assembled, adjusted, operated, and maintained in replacing parts, any power equipment unit or attachment are belts, shear pins, normal wear, normal adjustments, standard hardware and normal maintenance. 6. ID#, serial number and...


