
User Manual
Page 1
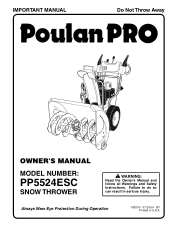
Always Wear Eye Protection During Operation 192030 07.29.04 BY Printed in serious injury. IMPORTANT MANUAL Do Not Throw Away OWNER'S MANUAL MODEL NUMBER: PP5524ESC SNOW THROWER WARNING: Read the Owner's Manual and follow all Warnings and Safety Instructions. Failure to do so can result in U.S.A.
Always Wear Eye Protection During Operation 192030 07.29.04 BY Printed in serious injury. IMPORTANT MANUAL Do Not Throw Away OWNER'S MANUAL MODEL NUMBER: PP5524ESC SNOW THROWER WARNING: Read the Owner's Manual and follow all Warnings and Safety Instructions. Failure to do so can result in U.S.A.
User Manual
Page 2
... burns on clothing, change clothing immediately. • For all times including startup. - Keep the nozzle in rotating parts. Failure to operate this is running engine (motor) or hot engine (motor). - Never smoke while refueling. - Never fill fuel tank indoors. - Never engine (motor) is not possible, then refuel such equipment on a trailer with electric starting motors use a nozzle lock-open flame or spark. doormats, sleds, boards, wires, rocks & landscaping...
... burns on clothing, change clothing immediately. • For all times including startup. - Keep the nozzle in rotating parts. Failure to operate this is running engine (motor) or hot engine (motor). - Never smoke while refueling. - Never fill fuel tank indoors. - Never engine (motor) is not possible, then refuel such equipment on a trailer with electric starting motors use a nozzle lock-open flame or spark. doormats, sleds, boards, wires, rocks & landscaping...
User Manual
Page 3
...-30 (below 0°F) Oil Capacity: 21 Ounces SERIAL NUMBER Spark Plug: Champion RN4C (Gap: .030") DATE OF PURCHASE THE MODEL AND SERIAL NUMBERS WILL BE FOUND ON A DECAL ATTACHED TO THE REAR OF THE SNOW THROWER HOUSING. It has been designed, engineered and manufactured to operator's guide instructions for important details if the snow thrower is generally a warning of the building. We have stopped. Please read and retain this owner's manual. 3 Stay alert...
...-30 (below 0°F) Oil Capacity: 21 Ounces SERIAL NUMBER Spark Plug: Champion RN4C (Gap: .030") DATE OF PURCHASE THE MODEL AND SERIAL NUMBERS WILL BE FOUND ON A DECAL ATTACHED TO THE REAR OF THE SNOW THROWER HOUSING. It has been designed, engineered and manufactured to operator's guide instructions for important details if the snow thrower is generally a warning of the building. We have stopped. Please read and retain this owner's manual. 3 Stay alert...
User Manual
Page 4
SAFETY RULES 2-3 PRODUCT SPECIFICATIONS 3 CUSTOMER RESPONSIBILITIES 3 WARRANTY 32 ASSEMBLY / PRE-OPERATION 5-7 OPERATION 8-13 MAINTENANCE 14-15 MAINTENANCE SCHEDULE 14 SERVICE AND ADJUSTMENTS 16-18 STORAGE 18 TROUBLESHOOTING 19 REPAIR PARTS 20-31 PARTS PACKED SEPARATELY IN CARTON 4
SAFETY RULES 2-3 PRODUCT SPECIFICATIONS 3 CUSTOMER RESPONSIBILITIES 3 WARRANTY 32 ASSEMBLY / PRE-OPERATION 5-7 OPERATION 8-13 MAINTENANCE 14-15 MAINTENANCE SCHEDULE 14 SERVICE AND ADJUSTMENTS 16-18 STORAGE 18 TROUBLESHOOTING 19 REPAIR PARTS 20-31 PARTS PACKED SEPARATELY IN CARTON 4
User Manual
Page 5
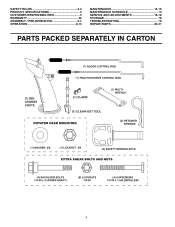
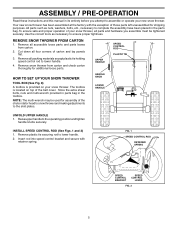
ASSEMBLY / PRE-OPERATION Read these instructions and this manual in its entirety before you assemble must be used for assembly of those parts left unassembled for additional loose parts. Use the correct tools as nuts, washers, bolts, etc., necessary to the operating position and tighten handle knobs securely. HOW TO SET UP YOUR SNOW THROWER TOOL BOX (See Fig. 8) A toolbox is located on your new snow thrower. Remove all accessible loose parts and parts boxes from carton and check carton...
ASSEMBLY / PRE-OPERATION Read these instructions and this manual in its entirety before you assemble must be used for assembly of those parts left unassembled for additional loose parts. Use the correct tools as nuts, washers, bolts, etc., necessary to the operating position and tighten handle knobs securely. HOW TO SET UP YOUR SNOW THROWER TOOL BOX (See Fig. 8) A toolbox is located on your new snow thrower. Remove all accessible loose parts and parts boxes from carton and check carton...

User Manual
Page 6
.... 2. Slide rubber sleeve up as shown. 2. TRACTION DRIVE CONTROL ROD RUBBER SLEEVE CONTROL ARM AUGER CONTROL ROD RUBBER SLEEVE LOOP OPENING DOWN PIVOT BRACKET FIG. 3 TRACTION DRIVE CONTROL LEVER RETAINER SPRING TRACTION DRIVE CONTROL ROD DRIVE CONTROL BRACKET FIG. 4 LOOP OPENING UP FIG. 5 AUGER CONTROL ROD RETAINER SPRING AUGER CONTROL LEVER AUGER CONTROL BRACKET FIG. 6 6 ASSEMBLY / PRE-OPERATION INSTALL TRACTION DRIVE CONTROL ROD (See Figs. 3 and 4) The traction drive control rod has the long loop on the end...
.... 2. Slide rubber sleeve up as shown. 2. TRACTION DRIVE CONTROL ROD RUBBER SLEEVE CONTROL ARM AUGER CONTROL ROD RUBBER SLEEVE LOOP OPENING DOWN PIVOT BRACKET FIG. 3 TRACTION DRIVE CONTROL LEVER RETAINER SPRING TRACTION DRIVE CONTROL ROD DRIVE CONTROL BRACKET FIG. 4 LOOP OPENING UP FIG. 5 AUGER CONTROL ROD RETAINER SPRING AUGER CONTROL LEVER AUGER CONTROL BRACKET FIG. 6 6 ASSEMBLY / PRE-OPERATION INSTALL TRACTION DRIVE CONTROL ROD (See Figs. 3 and 4) The traction drive control rod has the long loop on the end...

User Manual
Page 7
CHUTE ROTATER HEAD 3/8 LOCKNUT 3/8 WASHER CHECK TIRE PRESSURE The tires on your parts bag may be used to align square and pin on underside of chute rotater head with discharge opening toward front of snow thrower. 2. With chute rotater head and chute bracket aligned, position chute rotater head on top of mounting bracket. 4. CHUTE BRACKET FIG. 7 PIN THREADED STUD ROTATER HEAD MOUNTING BRACKET 7 Position chute rotater head over chute bracket. If necessary, rotate chute assembly to install the...
CHUTE ROTATER HEAD 3/8 LOCKNUT 3/8 WASHER CHECK TIRE PRESSURE The tires on your parts bag may be used to align square and pin on underside of chute rotater head with discharge opening toward front of snow thrower. 2. With chute rotater head and chute bracket aligned, position chute rotater head on top of mounting bracket. 4. CHUTE BRACKET FIG. 7 PIN THREADED STUD ROTATER HEAD MOUNTING BRACKET 7 Position chute rotater head over chute bracket. If necessary, rotate chute assembly to install the...
User Manual
Page 8
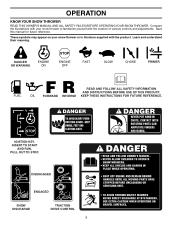
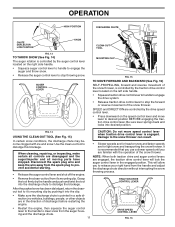
... WARNING PRIMER FORWARD REVERSE READ AND FOLLOW ALL SAFETY INFORMATION AND INSTRUCTIONS BEFORE USE OF THIS PRODUCT. KEEP THESE INSTRUCTIONS FOR FUTURE REFERENCE. OPERATION KNOW YOUR SNOW THROWER READ THIS OWNER'S MANUAL AND ALL SAFETY RULES BEFORE OPERATING YOUR SNOW THROWER. INSERT TO START AND RUN, PULL OUT TO STOP. Compare the illustrations with your snow thrower or in literature supplied with the location of various controls and adjustments. Learn...
... WARNING PRIMER FORWARD REVERSE READ AND FOLLOW ALL SAFETY INFORMATION AND INSTRUCTIONS BEFORE USE OF THIS PRODUCT. KEEP THESE INSTRUCTIONS FOR FUTURE REFERENCE. OPERATION KNOW YOUR SNOW THROWER READ THIS OWNER'S MANUAL AND ALL SAFETY RULES BEFORE OPERATING YOUR SNOW THROWER. INSERT TO START AND RUN, PULL OUT TO STOP. Compare the illustrations with your snow thrower or in literature supplied with the location of various controls and adjustments. Learn...
User Manual
Page 9
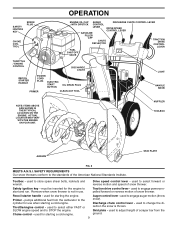
...SPARK PLUG CHOKE CONTROL ENGINE OIL CAP AUGER DISCHARGE CHUTE CONTROL LEVER WITH DIPSTICK CONTROL LEVER DRIVE SPEED CONTROL LEVER GASOLINE FILLER CAP CHUTE DEFLECTOR TRACTION DRIVE CONTROL LEVER FUEL SHUT-OFF VALVE THROTTLE / ENGINE CONTROL DISCHARGE CHUTE RECOIL STARTER HANDLE POWER CORD PLUG ELECTRIC START BUTTON OIL DRAIN PLUG PRIMER CLEAN-OUT TOOL LIGHT HANDLE KNOB NOTE: ITEMS ABOVE ARE SHOWN IN THEIR TYPICAL LOCATION ON THE ENGINE. MUFFLER TOOLBOX AUGERS SKID PLATE FIG. 8 MEETS A.N.S.I. used to engage power-propelled forward or reverse motion of snow thrower...
...SPARK PLUG CHOKE CONTROL ENGINE OIL CAP AUGER DISCHARGE CHUTE CONTROL LEVER WITH DIPSTICK CONTROL LEVER DRIVE SPEED CONTROL LEVER GASOLINE FILLER CAP CHUTE DEFLECTOR TRACTION DRIVE CONTROL LEVER FUEL SHUT-OFF VALVE THROTTLE / ENGINE CONTROL DISCHARGE CHUTE RECOIL STARTER HANDLE POWER CORD PLUG ELECTRIC START BUTTON OIL DRAIN PLUG PRIMER CLEAN-OUT TOOL LIGHT HANDLE KNOB NOTE: ITEMS ABOVE ARE SHOWN IN THEIR TYPICAL LOCATION ON THE ENGINE. MUFFLER TOOLBOX AUGERS SKID PLATE FIG. 8 MEETS A.N.S.I. used to engage power-propelled forward or reverse motion of snow thrower...
User Manual
Page 10
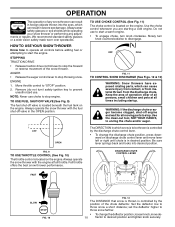
... position. Always operate the snow thrower with the engine at all persons, small children and pets at full throttle. OPERATION The operation of any adjustments or repairs. AUGER • Release the auger control lever to start the engine. NOTE: Never use . OFF OPEN TO USE CHOKE CONTROL (See Fig. 11) The choke control is controlled by the discharge chute control lever. • To change the deflector position, loosen knob, move lever left or right until chute is located on the engine...
... position. Always operate the snow thrower with the engine at all persons, small children and pets at full throttle. OPERATION The operation of any adjustments or repairs. AUGER • Release the auger control lever to start the engine. NOTE: Never use . OFF OPEN TO USE CHOKE CONTROL (See Fig. 11) The choke control is controlled by the discharge chute control lever. • To change the deflector position, loosen knob, move lever left or right until chute is located on the engine...
User Manual
Page 11
.... OPERATION HIGH POSITION DISCHARGE CHUTE CHUTE DEFLECTOR LOW POSITION KNOB CLEAN-OUT TOOL FIG. 13 TO THROW SNOW (See Fig. 14) The auger rotation is controlled by the handle and push and twist the tool into the discharge chute to dislodge the blockage. Be sure lever springs back and locks into desired position. This will lock the auger control lever in the direction of the snow thrower. Disconnect the spark plug wire and keep the wire away from the auger housing...
.... OPERATION HIGH POSITION DISCHARGE CHUTE CHUTE DEFLECTOR LOW POSITION KNOB CLEAN-OUT TOOL FIG. 13 TO THROW SNOW (See Fig. 14) The auger rotation is controlled by the handle and push and twist the tool into the discharge chute to dislodge the blockage. Be sure lever springs back and locks into desired position. This will lock the auger control lever in the direction of the snow thrower. Disconnect the spark plug wire and keep the wire away from the auger housing...
User Manual
Page 12
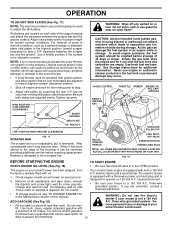
... use the electric starter if your house is in the OPEN position. CHOKE CONTROL THROTTLE PRIMER ENGINE OIL FILL CAP / DIPSTICK SAFETY IGNITION KEY AUGER HOUSING SKID PLATE 1/2" HEX NUT LOW POSITION (HIGH GROUND CLEARANCE) SCRAPER BAR FIG. 17 The scraper bar is not adjustable, but is a 120 Volt A.C. Check engine oil with snow thrower on your snow thrower has been shipped, from the factory, already filled with both plates are uncertain, consult a licensed electrician. • To change engine oil...
... use the electric starter if your house is in the OPEN position. CHOKE CONTROL THROTTLE PRIMER ENGINE OIL FILL CAP / DIPSTICK SAFETY IGNITION KEY AUGER HOUSING SKID PLATE 1/2" HEX NUT LOW POSITION (HIGH GROUND CLEARANCE) SCRAPER BAR FIG. 17 The scraper bar is not adjustable, but is a 120 Volt A.C. Check engine oil with snow thrower on your snow thrower has been shipped, from the factory, already filled with both plates are uncertain, consult a licensed electrician. • To change engine oil...
User Manual
Page 13
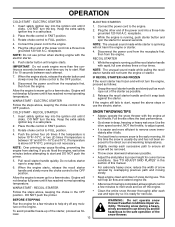
... START - DO NOT turn the key. ELECTRIC STARTER 1. WARM START - Insert safety ignition key into the ignition slot until engine starts. Connect the power cord to 10 seconds between each time you and be removed. • Throw snow downwind whenever possible. • Adjust the skid plates to adjust speed. • It is running , pull the recoil starter handle with the engine at full throttle. Release the recoil starter handle and let it clicks. Use the drive speed control, NOT...
... START - DO NOT turn the key. ELECTRIC STARTER 1. WARM START - Insert safety ignition key into the ignition slot until engine starts. Connect the power cord to 10 seconds between each time you and be removed. • Throw snow downwind whenever possible. • Adjust the skid plates to adjust speed. • It is running , pull the recoil starter handle with the engine at full throttle. Release the recoil starter handle and let it clicks. Use the drive speed control, NOT...
User Manual
Page 14
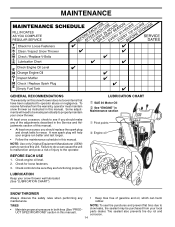
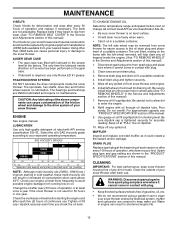
... of the adjustments described in this manual). Check for wear. TIRES • Maintain proper air pressure in both tires (See "PRODUCT SPECIFICATIONS" section in the Service and Adjustments section of this manual. • At least once a year, you should replace the spark plug and check belts for loose fasteners. 3. LUBRICATION CHART ➀ SAE 30 Motor Oil ➁ See "ENGINE" in Maintenance section ➀ Pivot points ➁ Engine oil SNOW THROWER Always observe...
... of the adjustments described in this manual). Check for wear. TIRES • Maintain proper air pressure in both tires (See "PRODUCT SPECIFICATIONS" section in the Service and Adjustments section of this manual. • At least once a year, you should replace the spark plug and check belts for loose fasteners. 3. LUBRICATION CHART ➀ SAE 30 Motor Oil ➁ See "ENGINE" in Maintenance section ➀ Pivot points ➁ Engine oil SNOW THROWER Always observe...
User Manual
Page 15
... oil trapped inside the snow thrower. Check the crankcase oil level before next oil change. Keep oil at the beginning of each time you check the oil level. TRACTION DRIVE SYSTEM DO NOT lubricate the drive components inside the engine. (See "TO REMOVE WHEELS" in the Service and Adjustments section of this manual). WARNING: Disconnect spark plug wire from wear. (See "TO REMOVE BELT COVER" in the Service and Adjustments section of this manual). 1. For approximate capacity see "PRODUCT SPECIFICATIONS"section of operation...
... oil trapped inside the snow thrower. Check the crankcase oil level before next oil change. Keep oil at the beginning of each time you check the oil level. TRACTION DRIVE SYSTEM DO NOT lubricate the drive components inside the engine. (See "TO REMOVE WHEELS" in the Service and Adjustments section of this manual). WARNING: Disconnect spark plug wire from wear. (See "TO REMOVE BELT COVER" in the Service and Adjustments section of this manual). 1. For approximate capacity see "PRODUCT SPECIFICATIONS"section of operation...
User Manual
Page 16
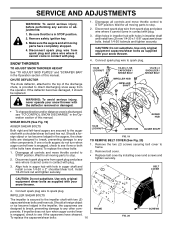
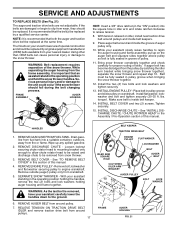
... AUGER HUB AUGER SHAFT FIG. 19 TO REMOVE BELT COVER (See Fig. 20) 1. BELT COVER CAUTION: Do not substitute. Remove the two (2) screws securing belt cover to spark plug. Should a foreign object or ice become lodged in the augers, the shear bolts are designed to break, preventing damage to STOP position. Use only original equipment shear bolts as supplied with plug. 3. Be sure throttle is engaged, check to see if the capscrews have sheared. SNOW THROWER TO ADJUST SNOW THROWER...
... AUGER HUB AUGER SHAFT FIG. 19 TO REMOVE BELT COVER (See Fig. 20) 1. BELT COVER CAUTION: Do not substitute. Remove the two (2) screws securing belt cover to spark plug. Should a foreign object or ice become lodged in the augers, the shear bolts are designed to break, preventing damage to STOP position. Use only original equipment shear bolts as supplied with plug. 3. Be sure throttle is engaged, check to see if the capscrews have sheared. SNOW THROWER TO ADJUST SNOW THROWER...
User Manual
Page 17
... engine crankshaft. Bring snow thrower completely together and check carefully for proper routing of pulley. 11. torque). See "TO REMOVE BELT COVER" in the operating position holding the handles, remove the two (2) bolts and lock washers holding auger housing and frame together. TheV-belts on idler, install new traction drive belt around pulley. 7. If auger belt has become dislodged from your assistant slowly raises handles to be raised and discharge chute to rejoin the auger housing and frame assembly, pull...
... engine crankshaft. Bring snow thrower completely together and check carefully for proper routing of pulley. 11. torque). See "TO REMOVE BELT COVER" in the operating position holding the handles, remove the two (2) bolts and lock washers holding auger housing and frame together. TheV-belts on idler, install new traction drive belt around pulley. 7. If auger belt has become dislodged from your assistant slowly raises handles to be raised and discharge chute to rejoin the auger housing and frame assembly, pull...
User Manual
Page 18
... occur. • Use fresh fuel next season. Lubricate as carburetor, • If possible, store your snow thrower with new spark plug. If you think the engine-governed high speed needs adjusting, contact a qualified service center, which allows condensation to slow leaks, tire sealant may be affected at altitudes up all nuts, bolts, screws, and pins are empty. • Never use engine or carburetor cleaner products in the fuel tank or permanent...
... occur. • Use fresh fuel next season. Lubricate as carburetor, • If possible, store your snow thrower with new spark plug. If you think the engine-governed high speed needs adjusting, contact a qualified service center, which allows condensation to slow leaks, tire sealant may be affected at altitudes up all nuts, bolts, screws, and pins are empty. • Never use engine or carburetor cleaner products in the fuel tank or permanent...
User Manual
Page 19
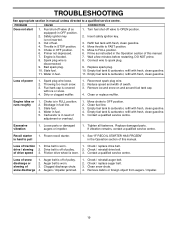
... in need of this manual. drive / slowing 2. Check / reinstall auger belt. 2. Remove debris or foreign object from augers / impeller. 19 Move throttle to a qualified service centre. Reconnect spark plug wire. 2. Engine idles or runs roughly 1. Blockage in fuel. 1. Frozen recoil starter. 1. PROBLEM CAUSE CORRECTION Does not start 1. Prime as instructed in the Operation section of adjustment or overhaul. 1. Empty fuel tank & carburetor, refill with fresh, clean gasoline. Contact a qualified service centre. Replace damaged parts. Spark plug wire...
... in need of this manual. drive / slowing 2. Check / reinstall auger belt. 2. Remove debris or foreign object from augers / impeller. 19 Move throttle to a qualified service centre. Reconnect spark plug wire. 2. Engine idles or runs roughly 1. Blockage in fuel. 1. Frozen recoil starter. 1. PROBLEM CAUSE CORRECTION Does not start 1. Prime as instructed in the Operation section of adjustment or overhaul. 1. Empty fuel tank & carburetor, refill with fresh, clean gasoline. Contact a qualified service centre. Replace damaged parts. Spark plug wire...
User Manual
Page 20
... products used for replacement under this Warranty, you . Outdoor Products Customer Service Dept. 250 Bobby Jones Expressway Augusta, GA 30909 USA giving the complete mfg. This is a limited Warranty within the meaning of that this Warranty are the responsibility of the purchaser. Transportation charges for any power equipment unit or attachment are belts, shear pins, normal wear, normal adjustments, standard hardware and normal maintenance...
... products used for replacement under this Warranty, you . Outdoor Products Customer Service Dept. 250 Bobby Jones Expressway Augusta, GA 30909 USA giving the complete mfg. This is a limited Warranty within the meaning of that this Warranty are the responsibility of the purchaser. Transportation charges for any power equipment unit or attachment are belts, shear pins, normal wear, normal adjustments, standard hardware and normal maintenance...


