
Owner Manual
Page 2
... year of age before operating a pedestrian controlled lawn mower and a minimum of 16 years of age before starting when setting up, transporting, adjusting or making repairs, always disconnect spark plug wire and place wire where it cannot contact spark plug. Keep clear of the discharge opening at the lowest possible speed when on a slope. Stop machine if anyone . FAILURE TO OBSERVE THE FOLLOWING SAFETY INSTRUCTIONS COULD RESULT IN...
... year of age before operating a pedestrian controlled lawn mower and a minimum of 16 years of age before starting when setting up, transporting, adjusting or making repairs, always disconnect spark plug wire and place wire where it cannot contact spark plug. Keep clear of the discharge opening at the lowest possible speed when on a slope. Stop machine if anyone . FAILURE TO OBSERVE THE FOLLOWING SAFETY INSTRUCTIONS COULD RESULT IN...

Owner Manual
Page 3
... eye protection when operating machine. 3 Always keep the machine in severe injury or death. SERVICE SAFE HANDLING OF GASOLINE To avoid personal injury or property damage, use a nozzle lock-open flame, spark, or pilot light such as necessary. Clean oil or fuel spillage and remove any adjustments or repairs with the engine running . • Allow engine to stabilize the machine by a safety device. The machine...
... eye protection when operating machine. 3 Always keep the machine in severe injury or death. SERVICE SAFE HANDLING OF GASOLINE To avoid personal injury or property damage, use a nozzle lock-open flame, spark, or pilot light such as necessary. Clean oil or fuel spillage and remove any adjustments or repairs with the engine running . • Allow engine to stabilize the machine by a safety device. The machine...
Owner Manual
Page 4
... tractor. SUPPORT / HELP If you to give you are outside mowing. It has been designed, engineered and manufactured to assemble and maintain your product: • Visit our website: www.poulanpro.com • Call Us Toll Free: 1-800-849-1297 TABLE OF CONTENTS SAFETY RULES 2-3 PRODUCT SPECIFICATIONS 4 CUSTOMER RESPONSIBILITIES 4 ASSEMBLY 5-6 OPERATION 7-13 MAINTENANCE SCHEDULE 14 MAINTENANCE 14-17 SERVICE AND ADJUSTMENTS 18-23 STORAGE 24 TROUBLESHOOTING...
... tractor. SUPPORT / HELP If you to give you are outside mowing. It has been designed, engineered and manufactured to assemble and maintain your product: • Visit our website: www.poulanpro.com • Call Us Toll Free: 1-800-849-1297 TABLE OF CONTENTS SAFETY RULES 2-3 PRODUCT SPECIFICATIONS 4 CUSTOMER RESPONSIBILITIES 4 ASSEMBLY 5-6 OPERATION 7-13 MAINTENANCE SCHEDULE 14 MAINTENANCE 14-17 SERVICE AND ADJUSTMENTS 18-23 STORAGE 24 TROUBLESHOOTING...
Owner Manual
Page 5
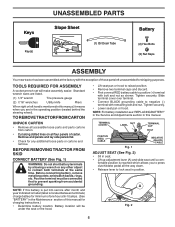
... are listed. (1) 1/2" wrench Tire pressure gauge (2) 7/16" wrenches Utility knife Pliers When right or left unassembled for minimum of one hour at the factory with the exception of carton. Keys Key(s) UNASSEMBLED PARTS Slope Sheet (1) Oil Drain Tube Battery (2) Hex Bolts (2) Nut Keps ASSEMBLY Your new tractor has been assembled at 6-10 amps. (See "BATTERY" in the Maintenance section of this manual for charging instructions.) • Determine battery location. Before connecting battery, remove...
... are listed. (1) 1/2" wrench Tire pressure gauge (2) 7/16" wrenches Utility knife Pliers When right or left unassembled for minimum of one hour at the factory with the exception of carton. Keys Key(s) UNASSEMBLED PARTS Slope Sheet (1) Oil Drain Tube Battery (2) Hex Bolts (2) Nut Keps ASSEMBLY Your new tractor has been assembled at 6-10 amps. (See "BATTERY" in the Maintenance section of this manual for charging instructions.) • Determine battery location. Before connecting battery, remove...
Owner Manual
Page 6
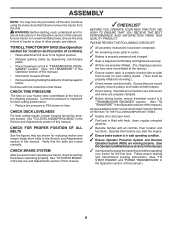
... for leveling.) ✓ Check mower and drive belts. Ensure the area in a well-ventilated area. Operate them before operating your tractor, check to -rear for best cutting results. (Tires must be properly leveled. Follow proper starting , read, understand and follow all connections are still secure and wires are routed correctly. CHECK TIRE PRESSURE The tires on tires. PLEASE REVIEW THE FOLLOWING CHECKLIST: ✓ All assembly instructions have been completed. ✓ No remaining loose parts in the Operation...
... for leveling.) ✓ Check mower and drive belts. Ensure the area in a well-ventilated area. Operate them before operating your tractor, check to -rear for best cutting results. (Tires must be properly leveled. Follow proper starting , read, understand and follow all connections are still secure and wires are routed correctly. CHECK TIRE PRESSURE The tires on tires. PLEASE REVIEW THE FOLLOWING CHECKLIST: ✓ All assembly instructions have been completed. ✓ No remaining loose parts in the Operation...

Owner Manual
Page 9
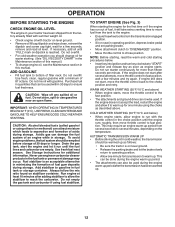
...). Fig. 4 STOPPING (See Fig. 5) MOWER BLADES - • To stop engine when stopping tractor on grass areas. B C ENGINE - • Move throttle control (D) to fast position, before leaving the operator's position. D ( ) ATTACHMENT CLUTCH LEVER "DISENGAGED" ( ) ATTACHMENT CLUTCH LEVER "ENGAGED" Fig. 5 GROUND DRIVE - • To stop the engine. HOW TO USE YOUR TRACTOR TO SET PARKING BRAKE (See Fig. 4) Your tractor is running , hot engine exhaust gases may cause engine to "backfire". • Turn ignition key (F) to "STOP" position and remove key. NOTE: Under certain conditions...
...). Fig. 4 STOPPING (See Fig. 5) MOWER BLADES - • To stop engine when stopping tractor on grass areas. B C ENGINE - • Move throttle control (D) to fast position, before leaving the operator's position. D ( ) ATTACHMENT CLUTCH LEVER "DISENGAGED" ( ) ATTACHMENT CLUTCH LEVER "ENGAGED" Fig. 5 GROUND DRIVE - • To stop the engine. HOW TO USE YOUR TRACTOR TO SET PARKING BRAKE (See Fig. 4) Your tractor is running , hot engine exhaust gases may cause engine to "backfire". • Turn ignition key (F) to "STOP" position and remove key. NOTE: Under certain conditions...

Owner Manual
Page 10
...; Start tractor and release parking brake. • Slowly depress forward (K) or reverse (L) drive pedal to begin movement. A Fig. 8 • Put attachment lift lever in desired height of cut . (See "TO ADJUST MOWER CUTTING HEIGHT".) • Start mower blades by engaging attachment clutch control. The heights are slightly off the engine. OPERATION TO MOVE FORWARD AND BACKWARD (See Fig. 7) The direction and speed of movement is controlled by the operator to leave the seat with the engine running . K L TO ADJUST GAUGE WHEELS (See...
...; Start tractor and release parking brake. • Slowly depress forward (K) or reverse (L) drive pedal to begin movement. A Fig. 8 • Put attachment lift lever in desired height of cut . (See "TO ADJUST MOWER CUTTING HEIGHT".) • Start mower blades by engaging attachment clutch control. The heights are slightly off the engine. OPERATION TO MOVE FORWARD AND BACKWARD (See Fig. 7) The direction and speed of movement is controlled by the operator to leave the seat with the engine running . K L TO ADJUST GAUGE WHEELS (See...
Owner Manual
Page 12
... gas tank and carburetor if using ethanol or methanol) can attract moisture which leads to run until "FULL" mark on stabilizer container. If engine still does not start, move fuel from the tank to choke position. WARM WEATHER STARTING (50°F/10°C and above . Do not mix oil with tractor on seat in operating position, depress brake pedal and set parking brake. • Move attachment clutch to "DISENGAGED" position. • Move throttle control...
... gas tank and carburetor if using ethanol or methanol) can attract moisture which leads to run until "FULL" mark on stabilizer container. If engine still does not start, move fuel from the tank to choke position. WARM WEATHER STARTING (50°F/10°C and above . Do not mix oil with tractor on seat in operating position, depress brake pedal and set parking brake. • Move attachment clutch to "DISENGAGED" position. • Move throttle control...
Owner Manual
Page 13
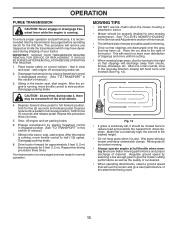
... TRACTOR. 1. with engine off engine and set . 2. Disengage transmission by placing freewheel control in engaged position. (See "TO TRANSPORT" in the Service and Adjustments section of the attachment being used. 13 Depress forward drive pedal to slow position. Depress reverse drive pedal to half (1/2) speed. After the engine is recommended that will discharge away from dried clippings. Disengage parking brake. 8. Repeat this section of cut . MOWING TIPS • DO NOT use tire chains when the mower housing...
... TRACTOR. 1. with engine off engine and set . 2. Disengage transmission by placing freewheel control in engaged position. (See "TO TRANSPORT" in the Service and Adjustments section of the attachment being used. 13 Depress forward drive pedal to slow position. Depress reverse drive pedal to half (1/2) speed. After the engine is recommended that will discharge away from dried clippings. Disengage parking brake. 8. Repeat this section of cut . MOWING TIPS • DO NOT use tire chains when the mower housing...
Owner Manual
Page 14
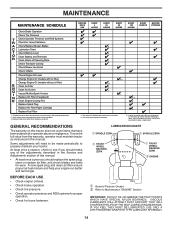
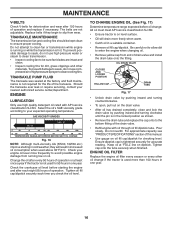
...A new spark plug and clean air filter ensure proper air-fuel mixture and help your engine run better and last longer. BEFORE EACH USE • Check engine oil level. • Check brake operation. • Check tire pressure. • Check operator presence and ROS systems for proper operation. • Check for Loose Fasteners A Check/Replace Mower Blades C Lubrication Chart T Check Battery Level O Clean Battery and Terminals R Clean Debris off Steering Plate Check Transaxle Cooling Check Mower Levelness Check V-Belts Check Engine Oil Level Change Engine Oil (models with maintenance-free...
...A new spark plug and clean air filter ensure proper air-fuel mixture and help your engine run better and last longer. BEFORE EACH USE • Check engine oil level. • Check brake operation. • Check tire pressure. • Check operator presence and ROS systems for proper operation. • Check for Loose Fasteners A Check/Replace Mower Blades C Lubrication Chart T Check Battery Level O Clean Battery and Terminals R Clean Debris off Steering Plate Check Transaxle Cooling Check Mower Levelness Check V-Belts Check Engine Oil Level Change Engine Oil (models with maintenance-free...
Owner Manual
Page 15
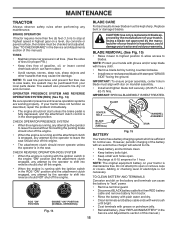
...; Keep tires free of this manual.) TIRES • Maintain proper air pressure in blade must be checked and adjusted. (See "TO CHECK BRAKE" in the Service and Adjustments section of this manual.) 15 CHECK REVERSE OPERATION (ROS) SYSTEM • When the engine is running with the ignition switch in the ROS "ON" position and the attachment clutch engaged, any maintenance. NOTE: The original equipment battery on mandrel assembly. • Install and tighten blade bolt securely (45-55 Ft. MAINTENANCE TRACTOR Always observe safety rules...
...; Keep tires free of this manual.) TIRES • Maintain proper air pressure in blade must be checked and adjusted. (See "TO CHECK BRAKE" in the Service and Adjustments section of this manual.) 15 CHECK REVERSE OPERATION (ROS) SYSTEM • When the engine is running with the ignition switch in the ROS "ON" position and the attachment clutch engaged, any maintenance. NOTE: The original equipment battery on mandrel assembly. • Install and tighten blade bolt securely (45-55 Ft. MAINTENANCE TRACTOR Always observe safety rules...
Owner Manual
Page 16
... drain valve by pushing inward and turning counterclockwise. • To open, pull out on oil. Replace belts if they will drain more freely when warm. • Catch oil in one year. Should the transaxle ever leak or require servicing, contact your engine oil level more than 100 hours in a suitable container. • Remove oil fill cap/dipstick. TO CHANGE ENGINE OIL (See Fig. 17) Determine temperature range expected before starting in...
... drain valve by pushing inward and turning counterclockwise. • To open, pull out on oil. Replace belts if they will drain more freely when warm. • Catch oil in one year. Should the transaxle ever leak or require servicing, contact your engine oil level more than 100 hours in a suitable container. • Remove oil fill cap/dipstick. TO CHANGE ENGINE OIL (See Fig. 17) Determine temperature range expected before starting in...

Owner Manual
Page 17
...) The fuel filter should be kept free of operation, whichever occurs first. of each season. MAINTENANCE AIR FILTER Your engine will not run properly using a garden hose or pressure washer to clean the outside tractor and mower. Clean with automotive type wax. NOTE: Operating the engine with a blocked grass screen, dirty or plugged cooling fins, and/or cooling shrouds removed will shorten the useful life of your tractor unless the engine and transmission are kept...
...) The fuel filter should be kept free of operation, whichever occurs first. of each season. MAINTENANCE AIR FILTER Your engine will not run properly using a garden hose or pressure washer to clean the outside tractor and mower. Clean with automotive type wax. NOTE: Operating the engine with a blocked grass screen, dirty or plugged cooling fins, and/or cooling shrouds removed will shorten the useful life of your tractor unless the engine and transmission are kept...

Owner Manual
Page 18
... bracket. • Remove clutch cable spring (Q) from idler arm (R). • Disconnect front link (E) from under tractor. SERVICE AND ADJUSTMENTS WARNING: TO AVOID SERIOUS INJURY, BEFORE PERFORMING ANY SERVICE OR ADJUSTMENTS: • Depress brake pedal fully and set parking brake. • Place attachment clutch in "DISENGAGED" position. • Turn ignition key to "STOP" and remove key. • Make sure the blades and all moving parts have completely stopped. • Disconnect spark plug wire from rear mower bracket (D) - TO REMOVE MOWER (See Fig. 20) • Place attachment clutch...
... bracket. • Remove clutch cable spring (Q) from idler arm (R). • Disconnect front link (E) from under tractor. SERVICE AND ADJUSTMENTS WARNING: TO AVOID SERIOUS INJURY, BEFORE PERFORMING ANY SERVICE OR ADJUSTMENTS: • Depress brake pedal fully and set parking brake. • Place attachment clutch in "DISENGAGED" position. • Turn ignition key to "STOP" and remove key. • Make sure the blades and all moving parts have completely stopped. • Disconnect spark plug wire from rear mower bracket (D) - TO REMOVE MOWER (See Fig. 20) • Place attachment clutch...

Owner Manual
Page 19
...; Hook end of clutch cable spring (Q) into hole in idler arm (R). • Push clutch cable housing guide (P) into bracket, slide collar (L) onto guide and secure with retainer spring (K). • Install belt on opposite side of tractor. • Insert end of tractor chassis and secure with retainer spring. • Repeat on engine pulley (M), in front mower bracket and secure with washer and retainer spring. Insert rod end of mower and position slot in link assembly over pin...
...; Hook end of clutch cable spring (Q) into hole in idler arm (R). • Push clutch cable housing guide (P) into bracket, slide collar (L) onto guide and secure with retainer spring (K). • Install belt on opposite side of tractor. • Insert end of tractor chassis and secure with retainer spring. • Repeat on engine pulley (M), in front mower bracket and secure with washer and retainer spring. Insert rod end of mower and position slot in link assembly over pin...

Owner Manual
Page 20
... tires are equal. B B TURN NUT RIGHT TO RAISE MOWER TURN NUT LEFT TO LOWER MOWER Fig. 26 NOTE: Each full turn of the adjustment nut will change mower height about 3/16" (4,7 mm). • Test your adjustment by mowing some uncut grass and visually checking the appearance. The distance should be level side-to think the mower is pointing straight forward. To obtain the best cutting results, the mower blades should...
... tires are equal. B B TURN NUT RIGHT TO RAISE MOWER TURN NUT LEFT TO LOWER MOWER Fig. 26 NOTE: Each full turn of the adjustment nut will change mower height about 3/16" (4,7 mm). • Test your adjustment by mowing some uncut grass and visually checking the appearance. The distance should be level side-to think the mower is pointing straight forward. To obtain the best cutting results, the mower blades should...

Owner Manual
Page 21
... steering plate (F) and remove from mower. If the rear wheels rotate, then the brake needs to be replaced without tools. TO REPLACE MOTION DRIVE BELT (See Fig. 31) Park the tractor on level surface. BELT INSTALLATION • Install new belt from centerspan idler (C). • Pull belt slack toward rear of left footrest. 21 E F A G B C D 02952 Fig. 31 ing plate (F) and above clutch brake pedal shaft (G). • Pull belt toward front of tractor and roll belt onto engine pulley (E). • Pull belt toward rear of all belt guides...
... steering plate (F) and remove from mower. If the rear wheels rotate, then the brake needs to be replaced without tools. TO REPLACE MOTION DRIVE BELT (See Fig. 31) Park the tractor on level surface. BELT INSTALLATION • Install new belt from centerspan idler (C). • Pull belt slack toward rear of left footrest. 21 E F A G B C D 02952 Fig. 31 ing plate (F) and above clutch brake pedal shaft (G). • Pull belt toward front of tractor and roll belt onto engine pulley (E). • Pull belt toward rear of all belt guides...

Owner Manual
Page 24
... STILL WARM. 24 TRACTOR Remove mower from dust and dirt. • Cover your tractor with gasoline in any enclosure. BATTERY • Fully charge the battery for storage. • After a period of time in the Maintenance section of oil through spark plug hole(s) into cylinder(s). • Turn ignition key to "START" position for damage, breakage and wear. Do not use engine or carburetor cleaner products in fuel tank or storage container. Plastic...
... STILL WARM. 24 TRACTOR Remove mower from dust and dirt. • Cover your tractor with gasoline in any enclosure. BATTERY • Fully charge the battery for storage. • After a period of time in the Maintenance section of oil through spark plug hole(s) into cylinder(s). • Turn ignition key to "START" position for damage, breakage and wear. Do not use engine or carburetor cleaner products in fuel tank or storage container. Plastic...

Owner Manual
Page 25
... Engine will not start . 4. Throttle in fuel. 9. Empty fuel tank and carburetor, refill tank with fresh, clean gas. 6. Replace damaged parts. 25 Loose or damaged wiring. 9. Clean battery terminals. 3. Clean and regap or change oil. 6. Clean engine air screen/fins. 12. Check all wiring. 9. Replace blade. Engine valves out of adjustment. 1. Contact an authorized service center/department. Faulty solenoid or starter. 1. Raise cutting height/reduce speed. 2. Bent blade mandrel. 3. Weak or dead battery. 4. Replace spark plug. 3. Loose...
... Engine will not start . 4. Throttle in fuel. 9. Empty fuel tank and carburetor, refill tank with fresh, clean gas. 6. Replace damaged parts. 25 Loose or damaged wiring. 9. Clean battery terminals. 3. Clean and regap or change oil. 6. Clean engine air screen/fins. 12. Check all wiring. 9. Replace blade. Engine valves out of adjustment. 1. Contact an authorized service center/department. Faulty solenoid or starter. 1. Raise cutting height/reduce speed. 2. Bent blade mandrel. 3. Weak or dead battery. 4. Replace spark plug. 3. Loose...
Owner Manual
Page 26
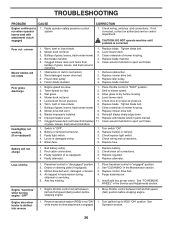
... 4. Check wiring, switches and connections. Obstruction in "disengaged" position. 2. Tighten blade bolt. 2. Replace blade mandrel. 5. Engine speed too slow. 1. Shift to ROS "ON" position. Low/uneven tire air pressure. 5. Mower drive belt worn. 8. Blades improperly installed. 9. Check/replace light switch. 4. Faulty alternator. 1. See "CLEANING" in the Service and Adjustments section. See "TO REMOVE WHEEL" in the Maintenance section. 3. Engine dies when tractor is engaged. Turn ignition key to slower speed. 3. TROUBLESHOOTING PROBLEM CAUSE Engine continues to run...
... 4. Check wiring, switches and connections. Obstruction in "disengaged" position. 2. Tighten blade bolt. 2. Replace blade mandrel. 5. Engine speed too slow. 1. Shift to ROS "ON" position. Low/uneven tire air pressure. 5. Mower drive belt worn. 8. Blades improperly installed. 9. Check/replace light switch. 4. Faulty alternator. 1. See "CLEANING" in the Service and Adjustments section. See "TO REMOVE WHEEL" in the Maintenance section. 3. Engine dies when tractor is engaged. Turn ignition key to slower speed. 3. TROUBLESHOOTING PROBLEM CAUSE Engine continues to run...


