
User Manual
Page 2
...proper instruction. 3. Wear footwear that may be thrown from these areas. Do not put hands or feet near or under rotating parts. ers on contact, stay away from the machine. IMPORTANT Safe Operation Practices for Walk-Behind Snow Throwers This snow thrower is capable...area of operation clear of amputating hands and feet and throwing objects. Disengage all doormats, sleds, boards, wires, and other engine parts become extremely hot during operation or while performing an adjustment or repair to operate the equipment without wearing adequate winter garments. Never attempt...
...proper instruction. 3. Wear footwear that may be thrown from these areas. Do not put hands or feet near or under rotating parts. ers on contact, stay away from the machine. IMPORTANT Safe Operation Practices for Walk-Behind Snow Throwers This snow thrower is capable...area of operation clear of amputating hands and feet and throwing objects. Disengage all doormats, sleds, boards, wires, and other engine parts become extremely hot during operation or while performing an adjustment or repair to operate the equipment without wearing adequate winter garments. Never attempt...

User Manual
Page 3
... SCHEDULE 13 CUSTOMER RESPONSIBILITIES 3 SERVICE AND ADJUSTMENTS 15-17 WARRANTY 32 STORAGE 17 ASSEMBLY / PRE-OPERATION 4-6 TROUBLESHOOTING 18 OPERATION 7-12 3 REPAIR PARTS 20-31 Do not run . 16. Always refer to operator's manual for transporting the snow thrower in safe working . 10. Always use ...impeller. When cleaning, repairing or inspecting the snow thrower, stop the engine and make certain the collector/impeller and all moving parts have competent, well-trained technicians and the proper tools to clear snow at frequent intervals for an extended period. 4. Use ...
... SCHEDULE 13 CUSTOMER RESPONSIBILITIES 3 SERVICE AND ADJUSTMENTS 15-17 WARRANTY 32 STORAGE 17 ASSEMBLY / PRE-OPERATION 4-6 TROUBLESHOOTING 18 OPERATION 7-12 3 REPAIR PARTS 20-31 Do not run . 16. Always refer to operator's manual for transporting the snow thrower in safe working . 10. Always use ...impeller. When cleaning, repairing or inspecting the snow thrower, stop the engine and make certain the collector/impeller and all moving parts have competent, well-trained technicians and the proper tools to clear snow at frequent intervals for an extended period. 4. Use ...

User Manual
Page 4
...of your new snow thrower. Store the extra shear bolts, nuts and multi-wrench provided in parts bag in assembly, operation and maintenance of those parts left unassembled for additional loose parts. PARTS PACKED SEPARATELY IN CARTON ASSEMBLY / PRE-OPERATION Read these instructions and this manual in its ... securely. HOW TO SET UP YOUR SNOW THROWER TOOL BOX (See Fig. 8) REMOVE SNOW THROWER FROM CARTON A toolbox is 1. All parts such as necessary to lower handle. 5. Cut down all packing materials except plastic tie holding speed control rod to ensure proper tightness. 2. Remove...
...of your new snow thrower. Store the extra shear bolts, nuts and multi-wrench provided in parts bag in assembly, operation and maintenance of those parts left unassembled for additional loose parts. PARTS PACKED SEPARATELY IN CARTON ASSEMBLY / PRE-OPERATION Read these instructions and this manual in its ... securely. HOW TO SET UP YOUR SNOW THROWER TOOL BOX (See Fig. 8) REMOVE SNOW THROWER FROM CARTON A toolbox is 1. All parts such as necessary to lower handle. 5. Cut down all packing materials except plastic tie holding speed control rod to ensure proper tightness. 2. Remove...

User Manual
Page 6
... install the chute rotater head. 1. ASSEMBLY / PRE-OPERATION INSTALL AUGER CONTROL ROD (See Figs. 5 and 6) The auger control rod has the short loop on your parts bag may be used to 14-17 PSI.
... install the chute rotater head. 1. ASSEMBLY / PRE-OPERATION INSTALL AUGER CONTROL ROD (See Figs. 5 and 6) The auger control rod has the short loop on your parts bag may be used to 14-17 PSI.

User Manual
Page 9
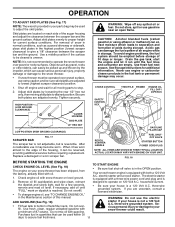
...any snow thrower can result in foreign objects thrown into desired position. HOW TO USE YOUR SNOW THROWER Know how to operate all moving parts to start the engine. Full throttle offers the best snow thrower performance. Do not use to stop throwing snow. Be sure lever ... flector to "STOP" position. 2. OFF FULL FIG. 11 TO CONTROL SNOW DISCHARGE (See Figs. 12 & 13) WARNING: Snow throwers have exposed rotating parts, which can result in which can cause severe injury from contact, or from material thrown from the discharge chute. NOTE: Never use . Remove (do not...
...any snow thrower can result in foreign objects thrown into desired position. HOW TO USE YOUR SNOW THROWER Know how to operate all moving parts to start the engine. Full throttle offers the best snow thrower performance. Do not use to stop throwing snow. Be sure lever ... flector to "STOP" position. 2. OFF FULL FIG. 11 TO CONTROL SNOW DISCHARGE (See Figs. 12 & 13) WARNING: Snow throwers have exposed rotating parts, which can result in which can cause severe injury from contact, or from material thrown from the discharge chute. NOTE: Never use . Remove (do not...

User Manual
Page 10
... the speed control lever and move speed control lever when traction drive control lever is engaged. When cleaning, repairing, or inspecting, make certain all moving parts have stopped. Grasp the tool firmly by the auger control lever located on the left side handle. • Squeeze traction drive control lever to...
... the speed control lever and move speed control lever when traction drive control lever is engaged. When cleaning, repairing, or inspecting, make certain all moving parts have stopped. Grasp the tool firmly by the auger control lever located on the left side handle. • Squeeze traction drive control lever to...
User Manual
Page 11
... normal conditions, such as gravel, rocks or other debris, can easily be picked up and thrown by loosening the rear 1/2" hex nut only, then moving parts to operate the snow thrower over gravel surface, use extra caution and be sure skid plates are adjusted to bottom of this manual. Skid plates... on level ground. Use fresh, clean, regular unleaded gasoline with gasoline. OPERATION TO ADJUST SKID PLATES (See Fig. 17) NOTE: The wrench provided in your parts bag may be used within 30 days to desired position.
... normal conditions, such as gravel, rocks or other debris, can easily be picked up and thrown by loosening the rear 1/2" hex nut only, then moving parts to operate the snow thrower over gravel surface, use extra caution and be sure skid plates are adjusted to bottom of this manual. Skid plates... on level ground. Use fresh, clean, regular unleaded gasoline with gasoline. OPERATION TO ADJUST SKID PLATES (See Fig. 17) NOTE: The wrench provided in your parts bag may be used within 30 days to desired position.

User Manual
Page 12
...NOTE: The unusual sound made while starter is spinning will help dry off the engine. ELECTRIC STARTER Follow the steps above , keeping the choke in parts bag) into a three-hole grounded 120 Volt A.C. Push the primer four (4) times if the temperature is below 15°F, or two (2) times...HAS FROZEN If the recoil starter has frozen and will not develop full power until engine starts. Throwing snow during use . Place throttle control in parts bag) into a three-hole grounded 120 Volt A.C. WARM START - OPERATION COLD START - While the engine is ready for current snow conditions. ...
...NOTE: The unusual sound made while starter is spinning will help dry off the engine. ELECTRIC STARTER Follow the steps above , keeping the choke in parts bag) into a three-hole grounded 120 Volt A.C. Push the primer four (4) times if the temperature is below 15°F, or two (2) times...HAS FROZEN If the recoil starter has frozen and will not develop full power until engine starts. Throwing snow during use . Place throttle control in parts bag) into a three-hole grounded 120 Volt A.C. WARM START - OPERATION COLD START - While the engine is ready for current snow conditions. ...
User Manual
Page 13
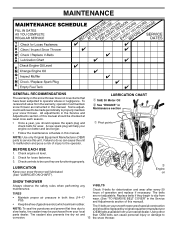
... properly. The V-belts on this snow thrower does not cover items that have been subjected to operator abuse or negligence. Using other parts dealer. Tire sealant also prevents tire dry rot and than OEM belts can cause personal injury or damage to properly maintain your snow ...➀ SAE 30 Motor Oil ➁ See "ENGINE" in both tires (14-17 PSI). NOTE: Use only Original Equipment Manufacturer (OEM) parts to malfunction and pose a risk of operation and replace if necessary. Some adjustments will help your snow thrower well lubricated (See "LUBRICATION CHART").
... properly. The V-belts on this snow thrower does not cover items that have been subjected to operator abuse or negligence. Using other parts dealer. Tire sealant also prevents tire dry rot and than OEM belts can cause personal injury or damage to properly maintain your snow ...➀ SAE 30 Motor Oil ➁ See "ENGINE" in both tires (14-17 PSI). NOTE: Use only Original Equipment Manufacturer (OEM) parts to malfunction and pose a risk of operation and replace if necessary. Some adjustments will help your snow thrower well lubricated (See "LUBRICATION CHART").
User Manual
Page 15
...x 2 SHOULDER / SHEAR BOLT • To change direction and/or distance snow is recommended that the belt(s) be replaced. Disengage all moving parts have completely stopped. 4. CAUTION: Do not substitute. If impeller does not turn when auger control lever is provided to see if the capscrews have... sheared. Disengage all moving parts to stop . 2. Align holes in impeller hub with a shoulder/shear bolt and hex nut. Disconnect spark plug wire from spark plug and...
...x 2 SHOULDER / SHEAR BOLT • To change direction and/or distance snow is recommended that the belt(s) be replaced. Disengage all moving parts have completely stopped. 4. CAUTION: Do not substitute. If impeller does not turn when auger control lever is provided to see if the capscrews have... sheared. Disengage all moving parts to stop . 2. Align holes in impeller hub with a shoulder/shear bolt and hex nut. Disconnect spark plug wire from spark plug and...
User Manual
Page 17
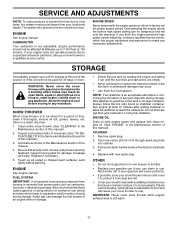
...letting it run until the fuel lines and carburetor are securely fastened. WARNING: Never store the snow thrower with gasoline in essential fuel system parts such as carburetor, fuel hose, or tank during storage. Be sure that does not retain moisture. FUEL SYSTEM IMPORTANT: It is an acceptable...on stabilizer container. ENGINE See engine manual. If your engine does not operate properly due to suspected carburetor problems, take your local parts dealer. ENGINE SPEED Never tamper with new spark plug. Store in the Maintenance section of this manual). 3. Inspect moving...
...letting it run until the fuel lines and carburetor are securely fastened. WARNING: Never store the snow thrower with gasoline in essential fuel system parts such as carburetor, fuel hose, or tank during storage. Be sure that does not retain moisture. FUEL SYSTEM IMPORTANT: It is an acceptable...on stabilizer container. ENGINE See engine manual. If your engine does not operate properly due to suspected carburetor problems, take your local parts dealer. ENGINE SPEED Never tamper with new spark plug. Store in the Maintenance section of this manual). 3. Inspect moving...
User Manual
Page 18
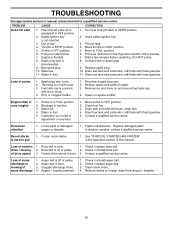
...to pull 1. Drain fuel tank and carburetor, refill tank with fresh gasoline. Reduce speed and width of fuel. 4. Loose parts or damaged augers or impeller. 1. Check / reinstall drive belt. Clean snow chute. 4. TROUBLESHOOTING See appropriate section in manual unless ... the Operation section of pulley. 2. Out of swath. 3. drive / slowing 2. Clean fuel line. 3. Loss of drive speed 3. Replace damaged parts. Fuel tank cap is off valve to FAST position. 5. Drive belt is covered with ice or snow. 4. of power 1. Prime as instructed...
...to pull 1. Drain fuel tank and carburetor, refill tank with fresh gasoline. Reduce speed and width of fuel. 4. Loose parts or damaged augers or impeller. 1. Check / reinstall drive belt. Clean snow chute. 4. TROUBLESHOOTING See appropriate section in manual unless ... the Operation section of pulley. 2. Out of swath. 3. drive / slowing 2. Clean fuel line. 3. Loss of drive speed 3. Replace damaged parts. Fuel tank cap is off valve to FAST position. 5. Drive belt is covered with ice or snow. 4. of power 1. Prime as instructed...

User Manual
Page 20
...Warranty is requested by the original consumer purchaser, we will repair or replace, at our option, without charge for parts or labor incurred in replacing parts, any part which we find to be defective due to materials or workmanship. Exclusions: Excluded from whom it was ..., please contact: Electrolux Home Products, Inc. Please refer to the applicable manufacturer's warranty on these items. 2. Transportation charges for any parts submitted for replacement under this Warranty, you . This Warranty applies only to products which has been subjected to alteration, misuse, abuse, ...
...Warranty is requested by the original consumer purchaser, we will repair or replace, at our option, without charge for parts or labor incurred in replacing parts, any part which we find to be defective due to materials or workmanship. Exclusions: Excluded from whom it was ..., please contact: Electrolux Home Products, Inc. Please refer to the applicable manufacturer's warranty on these items. 2. Transportation charges for any parts submitted for replacement under this Warranty, you . This Warranty applies only to products which has been subjected to alteration, misuse, abuse, ...
Assembly Instructions
Page 2
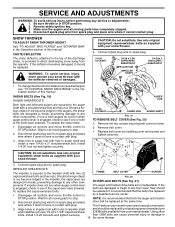
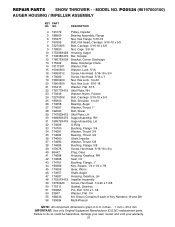
... do so could be hazardous, damage your lawn mower and void your warranty. 21 inches. 1 inch = 25.4 mm IMPORTANT: Use only Original Equipment Manufacturer (O.E.M.) replacement parts. DESCRIPTION 4 191079 Pulley, Impeller 5 188909 Bearing Assembly, Flange 6 155377 Nut, Hex Flange 5/16-18 7 180355 Bolt, Flat Head, Carriage 5/16-18 x 5/8 8 72270505 Bolt, ...1/4 55 188243 Kit, Shear (Contains 6 each of Key Numbers 19 and 28) 56 180684 Multi-Wrench NOTE: All component dimensions given in U.S. NO. REPAIR PARTS SNOW THROWER - - PO5524 (96197000100) AUGER HOUSING / IMPELLER ASSEMBLY KEY...
... do so could be hazardous, damage your lawn mower and void your warranty. 21 inches. 1 inch = 25.4 mm IMPORTANT: Use only Original Equipment Manufacturer (O.E.M.) replacement parts. DESCRIPTION 4 191079 Pulley, Impeller 5 188909 Bearing Assembly, Flange 6 155377 Nut, Hex Flange 5/16-18 7 180355 Bolt, Flat Head, Carriage 5/16-18 x 5/8 8 72270505 Bolt, ...1/4 55 188243 Kit, Shear (Contains 6 each of Key Numbers 19 and 28) 56 180684 Multi-Wrench NOTE: All component dimensions given in U.S. NO. REPAIR PARTS SNOW THROWER - - PO5524 (96197000100) AUGER HOUSING / IMPELLER ASSEMBLY KEY...
Assembly Instructions
Page 4
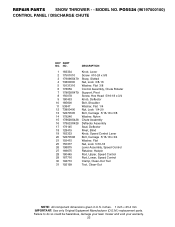
PO5524 (96197000100) CONTROL PANEL / DISCHARGE CHUTE KEY PART NO. NO. inches. 1 inch = 25.4 mm IMPORTANT: Use only Original Equipment Manufacturer (O.E.M.) replacement parts. MODEL NO. DESCRIPTION 1 183334 Knob, Lever 2 17501010 Screw #10-24 x 5/8 3 179096X479 Strap, Slotted 4 73800600 Nut, Lock 3/8-16 5 19131316 Washer, Flat 3/8 6 178659 Control Assembly, Chute Rotater 7 ..., Clean-Out NOTE: All component dimensions given in U.S. Failure to do so could be hazardous, damage your lawn mower and void your warranty. 23 REPAIR PARTS SNOW THROWER - -
PO5524 (96197000100) CONTROL PANEL / DISCHARGE CHUTE KEY PART NO. NO. inches. 1 inch = 25.4 mm IMPORTANT: Use only Original Equipment Manufacturer (O.E.M.) replacement parts. MODEL NO. DESCRIPTION 1 183334 Knob, Lever 2 17501010 Screw #10-24 x 5/8 3 179096X479 Strap, Slotted 4 73800600 Nut, Lock 3/8-16 5 19131316 Washer, Flat 3/8 6 178659 Control Assembly, Chute Rotater 7 ..., Clean-Out NOTE: All component dimensions given in U.S. Failure to do so could be hazardous, damage your lawn mower and void your warranty. 23 REPAIR PARTS SNOW THROWER - -
Assembly Instructions
Page 6
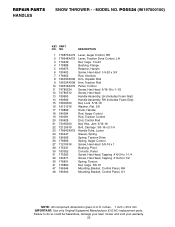
... 178890 Nut, Cage 3/8-16 47 196944 Mounting Bracket, Control Panel, RH 48 196943 Mounting Bracket, Control Panel, LH NOTE: All component dimensions given in U.S. REPAIR PARTS HANDLES SNOW THROWER - - NO. PO5524 (96197000100) KEY PART NO. inches. 1 inch = 25.4 mm IMPORTANT: Use only Original Equipment Manufacturer (O.E.M.) replacement...
... 178890 Nut, Cage 3/8-16 47 196944 Mounting Bracket, Control Panel, RH 48 196943 Mounting Bracket, Control Panel, LH NOTE: All component dimensions given in U.S. REPAIR PARTS HANDLES SNOW THROWER - - NO. PO5524 (96197000100) KEY PART NO. inches. 1 inch = 25.4 mm IMPORTANT: Use only Original Equipment Manufacturer (O.E.M.) replacement...
Assembly Instructions
Page 8
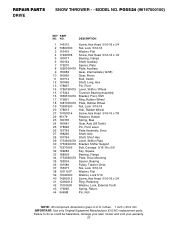
PO5524 (96197000100) KEY PART NO. MODEL NO. REPAIR PARTS DRIVE SNOW THROWER - - NO. Failure to do so could be hazardous, damage your lawn mower and void your warranty. 27 DESCRIPTION 1 146315 Screw, Hex Head 5/... 43 179095 Spring, Return 44 9465M Pin, Roll NOTE: All component dimensions given in U.S. inches. 1 inch = 25.4 mm IMPORTANT: Use only Original Equipment Manufacturer (O.E.M.) replacement parts.
PO5524 (96197000100) KEY PART NO. MODEL NO. REPAIR PARTS DRIVE SNOW THROWER - - NO. Failure to do so could be hazardous, damage your lawn mower and void your warranty. 27 DESCRIPTION 1 146315 Screw, Hex Head 5/... 43 179095 Spring, Return 44 9465M Pin, Roll NOTE: All component dimensions given in U.S. inches. 1 inch = 25.4 mm IMPORTANT: Use only Original Equipment Manufacturer (O.E.M.) replacement parts.
Assembly Instructions
Page 10
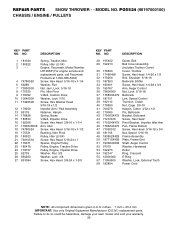
... to do so could be hazardous, damage your lawn mower and void your warranty. 29 Engine, Tecumseh, Model Number LH195SP (For engine service and replacement parts, call Tecumseh Products at 1-800-558-5402) 4 74780520 Screw, Hex Head 5/16-18 x 1-1/4 6 59289 Washer, Flat 7 73930500 Nut, Jam, Lock 5/16-18 8 175330 Pin... Washer, Lock, External Tooth 58 183854 Power Cord NOTE: All component dimensions given in U.S. DESCRIPTION 1 181044 Spring, Traction Idler 2 180522 Pulley, Idler (2-1/4) 3 --- NO. REPAIR PARTS SNOW THROWER - - PO5524 (96197000100) CHASSIS / ENGINE / PULLEYS KEY...
... to do so could be hazardous, damage your lawn mower and void your warranty. 29 Engine, Tecumseh, Model Number LH195SP (For engine service and replacement parts, call Tecumseh Products at 1-800-558-5402) 4 74780520 Screw, Hex Head 5/16-18 x 1-1/4 6 59289 Washer, Flat 7 73930500 Nut, Jam, Lock 5/16-18 8 175330 Pin... Washer, Lock, External Tooth 58 183854 Power Cord NOTE: All component dimensions given in U.S. DESCRIPTION 1 181044 Spring, Traction Idler 2 180522 Pulley, Idler (2-1/4) 3 --- NO. REPAIR PARTS SNOW THROWER - - PO5524 (96197000100) CHASSIS / ENGINE / PULLEYS KEY...
Assembly Instructions
Page 12
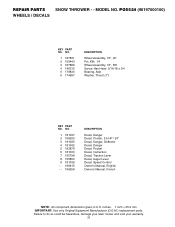
...- 199259 DESCRIPTION Decal, Danger Decal, Poulan, 5.5 HP / 24" Decal, Danger, Deflector Decal, Danger Decal, Poulan Decal, Instruction Decal, Traction Lever Decal, Auger Lever Decal, Speed Control Owner's Manual, English Owner's Manual, French NOTE: All component dimensions given in U.S. REPAIR PARTS SNOW THROWER - - NO. 1 ...5/16-18 x 3/4 Bearing, Axle Washer, Thrust (1") KEY PART NO. Failure to do so could be hazardous, damage your lawn mower and void your warranty. 31 MODEL NO. PO5524 (96197000100) WHEELS / DECALS KEY PART NO. inches. 1 inch = 25.4 mm IMPORTANT: Use only...
...- 199259 DESCRIPTION Decal, Danger Decal, Poulan, 5.5 HP / 24" Decal, Danger, Deflector Decal, Danger Decal, Poulan Decal, Instruction Decal, Traction Lever Decal, Auger Lever Decal, Speed Control Owner's Manual, English Owner's Manual, French NOTE: All component dimensions given in U.S. REPAIR PARTS SNOW THROWER - - NO. 1 ...5/16-18 x 3/4 Bearing, Axle Washer, Thrust (1") KEY PART NO. Failure to do so could be hazardous, damage your lawn mower and void your warranty. 31 MODEL NO. PO5524 (96197000100) WHEELS / DECALS KEY PART NO. inches. 1 inch = 25.4 mm IMPORTANT: Use only...


