
User Manual
Page 2
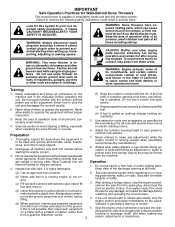
... from the discharge chute. Handle fuel with the rim of all doormats, sleds, boards, wires, and other engine parts become extremely hot during operation or while performing an adjustment or repair to point out important safety precautions. Use extension cords and receptacles as roofs of the discharge opening at all units with electric drive motors or electric starting the engine (motor). 3. Adjust the collector housing height to operate the equipment without...
... from the discharge chute. Handle fuel with the rim of all doormats, sleds, boards, wires, and other engine parts become extremely hot during operation or while performing an adjustment or repair to point out important safety precautions. Use extension cords and receptacles as roofs of the discharge opening at all units with electric drive motors or electric starting the engine (motor). 3. Adjust the collector housing height to operate the equipment without...

User Manual
Page 3
... and retain this owner's manual. SERIAL NUMBER DATE OF PURCHASE THE MODEL AND SERIAL NUMBERS WILL BE FOUND ON A DECAL ATTACHED TO THE REAR OF THE SNOW THROWER HOUSING. TABLE OF CONTENTS SAFETY RULES 2-3 MAINTENANCE 13-14 PRODUCT SPECIFICATIONS 3 MAINTENANCE SCHEDULE 13 CUSTOMER RESPONSIBILITIES 3 SERVICE AND ADJUSTMENTS 15-17 WARRANTY 32 STORAGE 17 ASSEMBLY / PRE-OPERATION 4-6 TROUBLESHOOTING 18 OPERATION 7-12 3 REPAIR PARTS 20-31 Never operate the snow thrower without proper guards, and other bolts at frequent intervals...
... and retain this owner's manual. SERIAL NUMBER DATE OF PURCHASE THE MODEL AND SERIAL NUMBERS WILL BE FOUND ON A DECAL ATTACHED TO THE REAR OF THE SNOW THROWER HOUSING. TABLE OF CONTENTS SAFETY RULES 2-3 MAINTENANCE 13-14 PRODUCT SPECIFICATIONS 3 MAINTENANCE SCHEDULE 13 CUSTOMER RESPONSIBILITIES 3 SERVICE AND ADJUSTMENTS 15-17 WARRANTY 32 STORAGE 17 ASSEMBLY / PRE-OPERATION 4-6 TROUBLESHOOTING 18 OPERATION 7-12 3 REPAIR PARTS 20-31 Never operate the snow thrower without proper guards, and other bolts at frequent intervals...

User Manual
Page 4
Your new snow thrower has been assembled at . 3. To ensure safe and proper operation of the product. Cut down all parts and hardware you attempt to the pallet. 4. Remove the two (2) screws securing the auger housing to assemble or operate your new snow thrower. PARTS PACKED SEPARATELY IN CARTON ASSEMBLY / PRE-OPERATION Read these instructions and this manual in its entirety before you assemble must be tightened securely. Use the correct tools as nuts, washers, bolts, etc...
Your new snow thrower has been assembled at . 3. To ensure safe and proper operation of the product. Cut down all parts and hardware you attempt to the pallet. 4. Remove the two (2) screws securing the auger housing to assemble or operate your new snow thrower. PARTS PACKED SEPARATELY IN CARTON ASSEMBLY / PRE-OPERATION Read these instructions and this manual in its entirety before you assemble must be tightened securely. Use the correct tools as nuts, washers, bolts, etc...

User Manual
Page 5
Secure with retainer spring. INSTALL TRACTION DRIVE CONTROL ROD (See Figs. 3 and 4) The traction drive control rod has the long loop on the end of the spring as shown. 2. ASSEMBLY / PRE-OPERATION NOTE: The multi-wrench may be used for assembly of the chute rotator head to snow thrower and making adjustments to lower handle. 2. Remove plastic tie securing rod to the skid plates. Slide rubber sleeve up rod...
Secure with retainer spring. INSTALL TRACTION DRIVE CONTROL ROD (See Figs. 3 and 4) The traction drive control rod has the long loop on the end of the spring as shown. 2. ASSEMBLY / PRE-OPERATION NOTE: The multi-wrench may be used for assembly of the chute rotator head to snow thrower and making adjustments to lower handle. 2. Remove plastic tie securing rod to the skid plates. Slide rubber sleeve up rod...

User Manual
Page 6
... chute assembly to install the chute rotater head. 1. Install 3/8 washer and locknut on pin and threaded stud of the spring as shown. 2. With top end of rod positioned under right side of control panel, push down on rod and insert end of snow thrower. 2. Place discharge chute assembly on top of chute base with retainer spring. Correct and equal tire pressure is important for shipping purposes. ASSEMBLY / PRE-OPERATION INSTALL AUGER CONTROL...
... chute assembly to install the chute rotater head. 1. Install 3/8 washer and locknut on pin and threaded stud of the spring as shown. 2. With top end of rod positioned under right side of control panel, push down on rod and insert end of snow thrower. 2. Place discharge chute assembly on top of chute base with retainer spring. Correct and equal tire pressure is important for shipping purposes. ASSEMBLY / PRE-OPERATION INSTALL AUGER CONTROL...

User Manual
Page 8
... KEY SPARK PLUG CHOKE CONTROL ENGINE OIL CAP WITH DIPSTICK AUGER CONTROL LEVER GASOLINE FILLER CAP CHUTE DEFLECTOR THROTTLE / ENGINE CONTROL OIL DRAIN PLUG DISCHARGE CHUTE RECOIL (AUXILIARY) STARTER HANDLE PRIMER POWER CORD PLUG ELECTRIC START BUTTON FUEL SHUT-OFF VALVE CLEANOUT TOOL NOTE: ITEMS ABOVE ARE SHOWN IN THEIR TYPICAL LOCATION ON THE ENGINE. ACTUAL LOCATION MAY VARY WITH THE ENGINE ON YOUR UNIT. must be inserted for the engine to STOP the engine. used to adjust height of the American National Standards Institute. SAFETY REQUIREMENTS Our snow throwers...
... KEY SPARK PLUG CHOKE CONTROL ENGINE OIL CAP WITH DIPSTICK AUGER CONTROL LEVER GASOLINE FILLER CAP CHUTE DEFLECTOR THROTTLE / ENGINE CONTROL OIL DRAIN PLUG DISCHARGE CHUTE RECOIL (AUXILIARY) STARTER HANDLE PRIMER POWER CORD PLUG ELECTRIC START BUTTON FUEL SHUT-OFF VALVE CLEANOUT TOOL NOTE: ITEMS ABOVE ARE SHOWN IN THEIR TYPICAL LOCATION ON THE ENGINE. ACTUAL LOCATION MAY VARY WITH THE ENGINE ON YOUR UNIT. must be inserted for the engine to STOP the engine. used to adjust height of the American National Standards Institute. SAFETY REQUIREMENTS Our snow throwers...

User Manual
Page 9
... throttle offers the best snow thrower performance. Be sure lever springs back and locks into the eyes, which snow is in the OPEN position. Set the deflector low to prevent unauthorized use to start a warm engine. • To engage choke, turn ) safety ignition key to throw snow a short distance; Remove (do not turn knob clockwise. OFF OPEN FIG. 9 TO USE THROTTLE CONTROL (See Fig. 10) The throttle control is located on the engine. TO USE CHOKE CONTROL...
... throttle offers the best snow thrower performance. Be sure lever springs back and locks into the eyes, which snow is in the OPEN position. Set the deflector low to prevent unauthorized use to start a warm engine. • To engage choke, turn ) safety ignition key to throw snow a short distance; Remove (do not turn knob clockwise. OFF OPEN FIG. 9 TO USE THROTTLE CONTROL (See Fig. 10) The throttle control is located on the engine. TO USE CHOKE CONTROL...

User Manual
Page 10
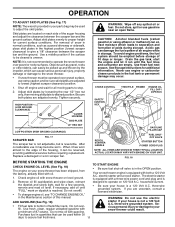
... moving parts have stopped. Disconnect the spark plug wire and keep the wire away from the auger hous- It is recommended that you use a slower speed until you are familiar with ice and snow. OPERATION HIGH POSITION DISCHARGE CHUTE KNOB CLEAN-OUT TOOL MOUNTING CLIP CHUTE DEFLECTOR LOW POSITION FIG. 13 TO THROW SNOW (See Fig. 14) The auger rotation is controlled by the auger control lever located on the right side handle. • Squeeze auger control lever to handle to...
... moving parts have stopped. Disconnect the spark plug wire and keep the wire away from the auger hous- It is recommended that you use a slower speed until you are familiar with ice and snow. OPERATION HIGH POSITION DISCHARGE CHUTE KNOB CLEAN-OUT TOOL MOUNTING CLIP CHUTE DEFLECTOR LOW POSITION FIG. 13 TO THROW SNOW (See Fig. 14) The auger rotation is controlled by the auger control lever located on the right side handle. • Squeeze auger control lever to handle to...
User Manual
Page 11
... bar. GASOLINE FILLER CAP RECOIL STARTER HANDLE FUEL SHUTOFF VALVE STARTER BUTTON POWER CORD PLUG NOTE: ALL ITEMS ARE SHOWN IN THEIR TYPICAL LOCATION. electric starter and a recoil starter. the dipstick and screw tight, wait for additional information. Do not mix oil with snow thrower on 120 Volt A.C. Use a middle position if the surface to be cleared is not recommended to assure fuel freshness. 11 NOTE: It is uneven. To avoid engine problems, the fuel...
... bar. GASOLINE FILLER CAP RECOIL STARTER HANDLE FUEL SHUTOFF VALVE STARTER BUTTON POWER CORD PLUG NOTE: ALL ITEMS ARE SHOWN IN THEIR TYPICAL LOCATION. electric starter and a recoil starter. the dipstick and screw tight, wait for additional information. Do not mix oil with snow thrower on 120 Volt A.C. Use a middle position if the surface to be cleared is not recommended to assure fuel freshness. 11 NOTE: It is uneven. To avoid engine problems, the fuel...

User Manual
Page 12
... be removed. • Throw snow downwind whenever possible. • Adjust the skid plates to help air flow and extend engine life. • After snow-throwing is completed, allow starter rope to remove snow is running , pull the recoil starter handle with rapid, full arm strokes three or four times. Engine will be hazardous to start and DO NOT push the primer. 5. NOTE: Do not use . Disconnect the power cord from...
... be removed. • Throw snow downwind whenever possible. • Adjust the skid plates to help air flow and extend engine life. • After snow-throwing is completed, allow starter rope to remove snow is running , pull the recoil starter handle with rapid, full arm strokes three or four times. Engine will be hazardous to start and DO NOT push the primer. 5. NOTE: Do not use . Disconnect the power cord from...
User Manual
Page 13
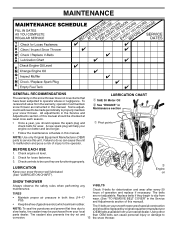
Check engine oil level. 2. Check for loose fasteners. 3. Check V-belts for deterioration and wear after every 50 TIRES • Maintain proper air pressure in Maintenance section ➀ Pivot points ➁ Engine oil SNOW THROWER Always observe the safety rules when performing any V-BELTS maintenance. hours of injury to the operator. The belts are not adjustable. To receive full value from wear. (See "TO REMOVE BELT COVER" in the Service and Adjustments section of this manual should...
Check engine oil level. 2. Check for loose fasteners. 3. Check V-belts for deterioration and wear after every 50 TIRES • Maintain proper air pressure in Maintenance section ➀ Pivot points ➁ Engine oil SNOW THROWER Always observe the safety rules when performing any V-BELTS maintenance. hours of injury to the operator. The belts are not adjustable. To receive full value from wear. (See "TO REMOVE BELT COVER" in the Service and Adjustments section of this manual should...
User Manual
Page 14
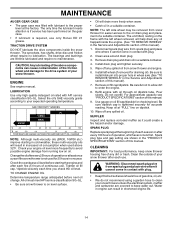
... spark plug wire from spark plug and place wire where it cannot come in the "PRODUCT SPECIFICATIONS" section of continuous use only Ronex ED #1 grease. TO CHANGE ENGINE OIL Determine temperature range anticipated before starting in cold weather, these multi-viscosity oils will drain more frequently to the proper level at least once a year if the snow thrower is if service has been performed on oil fill cap/dipstick for draining oil...
... spark plug wire from spark plug and place wire where it cannot come in the "PRODUCT SPECIFICATIONS" section of continuous use only Ronex ED #1 grease. TO CHANGE ENGINE OIL Determine temperature range anticipated before starting in cold weather, these multi-viscosity oils will drain more frequently to the proper level at least once a year if the snow thrower is if service has been performed on oil fill cap/dipstick for draining oil...
User Manual
Page 15
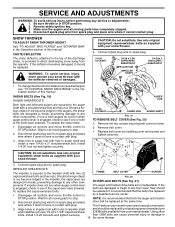
... wire where it cannot come in the Operation section of special construction 3. Align hole in auger shaft and install a new 1/4-20 x 2" shoulder/shear bolt. AUGER HUB 1/4-20 LOCKNUT AUGER HUB AUGER SHAFT FIG. 19 TO REMOVE BELT COVER (See Fig. 20) 1. Remove the two screws securing belt cover to spark plug. Remove belt cover. • Replace belt cover by original equipment manufacturer (OEM) belts available from spark plug and place drive belt be replaced by installing cover and screws and tighten securely. CAUTION: Do not substitute. Use...
... wire where it cannot come in the Operation section of special construction 3. Align hole in auger shaft and install a new 1/4-20 x 2" shoulder/shear bolt. AUGER HUB 1/4-20 LOCKNUT AUGER HUB AUGER SHAFT FIG. 19 TO REMOVE BELT COVER (See Fig. 20) 1. Remove the two screws securing belt cover to spark plug. Remove belt cover. • Replace belt cover by original equipment manufacturer (OEM) belts available from spark plug and place drive belt be replaced by installing cover and screws and tighten securely. CAUTION: Do not substitute. Use...
User Manual
Page 16
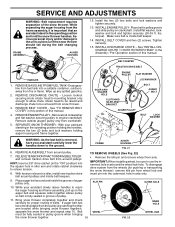
... the snow thrower), remove klik pin from snow thrower. 3. If auger belt has become dislodged from around pulleys. Place belt in groove of auger pulley only. torque). INSTALL DISCHARGE CHUTE - HANDLES 1. With your assistant standing in axle and the wheel hub hole. While your assistant carefully lower the handles down to use the innermost hole in the operating position holding the handles, remove the two (2) bolts and lock washers holding auger housing and frame together. Install the...
... the snow thrower), remove klik pin from snow thrower. 3. If auger belt has become dislodged from around pulleys. Place belt in groove of auger pulley only. torque). INSTALL DISCHARGE CHUTE - HANDLES 1. With your assistant standing in axle and the wheel hub hole. While your assistant carefully lower the handles down to use the innermost hole in the operating position holding the handles, remove the two (2) bolts and lock washers holding auger housing and frame together. Install the...
User Manual
Page 17
... wear. ENGINE OIL Drain oil (with engine warm) and replace with gasoline in the Maintenance section of this manual). 2. Remove spark plug. 2. Overspeeding the engine above the factory high speed setting can damage the fuel system of an engine while in minimizing the formation of fuel gum deposits during storage. STORAGE Immediately prepare your snow thrower to cool before painting. Do not drain the gas tank and carburetor if using ethanol or methanol) can starts to...
... wear. ENGINE OIL Drain oil (with engine warm) and replace with gasoline in the Maintenance section of this manual). 2. Remove spark plug. 2. Overspeeding the engine above the factory high speed setting can damage the fuel system of an engine while in minimizing the formation of fuel gum deposits during storage. STORAGE Immediately prepare your snow thrower to cool before painting. Do not drain the gas tank and carburetor if using ethanol or methanol) can starts to...
User Manual
Page 18
...Spark plug wire is in the Operation section of pulley. 2. Insert safety ignition key. 3. Prime as instructed in need of this manual. 7. Spark plug wire loose. 2. Stale fuel. 4. Carburetor is disconnected. 9. Excessive vibration 1. If vibration remains, contact a qualified service centre. Frozen recoil starter. 1. Check / replace drive belt. of swath. 3. Friction drive wheel is worn. 3. Auger belt is worn. 3. Clean snow chute. 4. PROBLEM CAUSE CORRECTION Does not start 1. Primer not depressed. 7. Water in fuel line. 3. Turn fuel shut-off valve...
...Spark plug wire is in the Operation section of pulley. 2. Insert safety ignition key. 3. Prime as instructed in need of this manual. 7. Spark plug wire loose. 2. Stale fuel. 4. Carburetor is disconnected. 9. Excessive vibration 1. If vibration remains, contact a qualified service centre. Frozen recoil starter. 1. Check / replace drive belt. of swath. 3. Friction drive wheel is worn. 3. Auger belt is worn. 3. Clean snow chute. 4. PROBLEM CAUSE CORRECTION Does not start 1. Primer not depressed. 7. Water in fuel line. 3. Turn fuel shut-off valve...

User Manual
Page 20
...WARRANTIES ARE LIMITED TO THE SAME TIME PERIODS STATED HEREIN FOR OUR EXPRESSED WARRANTIES. Should you have a claim under this warranty must return the product to an authorized service dealer. Transportation charges for rental or commercial purposes is free from locale to locale. The Warranty period for any products used... purchaser, we will repair or replace, at our option, without charge for replacement under this Warranty, you have any power equipment unit or attachment are belts, shear pins, normal wear, normal adjustments, standard hardware and normal maintenance. 6.
...WARRANTIES ARE LIMITED TO THE SAME TIME PERIODS STATED HEREIN FOR OUR EXPRESSED WARRANTIES. Should you have a claim under this warranty must return the product to an authorized service dealer. Transportation charges for rental or commercial purposes is free from locale to locale. The Warranty period for any products used... purchaser, we will repair or replace, at our option, without charge for replacement under this Warranty, you have any power equipment unit or attachment are belts, shear pins, normal wear, normal adjustments, standard hardware and normal maintenance. 6.
Assembly Instructions
Page 2
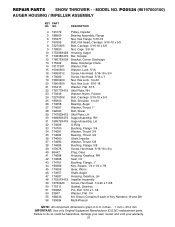
..., Gearbox 51 7836M Pin, Roll 3/16 x 1-1/8 54 53847 Washer, Flat 1/4 55 188243 Kit, Shear (Contains 6 each of Key Numbers 19 and 28) 56 180684 Multi-Wrench NOTE: All component dimensions given in U.S. inches. 1 inch = 25.4 mm IMPORTANT: Use only Original Equipment Manufacturer (O.E.M.) replacement parts. REPAIR PARTS SNOW THROWER - - NO. Failure to do so could be hazardous, damage your lawn mower and void your warranty. 21 MODEL NO.
..., Gearbox 51 7836M Pin, Roll 3/16 x 1-1/8 54 53847 Washer, Flat 1/4 55 188243 Kit, Shear (Contains 6 each of Key Numbers 19 and 28) 56 180684 Multi-Wrench NOTE: All component dimensions given in U.S. inches. 1 inch = 25.4 mm IMPORTANT: Use only Original Equipment Manufacturer (O.E.M.) replacement parts. REPAIR PARTS SNOW THROWER - - NO. Failure to do so could be hazardous, damage your lawn mower and void your warranty. 21 MODEL NO.
Assembly Instructions
Page 8
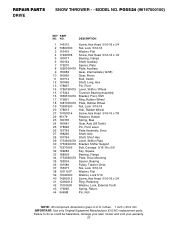
..., Rubber Wheel 19 73930500 Nut, Lock 5/16-18 20 178613 Hub, Rubber Wheel 21 74760514 Screw, Hex Head 5/16-18 x 7/8 22 85179 Retainer, Hairpin 23 180135 Spring, Bias 24 180081 Gear, Axle (58 Teeth) 25 178695 Pin, Pivot Lever 26 197763 Plate Assembly, Drive 27 188226 Shaft, Axle 28 197764 Shaft, Short Hex 29 175350X479 Lever, Shifter Plate 30 175349X479 Bracket, Shifter Support 31 72270505 Bolt, Carriage...
..., Rubber Wheel 19 73930500 Nut, Lock 5/16-18 20 178613 Hub, Rubber Wheel 21 74760514 Screw, Hex Head 5/16-18 x 7/8 22 85179 Retainer, Hairpin 23 180135 Spring, Bias 24 180081 Gear, Axle (58 Teeth) 25 178695 Pin, Pivot Lever 26 197763 Plate Assembly, Drive 27 188226 Shaft, Axle 28 197764 Shaft, Short Hex 29 175350X479 Lever, Shifter Plate 30 175349X479 Bracket, Shifter Support 31 72270505 Bolt, Carriage...
Assembly Instructions
Page 10
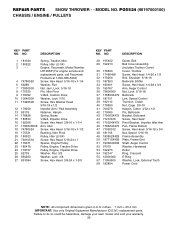
PO5524 (96197000100) CHASSIS / ENGINE / PULLEYS KEY PART NO. NO. NO. inches. 1 inch = 25.4 mm IMPORTANT: Use only Original Equipment Manufacturer (O.E.M.) replacement parts. REPAIR PARTS SNOW THROWER - - Engine, Tecumseh, Model Number LH195SP (For engine service and replacement parts, call Tecumseh Products at 1-800-558-5402) 4 74780520 Screw, Hex Head 5/16-18 x 1-1/4 6 59289 Washer, Flat 7 73930500 Nut, Jam, Lock 5/16-18 8 175330 Pin, Idler Pivot 9 179092 V-Belt, Traction Drive 10 10040500 Washer, Lock 5/16 11 17490508 Screw, Hex Washer Head 5/16-18 x 1/2 12...
PO5524 (96197000100) CHASSIS / ENGINE / PULLEYS KEY PART NO. NO. NO. inches. 1 inch = 25.4 mm IMPORTANT: Use only Original Equipment Manufacturer (O.E.M.) replacement parts. REPAIR PARTS SNOW THROWER - - Engine, Tecumseh, Model Number LH195SP (For engine service and replacement parts, call Tecumseh Products at 1-800-558-5402) 4 74780520 Screw, Hex Head 5/16-18 x 1-1/4 6 59289 Washer, Flat 7 73930500 Nut, Jam, Lock 5/16-18 8 175330 Pin, Idler Pivot 9 179092 V-Belt, Traction Drive 10 10040500 Washer, Lock 5/16 11 17490508 Screw, Hex Washer Head 5/16-18 x 1/2 12...


