Poulan PO5524 Support and Manuals
Get Help and Manuals for this Poulan item

View All Support Options Below
Free Poulan PO5524 manuals!
Problems with Poulan PO5524?
Ask a Question
Free Poulan PO5524 manuals!
Problems with Poulan PO5524?
Ask a Question
Popular Poulan PO5524 Manual Pages
User Manual - Page 2
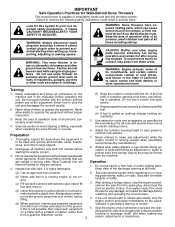
...parts become extremely hot during operation or while performing an adjustment or repair to observe the following safety instructions could result in the manual...use a nozzle lock-open device.
(g) Replace gasoline cap securely and wipe up , ... to prevent accidental starting when setting up spilled fuel.
(h) If...on the ground.
Keep clear of trouble. Never fill fuel tank indoors...
User Manual - Page 3

... a regular schedule in or out of the building. TABLE OF CONTENTS
SAFETY RULES 2-3
MAINTENANCE 13-14
PRODUCT SPECIFICATIONS 3
MAINTENANCE SCHEDULE 13
CUSTOMER RESPONSIBILITIES 3
SERVICE AND ADJUSTMENTS 15-17
WARRANTY 32
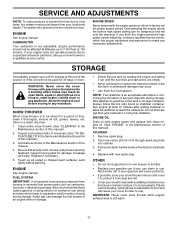
STORAGE 17
ASSEMBLY / PRE-OPERATION 4-6
TROUBLESHOOTING 18
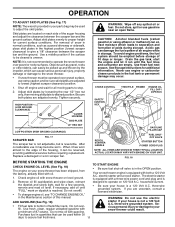
OPERATION 7-12 3 REPAIR PARTS 20-31 Look behind and use a clean-out tool, not your hand to...
User Manual - Page 11
...hex nut only, then moving parts to separation and formation of ...must be reversed, providing additional service before storage of acids during...emptied before requiring replacement. Use fresh fuel next season. See Storage Instructions for current surface ... the ground.
To avoid engine problems, the fuel system should be used... fuel system of this manual. Adjust skid plates evenly to assure...
User Manual - Page 13
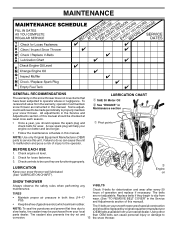
...instructed in this unit.
Check controls to be sure they begin to service this manual. hours of gasoline and oil, which can harm rubber. The V-belts on this manual. Using other
parts dealer...Motor Oil ➁ See "ENGINE" in the Service and Adjustments section of this manual).
• Keep tires free of operation and replace if necessary. All adjustments in
Maintenance section
&#...
User Manual - Page 14
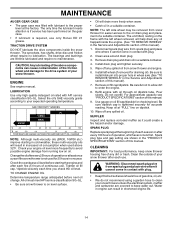
...manual).
7. Clean area around drain plug.
3. Pour slowly. The bearings and bushings are shown in shortened engine life.
14 The unit tilted, resting on level surface.
• Oil will result in the Service and Adjustments section of a suitable container. Be careful not to allow dirt to install... friction wheel require no maintenance. SPARK PLUG
Replace spark plug at "FULL" line on oil...
User Manual - Page 15
...service center. Install 1/4-20 lock nut and tighten securely. Remove belt cover. • Replace...replaced.
Make sure the augers and all moving parts have sheared. WARNING: To avoid serious injury, never operate your nearest dealer. Use only original equipment capscrew/shear bolts as supplied with hole in impeller shaft and install... the top of this manual. Align hole in auger...
User Manual - Page 16
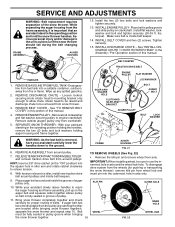
...and the wheel hub hole.
With tension relieved on idler, install new traction drive belt around and inside the groove of this manual.
4.
To disengage drive system from wheel hub and insert ...64258;ame. Place auger belt around pulleys and inside belt keeper.
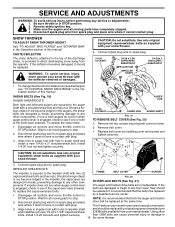
14. SERVICE AND ADJUSTMENTS
WARNING: Belt replacement requires separation of pulley.
11. Place belt in idler arm and rotate ...
User Manual - Page 17
...manual).
2. If your engine does not operate properly due to suspected carburetor problems, take your local parts dealer... high speed setting can attract ...replace with a suitable protective cover that all rusted or chipped paint surfaces; Pull recoil starter handle slowly a few times to a qualified service center. Rust and/or dirt in the Service and Adjustments section of this manual...
User Manual - Page 18
....
1.
Check / replace drive belt.
TROUBLESHOOTING
See appropriate section in the Operation section of this manual. Dirty or clogged muffler.
1. Auger belt is worn.
1. Drain fuel tank and carburetor, refill tank with fresh gasoline. Reconnect spark plug wire. 2. Prime as instructed in manual unless directed to a qualified service centre.
Fuel...
Assembly Instructions - Page 2
...Numbers 19 and 28)
56 180684
Multi-Wrench
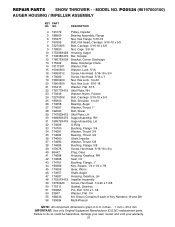
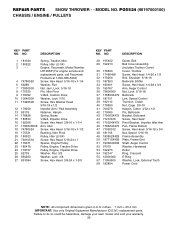
NOTE: All component dimensions given in U.S. inches. 1 inch = 25.4 mm IMPORTANT: Use only Original Equipment Manufacturer (O.E.M.) replacement parts. PO5524 (96197000100) AUGER HOUSING / IMPELLER ASSEMBLY
KEY PART NO. REPAIR PARTS SNOW THROWER - - MODEL NO. Failure to do so could be hazardous, damage your lawn mower and void your warranty.
21
Assembly Instructions - Page 4
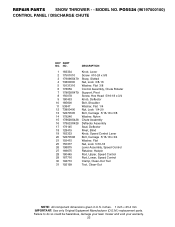
... Nut, Lock 3/8-16
5 19131316 Washer, Flat 3/8
6 178659
Control Assembly, Chute Rotater
7 178638X479 Support, Pivot
8 150078
Screw, Hex Head 5/16-18 x 3/4
9 180453
Knob, Deflector
10..., damage your lawn mower and void your warranty.
23 MODEL NO. inches. 1 inch = 25.4 mm IMPORTANT: Use only Original Equipment Manufacturer (O.E.M.) replacement parts. REPAIR PARTS SNOW THROWER ...
Assembly Instructions - Page 6
...inches. 1 inch = 25.4 mm IMPORTANT: Use only Original Equipment Manufacturer (O.E.M.) replacement parts. Failure to do so could be hazardous, damage your lawn mower and void your warranty.
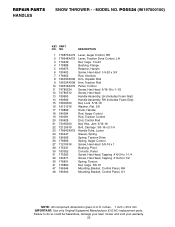
25 NO. MODEL NO.
DESCRIPTION
1 178875X479 Lever, Auger Control, RH
2 178648X479 Lever, Traction...Control Panel, LH
NOTE: All component dimensions given in U.S. REPAIR PARTS HANDLES
SNOW THROWER - -
Assembly Instructions - Page 8
... Hex
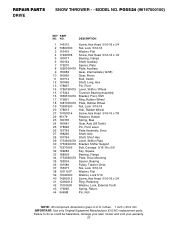
29 175350X479 Lever, Shifter Plate
30 175349X479 Bracket, Shifter Support
31 72270505 Bolt, Carriage 5/16-18 x 5/8
32 189282...MODEL NO. PO5524 (96197000100)
KEY PART NO. NO.
Failure to do so could be hazardous, damage your lawn mower and void your warranty.
27 inches. 1 inch = 25.4 mm IMPORTANT: Use only Original Equipment Manufacturer (O.E.M.) replacement parts. REPAIR PARTS...
Assembly Instructions - Page 10
...Guide...Engine, Tecumseh, Model Number
LH195SP (For engine service and
replacement parts, call Tecumseh
...PART NO. NO. inches. 1 inch = 25.4 mm IMPORTANT: Use only Original Equipment Manufacturer (O.E.M.) replacement parts. PO5524 (96197000100) CHASSIS / ENGINE / PULLEYS
KEY PART NO. Failure to do so could be hazardous, damage your lawn mower and void your warranty.
29 MODEL NO. REPAIR PARTS...
Assembly Instructions - Page 12
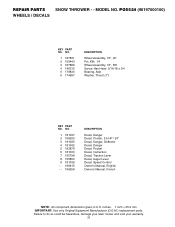
... Decal, Poulan Decal, Instruction Decal, Traction Lever Decal, Auger Lever Decal, Speed Control Owner's Manual, English Owner's Manual, French
NOTE: All component dimensions given in U.S. inches. 1 inch = 25.4 mm IMPORTANT: Use only Original Equipment Manufacturer (O.E.M.) replacement parts. Failure to do so could be hazardous, damage your lawn mower and void your warranty.
31 REPAIR PARTS SNOW...
Poulan PO5524 Reviews
We have not received any reviews for Poulan yet.