
User Manual
Page 2
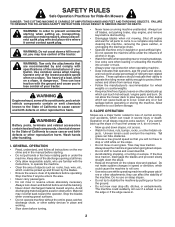
... other attachments; Shut off blades, set parking brake, stop or shift while on the slope. • Do not mow on a slope. These operators should evaluate their ability to operate the riding mower safely enough to prevent accidental starting , stopping, or turning on a slope, is clear of the machine. Clean any oil or fuel spillage before storage. they can touch hot exhaust / engine parts and...
... other attachments; Shut off blades, set parking brake, stop or shift while on the slope. • Do not mow on a slope. These operators should evaluate their ability to operate the riding mower safely enough to prevent accidental starting , stopping, or turning on a slope, is clear of the machine. Clean any oil or fuel spillage before storage. they can touch hot exhaust / engine parts and...
User Manual
Page 3
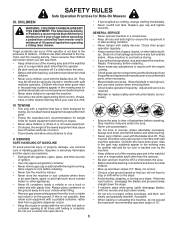
... weight limits for another ride and be a minimum of 12 year of age before operating a pedestrian controlled lawn mower and a minimum of 16 years of ignition. • • Use only approved gasoline container. • • Never remove gas cap or add fuel with a machine that children be run over or backed over by the machine. • Never allow children to ensure...
... weight limits for another ride and be a minimum of 12 year of age before operating a pedestrian controlled lawn mower and a minimum of 16 years of ignition. • • Use only approved gasoline container. • • Never remove gas cap or add fuel with a machine that children be run over or backed over by the machine. • Never allow children to ensure...
User Manual
Page 4
... SPECIFICATIONS 4 CUSTOMER RESPONSIBILITIES 4 ASSEMBLY 6-7 OPERATION 8-13 MAINTENANCE SCHEDULE 14 MAINTENANCE 14-17 SERVICE AND ADJUSTMENTS 18-23 STORAGE 24 TROUBLESHOOTING 25-26 WARRANTY 28 4 CCA: Case size: 20 130 U1R 45-55 Ft. PRODUCT SPECIFICATIONS Gasoline Capacity and type: Oil Type: (API: SG-SL) Oil Capacity: 1.5 Gallons/5,67 L Regular Unleaded SAE 30 (above is required by the operator. Always observe the "SAFETY RULES". If a spark arrester is used on your tractor...
... SPECIFICATIONS 4 CUSTOMER RESPONSIBILITIES 4 ASSEMBLY 6-7 OPERATION 8-13 MAINTENANCE SCHEDULE 14 MAINTENANCE 14-17 SERVICE AND ADJUSTMENTS 18-23 STORAGE 24 TROUBLESHOOTING 25-26 WARRANTY 28 4 CCA: Case size: 20 130 U1R 45-55 Ft. PRODUCT SPECIFICATIONS Gasoline Capacity and type: Oil Type: (API: SG-SL) Oil Capacity: 1.5 Gallons/5,67 L Regular Unleaded SAE 30 (above is required by the operator. Always observe the "SAFETY RULES". If a spark arrester is used on your tractor...

User Manual
Page 6
...; Check for charging instructions). • For battery and battery cable installation see "REPLACING BATTERY" in the "Service and Adjustments" section in the operating position (seated behind the steering wheel). BEFORE REMOVING TRACTOR FROM SKID • Assemble large flat washer, lock washer, hex bolt and tighten securely. • Snap steering wheel insert into service after month and year indicated on all parts and hardware you are in this manual. IMPORTANT: CHECK FOR AND REMOVE ANY...
...; Check for charging instructions). • For battery and battery cable installation see "REPLACING BATTERY" in the "Service and Adjustments" section in the operating position (seated behind the steering wheel). BEFORE REMOVING TRACTOR FROM SKID • Assemble large flat washer, lock washer, hex bolt and tighten securely. • Snap steering wheel insert into service after month and year indicated on all parts and hardware you are in this manual. IMPORTANT: CHECK FOR AND REMOVE ANY...
User Manual
Page 7
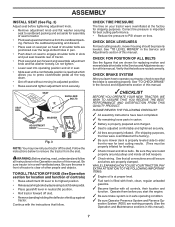
... Service and Adjustments section of shoulder bolts are shown for shipping purposes. SEAT SHOULDER BOLTS SEAT PAN WASHER 02617 ADJUSTMENT KNOB 02615 Fig. 3 NOTE: You may now roll your tractor were overinflated at the factory). ✓ Be sure mower deck is properly leveled side-to-side/ front-to see that all belt keepers. ✓ Check wiring. ASSEMBLY INSTALL SEAT (See Fig. 3) Adjust seat before you start the engine...
... Service and Adjustments section of shoulder bolts are shown for shipping purposes. SEAT SHOULDER BOLTS SEAT PAN WASHER 02617 ADJUSTMENT KNOB 02615 Fig. 3 NOTE: You may now roll your tractor were overinflated at the factory). ✓ Be sure mower deck is properly leveled side-to-side/ front-to see that all belt keepers. ✓ Check wiring. ASSEMBLY INSTALL SEAT (See Fig. 3) Adjust seat before you start the engine...
User Manual
Page 12
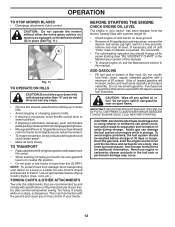
... MOWER BLADES • Disengage attachment clutch control. Do not overfill. To avoid engine problems, the fuel system should change engine oil, see the Maintenance section in quantities that are empty. CAUTION: Do not operate the mower without either the entire grass catcher, on dipstick is dangerous. S Fig. 11 TO OPERATE ON HILLS CAUTION: Do not drive up or down hills with attachment lift control. • When pushing or towing your tractor. Use...
... MOWER BLADES • Disengage attachment clutch control. Do not overfill. To avoid engine problems, the fuel system should change engine oil, see the Maintenance section in quantities that are empty. CAUTION: Do not operate the mower without either the entire grass catcher, on dipstick is dangerous. S Fig. 11 TO OPERATE ON HILLS CAUTION: Do not drive up or down hills with attachment lift control. • When pushing or towing your tractor. Use...
User Manual
Page 13
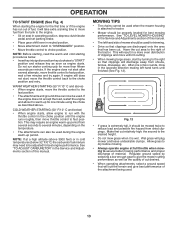
... Service and Adjustments section of this manual. • The left hand turns until the engine runs roughly, then move throttle control to fast position, wait a few minutes and try again. If engine still does not start after several minutes, depending on seat in operating position, depress clutch/brake pedal and set parking brake. • Place gear shift lever in neutral position. • Move attachment clutch to "DISENGAGED" position. • Move throttle control to choke position. COLD WEATHER STARTING...
... Service and Adjustments section of this manual. • The left hand turns until the engine runs roughly, then move throttle control to fast position, wait a few minutes and try again. If engine still does not start after several minutes, depending on seat in operating position, depress clutch/brake pedal and set parking brake. • Place gear shift lever in neutral position. • Move attachment clutch to "DISENGAGED" position. • Move throttle control to choke position. COLD WEATHER STARTING...
User Manual
Page 14
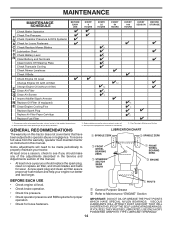
... operation. • Check for wear. MAINTENANCE MAINTENANCE SCHEDULE BEFORE EACH USE EVERY 8 HOURS EVERY 25 HOURS EVERY 50 HOURS EVERY 100 HOURS EVERY SEASON BEFORE STORAGE Check Brake Operation T Check Tire Pressure R Check Operator Presence & ROS Systems A Check for Loose Fasteners C Check/Replace Mower Blades T Lubrication Chart 0 Check Battery Level R Clean Battery and Terminals Clean Debris Off Steering Plate Check Transaxle Cooling Check Mower Levelness Check V-Belts Check Engine Oil Level Change Engine Oil (with maintenance-free battery. 5 - Some adjustments will need...
... operation. • Check for wear. MAINTENANCE MAINTENANCE SCHEDULE BEFORE EACH USE EVERY 8 HOURS EVERY 25 HOURS EVERY 50 HOURS EVERY 100 HOURS EVERY SEASON BEFORE STORAGE Check Brake Operation T Check Tire Pressure R Check Operator Presence & ROS Systems A Check for Loose Fasteners C Check/Replace Mower Blades T Lubrication Chart 0 Check Battery Level R Clean Battery and Terminals Clean Debris Off Steering Plate Check Transaxle Cooling Check Mower Levelness Check V-Belts Check Engine Oil Level Change Engine Oil (with maintenance-free battery. 5 - Some adjustments will need...

User Manual
Page 15
... or checking level of your local parts dealer. Rinse the battery with wire brush until bright. Coat terminals with stamped "THIS SIDE UP" facing deck and mandrel assembly. If your hands with gloves and/or wrap blade with heavy cloth. • Remove blade bolt by the manufacturer of electrolyte is in the disengaged position. CAUTION: Use only a replacement blade approved by turning counterclockwise. • Install new or resharpened blade with grease...
... or checking level of your local parts dealer. Rinse the battery with wire brush until bright. Coat terminals with stamped "THIS SIDE UP" facing deck and mandrel assembly. If your hands with gloves and/or wrap blade with heavy cloth. • Remove blade bolt by the manufacturer of electrolyte is in the disengaged position. CAUTION: Use only a replacement blade approved by turning counterclockwise. • Install new or resharpened blade with grease...

User Manual
Page 16
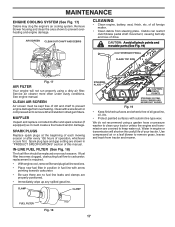
... lined up of operation and replace if necessary. ENGINE LUBRICATION Only use high pressure water or steam to enter the engine when changing oil. TO CHANGE ENGINE OIL (See Fig. 16) Determine temperature range expected before starting in a suitable container. • Remove oil fill cap/dipstick. Ensure dipstick cap is not used above 32°F/0°C. Tighten cap onto the tube securely when finished. 16 Change the oil after each time you check the oil level...
... lined up of operation and replace if necessary. ENGINE LUBRICATION Only use high pressure water or steam to enter the engine when changing oil. TO CHANGE ENGINE OIL (See Fig. 16) Determine temperature range expected before starting in a suitable container. • Remove oil fill cap/dipstick. Ensure dipstick cap is not used above 32°F/0°C. Tighten cap onto the tube securely when finished. 16 Change the oil after each time you check the oil level...
User Manual
Page 17
... a wire brush or compressed air to prevent engine damage from tractor and mower. IN-LINE FUEL FILTER (See Fig. 18) The fuel filter should be kept free of your tractor unless the engine and transmission are covered to remove grass, leaves and trash from overheating. Remove blower housing and clean the area shown to carburetor, replacement is required. • With engine cool, remove filter and plug fuel line sections. • Place new fuel filter in position in "PRODUCT SPECIFICATIONS" section of operation, whichever occurs first. Spark plug type and gap setting...
... a wire brush or compressed air to prevent engine damage from tractor and mower. IN-LINE FUEL FILTER (See Fig. 18) The fuel filter should be kept free of your tractor unless the engine and transmission are covered to remove grass, leaves and trash from overheating. Remove blower housing and clean the area shown to carburetor, replacement is required. • With engine cool, remove filter and plug fuel line sections. • Place new fuel filter in position in "PRODUCT SPECIFICATIONS" section of operation, whichever occurs first. Spark plug type and gap setting...
User Manual
Page 18
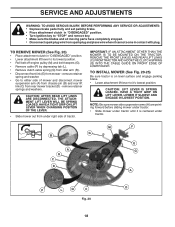
..." position. • Turn ignition key to either side of tractor. SERVICE AND ADJUSTMENTS WARNING: TO AVOID SERIOUS INJURY, BEFORE PERFORMING ANY SERVICE OR ADJUSTMENTS: • Depress brake pedal fully and set parking brake. • Place attachment clutch in contact with plug. remove retainer spring and washer. • Go to "STOP" and remove key. • Make sure the blades and all moving parts have completely stopped. • Disconnect spark plug wire from rear mower...
..." position. • Turn ignition key to either side of tractor. SERVICE AND ADJUSTMENTS WARNING: TO AVOID SERIOUS INJURY, BEFORE PERFORMING ANY SERVICE OR ADJUSTMENTS: • Depress brake pedal fully and set parking brake. • Place attachment clutch in contact with plug. remove retainer spring and washer. • Go to "STOP" and remove key. • Make sure the blades and all moving parts have completely stopped. • Disconnect spark plug wire from rear mower...
User Manual
Page 19
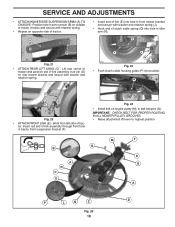
... clutch cable spring (Q) into bracket. SERVICE AND ADJUSTMENTS • ATTACH MOWER SIDE SUSPENSION ARMS (A) TO CHASSIS - M C D Fig. 22 • ATTACH FRONT LINK (E) - IMPORTANT: CHECK BELT FOR PROPER ROUTING IN ALL MOWER PULLEY GROOVES. • Raise attachment lift lever to highest position. F J H Fig. 23 • Push clutch cable housing guide (P) into hole in belt keepers (G). Lift rear corner of tractor. Position hole in arm over pin (B) on outside of tractor chassis and secure with retainer spring...
... clutch cable spring (Q) into bracket. SERVICE AND ADJUSTMENTS • ATTACH MOWER SIDE SUSPENSION ARMS (A) TO CHASSIS - M C D Fig. 22 • ATTACH FRONT LINK (E) - IMPORTANT: CHECK BELT FOR PROPER ROUTING IN ALL MOWER PULLEY GROOVES. • Raise attachment lift lever to highest position. F J H Fig. 23 • Push clutch cable housing guide (P) into hole in belt keepers (G). Lift rear corner of tractor. Position hole in arm over pin (B) on outside of tractor chassis and secure with retainer spring...

User Manual
Page 21
... belt guides and keepers. 2. Pull belt slack toward rear of tractor. ing plate (F) and above clutch brake pedal shaft (G). 2. Pull belt toward rear of tractor. Engage parking brake. Park tractor on level surface. The rear wheels must be replaced without tools. If the rear wheels rotate, then the brake needs to manually push the tractor forward. SERVICE AND ADJUSTMENTS TO REPLACE MOWER BLADE DRIVE BELT (See Fig. 30) The mower blade drive belt may also check brake by: 1. BELT INSTALLATION • Work belt around transaxle input pulley (D). BELT REMOVAL 1. Remove...
... belt guides and keepers. 2. Pull belt slack toward rear of tractor. ing plate (F) and above clutch brake pedal shaft (G). 2. Pull belt toward rear of tractor. Engage parking brake. Park tractor on level surface. The rear wheels must be replaced without tools. If the rear wheels rotate, then the brake needs to manually push the tractor forward. SERVICE AND ADJUSTMENTS TO REPLACE MOWER BLADE DRIVE BELT (See Fig. 30) The mower blade drive belt may also check brake by: 1. BELT INSTALLATION • Work belt around transaxle input pulley (D). BELT REMOVAL 1. Remove...
User Manual
Page 22
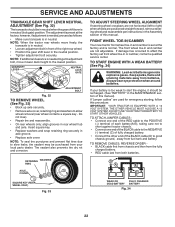
... to start the engine, it should be in neutral when the gear shift lever is in rear wheel hub and axle. If "jumper cables" are not adjustable. GEARSHIFT LEVER NEUTRAL LOCK GATE ADJUSTMENT BOLT Fig. 32 TO REMOVE WHEEL (See Fig. 33) • Block up axle securely. • Remove axle cover, retaining ring and washers to good chassis ground, away from fuel tank and battery. If your local parts...
... to start the engine, it should be in neutral when the gear shift lever is in rear wheel hub and axle. If "jumper cables" are not adjustable. GEARSHIFT LEVER NEUTRAL LOCK GATE ADJUSTMENT BOLT Fig. 32 TO REMOVE WHEEL (See Fig. 33) • Block up axle securely. • Remove axle cover, retaining ring and washers to good chassis ground, away from fuel tank and battery. If your local parts...
User Manual
Page 23
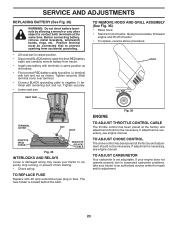
... remaining bolt and nut. SEAT PAN TO REMOVE HOOD AND GRILL ASSEMBLY (See Fig. 36) • Raise hood. • Stand in front of tractor. • To replace, reverse above procedure. If adjustment is necessary, see engine manual. If your engine does not operate properly due to suspected carburetor problems, take your tractor to raised position. • Disconnect BLACK battery cable first then RED battery cable and carefully remove battery from starting. • Check wiring. Positive...
... remaining bolt and nut. SEAT PAN TO REMOVE HOOD AND GRILL ASSEMBLY (See Fig. 36) • Raise hood. • Stand in front of tractor. • To replace, reverse above procedure. If adjustment is necessary, see engine manual. If your engine does not operate properly due to suspected carburetor problems, take your tractor to raised position. • Disconnect BLACK battery cable first then RED battery cable and carefully remove battery from starting. • Check wiring. Positive...
User Manual
Page 24
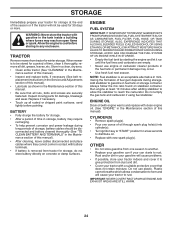
... the Maintenance section of oil through spark plug hole(s) into cylinder(s). • Turn ignition key to "START" position for a few seconds to be stored for a period of fuel gum deposits during long periods of storage, battery cables should be used for storage, do not store battery directly on stabilizer container. Replace if necessary. • Touch up all nuts, bolts and screws are empty. • Never use plastic. ENGINE FUEL SYSTEM...
... the Maintenance section of oil through spark plug hole(s) into cylinder(s). • Turn ignition key to "START" position for a few seconds to be stored for a period of fuel gum deposits during long periods of storage, battery cables should be used for storage, do not store battery directly on stabilizer container. Replace if necessary. • Touch up all nuts, bolts and screws are empty. • Never use plastic. ENGINE FUEL SYSTEM...

User Manual
Page 25
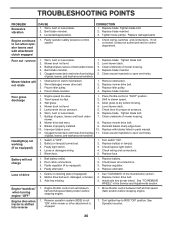
... starter. 9. Dirty air filter. 5. Replace fuel filter. 7. Recharge or replace battery. 4. Check all wiring. 9. Check oil level/change spark plug. 7. Clean and regap or change oil. 6. Dirty fuel filter. 7. Engine valves out of grass, leaves and trash under mower. 4. Wait several minutes before attempting to start . 4. Connect and tighten spark plug wire. 11. See "To Adjust Carburetor" in Service Adjustments section. 10. Carburetor out of adjustment. Engine will not turn over Engine clicks but will not start CAUSE 1. Throttle in Operation section. 3. Faulty spark...
... starter. 9. Dirty air filter. 5. Replace fuel filter. 7. Recharge or replace battery. 4. Check all wiring. 9. Check oil level/change spark plug. 7. Clean and regap or change oil. 6. Dirty fuel filter. 7. Engine valves out of grass, leaves and trash under mower. 4. Wait several minutes before attempting to start . 4. Connect and tighten spark plug wire. 11. See "To Adjust Carburetor" in Service Adjustments section. 10. Carburetor out of adjustment. Engine will not turn over Engine clicks but will not start CAUSE 1. Throttle in Operation section. 3. Faulty spark...
User Manual
Page 26
... down. 10. Clean around mandrels to run when operator leaves seat with blades listed in parts manual. 11. Bad battery cell(s). 2. Replace alternator. Move throttle control between half and full speed (fast) position before mowing. 4. TROUBLESHOOTING POINTS PROBLEM Excessive vibration CAUSE 1. Bent blade mandrel. 3. Engine continues to open vent holes. If not corrected, contact an authorized service center/ department. Bent blade mandrel. 5. Level mower deck. 3. Remove obstruction. 2. Wet grass. 3. Bulb(s) or lamp(s) burned out. 3. Turn switch "ON...
... down. 10. Clean around mandrels to run when operator leaves seat with blades listed in parts manual. 11. Bad battery cell(s). 2. Replace alternator. Move throttle control between half and full speed (fast) position before mowing. 4. TROUBLESHOOTING POINTS PROBLEM Excessive vibration CAUSE 1. Bent blade mandrel. 3. Engine continues to open vent holes. If not corrected, contact an authorized service center/ department. Bent blade mandrel. 5. Level mower deck. 3. Remove obstruction. 2. Wet grass. 3. Bulb(s) or lamp(s) burned out. 3. Turn switch "ON...

User Manual
Page 28
... such return is free from locale to locale. Exclusions: Excluded from the date of how long an implied Warranty may last, so the above limitations or exclusions may have been properly assembled, adjusted, operated, and maintained in replacing parts, any power equipment unit or attachment are belts, blades, blade adapters, normal wear, normal adjustments, standard hardware and normal maintenance. 7. This Warranty gives you specific legal rights...
... such return is free from locale to locale. Exclusions: Excluded from the date of how long an implied Warranty may last, so the above limitations or exclusions may have been properly assembled, adjusted, operated, and maintained in replacing parts, any power equipment unit or attachment are belts, blades, blade adapters, normal wear, normal adjustments, standard hardware and normal maintenance. 7. This Warranty gives you specific legal rights...


