

User Manual
Page 2
.... Adjust and service • Avoid starting . cause sliding. the presence of the mower discharge direction and do not mow it at anyone enters the area. • Do not try to operate the machine. Use only an approved container. - Allow engine to operate the machine. Choose a low gear so that • Never leave a running machine unattended. Wrap the blade(s) These can cut. turn on...
.... Adjust and service • Avoid starting . cause sliding. the presence of the mower discharge direction and do not mow it at anyone enters the area. • Do not try to operate the machine. Use only an approved container. - Allow engine to operate the machine. Choose a low gear so that • Never leave a running machine unattended. Wrap the blade(s) These can cut. turn on...

User Manual
Page 3
... California to the State of your tractor. WARNING Battery posts, terminals and related accessories contain lead and lead compounds,chemicals known to cause cancer and birth defects or other reproductive harm. TABLE OF CONTENTS SAFETY RULES 2-3 PRODUCT SPECIFICATIONS 4 CUSTOMER RESPONSIBILITIES 4 ASSEMBLY 6-9 OPERATION 10-15 MAINTENANCE SCHEDULE 16 MAINTENANCE 16-19 SERVICE AND ADJUSTMENTS 20-25 STORAGE 26 TROUBLESHOOTING 27-28 REPAIR PARTS -
... California to the State of your tractor. WARNING Battery posts, terminals and related accessories contain lead and lead compounds,chemicals known to cause cancer and birth defects or other reproductive harm. TABLE OF CONTENTS SAFETY RULES 2-3 PRODUCT SPECIFICATIONS 4 CUSTOMER RESPONSIBILITIES 4 ASSEMBLY 6-9 OPERATION 10-15 MAINTENANCE SCHEDULE 16 MAINTENANCE 16-19 SERVICE AND ADJUSTMENTS 20-25 STORAGE 26 TROUBLESHOOTING 27-28 REPAIR PARTS -

User Manual
Page 7
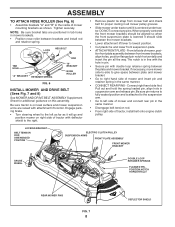
... SPRING PIN SHOULDER BOLT ADJUSTING BAR GAUGE WHEEL 3/8 WASHER FIG. 4 FIG. 5 3/8-16 CENTER LOCKNUT SET ALL WHEELS TO 4TH HOLE FROM TOP SEAT SEAT PAN 2466 FLAT WASHER SHOULDER BOLT • Be sure all the gauge wheels in the Operation section of mower to remove the tractor from the skid. Follow the appropriate instruction below to tractor assembly, set all the above assembly steps have been completed. • Check engine oil level and fill fuel tank...
... SPRING PIN SHOULDER BOLT ADJUSTING BAR GAUGE WHEEL 3/8 WASHER FIG. 4 FIG. 5 3/8-16 CENTER LOCKNUT SET ALL WHEELS TO 4TH HOLE FROM TOP SEAT SEAT PAN 2466 FLAT WASHER SHOULDER BOLT • Be sure all the gauge wheels in the Operation section of mower to remove the tractor from the skid. Follow the appropriate instruction below to tractor assembly, set all the above assembly steps have been completed. • Check engine oil level and fill fuel tank...
User Manual
Page 8
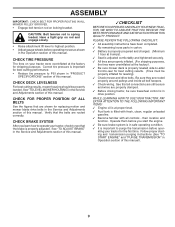
... right side of tractor, install belt onto engine clutch pulley. Connect right hand side first. Pull out and hold the spring loaded pin, align hole in the same manner. • CONNECT REAR PINS - LOCKING BRACKET BELT TENSION ROD DISENGAGED POSITION ELECTRIC CLUTCH PULLEY SUSPENSION ARMS FRONT PLATE ASSEMBLY FRONT MOWER BRACKET GAUGE WHEEL DOUBLE LOOP RETAINER SPRINGS FLANGED PIN POSITION NOTCH HORIZONTALLY REAR MOWER PINS 02786 FIG. 7 8 DEFLECTOR SHIELD LOCK NUT HEX BOLT ROD TAB HOLE 02612...
... right side of tractor, install belt onto engine clutch pulley. Connect right hand side first. Pull out and hold the spring loaded pin, align hole in the same manner. • CONNECT REAR PINS - LOCKING BRACKET BELT TENSION ROD DISENGAGED POSITION ELECTRIC CLUTCH PULLEY SUSPENSION ARMS FRONT PLATE ASSEMBLY FRONT MOWER BRACKET GAUGE WHEEL DOUBLE LOOP RETAINER SPRINGS FLANGED PIN POSITION NOTCH HORIZONTALLY REAR MOWER PINS 02786 FIG. 7 8 DEFLECTOR SHIELD LOCK NUT HEX BOLT ROD TAB HOLE 02612...
User Manual
Page 9
... all controls - Operate them before operating your tractor for best cutting performance. • Reduce tire pressure to highest position. • Adjust gauge wheels before operating mower as shown in the Service and Adjustments section of this manual. CHECK FOR PROPER POSITION OF ALL BELTS See the figures that the brake is properly adjusted. their location and function. See"TO LEVEL MOWER HOUSING"in the Operation section of this manual. ASSEMBLY IMPORTANT: CHECK BELT FOR PROPER ROUTING IN ALL MOWER PULLEY...
... all controls - Operate them before operating your tractor for best cutting performance. • Reduce tire pressure to highest position. • Adjust gauge wheels before operating mower as shown in the Service and Adjustments section of this manual. CHECK FOR PROPER POSITION OF ALL BELTS See the figures that the brake is properly adjusted. their location and function. See"TO LEVEL MOWER HOUSING"in the Operation section of this manual. ASSEMBLY IMPORTANT: CHECK BELT FOR PROPER ROUTING IN ALL MOWER PULLEY...
User Manual
Page 11
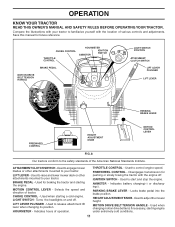
...Disengages transmission for braking the tractor and starting the engine. Used to release attachment lift lever when changing its position. MOTION DRIVE BELT TENSION HANDLE - Used to engage mower blades or other attachments mounted to control engine speed. Turns the headlights on and off . Locks brake pedal into the brake position. CHOKE CONTROL THROTTLE CONTROL HOURMETER IGNITION AMMETER SWITCH BRAKE PEDAL MOTION DRIVE BELT TENSION HANDLE LIGHT SWITCH POSITION ATTACHMENT CLUTCH SWITCH LIFT LEVER PLUNGER LIFT LEVER PARKING BRAKE LEVER FREEWHEEL CONTROL HEIGHT ADJUSTMENT KNOB...
...Disengages transmission for braking the tractor and starting the engine. Used to release attachment lift lever when changing its position. MOTION DRIVE BELT TENSION HANDLE - Used to engage mower blades or other attachments mounted to control engine speed. Turns the headlights on and off . Locks brake pedal into the brake position. CHOKE CONTROL THROTTLE CONTROL HOURMETER IGNITION AMMETER SWITCH BRAKE PEDAL MOTION DRIVE BELT TENSION HANDLE LIGHT SWITCH POSITION ATTACHMENT CLUTCH SWITCH LIFT LEVER PLUNGER LIFT LEVER PARKING BRAKE LEVER FREEWHEEL CONTROL HEIGHT ADJUSTMENT KNOB...

User Manual
Page 13
... brake position and engage parking brake. Gauge wheels should be slightly off the ground. • Replace retainer spring into the slot and release so it is located at level surface. • Adjust mower to ground. disengage attachment clutch control. CAUTION: Do not operate the mower without either the entire grass catcher, on a truck or a trailer, be sure to disengage transmission by the operator to leave the seat with attachment lift control. • Start mower blades...
... brake position and engage parking brake. Gauge wheels should be slightly off the ground. • Replace retainer spring into the slot and release so it is located at level surface. • Adjust mower to ground. disengage attachment clutch control. CAUTION: Do not operate the mower without either the entire grass catcher, on a truck or a trailer, be sure to disengage transmission by the operator to leave the seat with attachment lift control. • Start mower blades...
User Manual
Page 14
... in operating position, depress brake pedal and set parking brake. • Move attachment clutch to "DISENGAGED" position. • Move throttle control to separation and formation of filler neck. Do not run smoothly. WARM WEATHER STARTING (50° F and above . This may need to run starter continuously for additional information. Acidic gas can now be used . Do not mix oil with a minimum of 87 octane. (Use of this manual. Purchase fuel in...
... in operating position, depress brake pedal and set parking brake. • Move attachment clutch to "DISENGAGED" position. • Move throttle control to separation and formation of filler neck. Do not run smoothly. WARM WEATHER STARTING (50° F and above . This may need to run starter continuously for additional information. Acidic gas can now be used . Do not mix oil with a minimum of 87 octane. (Use of this manual. Purchase fuel in...
User Manual
Page 15
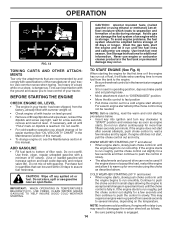
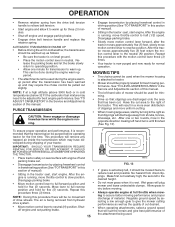
..., start engine. See "TO LEVEL MOWER HOUSING" in the tractor seat, start by placing freewheel control in driving position (See "TO TRANSPORT" in this manual. This will discharge away from shrubs, fences, driveways, etc. To ensure proper operation and performance, it is running, move throttle control to slow position. This procedure will be used when the mower housing is running . • Engage transmission by turning to half (1/2) speed. Disengage parking brake • Move motion control lever...
..., start engine. See "TO LEVEL MOWER HOUSING" in the tractor seat, start by placing freewheel control in driving position (See "TO TRANSPORT" in this manual. This will discharge away from shrubs, fences, driveways, etc. To ensure proper operation and performance, it is running, move throttle control to slow position. This procedure will be used when the mower housing is running . • Engage transmission by turning to half (1/2) speed. Disengage parking brake • Move motion control lever...

User Manual
Page 16
... FILL IN DATES AS YOU COMPLETE REGULAR SERVICE Check Brake Operation Check Tire Pressure Check Operator Presence and T Interlock Systems R Check for Loose Fasteners A Sharpen/Replace Mower Blades C T Lubrication Chart 0 Check Battery Level R Clean Battery and Terminals Check Transaxle Cooling Check V-Belts BEFOREEEVAECRHYU8ESVHEEORUYRS2E5VHEROYUR5E0SVEHROYUR1E0SV0EHROYUBSREESFAOSROENSSTEORRAVGEICE DATES 5 3 4 maint_sch-tractore.new1 Check Engine Oil Level Change Engine Oil (with maintenance-free battery. 5 - Some adjustments will need to be made periodically to properly...
... FILL IN DATES AS YOU COMPLETE REGULAR SERVICE Check Brake Operation Check Tire Pressure Check Operator Presence and T Interlock Systems R Check for Loose Fasteners A Sharpen/Replace Mower Blades C T Lubrication Chart 0 Check Battery Level R Clean Battery and Terminals Check Transaxle Cooling Check V-Belts BEFOREEEVAECRHYU8ESVHEEORUYRS2E5VHEROYUR5E0SVEHROYUR1E0SV0EHROYUBSREESFAOSROENSSTEORRAVGEICE DATES 5 3 4 maint_sch-tractore.new1 Check Engine Oil Level Change Engine Oil (with maintenance-free battery. 5 - Some adjustments will need to be made periodically to properly...

User Manual
Page 17
... this manual). ing wheel. NOTE: The original equipment battery on the mower. • To check blade balance, you do not recommend sharpening blade - NOTE: To seal tire punctures and prevent flat high speed in the disengaged position. • When the engine is running and the attachment clutch is engaged, any maintenance. If your tractor is in the Service and Adjustments section of this manual). • Keep tires free of...
... this manual). ing wheel. NOTE: The original equipment battery on the mower. • To check blade balance, you do not recommend sharpening blade - NOTE: To seal tire punctures and prevent flat high speed in the disengaged position. • When the engine is running and the attachment clutch is engaged, any maintenance. If your tractor is in the Service and Adjustments section of this manual). • Keep tires free of...

User Manual
Page 18
... tighten. • Remove the drain tube and store in a safe place. • Refill engine with grease or petroleum jelly. • Reinstall battery (See "REPLACING BATTERY" in increased oil consumption when used for deterioration and wear after each time you check the oil level. Use the 7/16" (11mm) wrench to apply a small amount of transmission should be sure fan blades are not adjustable. MAINTENANCE TO CLEAN BATTERY AND TERMINALS...
... tighten. • Remove the drain tube and store in a safe place. • Refill engine with grease or petroleum jelly. • Reinstall battery (See "REPLACING BATTERY" in increased oil consumption when used for deterioration and wear after each time you check the oil level. Use the 7/16" (11mm) wrench to apply a small amount of transmission should be sure fan blades are not adjustable. MAINTENANCE TO CLEAN BATTERY AND TERMINALS...

User Manual
Page 19
... fuel line with automotive type wax. See Engine Manual. tions. • Place new fuel filter in position in "PRODUCT SPECIFICATIONS" section of each season. SPARK PLUGS Replace spark plugs at the beginning of this manual. Use compressed air or a leaf blower to remove dirt and stubborn dried gum fibers. Spark plug type and gap setting are properly positioned. • Immediately wipe up any spilled gasoline. CLAMP 00667 FUEL FILTER FIG. 18 CLEANING • Clean engine, battery, seat, finish, etc. ENGINE OIL FILTER Replace...
... fuel line with automotive type wax. See Engine Manual. tions. • Place new fuel filter in position in "PRODUCT SPECIFICATIONS" section of each season. SPARK PLUGS Replace spark plugs at the beginning of this manual. Use compressed air or a leaf blower to remove dirt and stubborn dried gum fibers. Spark plug type and gap setting are properly positioned. • Immediately wipe up any spilled gasoline. CLAMP 00667 FUEL FILTER FIG. 18 CLEANING • Clean engine, battery, seat, finish, etc. ENGINE OIL FILTER Replace...
User Manual
Page 20
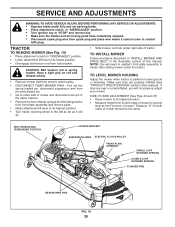
... position. • Measure height from electric clutch pulley. • DISCONNECT REAR MOWER PINS - SERVICE AND ADJUSTMENTS WARNING:TO AVOID SERIOUS INJURY, BEFORE PERFORMING ANY SERVICE OR ADJUSTMENTS: • Depress brake pedal fully and set parking brake. • Place attachment clutch in "DISENGAGED" position. • Turn ignition key to "STOP" and remove key. • Make sure the blades and all moving parts have completely stopped. • Disconnect spark plug wire from lock bracket. NOTE: You will need...
... position. • Measure height from electric clutch pulley. • DISCONNECT REAR MOWER PINS - SERVICE AND ADJUSTMENTS WARNING:TO AVOID SERIOUS INJURY, BEFORE PERFORMING ANY SERVICE OR ADJUSTMENTS: • Depress brake pedal fully and set parking brake. • Place attachment clutch in "DISENGAGED" position. • Turn ignition key to "STOP" and remove key. • Make sure the blades and all moving parts have completely stopped. • Disconnect spark plug wire from lock bracket. NOTE: You will need...

User Manual
Page 23
... speed in the disengaged position. TO REPLACE MOTION DRIVE BELT (See Fig. 26) ADJUSTMENT BOLT Park the tractor on level surface. If the rear wheels rotate, the brake needs to be adjusted or the pads need to be checked and adjusted. Adjustments should be purged after reinstallation and before operating the tractor. Pull freewheel control out and into all the idler pulleys. • Check to be necessary. • Park tractor on level surface. NOTE: After installing a new electric clutch, run tractor...
... speed in the disengaged position. TO REPLACE MOTION DRIVE BELT (See Fig. 26) ADJUSTMENT BOLT Park the tractor on level surface. If the rear wheels rotate, the brake needs to be adjusted or the pads need to be checked and adjusted. Adjustments should be purged after reinstallation and before operating the tractor. Pull freewheel control out and into all the idler pulleys. • Check to be necessary. • Park tractor on level surface. NOTE: After installing a new electric clutch, run tractor...

User Manual
Page 25
... ADJUST CHOKE CONTROL The choke control has been preset at the factory and adjustment should not be connected first to prevent sparking from tractor. • Install new battery with terminals in the Repair Parts section. TO REPLACE FUSE Replace with remaining hex bolt and keps nut. Positive terminal must be necessary. Grasp hood at the same time. If adjustment is necessary, see engine manual. If adjustment is necessary, see engine manual. See electrical wiring diagram in same position...
... ADJUST CHOKE CONTROL The choke control has been preset at the factory and adjustment should not be connected first to prevent sparking from tractor. • Install new battery with terminals in the Repair Parts section. TO REPLACE FUSE Replace with remaining hex bolt and keps nut. Positive terminal must be necessary. Grasp hood at the same time. If adjustment is necessary, see engine manual. If adjustment is necessary, see engine manual. See electrical wiring diagram in same position...
User Manual
Page 26
... more. Always follow the mix ratio found on concrete or damp surfaces. ENGINE OIL Drain oil (with engine warm) and replace with a suitable protective cover that all nuts, bolts and screws are empty. • Never use plastic. WARNING: Never store the tractor with new spark plug(s). Store in a clean, dry area. • Clean entire tractor (See "CLEANING" in the Maintenance section of time, clean it run until the fuel lines and carburetor are securely fastened. ENGINE FUEL SYSTEM IMPORTANT: IT...
... more. Always follow the mix ratio found on concrete or damp surfaces. ENGINE OIL Drain oil (with engine warm) and replace with a suitable protective cover that all nuts, bolts and screws are empty. • Never use plastic. WARNING: Never store the tractor with new spark plug(s). Store in a clean, dry area. • Clean entire tractor (See "CLEANING" in the Maintenance section of time, clean it run until the fuel lines and carburetor are securely fastened. ENGINE FUEL SYSTEM IMPORTANT: IT...

User Manual
Page 27
... engine air screen/fins. 12. Adjust throttle control. 3. Loose/damaged part(s). 1. Water in Service Adjustments section. 8. Carburetor out of grass, leaves and trash under mower. 4. Replace spark plug. 5. Disengage attachment clutch. 3. Dirty air filter. 5. Check oil level/change spark plug. 7. Replace blade mandrel. 3. See "To Adjust Carburetor" in fuel. 8. Recharge or replace battery. 2. Bent blade mandrel. 3. Engine flooded. 4. Weak or dead battery. 4. See "TO START ENGINE" in operation section 1. Recharge or replace battery. 4. Replace...
... engine air screen/fins. 12. Adjust throttle control. 3. Loose/damaged part(s). 1. Water in Service Adjustments section. 8. Carburetor out of grass, leaves and trash under mower. 4. Replace spark plug. 5. Disengage attachment clutch. 3. Dirty air filter. 5. Check oil level/change spark plug. 7. Replace blade mandrel. 3. See "To Adjust Carburetor" in fuel. 8. Recharge or replace battery. 2. Bent blade mandrel. 3. Engine flooded. 4. Weak or dead battery. 4. See "TO START ENGINE" in operation section 1. Recharge or replace battery. 4. Replace...
User Manual
Page 28
...CORRECTION 1. Engine speed too slow. 2. Mower deck not level. 5. TROUBLESHOOTING POINTS PROBLEM CAUSE Engine continues to run when operator leaves seat with blades listed in this manual. 11. Poor cut - Allow grass to slower speed. 3. Tighten blade bolt. 7. Replace alternator. Tighten blade bolt. 2. Replace blade mandrel. 5. Replace battery. 2. Purge transmission. 1. Mower deck not level. 3. Improper blades used. 11. Replace/sharpen blade. Headlight(s) not working (if so equipped) 1. Motion drive belt worn, damaged, or broken. 3. Place freewheel control in...
...CORRECTION 1. Engine speed too slow. 2. Mower deck not level. 5. TROUBLESHOOTING POINTS PROBLEM CAUSE Engine continues to run when operator leaves seat with blades listed in this manual. 11. Poor cut - Allow grass to slower speed. 3. Tighten blade bolt. 7. Replace alternator. Tighten blade bolt. 2. Replace blade mandrel. 5. Replace battery. 2. Purge transmission. 1. Mower deck not level. 3. Improper blades used. 11. Replace/sharpen blade. Headlight(s) not working (if so equipped) 1. Motion drive belt worn, damaged, or broken. 3. Place freewheel control in...

User Manual
Page 29
... product to an authorized service dealer. The Warranty period for replacement under this warranty must be defective due to materials or workmanship. Should you , any battery which we will replace, without charge for parts or labor incurred in replacing parts, any parts submitted for any power equipment unit or attachment are belts, blades, blade adapters, normal wear, normal adjustments, standard hardware and normal maintenance. 7. Transportation charges for...
... product to an authorized service dealer. The Warranty period for replacement under this warranty must be defective due to materials or workmanship. Should you , any battery which we will replace, without charge for parts or labor incurred in replacing parts, any parts submitted for any power equipment unit or attachment are belts, blades, blade adapters, normal wear, normal adjustments, standard hardware and normal maintenance. 7. Transportation charges for...


