
User Manual
Page 2
... inside a closed area. • Keep nuts and bolts, especially blade attachment bolts, II. Repair, if necessary, before removing grass catcher or un- running machine unattended. These can occur if the operator is an open flame, such as required. If tires lose trac- • Check brake operation frequently. CHILDREN Tragic accidents can change the stability of riding mower-related injuries. clogging chute. • Before and when backing...
... inside a closed area. • Keep nuts and bolts, especially blade attachment bolts, II. Repair, if necessary, before removing grass catcher or un- running machine unattended. These can occur if the operator is an open flame, such as required. If tires lose trac- • Check brake operation frequently. CHILDREN Tragic accidents can change the stability of riding mower-related injuries. clogging chute. • Before and when backing...
User Manual
Page 4
... this manual. CCA: CASE SIZE: 35 280 U1R BLADE BOLT TORQUE: 27-35 FT. TABLE OF CONTENTS SAFETY RULES 2-3 PRODUCT SPECIFICATIONS 4 CUSTOMER RESPONSIBILITIES 4 ASSEMBLY 6-8 OPERATION 9-15 MAINTENANCE SCHEDULE 16 MAINTENANCE 16-19 SERVICE AND ADJUSTMENTS 20-25 STORAGE 26 TROUBLESHOOTING 27-28 REPAIR PARTS - Should you experience any problem you to assemble and maintain your tractor properly. We have similar laws. age" sections of a new tractor. WARNING: This tractor is...
... this manual. CCA: CASE SIZE: 35 280 U1R BLADE BOLT TORQUE: 27-35 FT. TABLE OF CONTENTS SAFETY RULES 2-3 PRODUCT SPECIFICATIONS 4 CUSTOMER RESPONSIBILITIES 4 ASSEMBLY 6-8 OPERATION 9-15 MAINTENANCE SCHEDULE 16 MAINTENANCE 16-19 SERVICE AND ADJUSTMENTS 20-25 STORAGE 26 TROUBLESHOOTING 27-28 REPAIR PARTS - Should you experience any problem you to assemble and maintain your tractor properly. We have similar laws. age" sections of a new tractor. WARNING: This tractor is...

User Manual
Page 7
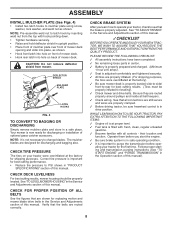
... seat pan so head of shoulder bolt is reached which allows you to press clutch/brake pedal all the above assembly steps have been completed. • Check engine oil level and fill fuel tank with the instructions that follow all instructions in a well-ventilated area. ASSEMBLY LABEL 02173 FIG. 2 HOW TO SET UP YOUR TRACTOR INSTALL SEAT (See Fig. 3) Adjust seat before tightening adjustment knob. • Remove adjustment knob and flat...
... seat pan so head of shoulder bolt is reached which allows you to press clutch/brake pedal all the above assembly steps have been completed. • Check engine oil level and fill fuel tank with the instructions that follow all instructions in a well-ventilated area. ASSEMBLY LABEL 02173 FIG. 2 HOW TO SET UP YOUR TRACTOR INSTALL SEAT (See Fig. 3) Adjust seat before tightening adjustment knob. • Remove adjustment knob and flat...
User Manual
Page 8
... operate your tractor for discharging and bagging also. NOTE: Pre-assemble weld nut to change blades. See"TO LEVEL MOWER HOUSING"in drive position. CHECK BRAKE SYSTEM After you start the engine. ✓ Be sure brake system is in flated for discharging or installation of mower deck opening and slide into hole on your tractor were overinflated at proper level. ✓ Fuel tank is in the Service and Adjustments section of mower deck. CHECK TIRE PRESSURE...
... operate your tractor for discharging and bagging also. NOTE: Pre-assemble weld nut to change blades. See"TO LEVEL MOWER HOUSING"in drive position. CHECK BRAKE SYSTEM After you start the engine. ✓ Be sure brake system is in flated for discharging or installation of mower deck opening and slide into hole on your tractor were overinflated at proper level. ✓ Fuel tank is in the Service and Adjustments section of mower deck. CHECK TIRE PRESSURE...

User Manual
Page 10
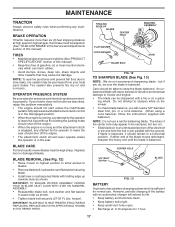
Used to engage the mower blades, or other attachments mounted to your tractor. AMMETER - FREEWHEEL CONTROL - ATTACHMENT LIFT LEVER - IGNITION SWITCH - CHOKE CONTROL THROTTLE CONTROL CLUTCH/BRAKE PEDAL AMMETER ATTACHMENT CLUTCH LEVER IGNITION SWITCH HEIGHT ADJUSTMENT KNOB FREE WHEEL CONTROL LIGHT SWITCH POSITION LIFT LEVER PLUNGER ATTACHMENT LIFT LEVER PARKING BRAKE MOTION CONTROL LEVER FIG. 5 Our tractors conform to the safety standards of battery. Turns the headlights on and off . Indicates charging (+) or discharging (-) of the American National Standards Institute. Locks ...
Used to engage the mower blades, or other attachments mounted to your tractor. AMMETER - FREEWHEEL CONTROL - ATTACHMENT LIFT LEVER - IGNITION SWITCH - CHOKE CONTROL THROTTLE CONTROL CLUTCH/BRAKE PEDAL AMMETER ATTACHMENT CLUTCH LEVER IGNITION SWITCH HEIGHT ADJUSTMENT KNOB FREE WHEEL CONTROL LIGHT SWITCH POSITION LIFT LEVER PLUNGER ATTACHMENT LIFT LEVER PARKING BRAKE MOTION CONTROL LEVER FIG. 5 Our tractors conform to the safety standards of battery. Turns the headlights on and off . Indicates charging (+) or discharging (-) of the American National Standards Institute. Locks ...

User Manual
Page 12
... brake position and engage parking brake. • Move motion control lever to neutral (N) position. Gauge wheels then keep the deck in proper position to ground. ATTACHMENT CLUTCH LEVER "DISENGAGED" POSITION "ENGAGED" POSITION ATTACHMENT LIFT LEVER HIGH POSITION LOW POSITION DEFLECTOR SHIELD FIG. 8 TO OPERATE ON HILLS WARNING: Do not drive up or down hills with an operator presence sensing switch. JUST MOWER CUTTING HEIGHT" in the Operation section of this manual). • Remove retainer spring and clevis pin which secure each gauge wheel bar...
... brake position and engage parking brake. • Move motion control lever to neutral (N) position. Gauge wheels then keep the deck in proper position to ground. ATTACHMENT CLUTCH LEVER "DISENGAGED" POSITION "ENGAGED" POSITION ATTACHMENT LIFT LEVER HIGH POSITION LOW POSITION DEFLECTOR SHIELD FIG. 8 TO OPERATE ON HILLS WARNING: Do not drive up or down hills with an operator presence sensing switch. JUST MOWER CUTTING HEIGHT" in the Operation section of this manual). • Remove retainer spring and clevis pin which secure each gauge wheel bar...

User Manual
Page 13
... avoid engine problems, the fuel system should change engine oil, see the Maintenance section in this manual). • To change oil for a cold engine start after several attempts, push choke control in slowly. OPERATION Transmission Engaged Transmission Disengaged CAUTION: Alcohol blended fuels (called gasohol or using the choke as engine starts. Do not over fill. • For cold weather operation you to accept small changes in operating position, depress clutch/brake pedal and set parking brake. Do not run until...
... avoid engine problems, the fuel system should change engine oil, see the Maintenance section in this manual). • To change oil for a cold engine start after several attempts, push choke control in slowly. OPERATION Transmission Engaged Transmission Disengaged CAUTION: Alcohol blended fuels (called gasohol or using the choke as engine starts. Do not over fill. • For cold weather operation you to accept small changes in operating position, depress clutch/brake pedal and set parking brake. Do not run until...

User Manual
Page 14
... "TO LEVEL MOWER HOUSING" in the Service and Adjustments section of this section of manual). • Sitting in the tractor seat, start engine. NOTE: During this procedure with engine off and parking brake set parking brake. • Engage transmission by placing freewheel control in freewheeling position (See "TO TRANSPORT" in this manual. • The left hand turns until finished (See Fig. 10). The air is running. After the tractor moves...
... "TO LEVEL MOWER HOUSING" in the Service and Adjustments section of this section of manual). • Sitting in the tractor seat, start engine. NOTE: During this procedure with engine off and parking brake set parking brake. • Engage transmission by placing freewheel control in freewheeling position (See "TO TRANSPORT" in this manual. • The left hand turns until finished (See Fig. 10). The air is running. After the tractor moves...

User Manual
Page 16
..., USE ONLY A DRY, POWDERED GRAPHITE TYPE LUBRICANT SPARINGLY. 16 MAINTENANCE MAINTENANCE SCHEDULE FILL IN DATES AS YOU COMPLETE REGULAR SERVICE Check Brake Operation Check Tire Pressure Check Operator Presence and T Interlock Systems R Check for Loose Fasteners A Sharpen/Replace Mower Blades C T Lubrication Chart 0 Check Battery Level R Clean Battery and Terminals Check Transaxle Cooling Check V-Belts BEFOREEEVAECRHYU8ESVHEEORUYRS2E5VHEROYUR5E0SVEHROYUR1E0SV0EHROYUBSREESFAOSROEN STORAGE SERVICE DATES 5 3 4 Check Engine Oil Level Change Engine Oil (with maintenance-free...
..., USE ONLY A DRY, POWDERED GRAPHITE TYPE LUBRICANT SPARINGLY. 16 MAINTENANCE MAINTENANCE SCHEDULE FILL IN DATES AS YOU COMPLETE REGULAR SERVICE Check Brake Operation Check Tire Pressure Check Operator Presence and T Interlock Systems R Check for Loose Fasteners A Sharpen/Replace Mower Blades C T Lubrication Chart 0 Check Battery Level R Clean Battery and Terminals Check Transaxle Cooling Check V-Belts BEFOREEEVAECRHYU8ESVHEEORUYRS2E5VHEROYUR5E0SVEHROYUR1E0SV0EHROYUBSREESFAOSROEN STORAGE SERVICE DATES 5 3 4 Check Engine Oil Level Change Engine Oil (with maintenance-free...
User Manual
Page 17
...; Keep battery and terminals clean. • Keep battery bolts tight. • Keep small vent holes open. • Recharge at washer in exact order as described, repair the problem immediately. • The engine should not start unless the clutch/brake pedal is fully depressed and attachement clutch control is in the disengaged position. • When the engine is running, any attempt by the operator to keep the blade balanced...
...; Keep battery and terminals clean. • Keep battery bolts tight. • Keep small vent holes open. • Recharge at washer in exact order as described, repair the problem immediately. • The engine should not start unless the clutch/brake pedal is fully depressed and attachement clutch control is in the disengaged position. • When the engine is running, any attempt by the operator to keep the blade balanced...

User Manual
Page 18
... battery to be kept clean to open , pull out on the drain valve. • After oil has drained completely, close and lock the drain valve by pushing inward and turning clockwise until bright. • Coat terminals with wire brush until the pin is not used above 32°F. V-BELTS Check V-belts for 50 hours in cold weather, these multi-viscosity oils will drain more frequently to clean fan or transmission while engine is running...
... battery to be kept clean to open , pull out on the drain valve. • After oil has drained completely, close and lock the drain valve by pushing inward and turning clockwise until bright. • Coat terminals with wire brush until the pin is not used above 32°F. V-BELTS Check V-belts for 50 hours in cold weather, these multi-viscosity oils will drain more frequently to clean fan or transmission while engine is running...
User Manual
Page 19
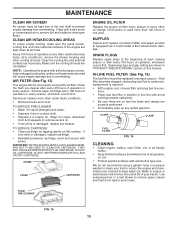
... there are no fuel line leaks and clamps are covered to clean your tractor. tions. • Place new fuel filter in position in clean, absorbent cloth and squeeze to prevent engine damage from tractor and mower. DO NOT OIL CARTRIDGE. DO NOT USE PRESSURIZED AIR TO CLEAN OR DRY CARTRIDGE. KNOBS COVER CARTRIDGE ENGINE OIL FILTER Replace the engine oil filter every season or every other external surfaces of this manual. SPARK PLUGS Replace spark plugs at the beginning...
... there are no fuel line leaks and clamps are covered to clean your tractor. tions. • Place new fuel filter in position in clean, absorbent cloth and squeeze to prevent engine damage from tractor and mower. DO NOT OIL CARTRIDGE. DO NOT USE PRESSURIZED AIR TO CLEAN OR DRY CARTRIDGE. KNOBS COVER CARTRIDGE ENGINE OIL FILTER Replace the engine oil filter every season or every other external surfaces of this manual. SPARK PLUGS Replace spark plugs at the beginning...

User Manual
Page 20
... SMALL RETAINER SPRING CLUTCH SPRING RETAINER SPRING SUSPENSION ARMS SQUARE HOLE ENGINE PULLEY FRONT LINK ANTI-SWAY BAR COLLAR RETAINER SPRINGS (BOTH SIDES) HOUSING GUIDE LARGE RETAINER SPRING BRACKET Fig. 17 20 DEFLECTOR SHIELD MENTS • Depress clutch/brake pedal fully and set parking brake. • Place motion control lever in neutral (N) position. • Place attachment clutch in "DISENGAGED" position. • Turn ignition key to "STOP" and remove key. • Make sure the blades and...
... SMALL RETAINER SPRING CLUTCH SPRING RETAINER SPRING SUSPENSION ARMS SQUARE HOLE ENGINE PULLEY FRONT LINK ANTI-SWAY BAR COLLAR RETAINER SPRINGS (BOTH SIDES) HOUSING GUIDE LARGE RETAINER SPRING BRACKET Fig. 17 20 DEFLECTOR SHIELD MENTS • Depress clutch/brake pedal fully and set parking brake. • Place motion control lever in neutral (N) position. • Place attachment clutch in "DISENGAGED" position. • Turn ignition key to "STOP" and remove key. • Make sure the blades and...
User Manual
Page 22
...; Pull belt toward rear of engine pulley. • Install belt through stationary idler and clutching idler. • Make sure belt is in "transmission disengaged" position. If the rear wheels rotate, the brake needs to be replaced. Carefully remove belt upwards from transmission input pulley and over cooling fan blades. • Remove belt from center span keeper and pull belt away from mower. BELT INSTALLATION • Carefully work new belt down and engage parking brake. • Disengage transmission by placing freewheel control...
...; Pull belt toward rear of engine pulley. • Install belt through stationary idler and clutching idler. • Make sure belt is in "transmission disengaged" position. If the rear wheels rotate, the brake needs to be replaced. Carefully remove belt upwards from transmission input pulley and over cooling fan blades. • Remove belt from center span keeper and pull belt away from mower. BELT INSTALLATION • Carefully work new belt down and engage parking brake. • Disengage transmission by placing freewheel control...
User Manual
Page 23
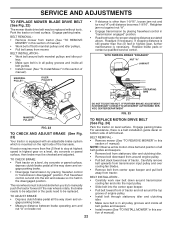
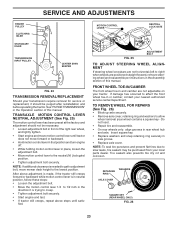
..., if the tractor still creeps forward or backward while motion control lever is needed to get to adjustment bolt, move mower deck height to affect the front wheel toe-in the Assembly section of the right rear wheel, and lightly tighten. • Start engine and move forward or backward. • Hold motion control lever in that position and turn engine off. • While holding motion control lever in the direction...
..., if the tractor still creeps forward or backward while motion control lever is needed to get to adjustment bolt, move mower deck height to affect the front wheel toe-in the Assembly section of the right rear wheel, and lightly tighten. • Start engine and move forward or backward. • Hold motion control lever in that position and turn engine off. • While holding motion control lever in the direction...

User Manual
Page 25
... casing clamp screw securely. • Replace air cleaner cover assembly and tighten knob. IF YOU THINK THE ENGINE-GOVERNED HIGH SPEED NEEDS ADJUSTING, CONTACTYOUR NEAREST AUTHORIZED SERVICE CENTER/ DEPARTMENT, WHICH HAS PROPER EQUIPMENT AND EXPERIENCE TO MAKE ANY NECESSARY ADJUSTMENTS. If it is not, loosen cable clamp screw and pull cable back until choke is necessary, proceed as follows: • With engine not running , move throttle control lever to fast position. • Check that swivel...
... casing clamp screw securely. • Replace air cleaner cover assembly and tighten knob. IF YOU THINK THE ENGINE-GOVERNED HIGH SPEED NEEDS ADJUSTING, CONTACTYOUR NEAREST AUTHORIZED SERVICE CENTER/ DEPARTMENT, WHICH HAS PROPER EQUIPMENT AND EXPERIENCE TO MAKE ANY NECESSARY ADJUSTMENTS. If it is not, loosen cable clamp screw and pull cable back until choke is necessary, proceed as follows: • With engine not running , move throttle control lever to fast position. • Check that swivel...
User Manual
Page 26
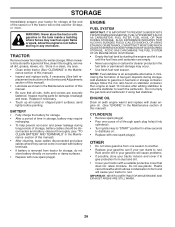
... of time in storage, battery may reach an open flame or spark. ENGINE OIL Drain oil (with engine warm) and replace with new spark plug(s). OTHER • Do not store gasoline from tractor for damage, breakage and wear. TRACTOR Remove mower from one ounce of this manual). • Inspect and replace belts, if necessary (See belt re- Do not empty the gas tank and carburetor if using fuel stabilizer. Add stabilizer to "START" position for storage...
... of time in storage, battery may reach an open flame or spark. ENGINE OIL Drain oil (with engine warm) and replace with new spark plug(s). OTHER • Do not store gasoline from tractor for damage, breakage and wear. TRACTOR Remove mower from one ounce of this manual). • Inspect and replace belts, if necessary (See belt re- Do not empty the gas tank and carburetor if using fuel stabilizer. Add stabilizer to "START" position for storage...

User Manual
Page 27
... or damaged wiring. 7. Check/replace solenoid or starter. 9. Engine clicks but will not turn over 1. Corroded battery terminals. 3. Recharge or replace battery. 2. Loss of grass, leaves and trash under mower. 4. Build-up of power 1. Dirty engine air screen/fins. 12. Carburetor out of adjustment. 10. Raise cutting height/reduce speed. 2. Clean/replace air filter. 5. Check oil level/change spark plug. 7. Replace fuel filter. 8. Contact an authorized service center/department. Bent blade mandrel. 3. Bad spark plug. 5. Water in "CHOKE" position...
... or damaged wiring. 7. Check/replace solenoid or starter. 9. Engine clicks but will not turn over 1. Corroded battery terminals. 3. Recharge or replace battery. 2. Loss of grass, leaves and trash under mower. 4. Build-up of power 1. Dirty engine air screen/fins. 12. Carburetor out of adjustment. 10. Raise cutting height/reduce speed. 2. Clean/replace air filter. 5. Check oil level/change spark plug. 7. Replace fuel filter. 8. Contact an authorized service center/department. Bent blade mandrel. 3. Bad spark plug. 5. Water in "CHOKE" position...
User Manual
Page 28
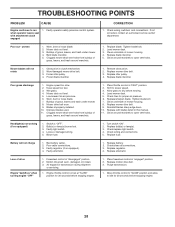
...and trash under mower. 4. Turn switch "ON". 2. Replace fuse. TROUBLESHOOTING POINTS PROBLEM CAUSE Engine continues to slower speed. 3. Mower deck not level. 5. Buildup of mower housing. 8. Replace blade. Worn, bent or loose blade. 7. Purge transmission. 1. Check wiring, switches and connections. Poor grass discharge 1. Bad battery cell(s). 2. Replace alternator. Bulb(s) or lamp(s) burned out. 3. Replace idler pulley. 4. Replace bulb(s) or lamp(s). 3. Place freewheel control in this manual. 11. Replace mower drive belt. 3. Poor cut - Battery will not rotate...
...and trash under mower. 4. Turn switch "ON". 2. Replace fuse. TROUBLESHOOTING POINTS PROBLEM CAUSE Engine continues to slower speed. 3. Mower deck not level. 5. Buildup of mower housing. 8. Replace blade. Worn, bent or loose blade. 7. Purge transmission. 1. Check wiring, switches and connections. Poor grass discharge 1. Bad battery cell(s). 2. Replace alternator. Bulb(s) or lamp(s) burned out. 3. Replace idler pulley. 4. Replace bulb(s) or lamp(s). 3. Place freewheel control in this manual. 11. Replace mower drive belt. 3. Poor cut - Battery will not rotate...

User Manual
Page 43
... Mower Deck Assembly, 42" 2 72140506 Bolt 3 138017 Bracket Asm Fr. NO. R RH 139 159767X421 Bracket Asm. ing Shaft and Shaft Hardware Only - Pulley Not Included) - - 184563 Replacement Mower, Complete (Std. R LH 136 155986 Bar Adjusting Gauge Wheel 138 159763X421 Bracket Asm Whl Ga. Whl Ga. F LH 142 165890 Arm Spring Brake Mower 143 157109 Bracket Arm Idler 42" 144 173441 Keeper Belt 42" Clutch Cable 145 173437 Pulley Idler Flat 146 173443 Bolt...
... Mower Deck Assembly, 42" 2 72140506 Bolt 3 138017 Bracket Asm Fr. NO. R RH 139 159767X421 Bracket Asm. ing Shaft and Shaft Hardware Only - Pulley Not Included) - - 184563 Replacement Mower, Complete (Std. R LH 136 155986 Bar Adjusting Gauge Wheel 138 159763X421 Bracket Asm Whl Ga. Whl Ga. F LH 142 165890 Arm Spring Brake Mower 143 157109 Bracket Arm Idler 42" 144 173441 Keeper Belt 42" Clutch Cable 145 173437 Pulley Idler Flat 146 173443 Bolt...


