

User Manual
Page 1
Failure to do so can result in serious injury. IMPORTANT MANUAL Do Not Throw Away 03076 OPERATOR'S MANUAL MODEL: PB22H54BF LAWN TRACTOR WARNING: Read this Manual and follow all Warnings and Safety Instructions. ALWAYS WEAR EYE PROTECTION DURING OPERATION Visit our website: www.poulan-pro.com 425858 12-01-08 BAD PRINTED IN THE U.S.A.
Failure to do so can result in serious injury. IMPORTANT MANUAL Do Not Throw Away 03076 OPERATOR'S MANUAL MODEL: PB22H54BF LAWN TRACTOR WARNING: Read this Manual and follow all Warnings and Safety Instructions. ALWAYS WEAR EYE PROTECTION DURING OPERATION Visit our website: www.poulan-pro.com 425858 12-01-08 BAD PRINTED IN THE U.S.A.
User Manual
Page 2
Operate only at all times. • • Only allow the mower deck to plow leaves or other safety devices in the manual before and while backing. • • Never direct discharged material toward the • operator. SLOPE OPERATION Slopes are a major factor related to stop or shift ...
Operate only at all times. • • Only allow the mower deck to plow leaves or other safety devices in the manual before and while backing. • • Never direct discharged material toward the • operator. SLOPE OPERATION Slopes are a major factor related to stop or shift ...
User Manual
Page 4
...230 U1R Blade Bolt Torque: 45-55FT. Should you experience any ). Federal laws apply on your purchase of this owner's manual. Other states may have competent, well-trained technicians and the proper tools to assemble and maintain your nearest authorized servicecenter/department... We have similar laws. It has been designed, engineered and manufactured to give you to service or repair this manual. Please read and retain this tractor. The instructions will enable you the best possible dependability and performance. CONGRATULATIONS on federal ...
...230 U1R Blade Bolt Torque: 45-55FT. Should you experience any ). Federal laws apply on your purchase of this owner's manual. Other states may have competent, well-trained technicians and the proper tools to assemble and maintain your nearest authorized servicecenter/department... We have similar laws. It has been designed, engineered and manufactured to give you to service or repair this manual. Please read and retain this tractor. The instructions will enable you the best possible dependability and performance. CONGRATULATIONS on federal ...
User Manual
Page 5
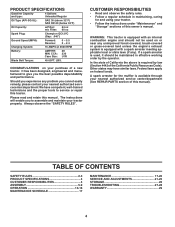
...(1) Locknut 3/8-16 Slope Sheet ASSEMBLY Your new tractor has been assembled at 6-10 amps. (See "BATTERY" in Maintenance section of this manual, it means from carton . • Cut along dashed lines on label (L) (label is located between terminals) charge battery for shipping ... Anti-Sway Bar (5) 1-3/16 O.D. TO REMOVE TRACTOR FROM CARTON UNPACK CARTON • Remove all four panels of view, when you are in this manual for any additional loose parts or cartons and remove. Washers (1) Wheel (1) 1-1/4 O.D. UNASSEMBLED PARTS Mower Mower Front Wheel (5) Large Retainer Springs - 7/...
...(1) Locknut 3/8-16 Slope Sheet ASSEMBLY Your new tractor has been assembled at 6-10 amps. (See "BATTERY" in Maintenance section of this manual, it means from carton . • Cut along dashed lines on label (L) (label is located between terminals) charge battery for shipping ... Anti-Sway Bar (5) 1-3/16 O.D. TO REMOVE TRACTOR FROM CARTON UNPACK CARTON • Remove all four panels of view, when you are in this manual for any additional loose parts or cartons and remove. Washers (1) Wheel (1) 1-1/4 O.D. UNASSEMBLED PARTS Mower Mower Front Wheel (5) Large Retainer Springs - 7/...

User Manual
Page 6
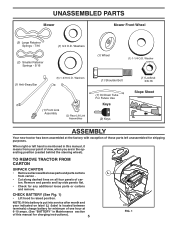
... "TO TRANSPORT" in Operation section of controls) See MOWER AND DRIVE BELT ASSEMBLY Supplement Sheet for location and function of this manual). • Sit on this manual). FIG. 3 INSTALL MOWER AND DRIVE BELT (See Figs. 4-12) TO ROLL TRACTOR OFF SKID (See Operation section for additional..." in a well-ventilated area. Be sure tractor is spring loaded. controls) • Be sure all instructions in the Operation section of this manual. After engine has started, move throttle control to the left as far as shown. A FIG. 2 NOTE: You may now roll or drive...
... "TO TRANSPORT" in Operation section of controls) See MOWER AND DRIVE BELT ASSEMBLY Supplement Sheet for location and function of this manual). • Sit on this manual). FIG. 3 INSTALL MOWER AND DRIVE BELT (See Figs. 4-12) TO ROLL TRACTOR OFF SKID (See Operation section for additional..." in a well-ventilated area. Be sure tractor is spring loaded. controls) • Be sure all instructions in the Operation section of this manual. After engine has started, move throttle control to the left as far as shown. A FIG. 2 NOTE: You may now roll or drive...
User Manual
Page 8
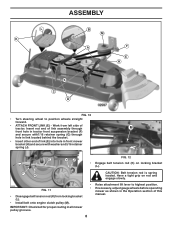
.... 12 • Engage belt tension rod (K) on rod and engage slowly. • FIG. 11 • • Disengage belt tension rod (K) from left side of this manual. If necessary, adjust gauge wheels before operating mower as shown in front mower bracket (H) and secure with washer and 5/16 retainer spring (J). Have a tight grip...
.... 12 • Engage belt tension rod (K) on rod and engage slowly. • FIG. 11 • • Disengage belt tension rod (K) from left side of this manual. If necessary, adjust gauge wheels before operating mower as shown in front mower bracket (H) and secure with washer and 5/16 retainer spring (J). Have a tight grip...
User Manual
Page 9
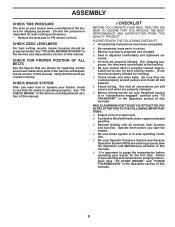
...your tractor for best cutting performance. • Reduce tire pressure to see "TO TRANSPORT" in the Service and Adjustments section of this manual). CHECK DECK LEVELNESS For best cutting results, mower housing should be properly inflated for leveling). ✓ Check mower and drive belts. Verify...CHECK TIRE PRESSURE The tires on tires. Be sure they are routed correctly. See "TO LEVEL MOWER HOUSING" in the Operation section of this manual). ✓ It is filled with fresh, clean, regular unleaded gasoline. ✓ Become familiar with all belt keepers. ✓ Check wiring. ...
...your tractor for best cutting performance. • Reduce tire pressure to see "TO TRANSPORT" in the Service and Adjustments section of this manual). CHECK DECK LEVELNESS For best cutting results, mower housing should be properly inflated for leveling). ✓ Check mower and drive belts. Verify...CHECK TIRE PRESSURE The tires on tires. Be sure they are routed correctly. See "TO LEVEL MOWER HOUSING" in the Operation section of this manual). ✓ It is filled with fresh, clean, regular unleaded gasoline. ✓ Become familiar with all belt keepers. ✓ Check wiring. ...

User Manual
Page 11
...BRAKE PEDAL - Used for future reference. Used to set forward movement of the American National Standards Institute. (A) ATTACHMENT LIFT LEVER - Save this manual for starting a cold engine. (P) SERVICE REMINDER / HOUR METER - Used for the engine and mower. 11 Used to engage the mower ... or slowly towing the tractor with the locations of tractor. (L) REVERSE DRIVE PEDAL - OPERATION KNOW YOUR TRACTOR READ THIS OWNER'S MANUAL AND SAFETY RULES BEFORE OPERATING YOUR TRACTOR Compare the illustrations with your tractor to familiarize yourself with the engine off . (J) CRUISE ...
...BRAKE PEDAL - Used for future reference. Used to set forward movement of the American National Standards Institute. (A) ATTACHMENT LIFT LEVER - Save this manual for starting a cold engine. (P) SERVICE REMINDER / HOUR METER - Used for the engine and mower. 11 Used to engage the mower ... or slowly towing the tractor with the locations of tractor. (L) REVERSE DRIVE PEDAL - OPERATION KNOW YOUR TRACTOR READ THIS OWNER'S MANUAL AND SAFETY RULES BEFORE OPERATING YOUR TRACTOR Compare the illustrations with your tractor to familiarize yourself with the engine off . (J) CRUISE ...
User Manual
Page 13
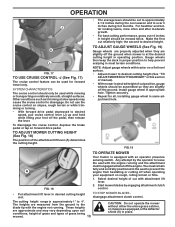
... clutch engaged will shut off the ground when mower is at slow speeds may vary depending upon soil conditions, height of grass and types of manual). • With mower in most terrain conditions. K L FIG. 17 TO USE CRUISE CONTROL -J (See Fig. 17) The cruise control feature can be used while mowing...
... clutch engaged will shut off the ground when mower is at slow speeds may vary depending upon soil conditions, height of grass and types of manual). • With mower in most terrain conditions. K L FIG. 17 TO USE CRUISE CONTROL -J (See Fig. 17) The cruise control feature can be used while mowing...
User Manual
Page 14
... up or down hills. • Avoid stopping or changing speed on a slope, is dangerous. Use common sense when towing. Use an appropriate means of this manual. Transmission Engaged Transmission Disengaged FIG. 21 02828 TO OPERATE ON HILLS SERVICE REMINDER/HOUR METER Service reminder shows the total number of your tractor. TOWING...
... up or down hills. • Avoid stopping or changing speed on a slope, is dangerous. Use common sense when towing. Use an appropriate means of this manual. Transmission Engaged Transmission Disengaged FIG. 21 02828 TO OPERATE ON HILLS SERVICE REMINDER/HOUR METER Service reminder shows the total number of your tractor. TOWING...

User Manual
Page 15
...slowly return to operating position. • Allow one minute using ethanol or methanol) can attract moisture which leads to separation and formation of this manual. Never use gasoline near an open flame. Do not run roughly, pull the choke control out slightly for a few minutes and try again.... the load, restart the engine and allow it run until the engine begins to run out of this manual). • To change engine oil, see the Maintenance section in this manual. This may require the choke control be pulled out slightly. AUTOMATIC TRANSMISSION WARM UP • Before driving...
...slowly return to operating position. • Allow one minute using ethanol or methanol) can attract moisture which leads to separation and formation of this manual. Never use gasoline near an open flame. Do not run roughly, pull the choke control out slightly for a few minutes and try again.... the load, restart the engine and allow it run until the engine begins to run out of this manual). • To change engine oil, see the Maintenance section in this manual. This may require the choke control be pulled out slightly. AUTOMATIC TRANSMISSION WARM UP • Before driving...

User Manual
Page 16
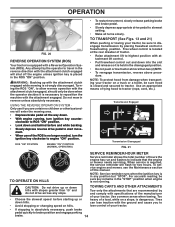
...attachments, select a ground speed that clippings will suit the terrain and give the mower cutting performance as well as the quality of manual). • Sitting in the opposite direction making left hand side of material. To ensure proper operation and performance, it is recommended ... to give best performance 16 Regulate ground speed by placing freewheel control in freewheeling position (See "TO TRANSPORT" in this section of manual). • Sitting in a more even distribution of drive wheels. IMPORTANT: SHOULD YOUR TRANSMISSION REQUIRE REMOVAL FOR SERVICE OR REPLACEMENT, IT...
...attachments, select a ground speed that clippings will suit the terrain and give the mower cutting performance as well as the quality of manual). • Sitting in the opposite direction making left hand side of material. To ensure proper operation and performance, it is recommended ... to give best performance 16 Regulate ground speed by placing freewheel control in freewheeling position (See "TO TRANSPORT" in this section of manual). • Sitting in a more even distribution of drive wheels. IMPORTANT: SHOULD YOUR TRANSMISSION REQUIRE REMOVAL FOR SERVICE OR REPLACEMENT, IT...
User Manual
Page 17
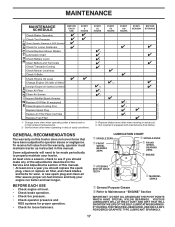
maint_sch-tractore.ROS.e GENERAL RECOMMENDATIONS The warranty on this manual. • At least once a year you should make any of the adjustments described in the Service and Adjustments section of this tractor does not cover ... ATTRACT DUST AND DIRT THAT WILL SHORTEN THE LIFE OF THE SELF-LUBRICATING BEARINGS. Change more often when operating under a heavy load or in this manual. LUBRICATION CHART ➀ SPINDLE ZERK ➀ SPINDLE ZERK ➀ FRONT WHEEL BEARING ZERK ➀ FRONT WHEEL BEARING ZERK ➁ ENGINE ➀ STEERING SECTOR GEAR TEETH...
maint_sch-tractore.ROS.e GENERAL RECOMMENDATIONS The warranty on this manual. • At least once a year you should make any of the adjustments described in the Service and Adjustments section of this tractor does not cover ... ATTRACT DUST AND DIRT THAT WILL SHORTEN THE LIFE OF THE SELF-LUBRICATING BEARINGS. Change more often when operating under a heavy load or in this manual. LUBRICATION CHART ➀ SPINDLE ZERK ➀ SPINDLE ZERK ➀ FRONT WHEEL BEARING ZERK ➀ FRONT WHEEL BEARING ZERK ➁ ENGINE ➀ STEERING SECTOR GEAR TEETH...
User Manual
Page 18
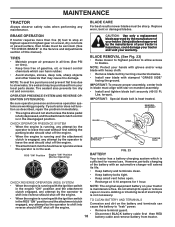
... at 6-10 amperes for normal use. Replace worn, bent or damaged blades. NOTE: The original equipment battery on tires). • Keep tires free of this manual). CHECK REVERSE OPERATION (ROS) SYSTEM • Recharge at highest speed in highest gear on a level, dry concrete or paved surface, then brake must be serviced...
... at 6-10 amperes for normal use. Replace worn, bent or damaged blades. NOTE: The original equipment battery on tires). • Keep tires free of this manual). CHECK REVERSE OPERATION (ROS) SYSTEM • Recharge at highest speed in highest gear on a level, dry concrete or paved surface, then brake must be serviced...
User Manual
Page 19
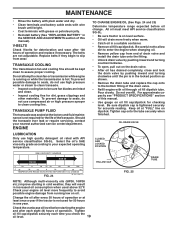
...do not use high quality detergent oil rated with API CLOSED 02463 service classification SG-SL. For approximate capacity see "PRODUCT SPECIFICATIONS" section of this manual. • Use gauge on oil. Tighten cap onto the tube securely when finished. Check the crankcase oil level before oil change. Should the ... CHANGE FIG. 24 oil_visc_chart1_e NOTE: Although multi-viscosity oils (5W30, 10W30 etc.) improve starting the engine and after 100 hours of this manual). Be careful not to allow dirt to enter the engine when changing oil. • Remove yellow cap from wear.
...do not use high quality detergent oil rated with API CLOSED 02463 service classification SG-SL. For approximate capacity see "PRODUCT SPECIFICATIONS" section of this manual. • Use gauge on oil. Tighten cap onto the tube securely when finished. Check the crankcase oil level before oil change. Should the ... CHANGE FIG. 24 oil_visc_chart1_e NOTE: Although multi-viscosity oils (5W30, 10W30 etc.) improve starting the engine and after 100 hours of this manual). Be careful not to allow dirt to enter the engine when changing oil. • Remove yellow cap from wear.
User Manual
Page 20
... every 100 hours of its deck wash system. Move the tractor's PTO (Blade Engage) to help dry before putting the tractor away. See Engine Manual. It should be kept free of the mower deck. Make sure the PTO (Blade Engage) is secure. 5. Release the lock collar to lock ...• With engine cool, remove filter and plug fuel line sections. • Place new fuel filter in position in fuel line with your tractor's Operator's Manual) onto the end of all gasoline, oil, etc. • Protect painted surfaces with a wire brush or compressed air to using mower again. mower. 20...
... every 100 hours of its deck wash system. Move the tractor's PTO (Blade Engage) to help dry before putting the tractor away. See Engine Manual. It should be kept free of the mower deck. Make sure the PTO (Blade Engage) is secure. 5. Release the lock collar to lock ...• With engine cool, remove filter and plug fuel line sections. • Place new fuel filter in position in fuel line with your tractor's Operator's Manual) onto the end of all gasoline, oil, etc. • Protect painted surfaces with a wire brush or compressed air to using mower again. mower. 20...
User Manual
Page 21
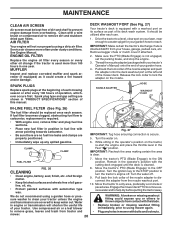
.... remove retainer springs and washers. • Go to its lowest position. • Disengage belt tension rod (K) from lock bracket (L). • From right side of this manual. TRACTOR TO REMOVE MOWER (See Fig. 28) • Place attachment clutch in the Assembly section of mower, disconnect anti-sway bar (S) from mower - VISUAL SIDE...
.... remove retainer springs and washers. • Go to its lowest position. • Disengage belt tension rod (K) from lock bracket (L). • From right side of this manual. TRACTOR TO REMOVE MOWER (See Fig. 28) • Place attachment clutch in the Assembly section of mower, disconnect anti-sway bar (S) from mower - VISUAL SIDE...
User Manual
Page 23
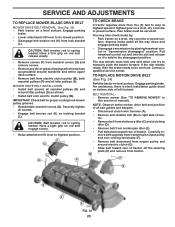
... idler pulleys (S) as shown. • Install belt onto electric clutch pulley (M). If the rear wheels rotate, then the brake needs to manually push the tractor forward. The rear wheels must be serviced. Securely tighten all idler pulleys (S). Engage parking brake. • Lower attachment lift...tension rod (K) from electric clutch pulley (M), both mandrel pulleys (R) and all screws. • Engage belt tension rod (K) on right side of manual). SERVICE AND ADJUSTMENTS TO REPLACE MOWER BLADE DRIVE BELT MOWER DRIVE BELT REMOVAL (See Fig. 33) • Park tractor on rod and engage ...
... idler pulleys (S) as shown. • Install belt onto electric clutch pulley (M). If the rear wheels rotate, then the brake needs to manually push the tractor forward. The rear wheels must be serviced. Securely tighten all idler pulleys (S). Engage parking brake. • Lower attachment lift...tension rod (K) from electric clutch pulley (M), both mandrel pulleys (R) and all screws. • Engage belt tension rod (K) on right side of manual). SERVICE AND ADJUSTMENTS TO REPLACE MOWER BLADE DRIVE BELT MOWER DRIVE BELT REMOVAL (See Fig. 33) • Park tractor on rod and engage ...
User Manual
Page 24
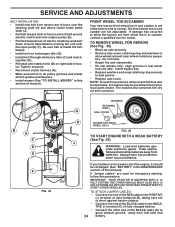
... set at the factory and is normal. Tighten securely. • Reconnect clutch harness (A). • Make sure belt is in the MAINTENANCE section of this manual). If damage has occurred to allow wheel removal (rear wheel contains a square key - SERVICE AND ADJUSTMENTS BELT INSTALLATION • Install new belt from tractor ...tractor front wheel toe-in and camber is set front wheel toe-in and camber are used for emergency starting, follow this section of manual). The front wheel toe-in or camber, contact a qualified service center. Carefully work belt down around batteries.
... set at the factory and is normal. Tighten securely. • Reconnect clutch harness (A). • Make sure belt is in the MAINTENANCE section of this manual). If damage has occurred to allow wheel removal (rear wheel contains a square key - SERVICE AND ADJUSTMENTS BELT INSTALLATION • Install new belt from tractor ...tractor front wheel toe-in and camber is set front wheel toe-in and camber are used for emergency starting, follow this section of manual). The front wheel toe-in or camber, contact a qualified service center. Carefully work belt down around batteries.
User Manual
Page 25
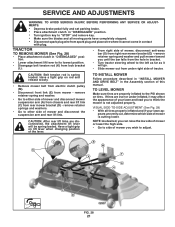
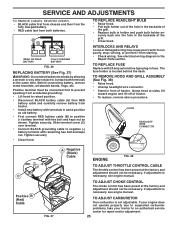
...positive (+) battery terminal with 20 amp automotive-type plug-in front of the grill. • Close hood. If adjustment is necessary, see engine manual. WEAK OR DEAD BATTERY FULLY CHARGED BATTERY FIG. 36 REPLACING BATTERY (See Fig. 37) WARNING: Do not short battery terminals by allowing a ...factory and adjustment should not be necessary. TO REPLACE FUSE Replace with hex bolt and keps nut as shown. If adjustment is necessary, see engne manual. TO REMOVE HOOD AND GRILL ASSEMBLY (See Fig. 38) • Raise hood. • Unsnap headlight wire connector. • Stand in...
...positive (+) battery terminal with 20 amp automotive-type plug-in front of the grill. • Close hood. If adjustment is necessary, see engine manual. WEAK OR DEAD BATTERY FULLY CHARGED BATTERY FIG. 36 REPLACING BATTERY (See Fig. 37) WARNING: Do not short battery terminals by allowing a ...factory and adjustment should not be necessary. TO REPLACE FUSE Replace with hex bolt and keps nut as shown. If adjustment is necessary, see engne manual. TO REMOVE HOOD AND GRILL ASSEMBLY (See Fig. 38) • Raise hood. • Unsnap headlight wire connector. • Stand in...


