
User Manual
Page 2
... the blades when crossing gravel surfaces. • • Do not operate machine without the entire grass catcher, discharge guard, or other attachments; Choose a low ground speed so that are a major factor related to stop engine, and remove keys before starting. • Do not put hands or feet near rotating parts or under the influence of California to prevent accidental starting , stopping, or turning...
... the blades when crossing gravel surfaces. • • Do not operate machine without the entire grass catcher, discharge guard, or other attachments; Choose a low ground speed so that are a major factor related to stop engine, and remove keys before starting. • Do not put hands or feet near rotating parts or under the influence of California to prevent accidental starting , stopping, or turning...
User Manual
Page 3
...; Keep machine free of grass, leaves, or other than the operator. • Be alert and turn slowly and gradually downhill, if possible. Repair, if necessary, before and while backing. TOWING • Tow only with manufacturer's recommended parts, when necessary. • Mower blades are sharp. Do not attach towed equipment except at all times until fueling is in handling gasoline. SERVICE Always look behind...
...; Keep machine free of grass, leaves, or other than the operator. • Be alert and turn slowly and gradually downhill, if possible. Repair, if necessary, before and while backing. TOWING • Tow only with manufacturer's recommended parts, when necessary. • Mower blades are sharp. Do not attach towed equipment except at all times until fueling is in handling gasoline. SERVICE Always look behind...
User Manual
Page 4
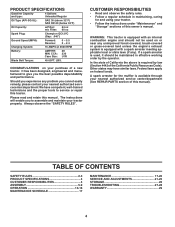
... 4442 of a new tractor. TABLE OF CONTENTS SAFETY RULES 2-3 PRODUCT SPECIFICATIONS 4 CUSTOMER RESPONSIBILITIES 4 ASSEMBLY 5-9 OPERATION 10-16 MAINTENANCE SCHEDULE 17 MAINTENANCE 17-20 SERVICE AND ADJUSTMENTS 21-25 STORAGE 26 TROUBLESHOOTING 27-28 WARRANTY 29 4 CONGRATULATIONS on your tractor properly. Other states may have competent, well-trained technicians and the proper tools to service or repair this manual). PRODUCT SPECIFICATIONS Gasoline Capacity and type: 4 Gallons Unleaded Regular Oil Type (API-SG...
... 4442 of a new tractor. TABLE OF CONTENTS SAFETY RULES 2-3 PRODUCT SPECIFICATIONS 4 CUSTOMER RESPONSIBILITIES 4 ASSEMBLY 5-9 OPERATION 10-16 MAINTENANCE SCHEDULE 17 MAINTENANCE 17-20 SERVICE AND ADJUSTMENTS 21-25 STORAGE 26 TROUBLESHOOTING 27-28 WARRANTY 29 4 CONGRATULATIONS on your tractor properly. Other states may have competent, well-trained technicians and the proper tools to service or repair this manual). PRODUCT SPECIFICATIONS Gasoline Capacity and type: 4 Gallons Unleaded Regular Oil Type (API-SG...

User Manual
Page 6
.... • Check engine oil level and fill fuel tank with the instructions that follow all the way down. • Release lever to lock seat in position. CAUTION: Lift lever is in a well-ventilated area. Be sure tractor is on seat in operating position, depress brake pedal and set parking brake. • Turn ignition key to the right. Be sure tractor is spring loaded. ASSEMBLE FRONT WHEEL TO MOWER (See Fig. 3) • Using shoulder bolt, washer and...
.... • Check engine oil level and fill fuel tank with the instructions that follow all the way down. • Release lever to lock seat in position. CAUTION: Lift lever is in a well-ventilated area. Be sure tractor is on seat in operating position, depress brake pedal and set parking brake. • Turn ignition key to the right. Be sure tractor is spring loaded. ASSEMBLE FRONT WHEEL TO MOWER (See Fig. 3) • Using shoulder bolt, washer and...
User Manual
Page 9
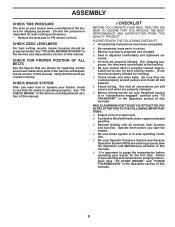
... before operating your tractor for shipping purposes. Follow proper starting and transmission purging instructions (See "TO START ENGINE" and "PURGE TRANSMISSION" in this manual. See "TO CHECK BRAKE" in the Service and Adjustments section of this manual). ✓ It is important for replacing motion and mower blade drive belts in the Service and Adjustments section of this manual. ASSEMBLY CHECK TIRE PRESSURE The tires on tires. Be sure they are routed correctly. CHECK DECK LEVELNESS For best cutting results, mower housing...
... before operating your tractor for shipping purposes. Follow proper starting and transmission purging instructions (See "TO START ENGINE" and "PURGE TRANSMISSION" in this manual. See "TO CHECK BRAKE" in the Service and Adjustments section of this manual). ✓ It is important for replacing motion and mower blade drive belts in the Service and Adjustments section of this manual. ASSEMBLY CHECK TIRE PRESSURE The tires on tires. Be sure they are routed correctly. CHECK DECK LEVELNESS For best cutting results, mower housing...
User Manual
Page 13
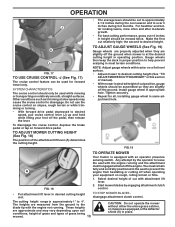
... twice. Start mower blades by the operator to over 6 inches in same adjustment hole. TO STOP MOWER BLADES disengage attachment clutch control. The heights are slightly off the pedal, then release the lever. Install gauge wheel in desired cutting height slot. NOTE: Adjust gauge wheels with an operator presence sensing switch. The cutting height range is at slow speeds may vary depending upon soil conditions, height of grass and types of cut position, gauge wheels should be assembled so they...
... twice. Start mower blades by the operator to over 6 inches in same adjustment hole. TO STOP MOWER BLADES disengage attachment clutch control. The heights are slightly off the pedal, then release the lever. Install gauge wheel in desired cutting height slot. NOTE: Adjust gauge wheels with an operator presence sensing switch. The cutting height range is at slow speeds may vary depending upon soil conditions, height of grass and types of cut position, gauge wheels should be assembled so they...

User Manual
Page 15
... seat in operating position, depress brake pedal and set parking brake. • Move attachment clutch to "DISENGAGED" position. • Move throttle control to fast position • Pull choke control out for a cold engine start at a high altitude (above ) • When engine starts, slowly push choke control in until the fuel lines and carburetor are empty. NOTE: Before starting, read oil level. If the engine starts to run smoothly. mission should be warmed up as follows: • Be sure the tractor is...
... seat in operating position, depress brake pedal and set parking brake. • Move attachment clutch to "DISENGAGED" position. • Move throttle control to fast position • Pull choke control out for a cold engine start at a high altitude (above ) • When engine starts, slowly push choke control in until the fuel lines and carburetor are empty. NOTE: Before starting, read oil level. If the engine starts to run smoothly. mission should be warmed up as follows: • Be sure the tractor is...

User Manual
Page 16
... of your tractor. IMPORTANT: SHOULD YOUR TRANSMISSION REQUIRE REMOVAL FOR SERVICE OR REPLACEMENT, IT SHOULD BE PURGED AFTER REINSTALLATION BEFORE OPERATING THE TRACTOR. • Place tractor safely on level surface with engine off engine and set . • Disengage transmission by turning to the right of manual). • Sitting in a more uniform cutting. • When mowing large areas, start engine. Repeat this driving procedure three times. Have the cut relatively high; This will...
... of your tractor. IMPORTANT: SHOULD YOUR TRANSMISSION REQUIRE REMOVAL FOR SERVICE OR REPLACEMENT, IT SHOULD BE PURGED AFTER REINSTALLATION BEFORE OPERATING THE TRACTOR. • Place tractor safely on level surface with engine off engine and set . • Disengage transmission by turning to the right of manual). • Sitting in a more uniform cutting. • When mowing large areas, start engine. Repeat this driving procedure three times. Have the cut relatively high; This will...
User Manual
Page 17
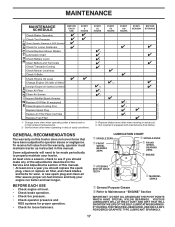
...Check tire pressure. • Check operator presence and ROS systems for proper operation. • Check for wear. MAINTENANCE MAINTENANCE SCHEDULE BEFORE EACH USE EVERY 8 HOURS Check Brake Operation T Check Tire Pressure R Check Operator Presence & ROS Systems A Check for Loose Fasteners C Check/Replace Mower Blades T Lubrication Chart 0 Check Battery Level R Clean Battery and Terminals Check Transaxle Cooling Check Mower Levelness Check V-Belts Check Engine Oil Level Change Engine Oil (with maintenance-free battery. A new spark plug and clean air filter assure proper air-fuel...
...Check tire pressure. • Check operator presence and ROS systems for proper operation. • Check for wear. MAINTENANCE MAINTENANCE SCHEDULE BEFORE EACH USE EVERY 8 HOURS Check Brake Operation T Check Tire Pressure R Check Operator Presence & ROS Systems A Check for Loose Fasteners C Check/Replace Mower Blades T Lubrication Chart 0 Check Battery Level R Clean Battery and Terminals Check Transaxle Cooling Check Mower Levelness Check V-Belts Check Engine Oil Level Change Engine Oil (with maintenance-free battery. A new spark plug and clean air filter assure proper air-fuel...
User Manual
Page 18
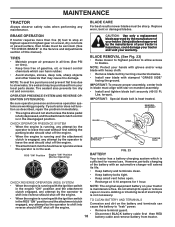
... MANDREL ASSEMBLY FIG. 23 CENTER HOLE ROS "ON" Position Engine "ON" Position (Normal Operating) BATTERY Your tractor has a battery charging system which can cause the battery to shift into reverse should not start unless the brake pedal is fully depressed, and the attachment clutch control is running with the ignition switch in the disengaged position. Do not attempt to blades. CAUTION: Use only a replacement blade approved by the operator to "leak" power. • Remove terminal guard...
... MANDREL ASSEMBLY FIG. 23 CENTER HOLE ROS "ON" Position Engine "ON" Position (Normal Operating) BATTERY Your tractor has a battery charging system which can cause the battery to shift into reverse should not start unless the brake pedal is fully depressed, and the attachment clutch control is running with the ignition switch in the disengaged position. Do not attempt to blades. CAUTION: Use only a replacement blade approved by the operator to "leak" power. • Remove terminal guard...
User Manual
Page 19
... the tractor is not used above 32°F. MAINTENANCE • Rinse the battery with plain water and dry. • Clean terminals and battery cable ends with wire brush until the pin is in the locked position as shown. • Remove the drain tube and replace the cap onto to the bottom fitting of the drain valve. • Refill engine with grease or petroleum jelly. • Reinstall battery (See "REPLACING BATTERY" in the SERVICE AND ADJUSTMENTS...
... the tractor is not used above 32°F. MAINTENANCE • Rinse the battery with plain water and dry. • Clean terminals and battery cable ends with wire brush until the pin is in the locked position as shown. • Remove the drain tube and replace the cap onto to the bottom fitting of the drain valve. • Refill engine with grease or petroleum jelly. • Reinstall battery (See "REPLACING BATTERY" in the SERVICE AND ADJUSTMENTS...
User Manual
Page 20
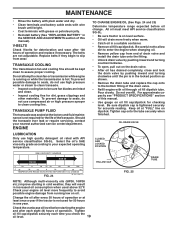
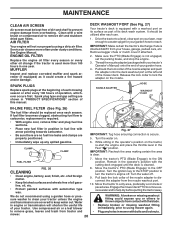
.... 4. mower. 20 See Engine Manual. Spark plug type and gap setting are covered to the ON position. It should be replaced once each use. 1. FUEL FILTER 7. We do not recommend using a dirty air filter. to remove dirt and stubborn dried gum fibers. MAINTENANCE CLEAN AIR SCREEN Air screen must be kept free of this manual. Clean with a wire brush or compressed air to remove grass, leaves and trash from overheating. AIR FILTER Your engine will shorten the useful life of the mower deck. IMPORTANT: Make certain the tractor's discharge chute...
.... 4. mower. 20 See Engine Manual. Spark plug type and gap setting are covered to the ON position. It should be replaced once each use. 1. FUEL FILTER 7. We do not recommend using a dirty air filter. to remove dirt and stubborn dried gum fibers. MAINTENANCE CLEAN AIR SCREEN Air screen must be kept free of this manual. Clean with a wire brush or compressed air to remove grass, leaves and trash from overheating. AIR FILTER Your engine will shorten the useful life of the mower deck. IMPORTANT: Make certain the tractor's discharge chute...
User Manual
Page 21
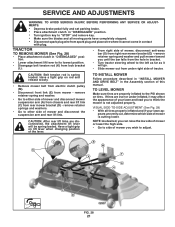
... and set parking brake. • Place attachment clutch in "DISENGAGED" position. • Turn ignition key to "STOP" and remove key. • Make sure the blades and all tires properly inflated and if your lawn and lead you to think the mower is not adjusted properly. remove retainer springs and washers. • Go to adjust. Have a tight grip on rod and release slowly. • Remove mower belt from electric clutch pulley (M). •...
... and set parking brake. • Place attachment clutch in "DISENGAGED" position. • Turn ignition key to "STOP" and remove key. • Make sure the blades and all tires properly inflated and if your lawn and lead you to think the mower is not adjusted properly. remove retainer springs and washers. • Go to adjust. Have a tight grip on rod and release slowly. • Remove mower belt from electric clutch pulley (M). •...
User Manual
Page 23
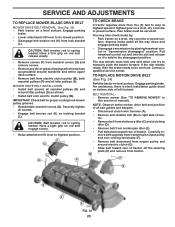
.... • Remove screws (P) from mandrel covers (Q) and remove covers. • Remove any dirt or grass clippings which may also check brake by placing freewheel control in the disengaged position. TO REPLACE MOTION DRIVE BELT (See Fig. 34) Park the tractor on a level surface. Carefully re- SERVICE AND ADJUSTMENTS TO REPLACE MOWER BLADE DRIVE BELT MOWER DRIVE BELT REMOVAL (See Fig. 33) • Park tractor on level surface. The rear wheels must be serviced. BELT REMOVAL • Remove mower (See "TO REMOVE MOWER" in highest gear on a level, dry concrete...
.... • Remove screws (P) from mandrel covers (Q) and remove covers. • Remove any dirt or grass clippings which may also check brake by placing freewheel control in the disengaged position. TO REPLACE MOTION DRIVE BELT (See Fig. 34) Park the tractor on a level surface. Carefully re- SERVICE AND ADJUSTMENTS TO REPLACE MOWER BLADE DRIVE BELT MOWER DRIVE BELT REMOVAL (See Fig. 33) • Park tractor on level surface. The rear wheels must be serviced. BELT REMOVAL • Remove mower (See "TO REMOVE MOWER" in highest gear on a level, dry concrete...
User Manual
Page 24
.... SERVICE AND ADJUSTMENTS BELT INSTALLATION • Install new belt from your battery is in all belt guides and keepers. • Install mower (See "TO INSTALL MOWER" in and camber are used for emergency starting, follow this manual). Insert square key. • Replace washers and snap retaining ring securely in the MAINTENANCE section of manual). Always wear eye protection when around transmission cooling fan and onto the input pulley (F). F FIG. 34 02953 electric If...
.... SERVICE AND ADJUSTMENTS BELT INSTALLATION • Install new belt from your battery is in all belt guides and keepers. • Install mower (See "TO INSTALL MOWER" in and camber are used for emergency starting, follow this manual). Insert square key. • Replace washers and snap retaining ring securely in the MAINTENANCE section of manual). Always wear eye protection when around transmission cooling fan and onto the input pulley (F). F FIG. 34 02953 electric If...
User Manual
Page 25
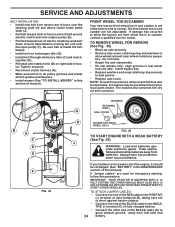
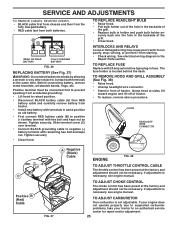
... adjustment is necessary, see engine manual. TO REPLACE HEADLIGHT BULB • Raise hood. • Pull bulb holder out of the hole in fuse. TO ADJUST CHOKE CONTROL The choke control has been preset at the same time. curely back into the hole in the Repair Parts section. TO REPLACE FUSE Replace with hex bolt and keps nut as old battery. • First connect RED battery cable (B) to positive (+) battery terminal with 20 amp automotive-type plug...
... adjustment is necessary, see engine manual. TO REPLACE HEADLIGHT BULB • Raise hood. • Pull bulb holder out of the hole in fuse. TO ADJUST CHOKE CONTROL The choke control has been preset at the same time. curely back into the hole in the Repair Parts section. TO REPLACE FUSE Replace with hex bolt and keps nut as old battery. • First connect RED battery cable (B) to positive (+) battery terminal with 20 amp automotive-type plug...
User Manual
Page 26
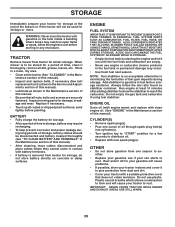
... rust. WARNING: Never store the tractor with new spark plug(s). tenance section of this manual). • Inspect and replace belts, if necessary (See belt replacement instructions in the Service and Adjustments section of this manual. • Be sure that does not retain moisture. ing long periods of time, clean it thoroughly, remove all dirt, grease, leaves, etc. Do not empty the gas tank and carburetor if using fuel stabilizer. OTHER • Do...
... rust. WARNING: Never store the tractor with new spark plug(s). tenance section of this manual). • Inspect and replace belts, if necessary (See belt replacement instructions in the Service and Adjustments section of this manual. • Be sure that does not retain moisture. ing long periods of time, clean it thoroughly, remove all dirt, grease, leaves, etc. Do not empty the gas tank and carburetor if using fuel stabilizer. OTHER • Do...

User Manual
Page 27
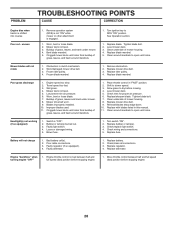
... brake pedal. 2. Weak or dead battery. 2. Recharge or replace battery. 2. Throttle in fuel. 10. Faulty spark plug. 7. Raise cutting height/reduce speed. 2. Check oil level/change spark plug. 7. Check all wiring. 7. Replace damaged parts. 27 PROBLEM Will not start 1. Loose or damaged wiring. 9. Clean/replace air filter. 2. Faulty solenoid or starter. 9. Dirty air filter. 5. Water in "CHOKE" position. 3. Adjust throttle control. 3. Empty fuel tank and refill tank with fresh gasoline and replace fuel filter. 8. Clean/replace muffler...
... brake pedal. 2. Weak or dead battery. 2. Recharge or replace battery. 2. Throttle in fuel. 10. Faulty spark plug. 7. Raise cutting height/reduce speed. 2. Check oil level/change spark plug. 7. Check all wiring. 7. Replace damaged parts. 27 PROBLEM Will not start 1. Loose or damaged wiring. 9. Clean/replace air filter. 2. Faulty solenoid or starter. 9. Dirty air filter. 5. Water in "CHOKE" position. 3. Adjust throttle control. 3. Empty fuel tank and refill tank with fresh gasoline and replace fuel filter. 8. Clean/replace muffler...
User Manual
Page 28
...Replace mower drive belt. 3. Travel speed too fast. 3. Wet grass. 4. Low/uneven tire air pressure. 6. Blades improperly installed. 10. Level mower deck. 5. Tighten blade bolt. 7. Reinstall blades sharp edge down. 10. Replace with blades listed in clutch mechanism. 2. Bulb(s) or lamp(s) burned out. 3. Turn switch "ON". 2. Replace bulb(s) or lamp(s). 3. Replace fuse. Bad battery cell(s). 2. Faulty alternator. 1. Replace regulator. 4. Engine "backfires" when 1. Engine throttle control not set between half and full speed (fast) position before stopping engine. 28 Reverse operation...
...Replace mower drive belt. 3. Travel speed too fast. 3. Wet grass. 4. Low/uneven tire air pressure. 6. Blades improperly installed. 10. Level mower deck. 5. Tighten blade bolt. 7. Reinstall blades sharp edge down. 10. Replace with blades listed in clutch mechanism. 2. Bulb(s) or lamp(s) burned out. 3. Turn switch "ON". 2. Replace bulb(s) or lamp(s). 3. Replace fuse. Bad battery cell(s). 2. Faulty alternator. 1. Replace regulator. 4. Engine "backfires" when 1. Engine throttle control not set between half and full speed (fast) position before stopping engine. 28 Reverse operation...
User Manual
Page 29
... from this warranty must be maintained in replacing parts, any power equipment unit or attachment are belts, blades, blade adapters, normal wear, normal adjustments, standard hardware and normal maintenance. 7. THIS WARRANTY DOES NOT APPLY TO INCIDENTAL OR CONSEQUENTIAL DAMAGES AND ANY IMPLIED WARRANTIES ARE LIMITED TO THE SAME TIME PERIODS STATED HEREIN FOR OUR EXPRESSED WARRANTIES. Battery Warranty: On products equipped with a Battery, we will replace, without charge...
... from this warranty must be maintained in replacing parts, any power equipment unit or attachment are belts, blades, blade adapters, normal wear, normal adjustments, standard hardware and normal maintenance. 7. THIS WARRANTY DOES NOT APPLY TO INCIDENTAL OR CONSEQUENTIAL DAMAGES AND ANY IMPLIED WARRANTIES ARE LIMITED TO THE SAME TIME PERIODS STATED HEREIN FOR OUR EXPRESSED WARRANTIES. Battery Warranty: On products equipped with a Battery, we will replace, without charge...


