

User Manual
Page 1
Failure to do so can result in U.S.A. ALWAYS WEAR EYE PROTECTION DURING OPERATION Visit our website: www.poulan-pro.com 403320 Rev. 3 09.22.06 CL Printed in serious injury. IMPORTANT MANUAL Do Not Throw Away 03076 OPERATOR'S MANUAL MODEL: PB19H42YT LAWN TRACTOR WARNING: Read this Manual and follow all Warnings and Safety Instructions.
Failure to do so can result in U.S.A. ALWAYS WEAR EYE PROTECTION DURING OPERATION Visit our website: www.poulan-pro.com 403320 Rev. 3 09.22.06 CL Printed in serious injury. IMPORTANT MANUAL Do Not Throw Away 03076 OPERATOR'S MANUAL MODEL: PB19H42YT LAWN TRACTOR WARNING: Read this Manual and follow all Warnings and Safety Instructions.
User Manual
Page 2
.... Do not shift to a complete stop before cleaning the machine, removing the grass catcher, or unclogging the discharge guard. • Operate machine only in the manual before operating or storing the machine. Do no use on steep slopes. • Do not try to cause cancer and birth defects or other reproductive...
.... Do not shift to a complete stop before cleaning the machine, removing the grass catcher, or unclogging the discharge guard. • Operate machine only in the manual before operating or storing the machine. Do no use on steep slopes. • Do not try to cause cancer and birth defects or other reproductive...
User Manual
Page 4
...24 TROUBLESHOOTING 25 WARRANTY 27 4 It has been designed, engineered and manufactured to give you to service or repair this manual). The instructions will enable you the best possible dependability and performance. Should you experience any unimproved forest-covered, brush-covered... tractor. • Follow the instructions under "Maintenance" and "Stor- In the state of this tractor. Please read and retain this owner's manual. CUSTOMER RESPONSIBILITIES • Read and observe the safety rules. • Follow a regular schedule in effective working order by law (Section 4442 ...
...24 TROUBLESHOOTING 25 WARRANTY 27 4 It has been designed, engineered and manufactured to give you to service or repair this manual). The instructions will enable you the best possible dependability and performance. Should you experience any unimproved forest-covered, brush-covered... tractor. • Follow the instructions under "Maintenance" and "Stor- In the state of this tractor. Please read and retain this owner's manual. CUSTOMER RESPONSIBILITIES • Read and observe the safety rules. • Follow a regular schedule in effective working order by law (Section 4442 ...
User Manual
Page 5
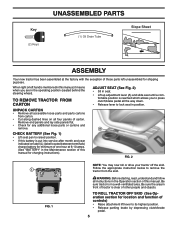
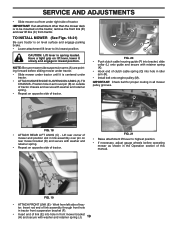
... to raised position. • If this battery is put into service after month and year indicated on all instructions in the Operation section of this manual. Be sure the area in front of tractor is in a well-ventilated area. A CHECK BATTERY (See Fig. 1) • Lift seat pan to its ... CARTON ADJUST SEAT (See Fig. 2) • Sit in seat. • Lift up adjustment lever (A) and slide seat until a comfortable position is mentioned in this manual, it means when you to press clutch/brake pedal all the way down. • Release lever to remove the tractor from carton. • Cut along...
... to raised position. • If this battery is put into service after month and year indicated on all instructions in the Operation section of this manual. Be sure the area in front of tractor is in a well-ventilated area. A CHECK BATTERY (See Fig. 1) • Lift seat pan to its ... CARTON ADJUST SEAT (See Fig. 2) • Sit in seat. • Lift up adjustment lever (A) and slide seat until a comfortable position is mentioned in this manual, it means when you to press clutch/brake pedal all the way down. • Release lever to remove the tractor from carton. • Cut along...
User Manual
Page 6
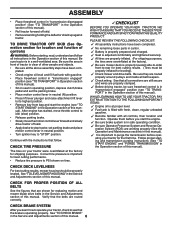
... is filled with gasoline. • Place freewheel control in "transmission engaged" position (see "TO TRANSPORT" in the Operation section of this manual). Check mower and drive belts. It is at the factory). See that follow all connections are still secure and wires are routed correctly. ... charged. CHECK BRAKE SYSTEM After you start the engine (see that are working properly (See the Operation and Maintenance sections in this manual). Be sure tractor is operating properly. Continue with all belt keepers. CHECKLIST BEFORE YOU OPERATE YOUR NEW TRACTOR, WE WISH TO ASSURE...
... is filled with gasoline. • Place freewheel control in "transmission engaged" position (see "TO TRANSPORT" in the Operation section of this manual). Check mower and drive belts. It is at the factory). See that follow all connections are still secure and wires are routed correctly. ... charged. CHECK BRAKE SYSTEM After you start the engine (see that are working properly (See the Operation and Maintenance sections in this manual). Be sure tractor is operating properly. Continue with all belt keepers. CHECKLIST BEFORE YOU OPERATE YOUR NEW TRACTOR, WE WISH TO ASSURE...
User Manual
Page 8
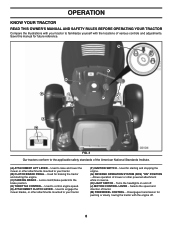
... and stopping the engine. (G) REVERSE OPERATION SYSTEM (ROS) "ON" POSITION - OPERATION KNOW YOUR TRACTOR READ THIS OWNER'S MANUAL AND SAFETY RULES BEFORE OPERATING YOUR TRACTOR Compare the illustrations with your tractor. (F) IGNITION SWITCH - Allows operation of tractor. ...direction of mower or other attachments mounted to raise and lower the mower or other powered attachment while in reverse. (H) LIGHT SWITCH - Save this manual for pushing or slowly towing the tractor with the locations of the American National Standards Institute. (A) ATTACHMENT LIFT LEVER - G B A M ...
... and stopping the engine. (G) REVERSE OPERATION SYSTEM (ROS) "ON" POSITION - OPERATION KNOW YOUR TRACTOR READ THIS OWNER'S MANUAL AND SAFETY RULES BEFORE OPERATING YOUR TRACTOR Compare the illustrations with your tractor. (F) IGNITION SWITCH - Allows operation of tractor. ...direction of mower or other attachments mounted to raise and lower the mower or other powered attachment while in reverse. (H) LIGHT SWITCH - Save this manual for pushing or slowly towing the tractor with the locations of the American National Standards Institute. (A) ATTACHMENT LIFT LEVER - G B A M ...
User Manual
Page 10
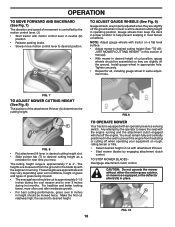
... the entire grass catcher, on a flat level surface. • Adjust mower to desired cutting height (See "TO ADJUST MOWER CUTTING HEIGHT" in this section of manual). • With mower in desired cutting height slot. • Slide pointer tab (T) to help prevent scalping in height should be mowed twice. Tighten securely. •...
... the entire grass catcher, on a flat level surface. • Adjust mower to desired cutting height (See "TO ADJUST MOWER CUTTING HEIGHT" in this section of manual). • With mower in desired cutting height slot. • Slide pointer tab (T) to help prevent scalping in height should be mowed twice. Tighten securely. •...
User Manual
Page 11
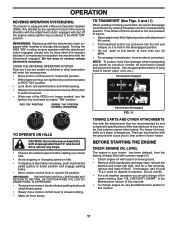
... position. Any attempt by the operator to reposition the machine with the attachment clutch engaged, should change engine oil, see the Maintenance section in this manual). • To change oil for a few seconds, remove and read oil level. Do not mow in the ROS "ON" position. Use an... To reengage transmission, reverse above procedure. USING THE REVERSE OPERATION SYSTEM Only use of the ROS is closed and secured to lose control of this manual. 11 TO TRANSPORT (See Figs. 3 and 11) When pushing or towing your tractor on dipstick is held in the disengaged position. •...
... position. Any attempt by the operator to reposition the machine with the attachment clutch engaged, should change engine oil, see the Maintenance section in this manual). • To change oil for a few seconds, remove and read oil level. Do not mow in the ROS "ON" position. Use an... To reengage transmission, reverse above procedure. USING THE REVERSE OPERATION SYSTEM Only use of the ROS is closed and secured to lose control of this manual. 11 TO TRANSPORT (See Figs. 3 and 11) When pushing or towing your tractor on dipstick is held in the disengaged position. •...
User Manual
Page 12
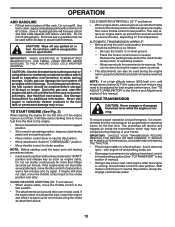
...used during shipping of 30 days or longer. To ensure proper operation and performance, it run starter continuously for transmission to bottom of manual). • Sitting in the choke position until the fuel lines and carburetor are empty. with the throttle control in the tractor seat...above) • When engine starts, move throttle control to assure fuel freshness. AUTOMATIC TRANSMISSION WARM UP • Before driving the unit in this manual. that can also be warmed up as described above 3000 feet) or in cold temperatures (below ) • When engine starts, allow it ...
...used during shipping of 30 days or longer. To ensure proper operation and performance, it run starter continuously for transmission to bottom of manual). • Sitting in the choke position until the fuel lines and carburetor are empty. with the throttle control in the tractor seat...above) • When engine starts, move throttle control to assure fuel freshness. AUTOMATIC TRANSMISSION WARM UP • Before driving the unit in this manual. that can also be warmed up as described above 3000 feet) or in cold temperatures (below ) • When engine starts, allow it ...
User Manual
Page 13
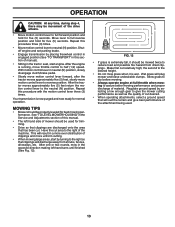
... lever three (3) times. Shutoff engine and set parking brake. • Engage transmission by placing freewheel control in engaged position (See "TO TRANSPORT" in this manual. • The left hand side of mower should be movement of manual). • Sitting in the opposite direction making left hand turns until finished (See Fig. 12).
... lever three (3) times. Shutoff engine and set parking brake. • Engage transmission by placing freewheel control in engaged position (See "TO TRANSPORT" in this manual. • The left hand side of mower should be movement of manual). • Sitting in the opposite direction making left hand turns until finished (See Fig. 12).
User Manual
Page 14
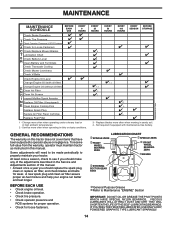
... 3 4 1,2 1,2 2 2 1, 2 2 2 3 - Some adjustments will need to be made periodically to see if you should make any of this manual. • At least once a year you should replace the spark plug, clean or replace air filter, and check blades and belts for wear. Change more...Service and Adjustments section of the adjustments described in high ambient temperatures. 2 - maint_sch-tractore.ROS.e GENERAL RECOMMENDATIONS The warranty on this manual. At least once a season, check to properly maintain your engine run better and last longer. LUBRICATION CHART dSPINDLE ZERK dSPINDLE ZERK ...
... 3 4 1,2 1,2 2 2 1, 2 2 2 3 - Some adjustments will need to be made periodically to see if you should make any of this manual. • At least once a year you should replace the spark plug, clean or replace air filter, and check blades and belts for wear. Change more...Service and Adjustments section of the adjustments described in high ambient temperatures. 2 - maint_sch-tractore.ROS.e GENERAL RECOMMENDATIONS The warranty on this manual. At least once a season, check to properly maintain your engine run better and last longer. LUBRICATION CHART dSPINDLE ZERK dSPINDLE ZERK ...
User Manual
Page 15
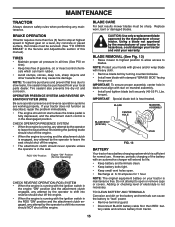
... securely (45-55 Ft. If your hands with gloves and/or wrap blade with heavy cloth. • Remove blade bolt by the manufacturer of this manual). Adding or checking level of gasoline, oil, or insect control chemicals which is engaged, any attempt by the operator to "leak" power. • Remove terminal...
... securely (45-55 Ft. If your hands with gloves and/or wrap blade with heavy cloth. • Remove blade bolt by the manufacturer of this manual). Adding or checking level of gasoline, oil, or insect control chemicals which is engaged, any attempt by the operator to "leak" power. • Remove terminal...
User Manual
Page 16
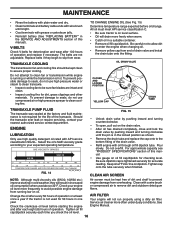
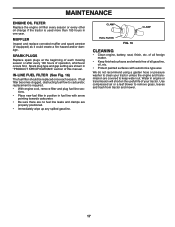
...OIL CHANGE FIG. 14 oil_visc_chart1_e • Remove the drain tube and replace the cap onto to prevent engine damage from end of this manual). For approximate capacity see "PRODUCT SPECIFICATIONS" section of drain valve and install the drain tube onto the fitting. Do not attempt to... necessary. CLEAN AIR SCREEN NOTE: Although multi-viscosity oils (5W30, 10W30 etc.) improve starting the engine and after 100 hours of this manual. • Use gauge on dipstick. Check the crankcase oil level before oil change. TRANSAXLE COOLING The transmission fan and cooling fins should ...
...OIL CHANGE FIG. 14 oil_visc_chart1_e • Remove the drain tube and replace the cap onto to prevent engine damage from end of this manual). For approximate capacity see "PRODUCT SPECIFICATIONS" section of drain valve and install the drain tube onto the fitting. Do not attempt to... necessary. CLEAN AIR SCREEN NOTE: Although multi-viscosity oils (5W30, 10W30 etc.) improve starting the engine and after 100 hours of this manual. • Use gauge on dipstick. Check the crankcase oil level before oil change. TRANSAXLE COOLING The transmission fan and cooling fins should ...
User Manual
Page 17
... or pressure washer to clean your tractor unless the engine and transmission are shown in engine or transmission will shorten the useful life of this manual.
... or pressure washer to clean your tractor unless the engine and transmission are shown in engine or transmission will shorten the useful life of this manual.
User Manual
Page 19
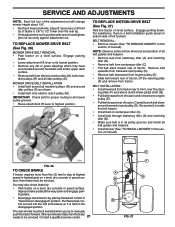
... in idler arm (R). • Install belt onto engine pulley (M). Position hole in front mower bracket (H) and secure with retainer spring (K). • Hook end of this manual. C D FIG. 19 • ATTACH FRONT LINK (E) - Insert rod end of link assembly through front hole in tractor front suspension bracket (F). • Insert end of link...
... in idler arm (R). • Install belt onto engine pulley (M). Position hole in front mower bracket (H) and secure with retainer spring (K). • Hook end of this manual. C D FIG. 19 • ATTACH FRONT LINK (E) - Insert rod end of link assembly through front hole in tractor front suspension bracket (F). • Insert end of link...
User Manual
Page 21
... to highest position. Remove belt upwards from transaxle input pulley (D). • Remove belt downward from engine pulley (E). • Slide belt toward rear of manual). ing plate (F) and above clutch brake pedal shaft (G). • Pull belt toward front of tractor and roll belt onto engine pulley (E). •...stop at highest speed in highest gear on a level, dry concrete or paved surface, then brake must lock and skid when you try to manually push the tractor forward. R R FIG. 26 TO CHECK BRAKE If tractor requires more than the rear tip. • Hold adjustment nut...
... to highest position. Remove belt upwards from transaxle input pulley (D). • Remove belt downward from engine pulley (E). • Slide belt toward rear of manual). ing plate (F) and above clutch brake pedal shaft (G). • Pull belt toward front of tractor and roll belt onto engine pulley (E). •...stop at highest speed in highest gear on a level, dry concrete or paved surface, then brake must lock and skid when you try to manually push the tractor forward. R R FIG. 26 TO CHECK BRAKE If tractor requires more than the rear tip. • Hold adjustment nut...

User Manual
Page 22
... batteries generate explosive gases. Insert square key. • Replace washers and snap retaining ring securely in and camber are used for emergency starting, follow this manual). Keep sparks, flame and smoking materials away from fuel tank and battery. If damage has occurred to allow wheel removal (rear wheel contains a square key...
... batteries generate explosive gases. Insert square key. • Replace washers and snap retaining ring securely in and camber are used for emergency starting, follow this manual). Keep sparks, flame and smoking materials away from fuel tank and battery. If damage has occurred to allow wheel removal (rear wheel contains a square key...
User Manual
Page 23
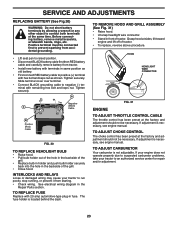
...be necessary. TO ADJUST CARBURETOR Your carburetor is located behind the dash. Tighten securely. Tighten securely. If adjustment is necessary, see engine manual. See electrical wiring diagram in fuse. TO REPLACE FUSE Replace with 20 amp automotive-type plug-in the Repair Parts section. If your... to negative (-) terminal with terminals in same position as shown. Grasp hood at the same time. If adjustment is necessary, see engne manual. SERVICE AND ADJUSTMENTS REPLACING BATTERY (See Fig.30) WARNING: Do not short battery terminals by allowing a wrench or any other object to...
...be necessary. TO ADJUST CARBURETOR Your carburetor is located behind the dash. Tighten securely. Tighten securely. If adjustment is necessary, see engine manual. See electrical wiring diagram in fuse. TO REPLACE FUSE Replace with 20 amp automotive-type plug-in the Repair Parts section. If your... to negative (-) terminal with terminals in same position as shown. Grasp hood at the same time. If adjustment is necessary, see engne manual. SERVICE AND ADJUSTMENTS REPLACING BATTERY (See Fig.30) WARNING: Do not short battery terminals by allowing a wrench or any other object to...

User Manual
Page 24
... the fuel tank or permanent damage may reach an open flame or spark. placement instructions in the Service and Adjustments section of this manual). • Lubricate as shown in minimizing the formation of fuel gum deposits during long periods of storage, battery cables should be stored...hole(s) into cylinder(s). • Turn ignition key to "START" position for storage. • After a period of time in the Maintenance section of this manual). • Inspect and replace belts, if necessary (See belt re- BATTERY • Fully charge the battery for a few seconds to distribute oil. &#...
... the fuel tank or permanent damage may reach an open flame or spark. placement instructions in the Service and Adjustments section of this manual). • Lubricate as shown in minimizing the formation of fuel gum deposits during long periods of storage, battery cables should be stored...hole(s) into cylinder(s). • Turn ignition key to "START" position for storage. • After a period of time in the Maintenance section of this manual). • Inspect and replace belts, if necessary (See belt re- BATTERY • Fully charge the battery for a few seconds to distribute oil. &#...

User Manual
Page 26
... system (ROS) is not "ON" while mower or other attachment is shifted into reverse 1. Check/replace light switch. 4. Replace battery. 2. Place freewheel control in this manual. 11. Engine continues to ROS "ON" position. Replace mower drive belt. 3. Replace regulator. 4. Replace blade. Worn/damaged mower drive belt. 3. Replace with attachment clutch engaged...
... system (ROS) is not "ON" while mower or other attachment is shifted into reverse 1. Check/replace light switch. 4. Replace battery. 2. Place freewheel control in this manual. 11. Engine continues to ROS "ON" position. Replace mower drive belt. 3. Replace regulator. 4. Replace blade. Worn/damaged mower drive belt. 3. Replace with attachment clutch engaged...


