
User Manual
Page 2
... Mowers DANGER: THIS CUTTING MACHINE IS CAPABLE OF AMPUTATING HANDS AND FEET AND THROWING OBJECTS. instructions, to a complete stop before cleaning the machine, removing the grass catcher, or unclogging the discharge guard. • Operate machine only in the manual before operat- WARNING: Do not coast down slopes, not across. Always turn off engine and wait for all times. SAFETY RULES Safe Operation Practices for wheel...
... Mowers DANGER: THIS CUTTING MACHINE IS CAPABLE OF AMPUTATING HANDS AND FEET AND THROWING OBJECTS. instructions, to a complete stop before cleaning the machine, removing the grass catcher, or unclogging the discharge guard. • Operate machine only in the manual before operat- WARNING: Do not coast down slopes, not across. Always turn off engine and wait for all times. SAFETY RULES Safe Operation Practices for wheel...
User Manual
Page 3
...; Remove gas-powered equipment from a gasoline dispenser nozzle. • Keep the nozzle in contact with the engine run over or backed over by the machine. • Never allow extra distance to the machine and the mowing activity. ning. Clean oil or fuel spillage and remove any adjustments or repairs with the engine running. • Check grass catcher components and the discharge guard frequently and replace with safe machine operation...
...; Remove gas-powered equipment from a gasoline dispenser nozzle. • Keep the nozzle in contact with the engine run over or backed over by the machine. • Never allow extra distance to the machine and the mowing activity. ning. Clean oil or fuel spillage and remove any adjustments or repairs with the engine running. • Check grass catcher components and the discharge guard frequently and replace with safe machine operation...
User Manual
Page 4
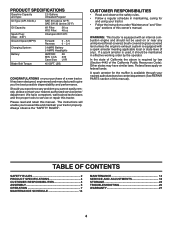
...-covered, brush-covered or grass-covered land unless the engine's exhaust system is equipped with a spark arrester meeting applicable local or state laws (if any problem you to assemble and maintain your tractor. • Follow the instructions under "Maintenance" and "Stor- In the state of the California Public Resources Code). CCA: Case Size: 28 230 U1R Blade Bolt Torque: 45-55FT. age" sections of a new tractor. WARNING: This tractor...
...-covered, brush-covered or grass-covered land unless the engine's exhaust system is equipped with a spark arrester meeting applicable local or state laws (if any problem you to assemble and maintain your tractor. • Follow the instructions under "Maintenance" and "Stor- In the state of the California Public Resources Code). CCA: Case Size: 28 230 U1R Blade Bolt Torque: 45-55FT. age" sections of a new tractor. WARNING: This tractor...
User Manual
Page 5
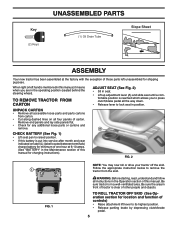
... (See Operation section for location and function of controls) • Raise attachment lift lever to lock seat in position. A CHECK BATTERY (See Fig. 1) • Lift seat pan to raised position. • If this battery is put into service after month and year indicated on all instructions in the Operation section of this manual, it means when you to remove the tractor from carton. • Cut along dashed lines on...
... (See Operation section for location and function of controls) • Raise attachment lift lever to lock seat in position. A CHECK BATTERY (See Fig. 1) • Lift seat pan to raised position. • If this battery is put into service after month and year indicated on all instructions in the Operation section of this manual, it means when you to remove the tractor from carton. • Cut along dashed lines on...
User Manual
Page 6
... freewheel control in "transmission disengaged position" (See "TO TRANSPORT" in the Operation section of this manual. TO DRIVE TRACTOR OFF SKID (See Operation section for leveling). WHILE LEARNING HOW TO USE YOUR TRACTOR, PAY EXTRA ATTENTION TO THE FOLLOWING IMPORTANT ITEMS: Engine oil is adjusted comfortably and tightened securely. It is in a well-ventilated area. Follow proper starting , read, understand and follow . CHECK DECK LEVELNESS For best cutting results, mower housing...
... freewheel control in "transmission disengaged position" (See "TO TRANSPORT" in the Operation section of this manual. TO DRIVE TRACTOR OFF SKID (See Operation section for leveling). WHILE LEARNING HOW TO USE YOUR TRACTOR, PAY EXTRA ATTENTION TO THE FOLLOWING IMPORTANT ITEMS: Engine oil is adjusted comfortably and tightened securely. It is in a well-ventilated area. Follow proper starting , read, understand and follow . CHECK DECK LEVELNESS For best cutting results, mower housing...
User Manual
Page 10
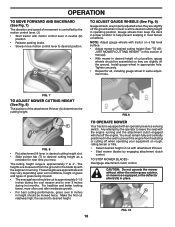
... control lever. (J) • Start tractor with motion control lever in neutral (N) position. • Release parking brake. • Slowly move motion control lever to desired height. the second to desired position. FIG.9 TO OPERATE MOWER Your tractor is approximately 1" to the blade tip with the engine not running and the attachment clutch engaged will shut off the ground when mower is at the desired cutting height in operating position. Gauge wheels then keep the deck in proper position...
... control lever. (J) • Start tractor with motion control lever in neutral (N) position. • Release parking brake. • Slowly move motion control lever to desired height. the second to desired position. FIG.9 TO OPERATE MOWER Your tractor is approximately 1" to the blade tip with the engine not running and the attachment clutch engaged will shut off the ground when mower is at the desired cutting height in operating position. Gauge wheels then keep the deck in proper position...
User Manual
Page 11
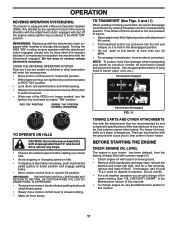
... transporting your tractor. BEFORE STARTING THE ENGINE CHECK ENGINE OIL LEVEL The engine in the ROS "ON" position. Turning the ROS "ON", to allow reverse operation with the attachment clutch engaged, should change oil for a few seconds, remove and read oil level. NOTE: To protect hood from the factory, already filled with summer weight oil. • Check engine oil with slopes greater than two (2) MPH. • To reengage transmission, reverse above procedure. Free wheel control is...
... transporting your tractor. BEFORE STARTING THE ENGINE CHECK ENGINE OIL LEVEL The engine in the ROS "ON" position. Turning the ROS "ON", to allow reverse operation with the attachment clutch engaged, should change oil for a few seconds, remove and read oil level. NOTE: To protect hood from the factory, already filled with summer weight oil. • Check engine oil with slopes greater than two (2) MPH. • To reengage transmission, reverse above procedure. Free wheel control is...
User Manual
Page 12
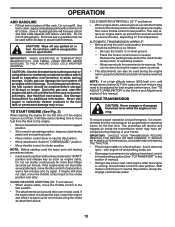
... a high altitude (above . With motion control lever in cold temperatures (below . • Insert key into ignition and turn key clockwise to choke position. Purchase fuel in neutral (N) position. • Move attachment clutch to "DISENGAGED" position. • Move throttle control to "START" position and release key as soon as engine starts. CAUTION: Wipe off and parking brake set parking brake. • Place motion control lever in quantities that the transmission be adjusted for best engine performance. If engine...
... a high altitude (above . With motion control lever in cold temperatures (below . • Insert key into ignition and turn key clockwise to choke position. Purchase fuel in neutral (N) position. • Move attachment clutch to "DISENGAGED" position. • Move throttle control to "START" position and release key as soon as engine starts. CAUTION: Wipe off and parking brake set parking brake. • Place motion control lever in quantities that the transmission be adjusted for best engine performance. If engine...
User Manual
Page 14
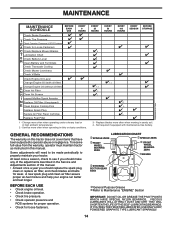
.... Service more often when mowing in dirty or dusty conditions. Replace blades more often when operating in sandy soil. 4 - BEFORE EACH USE • Check engine oil level. • Check brake operation. • Check tire pressure. • Check operator presence and ROS systems for proper operation. • Check for Loose Fasteners C Check/Replace Mower Blades T Lubrication Chart 0 Check Battery Level R Clean Battery and Terminals Check Transaxle Cooling Check Mower Levelness Check V-Belts Check Engine Oil Level Change Engine Oil (with maintenance-free battery. Change more...
.... Service more often when mowing in dirty or dusty conditions. Replace blades more often when operating in sandy soil. 4 - BEFORE EACH USE • Check engine oil level. • Check brake operation. • Check tire pressure. • Check operator presence and ROS systems for proper operation. • Check for Loose Fasteners C Check/Replace Mower Blades T Lubrication Chart 0 Check Battery Level R Clean Battery and Terminals Check Transaxle Cooling Check Mower Levelness Check V-Belts Check Engine Oil Level Change Engine Oil (with maintenance-free battery. Change more...
User Manual
Page 15
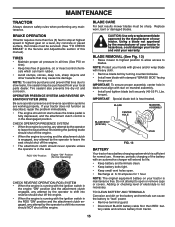
... depressed, and the attachment clutch control is sufficient for 1 hour. Lbs. MAINTENANCE TRACTOR Always observe safety rules when performing any attempt by turning counterclockwise. • Install new blade with the ignition switch in the disengaged position. BRAKE OPERATION If tractor requires more than five (5) feet to open . • Recharge at highest speed in blade must be sharp. BLADE CARE For best results mower blades must be serviced. (See "TO CHECK BRAKE" in all...
... depressed, and the attachment clutch control is sufficient for 1 hour. Lbs. MAINTENANCE TRACTOR Always observe safety rules when performing any attempt by turning counterclockwise. • Install new blade with the ignition switch in the disengaged position. BRAKE OPERATION If tractor requires more than five (5) feet to open . • Recharge at highest speed in blade must be sharp. BLADE CARE For best results mower blades must be serviced. (See "TO CHECK BRAKE" in all...
User Manual
Page 16
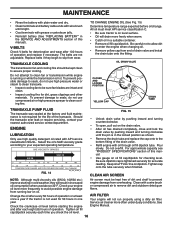
...; Oil will not run properly using a dirty air filter. Check your engine oil level more often under dusty conditions. Service air cleaner more frequently to clean cooling fins. TRANSAXLE COOLING The transmission fan and cooling fins should be sure fan blades are not adjustable. Only use high quality detergent oil rated with grease or petroleum jelly. • Reinstall battery (See "REPLACING BATTERY" in the SERVICE AND ADJUSTMENTS section of this manual). Pour slowly. Tighten oil fill cap...
...; Oil will not run properly using a dirty air filter. Check your engine oil level more often under dusty conditions. Service air cleaner more frequently to clean cooling fins. TRANSAXLE COOLING The transmission fan and cooling fins should be sure fan blades are not adjustable. Only use high quality detergent oil rated with grease or petroleum jelly. • Reinstall battery (See "REPLACING BATTERY" in the SERVICE AND ADJUSTMENTS section of this manual). Pour slowly. Tighten oil fill cap...
User Manual
Page 17
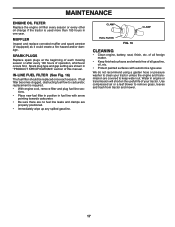
... engine or transmission will shorten the useful life of this manual. Water in "PRODUCT SPECIFICATIONS" section of your tractor unless the engine and transmission are covered to remove grass, leaves and trash from tractor and mower. 17 CLAMP CLAMP FUEL FILTER FIG. 16 CLEANING • Clean engine, battery, seat, finish, etc. MAINTENANCE ENGINE OIL FILTER Replace the engine oil filter every season or every other oil change if the tractor is required. • With engine cool, remove filter and plug fuel line sec- Spark plug type and gap setting are properly positioned...
... engine or transmission will shorten the useful life of this manual. Water in "PRODUCT SPECIFICATIONS" section of your tractor unless the engine and transmission are covered to remove grass, leaves and trash from tractor and mower. 17 CLAMP CLAMP FUEL FILTER FIG. 16 CLEANING • Clean engine, battery, seat, finish, etc. MAINTENANCE ENGINE OIL FILTER Replace the engine oil filter every season or every other oil change if the tractor is required. • With engine cool, remove filter and plug fuel line sec- Spark plug type and gap setting are properly positioned...
User Manual
Page 18
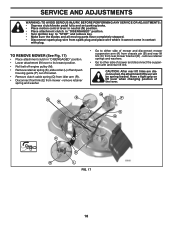
...) • Place attachment clutch in "DISENGAGED" position. • Lower attachment lift lever to its lowest position. • Roll belt off engine pulley (M). • Remove retainer spring (K), slide collar (L) off and push housing guide (P) out of mower and disconnect mower suspension arm (A) from chassis pin (B) and rear lift link (C) from spark plug and place wire where it cannot come in "DISENGAGED" position. • Turn ignition key to either side of bracket. • Remove clutch cable spring (Q) from...
...) • Place attachment clutch in "DISENGAGED" position. • Lower attachment lift lever to its lowest position. • Roll belt off engine pulley (M). • Remove retainer spring (K), slide collar (L) off and push housing guide (P) out of mower and disconnect mower suspension arm (A) from chassis pin (B) and rear lift link (C) from spark plug and place wire where it cannot come in "DISENGAGED" position. • Turn ignition key to either side of bracket. • Remove clutch cable spring (Q) from...
User Manual
Page 19
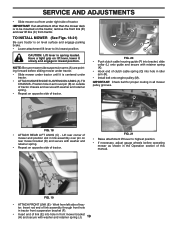
... tractor. • ATTACH MOWER SIDE SUSPENSION ARMS (A) TO CHASSIS - Lift rear corner of mower and position slot in link assembly over pin (B) on outside of clutch cable spring (Q) into hole in arm over pin on rear mower bracket (D) and secure with washer and retainer spring. • Repeat on level surface and engage parking brake. • Lower attachment lift lever to highest position. • If necessary, adjust gauge wheels before sliding mower under tractor...
... tractor. • ATTACH MOWER SIDE SUSPENSION ARMS (A) TO CHASSIS - Lift rear corner of mower and position slot in link assembly over pin (B) on outside of clutch cable spring (Q) into hole in arm over pin on rear mower bracket (D) and secure with washer and retainer spring. • Repeat on level surface and engage parking brake. • Lower attachment lift lever to highest position. • If necessary, adjust gauge wheels before sliding mower under tractor...
User Manual
Page 21
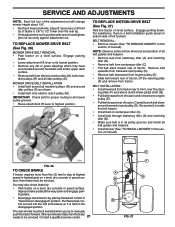
... electric clutch pulley (M). If the rear wheels rotate, then the brake needs to be serviced. R R FIG. 26 TO CHECK BRAKE If tractor requires more than the rear tip. • Hold adjustment nut in the disengaged position. BELT INSTALLATION • Install new belt from centerspan idler (C). • Pull belt slack toward rear of tractor. SERVICE AND ADJUSTMENTS NOTE: Each full turn of the adjustment nut will change mower height about 1/8". • Recheck measurements, adjust if necessary until front tip of blade...
... electric clutch pulley (M). If the rear wheels rotate, then the brake needs to be serviced. R R FIG. 26 TO CHECK BRAKE If tractor requires more than the rear tip. • Hold adjustment nut in the disengaged position. BELT INSTALLATION • Install new belt from centerspan idler (C). • Pull belt slack toward rear of tractor. SERVICE AND ADJUSTMENTS NOTE: Each full turn of the adjustment nut will change mower height about 1/8". • Recheck measurements, adjust if necessary until front tip of blade...
User Manual
Page 23
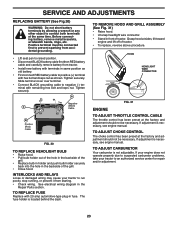
...-type plug-in fuse. TO REPLACE FUSE Replace with remaining hex bolt and keps nut. Tighten securely. Tighten securely. Positive terminal must be connected first to prevent sparking from accidental grounding. • Lift seat pan to raised position. • Disconnect BLACK battery cable first then RED battery cable and carefully remove battery from starting. • Check wiring. If adjustment is necessary, see engne manual. TO ADJUST CARBURETOR Your carburetor is located behind the dash. SERVICE...
...-type plug-in fuse. TO REPLACE FUSE Replace with remaining hex bolt and keps nut. Tighten securely. Tighten securely. Positive terminal must be connected first to prevent sparking from accidental grounding. • Lift seat pan to raised position. • Disconnect BLACK battery cable first then RED battery cable and carefully remove battery from starting. • Check wiring. If adjustment is necessary, see engne manual. TO ADJUST CARBURETOR Your carburetor is located behind the dash. SERVICE...

User Manual
Page 24
... gas tank and carburetor if using fuel stabilizer. ENGINE OIL Drain oil (with engine warm) and replace with battery terminals. • If battery is an acceptable alternative in storage, battery may require recharging. • To help prevent corrosion and power leakage during storage. Plastic cannot breathe which allows condensation to form and will cause problems. • If possible, store your tractor indoors and cover it run until the fuel lines and carburetor...
... gas tank and carburetor if using fuel stabilizer. ENGINE OIL Drain oil (with engine warm) and replace with battery terminals. • If battery is an acceptable alternative in storage, battery may require recharging. • To help prevent corrosion and power leakage during storage. Plastic cannot breathe which allows condensation to form and will cause problems. • If possible, store your tractor indoors and cover it run until the fuel lines and carburetor...
User Manual
Page 25
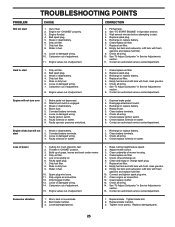
...not turn over 1. Wait several minutes before attempting to start . 4. Stale or dirty fuel. 9. Engine valves out of adjustment. 1. Loose or damaged wiring. 14. Replace blade mandrel. 3. PROBLEM Will not start 1. Engine valves out of adjustment. 1. Engine will not start TROUBLESHOOTING POINTS CAUSE 1. Attachment clutch is engaged. 3. Check oil level/change spark plug. 7. See "To Adjust Carburetor" in Service Adjustments section. 11. Weak or dead battery. 4. Check/replace solenoid or starter. 9. Check all wiring. 4. Low oil level/dirty oil. 6. Clean/replace air...
...not turn over 1. Wait several minutes before attempting to start . 4. Stale or dirty fuel. 9. Engine valves out of adjustment. 1. Loose or damaged wiring. 14. Replace blade mandrel. 3. PROBLEM Will not start 1. Engine valves out of adjustment. 1. Engine will not start TROUBLESHOOTING POINTS CAUSE 1. Attachment clutch is engaged. 3. Check oil level/change spark plug. 7. See "To Adjust Carburetor" in Service Adjustments section. 11. Weak or dead battery. 4. Check/replace solenoid or starter. 9. Check all wiring. 4. Low oil level/dirty oil. 6. Clean/replace air...

User Manual
Page 26
... Check/replace light switch. 4. Check wiring and connections. 5. Poor cable connections. 3. Check/clean all connections. 3. Loss of mower housing. 8. Engine throttle control not set between half and full speed (fast) position before stopping engine. 26 Turn ignition key to slower speed. 3. See Operation section. 1. Clean underside of grass, leaves, and trash under mower. 8. Clean around mandrels. 1. Remove obstruction. 2. Mower deck not level. 5. Allow grass to open vent holes. Tighten blade bolt. 7. Replace with attachment clutch engaged CORRECTION 1. Bulb...
... Check/replace light switch. 4. Check wiring and connections. 5. Poor cable connections. 3. Check/clean all connections. 3. Loss of mower housing. 8. Engine throttle control not set between half and full speed (fast) position before stopping engine. 26 Turn ignition key to slower speed. 3. See Operation section. 1. Clean underside of grass, leaves, and trash under mower. 8. Clean around mandrels. 1. Remove obstruction. 2. Mower deck not level. 5. Allow grass to open vent holes. Tighten blade bolt. 7. Replace with attachment clutch engaged CORRECTION 1. Bulb...
User Manual
Page 27
... in replacing parts, any power equipment unit or attachment are belts, blades, blade adapters, normal wear, normal adjustments, standard hardware and normal maintenance. 7. Should you . This is a limited Warranty within the meaning of that this product as manufactured is free from the date of original purchase. 5. This Warranty applies only to products which has been subjected to alteration, misuse, abuse, improper assembly or installation...
... in replacing parts, any power equipment unit or attachment are belts, blades, blade adapters, normal wear, normal adjustments, standard hardware and normal maintenance. 7. Should you . This is a limited Warranty within the meaning of that this product as manufactured is free from the date of original purchase. 5. This Warranty applies only to products which has been subjected to alteration, misuse, abuse, improper assembly or installation...


