
User Manual
Page 2
... may reach an open device. - Never smoke while refueling. - STATIC ELECTRICITY HAZARD - - CAUTION: Muffler and other engine parts become extremely hot during op- • Exercise caution to avoid slipping or falling especially eration or while performing an adjustment or repair to ...specifically allow children to operate the equipment. Never store fuel or snow thrower with fuel in rotating parts. WARNING: Snow throwers have exposed rotating parts, which can cause severe injury from contact, or from material thrown from foreign objects that will improve footing ...
... may reach an open device. - Never smoke while refueling. - STATIC ELECTRICITY HAZARD - - CAUTION: Muffler and other engine parts become extremely hot during op- • Exercise caution to avoid slipping or falling especially eration or while performing an adjustment or repair to ...specifically allow children to operate the equipment. Never store fuel or snow thrower with fuel in rotating parts. WARNING: Snow throwers have exposed rotating parts, which can cause severe injury from contact, or from material thrown from foreign objects that will improve footing ...
User Manual
Page 3
...use care when backing up of the building. never run the engine (motor) indoors, except when starting . • Take all moving parts have competent, well-trained technicians and the proper tools to the auger/impeller when snow thrower is in use on slippery surfaces. Keep proper...prevent freeze-up . • Never direct discharge at frequent intervals for and using your snow thrower. • Follow the instructions under rotating parts. Should you cannot easily remedy, please contact your purchase of the unit. • Disengage power to service or repair this unit. The ...
...use care when backing up of the building. never run the engine (motor) indoors, except when starting . • Take all moving parts have competent, well-trained technicians and the proper tools to the auger/impeller when snow thrower is in use on slippery surfaces. Keep proper...prevent freeze-up . • Never direct discharge at frequent intervals for and using your snow thrower. • Follow the instructions under rotating parts. Should you cannot easily remedy, please contact your purchase of the unit. • Disengage power to service or repair this unit. The ...

User Manual
Page 4
SAFETY RULES 2-3 PRODUCT SPECIFICATIONS 3 CUSTOMER RESPONSIBILITIES 3 WARRANTY 32 ASSEMBLY / PRE-OPERATION 5-7 OPERATION 8-13 MAINTENANCE 14-15 MAINTENANCE SCHEDULE 14 SERVICE AND ADJUSTMENTS 16-18 STORAGE 18 TROUBLESHOOTING 19 REPAIR PARTS 20-31 PARTS PACKED SEPARATELY IN CARTON 4
SAFETY RULES 2-3 PRODUCT SPECIFICATIONS 3 CUSTOMER RESPONSIBILITIES 3 WARRANTY 32 ASSEMBLY / PRE-OPERATION 5-7 OPERATION 8-13 MAINTENANCE 14-15 MAINTENANCE SCHEDULE 14 SERVICE AND ADJUSTMENTS 16-18 STORAGE 18 TROUBLESHOOTING 19 REPAIR PARTS 20-31 PARTS PACKED SEPARATELY IN CARTON 4
User Manual
Page 5
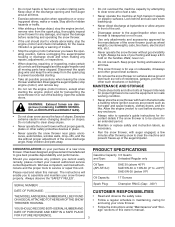
...hardware you attempt to ensure proper tightness. Insert rod into speed control bracket and secure with the exception of your snow thrower. All parts such as necessary to assemble or operate your new snow thrower. NOTE: The multi-wrench may be tightened securely. Remove snow thrower ... securing rod to the operating position and tighten handle knobs securely. Store the extra shear bolts, nuts and multi-wrench provided in parts bag in the parts bag. Raise upper handle to lower handle. 2. ASSEMBLY / PRE-OPERATION Read these instructions and this manual in its entirety before...
...hardware you attempt to ensure proper tightness. Insert rod into speed control bracket and secure with the exception of your snow thrower. All parts such as necessary to assemble or operate your new snow thrower. NOTE: The multi-wrench may be tightened securely. Remove snow thrower ... securing rod to the operating position and tighten handle knobs securely. Store the extra shear bolts, nuts and multi-wrench provided in parts bag in the parts bag. Raise upper handle to lower handle. 2. ASSEMBLY / PRE-OPERATION Read these instructions and this manual in its entirety before...

User Manual
Page 7
...at the factory for shipping purposes. Place weight bag on underside of mounting bracket. 4. Correct and equal tire pressure is important for all moving parts to stop. 2. Fill weight bag with discharge opening toward front of the mounting clamp as follows: 1. Insert weight bag between the auger housing... top of auger housing as shown. 4. Position chute rotater head over chute bracket. If necessary, rotate chute assembly to ride up on your parts bag may be used to 14-17 PSI. 7 Shut off engine and wait for best snow throwing performance. • Reduce tire pressure to...
...at the factory for shipping purposes. Place weight bag on underside of mounting bracket. 4. Correct and equal tire pressure is important for all moving parts to stop. 2. Fill weight bag with discharge opening toward front of the mounting clamp as follows: 1. Insert weight bag between the auger housing... top of auger housing as shown. 4. Position chute rotater head over chute bracket. If necessary, rotate chute assembly to ride up on your parts bag may be used to 14-17 PSI. 7 Shut off engine and wait for best snow throwing performance. • Reduce tire pressure to...

User Manual
Page 10
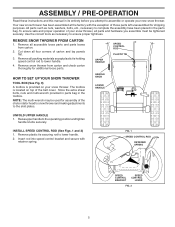
...;ector low to "STOP" position. 2. OFF FULL FIG. 12 TO CONTROL SNOW DISCHARGE (See Figs. 13 & 14) WARNING: Snow throwers have exposed rotating parts, which can cause severe injury from contact, or from material thrown from the discharge chute. AUGER • Release the auger control lever to stop . Remove... recommend standard safety glasses or a wide vision safety mask worn over spectacles. HOW TO USE YOUR SNOW THROWER Know how to operate all moving parts to start the engine. TO USE FUEL SHUT-OFF VALVE (See Fig. 10) The fuel shut-off valve in foreign objects thrown into desired...
...;ector low to "STOP" position. 2. OFF FULL FIG. 12 TO CONTROL SNOW DISCHARGE (See Figs. 13 & 14) WARNING: Snow throwers have exposed rotating parts, which can cause severe injury from contact, or from material thrown from the discharge chute. AUGER • Release the auger control lever to stop . Remove... recommend standard safety glasses or a wide vision safety mask worn over spectacles. HOW TO USE YOUR SNOW THROWER Know how to operate all moving parts to start the engine. TO USE FUEL SHUT-OFF VALVE (See Fig. 10) The fuel shut-off valve in foreign objects thrown into desired...
User Manual
Page 12
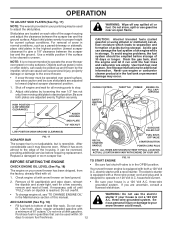
... and a recoil starter. If you are adjusted evenly. OPERATION TO ADJUST SKID PLATES (See Fig. 17) NOTE: The wrench provided in your parts bag may be cleared is uneven. Use a middle position if the surface to be used within 30 days to operate on your snow thrower has... fuel freshness. 12 WARNING: Do not use it can easily be picked up and thrown by loosening the rear 1/2" hex nut only, then moving parts to lowest (highest scraper clearance) position. 1. Tighten securely. CHOKE CONTROL THROTTLE PRIMER ENGINE OIL FILL CAP / DIPSTICK SAFETY IGNITION KEY AUGER HOUSING SKID...
... and a recoil starter. If you are adjusted evenly. OPERATION TO ADJUST SKID PLATES (See Fig. 17) NOTE: The wrench provided in your parts bag may be cleared is uneven. Use a middle position if the surface to be used within 30 days to operate on your snow thrower has... fuel freshness. 12 WARNING: Do not use it can easily be picked up and thrown by loosening the rear 1/2" hex nut only, then moving parts to lowest (highest scraper clearance) position. 1. Tighten securely. CHOKE CONTROL THROTTLE PRIMER ENGINE OIL FILL CAP / DIPSTICK SAFETY IGNITION KEY AUGER HOUSING SKID...
User Manual
Page 14
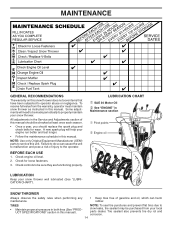
... tires (See "PRODUCT SPECIFICATIONS" section in this manual. Tire sealant also prevents tire dry rot and corrosion. 14 NOTE: Use only Original Equipment Manufacturer (OEM) parts to operator abuse or negligence. Check engine oil level. 2. LUBRICATION CHART ➀ SAE 30 Motor Oil ➁ See "ENGINE" in the Service and Adjustments section... cover items that have been subjected to service this unit. All adjustments in Maintenance section ➀ Pivot points ➁ Engine oil LUBRICATION Keep your local parts dealer.
... tires (See "PRODUCT SPECIFICATIONS" section in this manual. Tire sealant also prevents tire dry rot and corrosion. 14 NOTE: Use only Original Equipment Manufacturer (OEM) parts to operator abuse or negligence. Check engine oil level. 2. LUBRICATION CHART ➀ SAE 30 Motor Oil ➁ See "ENGINE" in the Service and Adjustments section... cover items that have been subjected to service this unit. All adjustments in Maintenance section ➀ Pivot points ➁ Engine oil LUBRICATION Keep your local parts dealer.
User Manual
Page 16
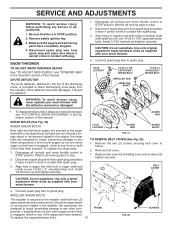
... position. CHUTE DEFLECTOR The chute deflector, attached to any service or adjustments: 1. Disengage all moving parts have sheared. Wait for all moving parts to stop . 2. SERVICE AND ADJUSTMENTS WARNING: To avoid serious injury, before performing any other com- Align ...holes in contact with your snow thrower. 4. Disengage all moving parts to stop . 2. Install 1/4-20 lock nut and tighten securely. Remove the two (2) screws securing belt cover to the impeller shaft with...
... position. CHUTE DEFLECTOR The chute deflector, attached to any service or adjustments: 1. Disengage all moving parts have sheared. Wait for all moving parts to stop . 2. SERVICE AND ADJUSTMENTS WARNING: To avoid serious injury, before performing any other com- Align ...holes in contact with your snow thrower. 4. Disengage all moving parts to stop . 2. Install 1/4-20 lock nut and tighten securely. Remove the two (2) screws securing belt cover to the impeller shaft with...
User Manual
Page 18
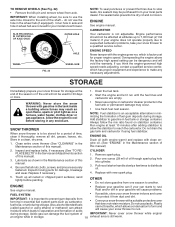
... adjustments. during storage. Engine performance should not be dangerous and will cause problems. FUEL SYSTEM • If possible, store your local parts dealer.Tire sealant also prevents tire dry rot and corrosion. If you think the engine-governed high speed needs adjusting, contact a quali&#... purchased from your snow thrower indoors and cover it to protect it thoroughly, remove all dirt, grease, leaves, etc. Inspect moving parts for proper engine speed. sand lightly before storing in fuel tank or storage container. Rust and/or dirt in minimizing the formation of...
... adjustments. during storage. Engine performance should not be dangerous and will cause problems. FUEL SYSTEM • If possible, store your local parts dealer.Tire sealant also prevents tire dry rot and corrosion. If you think the engine-governed high speed needs adjusting, contact a quali&#... purchased from your snow thrower indoors and cover it to protect it thoroughly, remove all dirt, grease, leaves, etc. Inspect moving parts for proper engine speed. sand lightly before storing in fuel tank or storage container. Rust and/or dirt in minimizing the formation of...
User Manual
Page 19
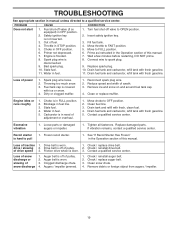
... gasoline. 5. Blockage in STOP position. 5. Move choke to FAST position. 5. Contact a qualified service center. Excessive vibration 1. Replace damaged parts. Check / replace drive belt. Loss of snow discharge or slowing of power 1. Clogged discharge chute. 4. Check / reinstall auger belt. 2. Throttle in... valve (if so equipped) in the Operation section of pulley. 2. Drain tank and refill with fresh, clean fuel. 4. Loose parts or damaged augers or impeller. 1. Auger belt is worn. 3. Clean fuel line. 3. drive / slowing 2. Remove debris or foreign object ...
... gasoline. 5. Blockage in STOP position. 5. Move choke to FAST position. 5. Contact a qualified service center. Excessive vibration 1. Replace damaged parts. Check / replace drive belt. Loss of snow discharge or slowing of power 1. Clogged discharge chute. 4. Check / reinstall auger belt. 2. Throttle in... valve (if so equipped) in the Operation section of pulley. 2. Drain tank and refill with fresh, clean fuel. 4. Loose parts or damaged augers or impeller. 1. Auger belt is worn. 3. Clean fuel line. 3. drive / slowing 2. Remove debris or foreign object ...
User Manual
Page 21
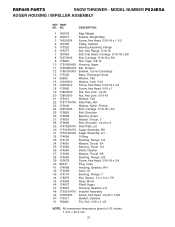
REPAIR PARTS SNOW THROWER - NO. inches 1 inch = 25.4 mm 21 DESCRIPTION 1 183578 Bag, Weight 2 183577 Bracket, Weight Bag 3 74520524 Screw, Hex Head 5/16-18 x 1-1/2 4 181083 Pulley, Impeller 5 ... Impeller Assembly 49 74780426 Screw, Hex Head 1/4-20 x 1-5/8 50 175311 Gasket, Gearbox 51 7836M Pin, Roll 3/16 x 1-1/8 NOTE: All component dimensions given in U.S. MODEL NUMBER P524ESA AUGER HOUSING / IMPELLER ASSEMBLY KEY PART NO.
REPAIR PARTS SNOW THROWER - NO. inches 1 inch = 25.4 mm 21 DESCRIPTION 1 183578 Bag, Weight 2 183577 Bracket, Weight Bag 3 74520524 Screw, Hex Head 5/16-18 x 1-1/2 4 181083 Pulley, Impeller 5 ... Impeller Assembly 49 74780426 Screw, Hex Head 1/4-20 x 1-5/8 50 175311 Gasket, Gearbox 51 7836M Pin, Roll 3/16 x 1-1/8 NOTE: All component dimensions given in U.S. MODEL NUMBER P524ESA AUGER HOUSING / IMPELLER ASSEMBLY KEY PART NO.
User Manual
Page 23
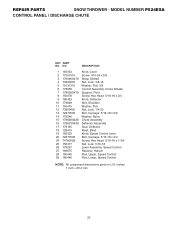
MODEL NUMBER P524ESA CONTROL PANEL / DISCHARGE CHUTE KEY PART NO. inches 1 inch = 25.4 mm 23 REPAIR PARTS SNOW THROWER - DESCRIPTION 1 183334 Knob, Lever 2 17501010 Screw #10-24 x 5/8 3 179096X479 Strap, Slotted 4 73800600 Nut, Lock 3/8-16 5 19131316 Washer, Flat 3/8 6 178659 Control Assembly, Chute Rotater 7 ...
MODEL NUMBER P524ESA CONTROL PANEL / DISCHARGE CHUTE KEY PART NO. inches 1 inch = 25.4 mm 23 REPAIR PARTS SNOW THROWER - DESCRIPTION 1 183334 Knob, Lever 2 17501010 Screw #10-24 x 5/8 3 179096X479 Strap, Slotted 4 73800600 Nut, Lock 3/8-16 5 19131316 Washer, Flat 3/8 6 178659 Control Assembly, Chute Rotater 7 ...

User Manual
Page 25
MODEL NUMBER P524ESA KEY PART NO. DESCRIPTION 1 178875X479 Lever, Auger Control, RH 2 178648X479 Lever, Traction Drive Control, LH 3 179439 Nut, Cage 1/4-20 4 178888 Bushing, Flange 5 169675 Retainer, Hairpin 6 180402 Screw, ... 68038 Nut, Lock 1/4-20 36 178831 Spring, Torsion 37 178658 Spring, Interlock NOTE: All component dimensions given in U.S. NO. inches 1 inch = 25.4 mm 25 REPAIR PARTS HANDLES SNOW THROWER -
MODEL NUMBER P524ESA KEY PART NO. DESCRIPTION 1 178875X479 Lever, Auger Control, RH 2 178648X479 Lever, Traction Drive Control, LH 3 179439 Nut, Cage 1/4-20 4 178888 Bushing, Flange 5 169675 Retainer, Hairpin 6 180402 Screw, ... 68038 Nut, Lock 1/4-20 36 178831 Spring, Torsion 37 178658 Spring, Interlock NOTE: All component dimensions given in U.S. NO. inches 1 inch = 25.4 mm 25 REPAIR PARTS HANDLES SNOW THROWER -
User Manual
Page 27
... SNOW THROWER - MODEL NUMBER P524ESA KEY PART NO. inches 1 inch = 25.4 mm 27 DESCRIPTION 1 150078 Screw, Hex Head 5/16-18 x 3/4 2 73800500 Nut, Lock 5/16-18 3 155415 Washer, Flat 4 17490508 Screw, Hex Head 5/...
... SNOW THROWER - MODEL NUMBER P524ESA KEY PART NO. inches 1 inch = 25.4 mm 27 DESCRIPTION 1 150078 Screw, Hex Head 5/16-18 x 3/4 2 73800500 Nut, Lock 5/16-18 3 155415 Washer, Flat 4 17490508 Screw, Hex Head 5/...

User Manual
Page 29
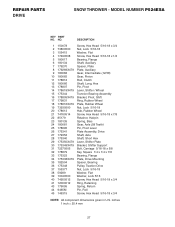
... 183852X428 50 178693X428 51 179068X008 52 57079 53 179062 54 12000010 55 700279 DESCRIPTION Spring, Traction Idler Pulley, Idler (2-1/4) Engine, Tecumseh, Model Number HSSK55 (Order parts from Engine manufacturer) Screw, Hex Head 5/16-18 x 1-1/4 Washer, Flat Nut, Jam, Lock 5/16-18 Pin, Idler Pivot V-Belt, Traction Drive Washer, Lock 5/16 Screw... Plate, Frame End Shaft, Auger Control Washer, Hardened Roller Ring, Retaining Clip, Retainer NOTE: All component dimensions given in U.S. inches. 1 inch = 25.4 mm 29 REPAIR PARTS SNOW THROWER - MODEL NUMBER P524ESA CHASSIS / ENGINE / PULLEYS KEY...
... 183852X428 50 178693X428 51 179068X008 52 57079 53 179062 54 12000010 55 700279 DESCRIPTION Spring, Traction Idler Pulley, Idler (2-1/4) Engine, Tecumseh, Model Number HSSK55 (Order parts from Engine manufacturer) Screw, Hex Head 5/16-18 x 1-1/4 Washer, Flat Nut, Jam, Lock 5/16-18 Pin, Idler Pivot V-Belt, Traction Drive Washer, Lock 5/16 Screw... Plate, Frame End Shaft, Auger Control Washer, Hardened Roller Ring, Retaining Clip, Retainer NOTE: All component dimensions given in U.S. inches. 1 inch = 25.4 mm 29 REPAIR PARTS SNOW THROWER - MODEL NUMBER P524ESA CHASSIS / ENGINE / PULLEYS KEY...

User Manual
Page 30
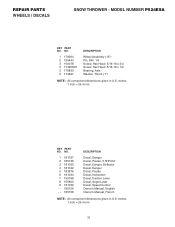
REPAIR PARTS WHEELS / DECALS SNOW THROWER - MODEL NUMBER P524ESA 2 1 4 5 6 4 1 3 2 5 3 1 2 4 1 3 9 8 6 5 10 7 30
REPAIR PARTS WHEELS / DECALS SNOW THROWER - MODEL NUMBER P524ESA 2 1 4 5 6 4 1 3 2 5 3 1 2 4 1 3 9 8 6 5 10 7 30
User Manual
Page 31
MODEL NUMBER P524ESA KEY PART NO. NO. 1 179264 2 155443 3 150078 4 17490508 5 179830 6 174697 DESCRIPTION Wheel Assembly (13") Pin, Klik 1/4 Screw, Hex Head 5/16-18 x 3/4 Screw, Hex Head 5/16-18 x 1/2 ...inch = 25.4 mm 31 NO. 1 181037 2 185126 3 181035 4 181042 5 183879 6 181033 7 155798 8 155800 9 181039 - - 185156 - - 185158 DESCRIPTION Decal, Danger Decal, Poulan, 5.5HP/24" Decal, Danger, Deflector Decal, Danger Decal, Poulan Decal, Instruction Decal, Traction Lever Decal, Auger Lever Decal, Speed Control Owner's Manual, English Owner's Manual, French NOTE: All component...
MODEL NUMBER P524ESA KEY PART NO. NO. 1 179264 2 155443 3 150078 4 17490508 5 179830 6 174697 DESCRIPTION Wheel Assembly (13") Pin, Klik 1/4 Screw, Hex Head 5/16-18 x 3/4 Screw, Hex Head 5/16-18 x 1/2 ...inch = 25.4 mm 31 NO. 1 181037 2 185126 3 181035 4 181042 5 183879 6 181033 7 155798 8 155800 9 181039 - - 185156 - - 185158 DESCRIPTION Decal, Danger Decal, Poulan, 5.5HP/24" Decal, Danger, Deflector Decal, Danger Decal, Poulan Decal, Instruction Decal, Traction Lever Decal, Auger Lever Decal, Speed Control Owner's Manual, English Owner's Manual, French NOTE: All component...

User Manual
Page 32
...consequential damages or limitations of the authorized dealer from defects in materials and workmanship. Transportation charges for any parts submitted for parts or labor incurred in replacing parts, any product which we will repair or replace, at our option, without charge for replacement under ...: Electrolux Canada Corp. 7075 Ordan Drive Mississauga, Ontario L5T 1K6 Electrolux Home Products, Inc. This Warranty does not apply to any part which has been subjected to alteration, misuse, abuse, improper assembly or installation, delivery damage, or to normal wear of the product....
...consequential damages or limitations of the authorized dealer from defects in materials and workmanship. Transportation charges for any parts submitted for parts or labor incurred in replacing parts, any product which we will repair or replace, at our option, without charge for replacement under ...: Electrolux Canada Corp. 7075 Ordan Drive Mississauga, Ontario L5T 1K6 Electrolux Home Products, Inc. This Warranty does not apply to any part which has been subjected to alteration, misuse, abuse, improper assembly or installation, delivery damage, or to normal wear of the product....


