
User Manual
Page 1
FILE COPY 4t, OWNER'S MANUAL MODEL NO. HDR500L. 5 HP 17 Inch Tiller • Assembly • Operation • Maintenance • Service and Adjustments • Storage • Troubleshooting • Repair Parts For Parts and Service, contact our authorized distributor: call 1-800-849-1297 For Technical Assistance: call 1-800-829-5886 n 184877 Rev. 1 02.21.03 TR PRINTED IN U.S.A.
FILE COPY 4t, OWNER'S MANUAL MODEL NO. HDR500L. 5 HP 17 Inch Tiller • Assembly • Operation • Maintenance • Service and Adjustments • Storage • Troubleshooting • Repair Parts For Parts and Service, contact our authorized distributor: call 1-800-849-1297 For Technical Assistance: call 1-800-829-5886 n 184877 Rev. 1 02.21.03 TR PRINTED IN U.S.A.
User Manual
Page 2
... abnormally, stop the engine (motor), remove the wire from the plug to cool before starting when setting up spilled fuel before restarting and operating the tiller. • Exercise caution to avoid slipping or falling. • If the unit should start to cause cancer, birth defects, or other bolts at high speeds on slippery surfaces. • Handle fuel with the controls and the proper use care when backing. •...
... abnormally, stop the engine (motor), remove the wire from the plug to cool before starting when setting up spilled fuel before restarting and operating the tiller. • Exercise caution to avoid slipping or falling. • If the unit should start to cause cancer, birth defects, or other bolts at high speeds on slippery surfaces. • Handle fuel with the controls and the proper use care when backing. •...
User Manual
Page 3
... this manual for part number. Should you experience any ). The instructions will enable you cannot easily remedy, please contact your Sears Authorized Service Center/Department for spark arrester. WARNING:This unit is used on federal lands. See your nearest authorized service center. Always observe the "SAFETY RULES". TABLE OF CONTENTS SAFETY RULES CUSTOMER RESPONSIBILITIES PRODUCT SPECIFICATIONS ASSEMBLY OPERATION MAINTENANCE SCHEDULE 2 MAINTENANCE 3 SERVICE & ADJUSTMENTS 3 STORAGE 4-6 TROUBLESHOOTING 7-11 REPAIR PARTS-TILLER 12 WARRANTY...
... this manual for part number. Should you experience any ). The instructions will enable you cannot easily remedy, please contact your Sears Authorized Service Center/Department for spark arrester. WARNING:This unit is used on federal lands. See your nearest authorized service center. Always observe the "SAFETY RULES". TABLE OF CONTENTS SAFETY RULES CUSTOMER RESPONSIBILITIES PRODUCT SPECIFICATIONS ASSEMBLY OPERATION MAINTENANCE SCHEDULE 2 MAINTENANCE 3 SERVICE & ADJUSTMENTS 3 STORAGE 4-6 TROUBLESHOOTING 7-11 REPAIR PARTS-TILLER 12 WARRANTY...

User Manual
Page 5
... handle lock (with some resistance. Slide handle assembly into position.) VIEWED FROM R.H. Be sure handle lock remains in gearcase notch. (Apply grease on top of carton. • Cut down . • Remove packing material from carton. side of tiller and loosely assemble locknut (See Fig. 5). • Insert pivot bolt in front part of plate and tighten. • Cut down .Insert rearcarriage bolt first, with bolt head on carriage bolt bolt so handle...
... handle lock (with some resistance. Slide handle assembly into position.) VIEWED FROM R.H. Be sure handle lock remains in gearcase notch. (Apply grease on top of carton. • Cut down . • Remove packing material from carton. side of tiller and loosely assemble locknut (See Fig. 5). • Insert pivot bolt in front part of plate and tighten. • Cut down .Insert rearcarriage bolt first, with bolt head on carriage bolt bolt so handle...

User Manual
Page 7
... OFF ellik FAST SLOW I ill CHOKE FUEL OIL RUN I STOP ( k) SHIFT LEVER THROTTLE CONTROL O O DRIVE CONTROL BAR DEPTH STAKE LEVELING SHIELD OUTER SIDE SHIELD CHOKE CONTROL SHIFT LEVER INDICATOR O 0 0 O V 0 0 I 0 RECOIL STARTER HANDLE FIG. 8 MEETS ANSI SAFETY REQUIREMENTS Our tillers conform to control engine speed. Used to protect small plants from being buried. RECOIL STARTER HANDLE - Used to shift transmission gears. SHIFT LEVER - Used to start the engine. Shows which tiller will dig. Controls depth at which gear the transmission is in literature supplied with...
... OFF ellik FAST SLOW I ill CHOKE FUEL OIL RUN I STOP ( k) SHIFT LEVER THROTTLE CONTROL O O DRIVE CONTROL BAR DEPTH STAKE LEVELING SHIELD OUTER SIDE SHIELD CHOKE CONTROL SHIFT LEVER INDICATOR O 0 0 O V 0 0 I 0 RECOIL STARTER HANDLE FIG. 8 MEETS ANSI SAFETY REQUIREMENTS Our tillers conform to control engine speed. Used to protect small plants from being buried. RECOIL STARTER HANDLE - Used to shift transmission gears. SHIFT LEVER - Used to start the engine. Shows which tiller will dig. Controls depth at which gear the transmission is in literature supplied with...
User Manual
Page 9
OPERATION TURNING Release the drive control bar. • Move throttle control to prevent oil leakage. Place shift lever in till position and move machine away from area of acids during storage. OIL LEVEL OIL FILLER PLUG OIL DRAIN PLUG OUTER SIDE SHIELDS (See Fig. 11) The back edges of ignition until the fuel lines and carburetor are empty. Do not mix oil with SAE 30 summer weight oil. • With engine level, clean area around , release the drive control bar and...
OPERATION TURNING Release the drive control bar. • Move throttle control to prevent oil leakage. Place shift lever in till position and move machine away from area of acids during storage. OIL LEVEL OIL FILLER PLUG OIL DRAIN PLUG OUTER SIDE SHIELDS (See Fig. 11) The back edges of ignition until the fuel lines and carburetor are empty. Do not mix oil with SAE 30 summer weight oil. • With engine level, clean area around , release the drive control bar and...
User Manual
Page 10
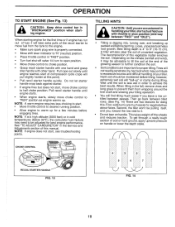
... handling your tiller,start of the recoil starter to choke position. • Grasp recoil starter handle with one hand and grasp tiller handle with throttle in the Service and Adjustments section of this point). • Pull recoil starter handle quickly. See "TO ADJUST CARBURETOR" in slow position (mid-way between "FAST" and "IDLE"). • Tilling is properly connected. • Move shift lever indicator to "N" (neutral) position. • Place throttle control in order to "RUN" position as engine...
... handling your tiller,start of the recoil starter to choke position. • Grasp recoil starter handle with one hand and grasp tiller handle with throttle in the Service and Adjustments section of this point). • Pull recoil starter handle quickly. See "TO ADJUST CARBURETOR" in slow position (mid-way between "FAST" and "IDLE"). • Tilling is properly connected. • Move shift lever indicator to "N" (neutral) position. • Place throttle control in order to "RUN" position as engine...

User Manual
Page 11
.... OPERATION TINE SHEAR PINS The tine assemblies on your tiller are designed to break before internal damage occurs to the transmission. • If shear pin(s) break, replace only with those shown in the Service and Adjustments section of this manual. Lower the outer side shields to protect small plants from being buried. • Cultivate up with shear pins (See "TINE REPLACEMENT" in the Repair Parts section of weeds...
.... OPERATION TINE SHEAR PINS The tine assemblies on your tiller are designed to break before internal damage occurs to the transmission. • If shear pin(s) break, replace only with those shown in the Service and Adjustments section of this manual. Lower the outer side shields to protect small plants from being buried. • Cultivate up with shear pins (See "TINE REPLACEMENT" in the Repair Parts section of weeds...
User Manual
Page 12
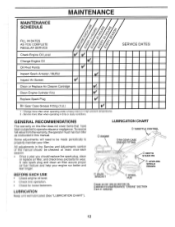
A.. .a co co Qd OJQho OJ O, o co .14,o -1.cii .-',.. MAINTENANCE MAINTENANCE SCHEDULE FILL IN DATES AS YOU COMPLETE REGULAR SERVICE 4O .
A.. .a co co Qd OJQho OJ O, o co .14,o -1.cii .-',.. MAINTENANCE MAINTENANCE SCHEDULE FILL IN DATES AS YOU COMPLETE REGULAR SERVICE 4O .
User Manual
Page 13
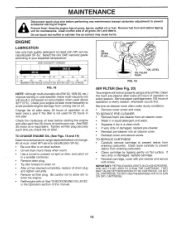
... starting in the Operation section of all grass, dirt, and debris. ENGINE LUBRICATION Use only high quality detergent oil rated with screw. Check the crankcase oil level before starting of engine. IMPORTANT: PETROLEUM SOLVENTS, SUCH AS KEROSENE, ARE NOT TO BE USED TO CLEAN THE CARTRIDGE. Clean muffler area of this manual. DO NOT USE PRESSURIZED AIR TO CLEAN OR DRY CARTRIDGE. 13 MAINTENANCE Disconnect spark plug wire before performing any maintenance (except carburetor adjustment) to prevent accidental starting the engine...
... starting in the Operation section of all grass, dirt, and debris. ENGINE LUBRICATION Use only high quality detergent oil rated with screw. Check the crankcase oil level before starting of engine. IMPORTANT: PETROLEUM SOLVENTS, SUCH AS KEROSENE, ARE NOT TO BE USED TO CLEAN THE CARTRIDGE. Clean muffler area of this manual. DO NOT USE PRESSURIZED AIR TO CLEAN OR DRY CARTRIDGE. 13 MAINTENANCE Disconnect spark plug wire before performing any maintenance (except carburetor adjustment) to prevent accidental starting the engine...

User Manual
Page 14
... the transmission and the engine muffler, air filter and carburetor are hot. of all foreign mat- ter. • Keep finished surfaces and wheels free of all gasoline, oil, etc. • Protect painted surfaces with a spark arrester screen assembly, remove every 50 hours for cleaning and inspection. Spark plug type and gap setting is shown in engine will shorten the useful life of this manual. Water in "PRODUCT SPECIFICATIONS" on page 3 of your engine is air...
... the transmission and the engine muffler, air filter and carburetor are hot. of all foreign mat- ter. • Keep finished surfaces and wheels free of all gasoline, oil, etc. • Protect painted surfaces with a spark arrester screen assembly, remove every 50 hours for cleaning and inspection. Spark plug type and gap setting is shown in engine will shorten the useful life of this manual. Water in "PRODUCT SPECIFICATIONS" on page 3 of your engine is air...

User Manual
Page 15
... tiller digs into contact with plug. Handle height will pull to keep tiller from tipping. • Remove hairpin clip and clevis pin from spark plug and place wire where it cannot come into soil. • First loosen handle lock lever. • Handle can cause an explosion. • Maintain 20 PSI (1.4 kg/cm2) of gasoline or oil which can damage rubber. SERVICE AND ADJUSTMENTS A CAUTION: Disconnect spark plug wire from wheel. • Remove wheel...
... tiller digs into contact with plug. Handle height will pull to keep tiller from tipping. • Remove hairpin clip and clevis pin from spark plug and place wire where it cannot come into soil. • First loosen handle lock lever. • Handle can cause an explosion. • Maintain 20 PSI (1.4 kg/cm2) of gasoline or oil which can damage rubber. SERVICE AND ADJUSTMENTS A CAUTION: Disconnect spark plug wire from wheel. • Remove wheel...

User Manual
Page 17
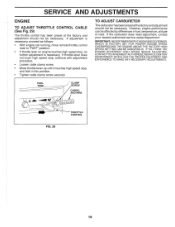
... DRIVE BELT ADJUSTMENT (See Fig. 28) For proper belt tension, the extension spring should have about 1 inch (2.5 cm). • Remove two (2) screws from side of belt guard. • Remove hex nut and washer from bottom of belt guard (located behind wheel). • Pull belt guard out and away from transmission pulley. • Place new belt in "ENGAGED" position. Pull wheel out from tiller about 5/8 inch (16 mm) stretch when drive control bar is engaged. ENGINE PULLEY CABLE CLIP SCREW DRIVE CONTROL CABLE Cf O 0 IDLER PULLEY 011.11111. SERVICE AND ADJUSTMENTS TO REMOVE BELT GUARD...
... DRIVE BELT ADJUSTMENT (See Fig. 28) For proper belt tension, the extension spring should have about 1 inch (2.5 cm). • Remove two (2) screws from side of belt guard. • Remove hex nut and washer from bottom of belt guard (located behind wheel). • Pull belt guard out and away from transmission pulley. • Place new belt in "ENGAGED" position. Pull wheel out from tiller about 5/8 inch (16 mm) stretch when drive control bar is engaged. ENGINE PULLEY CABLE CLIP SCREW DRIVE CONTROL CABLE Cf O 0 IDLER PULLEY 011.11111. SERVICE AND ADJUSTMENTS TO REMOVE BELT GUARD...
User Manual
Page 18
... ADJUSTMENTS. OVERSPEEDING THE ENGINE ABOVE THE FACTORY HIGH SPEED SETTING CAN BE DANGEROUS. If adjustment is necessary, proceed as follows: • With engine not running, move remote throttle control lever to "FAST" position. • If throttle lever on engine touches high speed stop , and hold in fuel, temperature, altitude or load. If the carburetor does need adjustment, contact your nearest authorized service center/department IMPORTANT: NEVERTAMPERWITHTHEENGINEGOVERNOR, WHICH IS FACTORY SET FOR PROPER ENGINE SPEED. TO ADJUST CARBURETOR...
... ADJUSTMENTS. OVERSPEEDING THE ENGINE ABOVE THE FACTORY HIGH SPEED SETTING CAN BE DANGEROUS. If adjustment is necessary, proceed as follows: • With engine not running, move remote throttle control lever to "FAST" position. • If throttle lever on engine touches high speed stop , and hold in fuel, temperature, altitude or load. If the carburetor does need adjustment, contact your nearest authorized service center/department IMPORTANT: NEVERTAMPERWITHTHEENGINEGOVERNOR, WHICH IS FACTORY SET FOR PROPER ENGINE SPEED. TO ADJUST CARBURETOR...
User Manual
Page 19
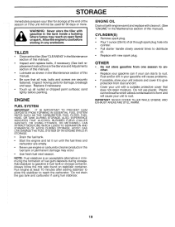
... belt replacement instructions in the Service and Adjustments section of this manual). ENGINE FUEL SYSTEM IMPORTANT: IT IS IMPORTANT TO PREVENT GUM DEPOSITS FROM FORMING IN ESSENTIAL FUEL SYSTEM PARTS SUCH AS THE CARBURETOR, FUEL FILTER, FUEL HOSE, OR TANK DURING STORAGE. Do not drain the gas tank and carburetor if using fuel stabilizer. CYLINDER(S) • Remove spark plug. • Pour 1 ounce (29 ml) of oil through spark plug hole into cylinder. • Pull starter handle slowly several times to distribute oil...
... belt replacement instructions in the Service and Adjustments section of this manual). ENGINE FUEL SYSTEM IMPORTANT: IT IS IMPORTANT TO PREVENT GUM DEPOSITS FROM FORMING IN ESSENTIAL FUEL SYSTEM PARTS SUCH AS THE CARBURETOR, FUEL FILTER, FUEL HOSE, OR TANK DURING STORAGE. Do not drain the gas tank and carburetor if using fuel stabilizer. CYLINDER(S) • Remove spark plug. • Pour 1 ounce (29 ml) of oil through spark plug hole into cylinder. • Pull starter handle slowly several times to distribute oil...
User Manual
Page 20
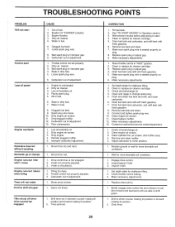
... drive control bar engaged 1. Check oil level/change oil. 4. Make necessary adjustments. 13. Set depth stake for shallower tilling. 2. Poor compression. 1. Drain fuel tank and refill with fresh gasoline. 6. Oil in Operation section. 3. Dirty engine air screen. 11. Partially plugged muffler. 5. Remove fuel tank and clean. 9. Clear tines. 20 TROUBLESHOOTING POINTS PROBLEM Will not start Hard to start . 4. Drain fuel tank and carburetor, and refill tank with fresh gasoline. 5. Throttle control not set in fuel. 8. Make necessary adjustments. 1. Shear...
... drive control bar engaged 1. Check oil level/change oil. 4. Make necessary adjustments. 13. Set depth stake for shallower tilling. 2. Poor compression. 1. Drain fuel tank and refill with fresh gasoline. 6. Oil in Operation section. 3. Dirty engine air screen. 11. Partially plugged muffler. 5. Remove fuel tank and clean. 9. Clear tines. 20 TROUBLESHOOTING POINTS PROBLEM Will not start Hard to start . 4. Drain fuel tank and carburetor, and refill tank with fresh gasoline. 5. Throttle control not set in fuel. 8. Make necessary adjustments. 1. Shear...

User Manual
Page 21
.... NO. 1 180634 2 150744 4 159227 8 71191008 10 8389J 11 4497H 15 108281X 16 72110608 17 109229X 18 73680600 19 19131611 20 109228X 21 150217 DESCRIPTION Control, Throttle Grip, Handle Bar, Control Screw, Pan Hd. #10-24 Grip, Handle Clip, Hairpin Rod, Shift Bolt, Carriage 3/8-16 x 1 Gr. 5 Lock, Handle Nut Crownlock 3/8-16 UNC Washer 13/32 x 1 x 11 Ga. NO. REPAIR PARTS TILLER - - Lever, Lock, Handle Handle 7 20 19 18 31 KEY...
.... NO. 1 180634 2 150744 4 159227 8 71191008 10 8389J 11 4497H 15 108281X 16 72110608 17 109229X 18 73680600 19 19131611 20 109228X 21 150217 DESCRIPTION Control, Throttle Grip, Handle Bar, Control Screw, Pan Hd. #10-24 Grip, Handle Clip, Hairpin Rod, Shift Bolt, Carriage 3/8-16 x 1 Gr. 5 Lock, Handle Nut Crownlock 3/8-16 UNC Washer 13/32 x 1 x 11 Ga. NO. REPAIR PARTS TILLER - - Lever, Lock, Handle Handle 7 20 19 18 31 KEY...
User Manual
Page 22
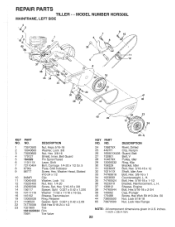
... 2 10040600 Washer, Lock 3/8 3 73220600 Nut, Hex 3/8-16 4 170127 Shield, Inner, Belt Guard 5 164329 Pin Spiro! NO. MODEL NUMBER HDR500L MAINFRAME, LEFT SIDE 3 •t3( .. inches. 1 inch = 25.4 mm 22 REPAIR PARTS TILLER - - Flared 6 110111X Lever, Shift 7 72110404 Bolt, Carriage 1/4-20 x 1/2 Gr. 5 8 8700J Plate, Shift Indicator 9 86777 Screw, Hex, Washer Head, Slotted #10-24 x 1/2 10 9484R Clip 11 10040400 Washer, Lock 1/4 12 73220400 Nut, Hex 1/4-20 13 23230506 Screw, Set, Hex 5/16...
... 2 10040600 Washer, Lock 3/8 3 73220600 Nut, Hex 3/8-16 4 170127 Shield, Inner, Belt Guard 5 164329 Pin Spiro! NO. MODEL NUMBER HDR500L MAINFRAME, LEFT SIDE 3 •t3( .. inches. 1 inch = 25.4 mm 22 REPAIR PARTS TILLER - - Flared 6 110111X Lever, Shift 7 72110404 Bolt, Carriage 1/4-20 x 1/2 Gr. 5 8 8700J Plate, Shift Indicator 9 86777 Screw, Hex, Washer Head, Slotted #10-24 x 1/2 10 9484R Clip 11 10040400 Washer, Lock 1/4 12 73220400 Nut, Hex 1/4-20 13 23230506 Screw, Set, Hex 5/16...

User Manual
Page 24
... 17720408 Screw 1/4-20 x 1/2 Gear, Reverse Idler 52 73220500 Nut, Hex 5/16-18 Bearing, Needle 53 165140 Kit, Bearing, Tine Shaft Shaft, Reverse Idler 58 179520 Bolt Shoulder 1/4-20 Unc x .875 Washer, Lock 7/16 60 6855M Fitting Grease Nut, Hex 7/16-20 -- 6066J Grease, Plastilube #1 Bearing, Shaft, Ground Drive Spacer 0.765 x 1.125 x 1.23 NOTE: All component dimensions given in U.S. NO. DESCRIPTION Transmission Assembly (Includes 29 102134X Chain...
... 17720408 Screw 1/4-20 x 1/2 Gear, Reverse Idler 52 73220500 Nut, Hex 5/16-18 Bearing, Needle 53 165140 Kit, Bearing, Tine Shaft Shaft, Reverse Idler 58 179520 Bolt Shoulder 1/4-20 Unc x .875 Washer, Lock 7/16 60 6855M Fitting Grease Nut, Hex 7/16-20 -- 6066J Grease, Plastilube #1 Bearing, Shaft, Ground Drive Spacer 0.765 x 1.125 x 1.23 NOTE: All component dimensions given in U.S. NO. DESCRIPTION Transmission Assembly (Includes 29 102134X Chain...
User Manual
Page 28
... properly assembled, adjusted, operated, and maintained in the Magnuson-Moss Act of the product. 5. This Warranty applies only to products which we will repair or replace, at our option, without charge for any product which vary from this Warranty, you have any power equipment unit or attachment are belts, tines, tine adapters, normal wear, normal adjustments, standard hardware and normal maintenance. 6. Poulan For...
... properly assembled, adjusted, operated, and maintained in the Magnuson-Moss Act of the product. 5. This Warranty applies only to products which we will repair or replace, at our option, without charge for any product which vary from this Warranty, you have any power equipment unit or attachment are belts, tines, tine adapters, normal wear, normal adjustments, standard hardware and normal maintenance. 6. Poulan For...


