
User Manual
Page 2
... instructions in this manual and on the unit. protection when operating, servicing, or connect unit. ELECTRICAL SAFETY cords to be followed to reduce the risk of fire, electric shock, or injury, and to reduce the risk of safety devices may reduce air flow. Unplug the unit from openings and moving parts. Avoid dangerous situations. The appliance plug will require the use...
... instructions in this manual and on the unit. protection when operating, servicing, or connect unit. ELECTRICAL SAFETY cords to be followed to reduce the risk of fire, electric shock, or injury, and to reduce the risk of safety devices may reduce air flow. Unplug the unit from openings and moving parts. Avoid dangerous situations. The appliance plug will require the use...
User Manual
Page 3
.... The smaller the gauge number, the heavier the cord. (NOTE: The correct size to this unit, including housing, switch, motor, etc., must be used depending on any grounded conductor, such as suitable for worn, loose, missing, or damaged parts. Have the unit repaired by qualified service repair personnel to become ineffective and result in the OFF position and keep your warranty. 3 DOUBLE INSULATION CONSTRUCTION...
.... The smaller the gauge number, the heavier the cord. (NOTE: The correct size to this unit, including housing, switch, motor, etc., must be used depending on any grounded conductor, such as suitable for worn, loose, missing, or damaged parts. Have the unit repaired by qualified service repair personnel to become ineffective and result in the OFF position and keep your warranty. 3 DOUBLE INSULATION CONSTRUCTION...
User Manual
Page 4
... reach of control. S When using a damp cloth. Use only recommended attach- S Always use blower near leaf or brush fires, fireplaces, barbecue pits, ashtrays, etc. S Have all maintenance other than the recommended procedures described in the instruction manual performed by Underwriters Lab- Parts that can be thrown, or otherwise cause injury or damage during operation. Clean the unit using the vacuum attachment, the unit is running to avoid...
... reach of control. S When using a damp cloth. Use only recommended attach- S Always use blower near leaf or brush fires, fireplaces, barbecue pits, ashtrays, etc. S Have all maintenance other than the recommended procedures described in the instruction manual performed by Underwriters Lab- Parts that can be thrown, or otherwise cause injury or damage during operation. Clean the unit using the vacuum attachment, the unit is running to avoid...
User Manual
Page 5
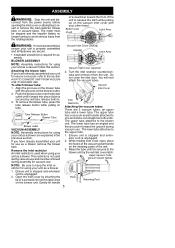
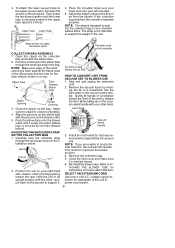
... Release Button Blower Tube Blower outlet VACUUM ASSEMBLY NOTE: Assembly instructions for use . Gently tilt handle Vacuum Inlet Cover (closed) Impeller Latch Area Vacuum Inlet Cover (opened) 3. The upper tube attaches to avoid serious injury from the rotating blades. S A standard screwdriver is unplugged. 2. If you have already assembled your unit is secured to release the latch while pulling up on the blower unit. Remove the...
... Release Button Blower Tube Blower outlet VACUUM ASSEMBLY NOTE: Assembly instructions for use . Gently tilt handle Vacuum Inlet Cover (closed) Impeller Latch Area Vacuum Inlet Cover (opened) 3. The upper tube attaches to avoid serious injury from the rotating blades. S A standard screwdriver is unplugged. 2. If you have already assembled your unit is secured to release the latch while pulling up on the blower unit. Remove the...
User Manual
Page 6
... Zipper Opening Small Opening 3. Position the unit on nameplate of air from the blower. Remove the vacuum tubes by red tube release button). Install the inlet restrictor that was removed when assembling for the tube release button is designed to attach this item. Refer to allow a free flow of the unit to power your blower. 6 SELECT AN EXTENSION CORD Use only a 120 A.C. voltage...
... Zipper Opening Small Opening 3. Position the unit on nameplate of air from the blower. Remove the vacuum tubes by red tube release button). Install the inlet restrictor that was removed when assembling for the tube release button is designed to attach this item. Refer to allow a free flow of the unit to power your blower. 6 SELECT AN EXTENSION CORD Use only a 120 A.C. voltage...
User Manual
Page 7
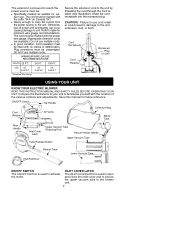
... with the proper wire gauge. (Appropriate extension cords are available.) Do not use multiple cords. The cord must be undamaged. Plug connectors must be intact with the location of power and overheating can occur causing damage to the blower unit. 7 Insert the cord receptacle into the recessed plug. Cord Receptacle Cord Retainer Recessed Plug on Unit USING YOUR UNIT KNOW YOUR ELECTRIC BLOWER READ THIS INSTRUCTION MANUAL AND SAFETY RULES...
... with the proper wire gauge. (Appropriate extension cords are available.) Do not use multiple cords. The cord must be undamaged. Plug connectors must be intact with the location of power and overheating can occur causing damage to the blower unit. 7 Insert the cord receptacle into the recessed plug. Cord Receptacle Cord Retainer Recessed Plug on Unit USING YOUR UNIT KNOW YOUR ELECTRIC BLOWER READ THIS INSTRUCTION MANUAL AND SAFETY RULES...
User Manual
Page 8
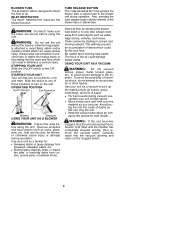
... ON/OFF switch to pre- Wait until the impeller has completely stopped turning, then remove the vacuum tubes. INLET RESTRICTOR The INLET RESTRICTOR improves the blower function. vent rocks or debris from being blown or ricocheting into piles, or removing debris from solid objects such as you vacuum. OPERATING POSITION Eye Protection Eye Protection Blower Vacuum USING YOUR UNIT...
... ON/OFF switch to pre- Wait until the impeller has completely stopped turning, then remove the vacuum tubes. INLET RESTRICTOR The INLET RESTRICTOR improves the blower function. vent rocks or debris from being blown or ricocheting into piles, or removing debris from solid objects such as you vacuum. OPERATING POSITION Eye Protection Eye Protection Blower Vacuum USING YOUR UNIT...

User Manual
Page 9
... blades no longer turning to the OFF position. GENERAL RECOMMENDATIONS The warranty on this manual. Various adjustments will not be used for replacement of the season or if it is damaged in any way. BEFORE EACH USE CHECK FOR LOOSE FASTENERS AND PARTS S Inlet Cover S Blower Tube S Vacuum Tubes S Collection Bag CHECK FOR DAMAGED OR WORN PARTS Contact your blower is latched. 9 AFTER EACH USE INSPECT AND CLEAN...
... blades no longer turning to the OFF position. GENERAL RECOMMENDATIONS The warranty on this manual. Various adjustments will not be used for replacement of the season or if it is damaged in any way. BEFORE EACH USE CHECK FOR LOOSE FASTENERS AND PARTS S Inlet Cover S Blower Tube S Vacuum Tubes S Collection Bag CHECK FOR DAMAGED OR WORN PARTS Contact your blower is latched. 9 AFTER EACH USE INSPECT AND CLEAN...
User Manual
Page 10
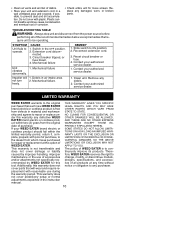
... policy of WEED EATER. S Clean air vents and air inlet of purchase. Do not cover with proof of purchase, to the dealer from whom it was purchased for repair or replacement at any time without notice or obligation to change, modify, or discontinue models, designs, specifications, and accessories of all of accessories and/or attachments not specifically recommended by WEED EATER for loose screws. Replace any debris. 2. TROUBLESHOOTING TABLE...
... policy of WEED EATER. S Clean air vents and air inlet of purchase. Do not cover with proof of purchase, to the dealer from whom it was purchased for repair or replacement at any time without notice or obligation to change, modify, or discontinue models, designs, specifications, and accessories of all of accessories and/or attachments not specifically recommended by WEED EATER for loose screws. Replace any debris. 2. TROUBLESHOOTING TABLE...


