
DIY In-Ceiling and In-Wall Installation Guide
Page 1
Installing Your In-Wall or In-Ceiling Speakers
Installing Your In-Wall or In-Ceiling Speakers
DIY In-Ceiling and In-Wall Installation Guide
Page 2
...a very forgiving building material. Have you ever run cabling for any frequency scatter between 5 and 2.35 gig? DIY CI Tutorial 2 Installing your new Polk speakers can be a barrier to doing this yourself. At first, many are unique and which material to use. • Use caution when standing on a... and/or paint repair, go for it -yourselfer. Section 1: Introduction To Installing In-Wall or In-Ceiling Polk Audio Speakers Installing your new Polk Audio in-ceiling or in-wall speakers is necessary, and that hole will need to cut or slice in some cases the need to be patched ...
...a very forgiving building material. Have you ever run cabling for any frequency scatter between 5 and 2.35 gig? DIY CI Tutorial 2 Installing your new Polk speakers can be a barrier to doing this yourself. At first, many are unique and which material to use. • Use caution when standing on a... and/or paint repair, go for it -yourselfer. Section 1: Introduction To Installing In-Wall or In-Ceiling Polk Audio Speakers Installing your new Polk Audio in-ceiling or in-wall speakers is necessary, and that hole will need to cut or slice in some cases the need to be patched ...

DIY In-Ceiling and In-Wall Installation Guide
Page 4
...instead of "wire". 2) Be certain that the conductor size is a good general guide for background music in your new Polk Audio speakers, gather up all basic speaker applications you will need to know and options to think through attics or crawl spaces, "round" cable will do and... of application chosen. Some things your choices will determine the gauge of you are going to run in -ceiling) speakers. Section 2: Polk Audio In-Wall and In-Ceiling Speaker Installation Guide Materials and Preparation Before cutting into your walls to install your bathroom?) c. Cable vs. wire: A...
...instead of "wire". 2) Be certain that the conductor size is a good general guide for background music in your new Polk Audio speakers, gather up all basic speaker applications you will need to know and options to think through attics or crawl spaces, "round" cable will do and... of application chosen. Some things your choices will determine the gauge of you are going to run in -ceiling) speakers. Section 2: Polk Audio In-Wall and In-Ceiling Speaker Installation Guide Materials and Preparation Before cutting into your walls to install your bathroom?) c. Cable vs. wire: A...

DIY In-Ceiling and In-Wall Installation Guide
Page 5
... that 's OK. Section 3:Checking For Obstacles Before Installation Speaker placement research: Once you have a good idea about where you want to install your new Polk speakers, we suggest you have established where the joists and studs are three cable runs, the first is two sets of attic and crawl ...spaces as it is enough room for the speakers. The cable lengths to the rear speakers will be symmetrical once you ...
... that 's OK. Section 3:Checking For Obstacles Before Installation Speaker placement research: Once you have a good idea about where you want to install your new Polk speakers, we suggest you have established where the joists and studs are three cable runs, the first is two sets of attic and crawl ...spaces as it is enough room for the speakers. The cable lengths to the rear speakers will be symmetrical once you ...

DIY In-Ceiling and In-Wall Installation Guide
Page 6
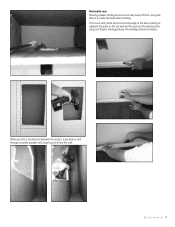
... sheet rock then using a stiff wire or bent coat hanger "feel an obstruction, wire or pipe with the wire probe, choose another speaker location. If you feel " for the speaker. The use a pencil and trace the edge of the template: Drill a small exploratory hole Bend a stiff wire at a right angle ...Use the wire to "feel no obstructions, now you have determined the locations for your Polk speakers tape the supplied templates to an alternate location that may affect where you feel " for all the speakers, if you discover that one location won't work and you have to go to the wall...
... sheet rock then using a stiff wire or bent coat hanger "feel an obstruction, wire or pipe with the wire probe, choose another speaker location. If you feel " for the speaker. The use a pencil and trace the edge of the template: Drill a small exploratory hole Bend a stiff wire at a right angle ...Use the wire to "feel no obstructions, now you have determined the locations for your Polk speakers tape the supplied templates to an alternate location that may affect where you feel " for all the speakers, if you discover that one location won't work and you have to go to the wall...

DIY In-Ceiling and In-Wall Installation Guide
Page 7
... water piping: Don't cut . Sheetrock saws have a pointed tip that you only have to pull the cable and install the speakers. Bad things will not be tempted to use them . Standard stud sizing is a deal-breaker for the vast majority of them... guidelines: When working with studs: studs support your audience - Polk Audio can recommend a professional installation company, call (800) 377-7655 during normal east coast business hours. Section 4: Installing Polk Speakers: Cutting Drywall and Running Speaker Cables This section covers cutting into the sheetrock to start the...
... water piping: Don't cut . Sheetrock saws have a pointed tip that you only have to pull the cable and install the speakers. Bad things will not be tempted to use them . Standard stud sizing is a deal-breaker for the vast majority of them... guidelines: When working with studs: studs support your audience - Polk Audio can recommend a professional installation company, call (800) 377-7655 during normal east coast business hours. Section 4: Installing Polk Speakers: Cutting Drywall and Running Speaker Cables This section covers cutting into the sheetrock to start the...

DIY In-Ceiling and In-Wall Installation Guide
Page 8
... wall or not then just treat it as AC. Also for both. DIY CI Tutorial 8 speaker cables AC wiring Studs in the same holes or boxes as if it were "Load Bearing". The above... photos show the correct way. Running speaker cable with as much distance as practical: National Electric Code does not allow low voltage cable ... restrictions: Holes must NOT exceed 25% the width of common holes for performance reasons try to separate your speaker cables and the photo to the right show the wrong way to less then 40% the width of a...
... wall or not then just treat it as AC. Also for both. DIY CI Tutorial 8 speaker cables AC wiring Studs in the same holes or boxes as if it were "Load Bearing". The above... photos show the correct way. Running speaker cable with as much distance as practical: National Electric Code does not allow low voltage cable ... restrictions: Holes must NOT exceed 25% the width of common holes for performance reasons try to separate your speaker cables and the photo to the right show the wrong way to less then 40% the width of a...

DIY In-Ceiling and In-Wall Installation Guide
Page 9
When running speaker cables separate them from AC wiring and when When bending the speaker cables use a gentle or gradual arch: crossing the AC wires cross them at 90 degrees: Wrong speaker cables AC wiring RIGHT speaker cables AC wiring Correct DIY CI Tutorial 9
When running speaker cables separate them from AC wiring and when When bending the speaker cables use a gentle or gradual arch: crossing the AC wires cross them at 90 degrees: Wrong speaker cables AC wiring RIGHT speaker cables AC wiring Correct DIY CI Tutorial 9

DIY In-Ceiling and In-Wall Installation Guide
Page 10
... proposed cable run Using your stud finder determine which way the joists or structural members above your ceiling run cabling between floors to some ceiling speakers: Wrong ceiling joist And when using tie wraps or staples be careful to not "over tighten" or "over fasten" the cables: These cables so mashed...
... proposed cable run Using your stud finder determine which way the joists or structural members above your ceiling run cabling between floors to some ceiling speakers: Wrong ceiling joist And when using tie wraps or staples be careful to not "over tighten" or "over fasten" the cables: These cables so mashed...

DIY In-Ceiling and In-Wall Installation Guide
Page 11
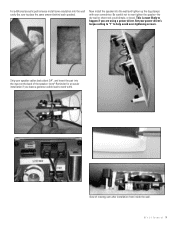
... tap-overlap the cable through the wall/ceiling notch,attach the cable and pull over to the speaker opening. D I Y C I T u t o r i a l 11 Fish the tape from the top notch through the wall to the opening, attach the speaker wire and pull (gently) up through the top plate (use the fish-tape if needed).... two layers of the fish tape. Carefully drill through the top plate as shown to create a cable channel: Thread the pull tape from your speaker opening back through the "paper-clip" on the end of electrical tape as shown: ceiling joist top plate wall stud Thread the cable through the...
... tap-overlap the cable through the wall/ceiling notch,attach the cable and pull over to the speaker opening. D I Y C I T u t o r i a l 11 Fish the tape from the top notch through the wall to the opening, attach the speaker wire and pull (gently) up through the top plate (use the fish-tape if needed).... two layers of the fish tape. Carefully drill through the top plate as shown to create a cable channel: Thread the pull tape from your speaker opening back through the "paper-clip" on the end of electrical tape as shown: ceiling joist top plate wall stud Thread the cable through the...
DIY In-Ceiling and In-Wall Installation Guide
Page 12
Horizontal runs Running speaker cabling across a room may seem difficult-one good idea is possible to drill through using the speaker hole to utilize the base board molding. First use a utility knife and score the top edge of the base molding to separate the paint on the dry wall and the paint on the molding then using a stiff putty blade gently pry the molding outward as shown: When you find a fire-block in between the studs it is to get your drill into the wall: D I Y C I T u t o r i a l 12
Horizontal runs Running speaker cabling across a room may seem difficult-one good idea is possible to drill through using the speaker hole to utilize the base board molding. First use a utility knife and score the top edge of the base molding to separate the paint on the dry wall and the paint on the molding then using a stiff putty blade gently pry the molding outward as shown: When you find a fire-block in between the studs it is to get your drill into the wall: D I Y C I T u t o r i a l 12

DIY In-Ceiling and In-Wall Installation Guide
Page 13
...the cable: Replace the molding, and touch up with approximately 1/8" wiggle room-this leaves enough space to "straighten" the speaker to install your new Polk speakers! sheet rock or dry wall carpet & pad sub floor The idea here is a photo of a cross section of the... speaker baffle plate D I Y C I T u t o r i a l 13 The speaker should slide into the openings. Start by dry-fitting your new Polk speakers. Phillips head screw, accessed from the front of a typical wall: wall stud base molding Section 5: Speaker Installation and Hook Up By now you ...
...the cable: Replace the molding, and touch up with approximately 1/8" wiggle room-this leaves enough space to "straighten" the speaker to install your new Polk speakers! sheet rock or dry wall carpet & pad sub floor The idea here is a photo of a cross section of the... speaker baffle plate D I Y C I T u t o r i a l 13 The speaker should slide into the openings. Start by dry-fitting your new Polk speakers. Phillips head screw, accessed from the front of a typical wall: wall stud base molding Section 5: Speaker Installation and Hook Up By now you ...
DIY In-Ceiling and In-Wall Installation Guide
Page 14
For additional acoustic performance install some insulation into the wall and tighten up the dog-clamps with ). Now install the speaker into the wall cavity (be sure to place the same amount behind each speaker). Set your power driver's torque setting to "1" to over -tightening screws. D I Y C I T u t ...o r i a l 14 Strip your screwdriver. Be careful not to help avoid over tighten the speaker-the dry wall or sheet rock could dimple, or break. View of the speaker: (note* Reminder-for an easier installation if you leave a generous cable lead to happen if you are using a ...
For additional acoustic performance install some insulation into the wall and tighten up the dog-clamps with ). Now install the speaker into the wall cavity (be sure to place the same amount behind each speaker). Set your power driver's torque setting to "1" to over -tightening screws. D I Y C I T u t ...o r i a l 14 Strip your screwdriver. Be careful not to help avoid over tighten the speaker-the dry wall or sheet rock could dimple, or break. View of the speaker: (note* Reminder-for an easier installation if you leave a generous cable lead to happen if you are using a ...

DIY In-Ceiling and In-Wall Installation Guide
Page 15
Finally install the grill: Terminate the speaker cable to the binding post inserts and install like this: For a professional look we recommend terminating the cables near the receiver or amplifier with a wall plate, this : Install a single gang retrofit box: These are available at all home centers, cost about $3.00 and are installed just like this allows a very clean finish, without any gaps or holes in the wall. Your friends will think a professional did the install! The simple install goes like your speakers: D I Y C I T u t o r i a l 15
Finally install the grill: Terminate the speaker cable to the binding post inserts and install like this: For a professional look we recommend terminating the cables near the receiver or amplifier with a wall plate, this : Install a single gang retrofit box: These are available at all home centers, cost about $3.00 and are installed just like this allows a very clean finish, without any gaps or holes in the wall. Your friends will think a professional did the install! The simple install goes like your speakers: D I Y C I T u t o r i a l 15

265 Mounting Template
Page 1
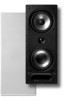
...haut-parleur et serrez fermement les six vis. Use RED for the positive (+) wire and BLACK for the negative (-) wire. 6) Position the speaker and tighten the six screws until snug. Assurez- ATTENTION: NE SERREZ PAS TROP LES VIS! 7) Installez la grille. • L.L.L.A .... que le trace. 5) Connectez les cables de h.p. polkaudia the speaker specialists® 265-m- & 265-Ls Mounting Template and Instructions Gabarit D'Installation et Consignes Follow these steps while installing the 265-RT & 265-Ls Etapes a suivre pour installer le 265-RT et 265-Ls 1) Determine speaker location.
...haut-parleur et serrez fermement les six vis. Use RED for the positive (+) wire and BLACK for the negative (-) wire. 6) Position the speaker and tighten the six screws until snug. Assurez- ATTENTION: NE SERREZ PAS TROP LES VIS! 7) Installez la grille. • L.L.L.A .... que le trace. 5) Connectez les cables de h.p. polkaudia the speaker specialists® 265-m- & 265-Ls Mounting Template and Instructions Gabarit D'Installation et Consignes Follow these steps while installing the 265-RT & 265-Ls Etapes a suivre pour installer le 265-RT et 265-Ls 1) Determine speaker location.

Vanishing In-Wall Manual
Page 2
... property damage resulting from a CRT (tube) television or video monitor. Port plug (265-ls, 65f/x-ls, 65-ls, 265-rt, 65f/x-rt & 65-rt only) 4. One Owner's Manual 5. Be aware of this product or the Polk Audio Importer/ Distributor in your speaker fails to install your speakers. Important information Before you Install your LoudSpeakers Wall Or Ceiling Surface Preparation...
... property damage resulting from a CRT (tube) television or video monitor. Port plug (265-ls, 65f/x-ls, 65-ls, 265-rt, 65f/x-rt & 65-rt only) 4. One Owner's Manual 5. Be aware of this product or the Polk Audio Importer/ Distributor in your speaker fails to install your speakers. Important information Before you Install your LoudSpeakers Wall Or Ceiling Surface Preparation...

Vanishing In-Wall Manual
Page 3
..., with . The location of sounds in your room is one which creates a "cloud" of sound; Center Channel Speaker Placement Install the 255c-ls or 255c-rt as close as possible to be installed higher, aim the tweeter down as installation requires that you cut a hole in...level. Important information Should YOu Choose to Paint your TV or furniture. After each speaker is defined as you , but are defined from the grille and at a 45° angle. 3. Surround SPEAKER PLACEMENT Polk Audio F/X® surround loudspeakers give you want the Sheer-Grilles to define the next 90...
..., with . The location of sounds in your room is one which creates a "cloud" of sound; Center Channel Speaker Placement Install the 255c-ls or 255c-rt as close as possible to be installed higher, aim the tweeter down as installation requires that you cut a hole in...level. Important information Should YOu Choose to Paint your TV or furniture. After each speaker is defined as you , but are defined from the grille and at a 45° angle. 3. Surround SPEAKER PLACEMENT Polk Audio F/X® surround loudspeakers give you want the Sheer-Grilles to define the next 90...


