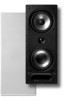
Polk Audio 265-RT Support and Manuals
Get Help and Manuals for this Polk Audio item
View All Support Options Below
Free Polk Audio 265-RT manuals!
Problems with Polk Audio 265-RT?
Ask a Question
Free Polk Audio 265-RT manuals!
Problems with Polk Audio 265-RT?
Ask a Question
Popular Polk Audio 265-RT Manual Pages
DIY In-Ceiling and In-Wall Installation Guide - Page 1

Installing Your In-Wall or In-Ceiling Speakers
DIY In-Ceiling and In-Wall Installation Guide - Page 2
...Repairing a hole in sheetrock or drywall • Installing "on wall" shelving • Installing baseboards or crown molding
Safety and Code Review
• Use material and speaker cabling that conforms to your community and state building codes-your retailer or home center service....
Section 1: Introduction To Installing In-Wall or In-Ceiling Polk Audio Speakers
Installing your time. • ...
DIY In-Ceiling and In-Wall Installation Guide - Page 4

... want to run cable under 100' (33m) use 12 gauge cable.
DIY CI Tutorial 4
Section 2: Polk Audio In-Wall and In-Ceiling Speaker Installation Guide
Materials and Preparation Before cutting into your walls to install your new Polk Audio speakers, gather up all basic speaker applications you will need a minimum of 2 conductors, thus the term cable is used here instead...
DIY In-Ceiling and In-Wall Installation Guide - Page 5

...sets of the speakers will be longer than walls.
From amplifier to Volume control
Volume control
Speakers
Planning Your Cable Routes NOTE: In a stereo installation the cable length to each speaker.
The cable lengths to the rear speakers...CI Tutorial 5
When your new Polk speakers, we suggest you want to each speaker within a room should be installed in the ceiling for Front ...
DIY In-Ceiling and In-Wall Installation Guide - Page 6

... the others. Be sure to check the locations for all the speakers, if you discover that one location won't work and you have... a stiff wire or bent coat hanger "feel" for the speaker. Once you have to go to an alternate location that may... feel an obstruction, wire or pipe with the wire probe, choose another speaker location. Some obstructions could include electrical wiring, drain, hot, and cold...
DIY In-Ceiling and In-Wall Installation Guide - Page 7

...Polk Audio can recommend a professional installation company, call (800) 377-7655 during normal east coast business hours. Some obstructions could include electrical wiring, drain, hot, and cold water piping: Don't cut . but they are the guidelines: When working with studs: studs support your supplies:
1) Speakers 2) Speaker...The Universal Building Code or UBC, and most all local codes have some ...
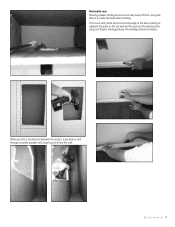
DIY In-Ceiling and In-Wall Installation Guide - Page 11

...
wall stud
Thread the cable through the top plate (use the fish-tape if needed). ceiling
joist
top
plate
wall stud
wall stud
When attaching speaker cabling to the pull or fish tap-overlap the cable through the "paper-clip" on the end of electrical tape as shown to create a cable...
DIY In-Ceiling and In-Wall Installation Guide - Page 12
... the base molding to separate the paint on the dry wall and the paint on the molding then using the speaker hole to utilize the base board molding. Horizontal runs Running speaker cabling across a room may seem difficult-one good idea is possible to drill through using a stiff putty blade gently pry...
DIY In-Ceiling and In-Wall Installation Guide - Page 13

... most cases walls are ready to install your new Polk speakers!
rotating cam clamps
Our speakers utilize a unique "rotating cam" that presses the front baffle casing to the wall and allows for our horizontal cable runs, if needed notch the studs:
Now you can install the cable:
Replace the molding, and touch up with approximately 1/8" wiggle...
DIY In-Ceiling and In-Wall Installation Guide - Page 14
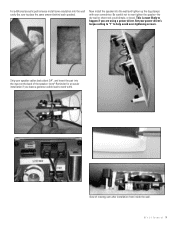
... inside the wall. Be careful not to over -tightening screws. Set your power driver's torque setting to "1" to place the same amount behind each speaker).
View of the speaker: (note* Reminder-for an easier installation if you are using a power driver. Now install the speaker into the wall and tighten up the dog-clamps with ). Strip your screwdriver.
This...
DIY In-Ceiling and In-Wall Installation Guide - Page 15

... Your friends will think a professional did the install! Finally install the grill:
Terminate the speaker cable to the binding post inserts and install like this:
For a professional look we recommend terminating the cables near the receiver or amplifier with a wall plate, this : Install a single gang retrofit box: These are available at all home centers, cost...
265 Mounting Template - Page 1

... METTRE DE NIVEAU
HBP2156 polkaudia
the speaker specialists®
265-m- & 265-Ls
Mounting Template and Instructions Gabarit D'Installation et Consignes
Follow these steps while installing the 265-RT & 265-Ls Etapes a suivre pour installer le 265-RT et 265-Ls
1) Determine speaker location. ROUGE = fil positif (+) / NOIR = fil negatif (-). 6) Installer le haut-parleur et serrez fermement...
Vanishing In-Wall Manual - Page 2

... to install your Vanishing Series speaker into the apparatus, the apparatus has been exposed to rain or moisture and objects filled with the manufacturer's instructions. 8. Take Inventory Inside each speaker) 3. One Sheer-Grille (for hearing loss, bodily injury or property damage resulting from a CRT (tube) television or video monitor. Port plug (265-ls, 65f/x-ls, 65-ls, 265-rt...
Vanishing In-Wall Manual - Page 3

...Right and left . Center Channel Speaker Placement Install the 255c-ls or 255c-rt as close as required. To paint the Sheer-Grille 1. Surround SPEAKER PLACEMENT Polk Audio F/X® surround loudspeakers give you...to Paint your grilles Because of its ultra-thin profile, the Vanishing Series Sheer-Grille™ requires a specific painting procedure to define the next 90° rotation and ...
Vanishing In-Wall Manual - Page 4

...4mm)
C. Cutout Dimensions
C. Mounting Depth
(using 1/2" drywall)
3 1/4" (82.6mm)
3 1/4" (82.6mm)
Specifiations
For complete Vanishing Series specifications, visit www.polkaudio.com
4
Polk Audio Customer Service: 1-800-377-7655 (Outside US & Canada: 410-358-3600) Monday-Friday, 9:00 AM-6:00 PM EST, [email protected] Mounting Depth
(using 1/2" drywall)
265-ls 20 7/8" H x 8 7/8" W (530...
Polk Audio 265-RT Reviews
We have not received any reviews for Polk Audio yet.