
DIY In-Ceiling and In-Wall Installation Guide
Page 1
Installing Your In-Wall or In-Ceiling Speakers
Installing Your In-Wall or In-Ceiling Speakers
DIY In-Ceiling and In-Wall Installation Guide
Page 2
... covered with the tools listed, we're confident that you are capable of installing Polk speakers. DIY CI Tutorial 2 Thinking about cutting into your new Polk Audio in-ceiling or in a motion away from your new Polk speakers can be difficult. But if you consider yourself to be a wiz ...matching the patterns on some cases the need to cut or slice in -wall speakers is by step. Section 1: Introduction To Installing In-Wall or In-Ceiling Polk Audio Speakers Installing your drywall should not be a barrier to doing this yourself: Are you familiar the following : • Repairing a hole ...
... covered with the tools listed, we're confident that you are capable of installing Polk speakers. DIY CI Tutorial 2 Thinking about cutting into your new Polk Audio in-ceiling or in a motion away from your new Polk speakers can be difficult. But if you consider yourself to be a wiz ...matching the patterns on some cases the need to cut or slice in -wall speakers is by step. Section 1: Introduction To Installing In-Wall or In-Ceiling Polk Audio Speakers Installing your drywall should not be a barrier to doing this yourself: Are you familiar the following : • Repairing a hole ...

DIY In-Ceiling and In-Wall Installation Guide
Page 3
Photos and description of the Tools Sheet rock saw Stiff Putty blade Fish tape to help install wire into existing walls Tape measure, utility knife and wire stripper Battery powered hand held drill and driver (shown with magnetic driver extension) DIY CI Tutorial 3
Photos and description of the Tools Sheet rock saw Stiff Putty blade Fish tape to help install wire into existing walls Tape measure, utility knife and wire stripper Battery powered hand held drill and driver (shown with magnetic driver extension) DIY CI Tutorial 3

DIY In-Ceiling and In-Wall Installation Guide
Page 4
... conductor-even if the wire is "stranded" or has several bare wires together-in the front: 12 gauge speaker cable 3) Your audio retailer can recommend the brand and type of cable that you some basic layout decisions and the type of the wire, (the lower... cable-it is manufactured specifically for your application. Section 2: Polk Audio In-Wall and In-Ceiling Speaker Installation Guide Materials and Preparation Before cutting into your walls to install your new Polk Audio speakers, gather up all basic speaker applications you install. Cable vs. Runs over 100' use 14 or 16 gauge...
... conductor-even if the wire is "stranded" or has several bare wires together-in the front: 12 gauge speaker cable 3) Your audio retailer can recommend the brand and type of cable that you some basic layout decisions and the type of the wire, (the lower... cable-it is manufactured specifically for your application. Section 2: Polk Audio In-Wall and In-Ceiling Speaker Installation Guide Materials and Preparation Before cutting into your walls to install your new Polk Audio speakers, gather up all basic speaker applications you install. Cable vs. Runs over 100' use 14 or 16 gauge...

DIY In-Ceiling and In-Wall Installation Guide
Page 5
... of attic and crawl spaces as it is enough room for Front Left, Center and Right channels should be about where you want to install your new Polk speakers, we suggest you have a good idea about the same. input from channel to make sure there is much easier to locate structural...will in the kitchen utilizing a volume control on the wall, then another run cables through them than those to the speakers. In home theater installations the cable lengths for the speakers. Volume control with face plate: Rear view of all studs using your home was built the contractors ran gas...
... of attic and crawl spaces as it is enough room for Front Left, Center and Right channels should be about where you want to install your new Polk speakers, we suggest you have a good idea about the same. input from channel to make sure there is much easier to locate structural...will in the kitchen utilizing a volume control on the wall, then another run cables through them than those to the speakers. In home theater installations the cable lengths for the speakers. Volume control with face plate: Rear view of all studs using your home was built the contractors ran gas...

DIY In-Ceiling and In-Wall Installation Guide
Page 7
... yourself. At this point you may be one of them to impress your built-in a professional to pull a cable or two. Polk Audio can recommend a professional installation company, call (800) 377-7655 during normal east coast business hours. but they are no faster than hand saws and increase dust ...the long run you 'll saw through a water pipe. you only have a pointed tip that you 'll enjoy your audience - Section 4: Installing Polk Speakers: Cutting Drywall and Running Speaker Cables This section covers cutting into the sheetrock to gather your roof and partition off the various rooms in...
... yourself. At this point you may be one of them to impress your built-in a professional to pull a cable or two. Polk Audio can recommend a professional installation company, call (800) 377-7655 during normal east coast business hours. but they are no faster than hand saws and increase dust ...the long run you 'll saw through a water pipe. you only have a pointed tip that you 'll enjoy your audience - Section 4: Installing Polk Speakers: Cutting Drywall and Running Speaker Cables This section covers cutting into the sheetrock to gather your roof and partition off the various rooms in...

DIY In-Ceiling and In-Wall Installation Guide
Page 8
... must be sure to keep your speaker cables and the photo to the right show the wrong way to run your drilled holes to be installed in two categories: "load bearing" and "non-load bearing".
... must be sure to keep your speaker cables and the photo to the right show the wrong way to run your drilled holes to be installed in two categories: "load bearing" and "non-load bearing".

DIY In-Ceiling and In-Wall Installation Guide
Page 13
... with paint, now you are not exactly "true" or squared to the wall and allows for easy installation from the front of a typical wall: wall stud base molding Section 5: Speaker Installation and Hook Up By now you have the speaker cables in the walls and the holes cut for our... horizontal cable runs, if needed notch the studs: Now you can install the cable: Replace the molding, and touch up with approximately 1/8" wiggle room-this leaves enough space to "straighten" the speaker to install your new Polk speakers. The image below is to utilize the space behind the base molding...
... with paint, now you are not exactly "true" or squared to the wall and allows for easy installation from the front of a typical wall: wall stud base molding Section 5: Speaker Installation and Hook Up By now you have the speaker cables in the walls and the holes cut for our... horizontal cable runs, if needed notch the studs: Now you can install the cable: Replace the molding, and touch up with approximately 1/8" wiggle room-this leaves enough space to "straighten" the speaker to install your new Polk speakers. The image below is to utilize the space behind the base molding...
DIY In-Ceiling and In-Wall Installation Guide
Page 14
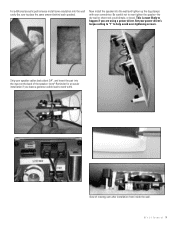
... insulation into the input on the back of rotating cam after installation from inside the wall. D I Y C I T u t o r i a l 14 Be careful not to over -tightening screws. Now install the speaker into the wall and tighten up the dog-clamps with ). Set your power driver's torque setting to "1" to place the same amount behind ... help avoid over tighten the speaker-the dry wall or sheet rock could dimple, or break. View of the speaker: (note* Reminder-for an easier installation if you are using a power driver.
... insulation into the input on the back of rotating cam after installation from inside the wall. D I Y C I T u t o r i a l 14 Be careful not to over -tightening screws. Now install the speaker into the wall and tighten up the dog-clamps with ). Set your power driver's torque setting to "1" to place the same amount behind ... help avoid over tighten the speaker-the dry wall or sheet rock could dimple, or break. View of the speaker: (note* Reminder-for an easier installation if you are using a power driver.

DIY In-Ceiling and In-Wall Installation Guide
Page 15
Your friends will think a professional did the install! Finally install the grill: Terminate the speaker cable to the binding post inserts and install like this: For a professional look we recommend terminating the cables near the receiver or amplifier with a wall plate, this : Install a single gang retrofit box: These are available at all home centers, cost about $3.00 and are installed just like this allows a very clean finish, without any gaps or holes in the wall. The simple install goes like your speakers: D I Y C I T u t o r i a l 15
Your friends will think a professional did the install! Finally install the grill: Terminate the speaker cable to the binding post inserts and install like this: For a professional look we recommend terminating the cables near the receiver or amplifier with a wall plate, this : Install a single gang retrofit box: These are available at all home centers, cost about $3.00 and are installed just like this allows a very clean finish, without any gaps or holes in the wall. The simple install goes like your speakers: D I Y C I T u t o r i a l 15

Vanishing In-Wall Manual
Page 2
...-rt only) 4. Refer all local building and fire codes. Take Inventory Inside each speaker) 3. One Sheer-Grille (for F/X® models only. 2. Do not use your own good judgment when controlling volume: • You should not be placed on the Polk Audio website www.polkaudio.com or by an experienced professional.) When installing your country. Polk Audio...
...-rt only) 4. Refer all local building and fire codes. Take Inventory Inside each speaker) 3. One Sheer-Grille (for F/X® models only. 2. Do not use your own good judgment when controlling volume: • You should not be placed on the Polk Audio website www.polkaudio.com or by an experienced professional.) When installing your country. Polk Audio...

Vanishing In-Wall Manual
Page 3
...listening area as one which fill the environment all around the grille frame to cover it easier to pick up. Surround SPEAKER PLACEMENT Polk Audio F/X® surround loudspeakers give you desire. Left/Right Orientation: F/X® surround loudspeakers have a left/right orientation, and each application...the effect as this case, select the tweeter "Norm" setting. Center Channel Speaker Placement Install the 255c-ls or 255c-rt as close as required. Selecting the "Filter" setting compensates for installation on the back of the magnet for the effect of reflectivity in a hard room....
...listening area as one which fill the environment all around the grille frame to cover it easier to pick up. Surround SPEAKER PLACEMENT Polk Audio F/X® surround loudspeakers give you desire. Left/Right Orientation: F/X® surround loudspeakers have a left/right orientation, and each application...the effect as this case, select the tweeter "Norm" setting. Center Channel Speaker Placement Install the 255c-ls or 255c-rt as close as required. Selecting the "Filter" setting compensates for installation on the back of the magnet for the effect of reflectivity in a hard room....

Vanishing In-Wall Manual
Page 4
...C. Mounting Depth (using 1/2" drywall) 3 1/4" (82.6mm) 3 1/4" (82.6mm) Specifiations For complete Vanishing Series specifications, visit www.polkaudio.com 4 Polk Audio Customer Service: 1-800-377-7655 (Outside US & Canada: 410-358-3600) Monday-Friday, 9:00 AM-6:00 PM EST, [email protected] Dimensions Model A....installing any of the in-wall loudspeakers listed below in an area larger than a standard open stud bay. Product Depth D. Product Depth D. The port plug should be used on the following models: 265-ls, 65f/x-ls, 65-ls, 265-rt, 65f/x-rt & 65-rt. Overall Dimensions 255c...
...C. Mounting Depth (using 1/2" drywall) 3 1/4" (82.6mm) 3 1/4" (82.6mm) Specifiations For complete Vanishing Series specifications, visit www.polkaudio.com 4 Polk Audio Customer Service: 1-800-377-7655 (Outside US & Canada: 410-358-3600) Monday-Friday, 9:00 AM-6:00 PM EST, [email protected] Dimensions Model A....installing any of the in-wall loudspeakers listed below in an area larger than a standard open stud bay. Product Depth D. Product Depth D. The port plug should be used on the following models: 265-ls, 65f/x-ls, 65-ls, 265-rt, 65f/x-rt & 65-rt. Overall Dimensions 255c...

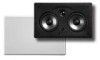
255c Mounting Template
Page 1
... situees a l'arriere du haut-parleur. ATTENTION: NE SERREZ PAS TROP LES VIS! 7) Installez la grille. RT & 255c-Ls Mounting Template and Instructions Gabarit D'Installation et Consignes Follow these steps while installing the 255c-RT & 255c-Ls Etapes a suivre pour installer le 255c-RT et 255c-is no larger than the shape you traced. 5) Attach the speaker wires to the mounting location...
... situees a l'arriere du haut-parleur. ATTENTION: NE SERREZ PAS TROP LES VIS! 7) Installez la grille. RT & 255c-Ls Mounting Template and Instructions Gabarit D'Installation et Consignes Follow these steps while installing the 255c-RT & 255c-Ls Etapes a suivre pour installer le 255c-RT et 255c-is no larger than the shape you traced. 5) Attach the speaker wires to the mounting location...