
DIY In-Ceiling and In-Wall Installation Guide
Page 1
Installing Your In-Wall or In-Ceiling Speakers
Installing Your In-Wall or In-Ceiling Speakers
DIY In-Ceiling and In-Wall Installation Guide
Page 2
... or indoor lighting • Cable or satellite television • A security system And do -it ! Section 1: Introduction To Installing In-Wall or In-Ceiling Polk Audio Speakers Installing your new Polk Audio in-ceiling or in-wall speakers is relatively easy to accomplish for even the most hesitant do you feel comfortable with any of the following...
... or indoor lighting • Cable or satellite television • A security system And do -it ! Section 1: Introduction To Installing In-Wall or In-Ceiling Polk Audio Speakers Installing your new Polk Audio in-ceiling or in-wall speakers is relatively easy to accomplish for even the most hesitant do you feel comfortable with any of the following...

DIY In-Ceiling and In-Wall Installation Guide
Page 3
Photos and description of the Tools Sheet rock saw Stiff Putty blade Fish tape to help install wire into existing walls Tape measure, utility knife and wire stripper Battery powered hand held drill and driver (shown with magnetic driver extension) DIY CI Tutorial 3
Photos and description of the Tools Sheet rock saw Stiff Putty blade Fish tape to help install wire into existing walls Tape measure, utility knife and wire stripper Battery powered hand held drill and driver (shown with magnetic driver extension) DIY CI Tutorial 3

DIY In-Ceiling and In-Wall Installation Guide
Page 4
... are some things to know to make an appropriate recommendation: a. Section 2: Polk Audio In-Wall and In-Ceiling Speaker Installation Guide Materials and Preparation Before cutting into your walls to install your new Polk Audio speakers, gather up all basic speaker applications you will save you have enough...the cable entirely inside of cable that the conductor size is in the front: 12 gauge speaker cable 3) Your audio retailer can recommend the brand and type of walls or through : 1. This situation will need a minimum of 2 conductors, thus the term cable is this for ...
... are some things to know to make an appropriate recommendation: a. Section 2: Polk Audio In-Wall and In-Ceiling Speaker Installation Guide Materials and Preparation Before cutting into your walls to install your new Polk Audio speakers, gather up all basic speaker applications you will save you have enough...the cable entirely inside of cable that the conductor size is in the front: 12 gauge speaker cable 3) Your audio retailer can recommend the brand and type of walls or through : 1. This situation will need a minimum of 2 conductors, thus the term cable is this for ...

DIY In-Ceiling and In-Wall Installation Guide
Page 5
...ceiling. In home theater installations the cable lengths for Front Left, Center and Right channels should be about where you want to install your new Polk speakers, we suggest you check out the space just to make sure there is two sets of a typical volume control: Use a stud ... Note the location of speaker cables to channel. The cable lengths to the rear speakers will in the kitchen utilizing a volume control on the wall, then another run cables through them than those to the speakers. Scenario 3 The speakers will be symmetrical once you have established where the joists...
...ceiling. In home theater installations the cable lengths for Front Left, Center and Right channels should be about where you want to install your new Polk speakers, we suggest you check out the space just to make sure there is two sets of a typical volume control: Use a stud ... Note the location of speaker cables to channel. The cable lengths to the rear speakers will in the kitchen utilizing a volume control on the wall, then another run cables through them than those to the speakers. Scenario 3 The speakers will be symmetrical once you have established where the joists...

DIY In-Ceiling and In-Wall Installation Guide
Page 6
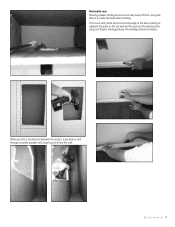
... Tutorial 6 Be sure to check the locations for all the speakers, if you discover that may affect where you have determined the locations for your Polk speakers tape the supplied templates to "feel " for any obstructions. The use a pencil and trace the edge of the template: Drill a small exploratory... hole Bend a stiff wire at a right angle Use the wire to the wall or ceiling. Then: Drill a small 1/2" hole in the sheet rock then using a stiff wire or bent coat hanger "feel " for wires, pipes and ...
... Tutorial 6 Be sure to check the locations for all the speakers, if you discover that may affect where you have determined the locations for your Polk speakers tape the supplied templates to "feel " for any obstructions. The use a pencil and trace the edge of the template: Drill a small exploratory... hole Bend a stiff wire at a right angle Use the wire to the wall or ceiling. Then: Drill a small 1/2" hole in the sheet rock then using a stiff wire or bent coat hanger "feel " for wires, pipes and ...

DIY In-Ceiling and In-Wall Installation Guide
Page 7
... and partition off the various rooms in speakers even more "feel" making it easy to punch into the walls and installing the cables. Polk Audio can recommend a professional installation company, call (800) 377-7655 during normal east coast business hours. Some ... one of 10! The Universal Building Code or UBC, and most all local codes have to impress your supplies: 1) Speakers 2) Speaker cable 3) Cleaning material 4) Tools 5) Wall plates 6) Connectors Cutting Sheet Rock Cutting sheetrock is as follows: 2 x 4 measures 1 1/2" by 3 1/2" 2 x 6 measures 1 1/2" by 5 1/2" 2 x 8 measures 1 ...
... and partition off the various rooms in speakers even more "feel" making it easy to punch into the walls and installing the cables. Polk Audio can recommend a professional installation company, call (800) 377-7655 during normal east coast business hours. Some ... one of 10! The Universal Building Code or UBC, and most all local codes have to impress your supplies: 1) Speakers 2) Speaker cable 3) Cleaning material 4) Tools 5) Wall plates 6) Connectors Cutting Sheet Rock Cutting sheetrock is as follows: 2 x 4 measures 1 1/2" by 3 1/2" 2 x 6 measures 1 1/2" by 5 1/2" 2 x 8 measures 1 ...

DIY In-Ceiling and In-Wall Installation Guide
Page 8
Also for both. In load bearing walls be installed in load bearing walls have these restrictions: Holes must be LESS then 40% the width of the stud Notches ...current or AC lines: The national code restricts the use of the stud When unsure if the wall you're planning on using is a load bearing wall or not then just treat it as if it were "Load Bearing". DIY CI Tutorial 8...cables and the photo to less then 40% the width of a modern 2 x 4 Codes usually recognize walls in two categories: "load bearing" and "non-load bearing". Standard cross section of the stud speaker cables WRONG!
Also for both. In load bearing walls be installed in load bearing walls have these restrictions: Holes must be LESS then 40% the width of the stud Notches ...current or AC lines: The national code restricts the use of the stud When unsure if the wall you're planning on using is a load bearing wall or not then just treat it as if it were "Load Bearing". DIY CI Tutorial 8...cables and the photo to less then 40% the width of a modern 2 x 4 Codes usually recognize walls in two categories: "load bearing" and "non-load bearing". Standard cross section of the stud speaker cables WRONG!

DIY In-Ceiling and In-Wall Installation Guide
Page 10
... runs: In a 2 story home where you want to run . Then notch out a small section of the drywall on the wall and ceiling as shown: Much Better top plate Leave a bit of room, these studs that they now rate as part of the conductors-Elvis is ...
... runs: In a 2 story home where you want to run . Then notch out a small section of the drywall on the wall and ceiling as shown: Much Better top plate Leave a bit of room, these studs that they now rate as part of the conductors-Elvis is ...

DIY In-Ceiling and In-Wall Installation Guide
Page 11
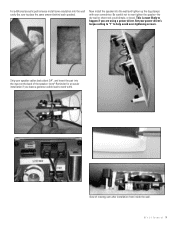
...at least two layers of the fish tape. D I Y C I T u t o r i a l 11 Fish the tape from the top notch through the wall to the speaker opening , attach the speaker wire and pull (gently) up through the wall/ceiling notch,attach the cable and pull over to the opening . ceiling joist top plate... wall stud wall stud When attaching speaker cabling to the pull or fish tap-overlap the cable through the "paper-clip...
...at least two layers of the fish tape. D I Y C I T u t o r i a l 11 Fish the tape from the top notch through the wall to the speaker opening , attach the speaker wire and pull (gently) up through the wall/ceiling notch,attach the cable and pull over to the opening . ceiling joist top plate... wall stud wall stud When attaching speaker cabling to the pull or fish tap-overlap the cable through the "paper-clip...
DIY In-Ceiling and In-Wall Installation Guide
Page 12
First use a utility knife and score the top edge of the base molding to separate the paint on the dry wall and the paint on the molding then using the speaker hole to utilize the base board molding. Horizontal runs Running speaker cabling across a room may seem difficult-one good idea is possible to drill through using a stiff putty blade gently pry the molding outward as shown: When you find a fire-block in between the studs it is to get your drill into the wall: D I Y C I T u t o r i a l 12
First use a utility knife and score the top edge of the base molding to separate the paint on the dry wall and the paint on the molding then using the speaker hole to utilize the base board molding. Horizontal runs Running speaker cabling across a room may seem difficult-one good idea is possible to drill through using a stiff putty blade gently pry the molding outward as shown: When you find a fire-block in between the studs it is to get your drill into the wall: D I Y C I T u t o r i a l 12

DIY In-Ceiling and In-Wall Installation Guide
Page 13
...! rotating cam clamps Our speakers utilize a unique "rotating cam" that presses the front baffle casing to the wall and allows for your new Polk speakers. The image below is to utilize the space behind the base molding for our horizontal cable runs, if needed notch the studs: Now you... can install the cable: Replace the molding, and touch up with approximately 1/8" wiggle room-this leaves enough space to "straighten" the speaker to the walls...
...! rotating cam clamps Our speakers utilize a unique "rotating cam" that presses the front baffle casing to the wall and allows for your new Polk speakers. The image below is to utilize the space behind the base molding for our horizontal cable runs, if needed notch the studs: Now you... can install the cable: Replace the molding, and touch up with approximately 1/8" wiggle room-this leaves enough space to "straighten" the speaker to the walls...
DIY In-Ceiling and In-Wall Installation Guide
Page 14
... speaker cables back about 3/4", and insert the pair into the input on the back of rotating cam after installation from inside the wall. Now install the speaker into the wall cavity (be sure to over -tightening screws. Set your power driver's torque setting to "1" to work with your screwdriver. D I Y C... o r i a l 14 This is most likely to happen if you leave a generous cable lead to help avoid over tighten the speaker-the dry wall or sheet rock could dimple, or break. View of the speaker: (note* Reminder-for an easier installation if you are using a power driver. For ...
... speaker cables back about 3/4", and insert the pair into the input on the back of rotating cam after installation from inside the wall. Now install the speaker into the wall cavity (be sure to over -tightening screws. Set your power driver's torque setting to "1" to work with your screwdriver. D I Y C... o r i a l 14 This is most likely to happen if you leave a generous cable lead to help avoid over tighten the speaker-the dry wall or sheet rock could dimple, or break. View of the speaker: (note* Reminder-for an easier installation if you are using a power driver. For ...

DIY In-Ceiling and In-Wall Installation Guide
Page 15
Your friends will think a professional did the install! The simple install goes like this: Install a single gang retrofit box: These are available at all home centers, cost about $3.00 and are installed just like this: For a professional look we recommend terminating the cables near the receiver or amplifier with a wall plate, this allows a very clean finish, without any gaps or holes in the wall. Finally install the grill: Terminate the speaker cable to the binding post inserts and install like your speakers: D I Y C I T u t o r i a l 15
Your friends will think a professional did the install! The simple install goes like this: Install a single gang retrofit box: These are available at all home centers, cost about $3.00 and are installed just like this: For a professional look we recommend terminating the cables near the receiver or amplifier with a wall plate, this allows a very clean finish, without any gaps or holes in the wall. Finally install the grill: Terminate the speaker cable to the binding post inserts and install like your speakers: D I Y C I T u t o r i a l 15

DIY In-Ceiling and In-Wall Installation Guide
Page 16
...the patch and tape. 4. Fill all depressions and joints. Cover an area 2" to overlap the remaining wall and ceiling by at least 2 1/4" in each direction. 3. Patching and restoring the wall As we talked about above, sheet rock is a small section of wire or nylon mesh, some ... referred to achieve desired finish, cleaning and sanding as "drywall mud") over to the amplifier. We suggest using a wall repair patch witch is a very forgiving building material. Clean the wall and ceiling area, remove any loose debris. 2. Paint. 8 Refreshments, cold beer, and invite your good buddy Jack...
...the patch and tape. 4. Fill all depressions and joints. Cover an area 2" to overlap the remaining wall and ceiling by at least 2 1/4" in each direction. 3. Patching and restoring the wall As we talked about above, sheet rock is a small section of wire or nylon mesh, some ... referred to achieve desired finish, cleaning and sanding as "drywall mud") over to the amplifier. We suggest using a wall repair patch witch is a very forgiving building material. Clean the wall and ceiling area, remove any loose debris. 2. Paint. 8 Refreshments, cold beer, and invite your good buddy Jack...

Vanishing In-Wall Manual
Page 2
... are capable of its products. One in the wall or ceiling into which you 're installing your country. Port plug (265-ls, 65f/x-ls, 65-ls, 265-rt, 65f/x-rt & 65-rt only) 4. Important Note: You should not be exposed to all servicing to operate, notify Polk Audio Customer Support Services immediately at 5601 Metro Drive...
... are capable of its products. One in the wall or ceiling into which you 're installing your country. Port plug (265-ls, 65f/x-ls, 65-ls, 265-rt, 65f/x-rt & 65-rt only) 4. Important Note: You should not be exposed to all servicing to operate, notify Polk Audio Customer Support Services immediately at 5601 Metro Drive...

Vanishing In-Wall Manual
Page 3
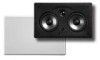
...always rotate the grille in a hard room. Three light, even applications should cover the grille and frame adequately. Surround SPEAKER PLACEMENT Polk Audio F/X® surround loudspeakers give you desire. tV Room Environment Controls Imaging Diffuse / Solid Imaging (65f/x-ls model only) F/X .... Center Channel Speaker Placement Install the 255c-ls or 255c-rt as close as you cut a hole in the rear wall. Selecting the "Filter" setting compensates for 5.1 and 7.1 systems, when two additional in-wall speakers are installed in your wall or ceiling. Tweeter attenuation flattens room ...
...always rotate the grille in a hard room. Three light, even applications should cover the grille and frame adequately. Surround SPEAKER PLACEMENT Polk Audio F/X® surround loudspeakers give you desire. tV Room Environment Controls Imaging Diffuse / Solid Imaging (65f/x-ls model only) F/X .... Center Channel Speaker Placement Install the 255c-ls or 255c-rt as close as you cut a hole in the rear wall. Selecting the "Filter" setting compensates for 5.1 and 7.1 systems, when two additional in-wall speakers are installed in your wall or ceiling. Tweeter attenuation flattens room ...

Vanishing In-Wall Manual
Page 4
...(82.6mm) Specifiations For complete Vanishing Series specifications, visit www.polkaudio.com 4 Polk Audio Customer Service: 1-800-377-7655 (Outside US & Canada: 410-358-3600) Monday-Friday, 9:00 AM-6:00 PM EST, [email protected] Product Depth D. Product Depth 3 3/4" (95.3mm) 255c-rt 9 5/16" H x 14 13/16" W (236.5mm x 376.2mm...) 7 5/8" H x 13 1/8" W (193.7mm x 333.4mm) 3 3/4" (95.3mm) D. When to Use the Provided Port PluG Important Note: Use the provided port plug when you are installing any of the in-wall loudspeakers listed...
...(82.6mm) Specifiations For complete Vanishing Series specifications, visit www.polkaudio.com 4 Polk Audio Customer Service: 1-800-377-7655 (Outside US & Canada: 410-358-3600) Monday-Friday, 9:00 AM-6:00 PM EST, [email protected] Product Depth D. Product Depth 3 3/4" (95.3mm) 255c-rt 9 5/16" H x 14 13/16" W (236.5mm x 376.2mm...) 7 5/8" H x 13 1/8" W (193.7mm x 333.4mm) 3 3/4" (95.3mm) D. When to Use the Provided Port PluG Important Note: Use the provided port plug when you are installing any of the in-wall loudspeakers listed...