
User Guide
Page 2
... 14. Set / Display button 21. Battery / SD card door 2 15 9 16 10 17 11 18 12 19 13 20 14 21 22 23 Polaroid i533 Digital Camera User Guide www.polaroid.com Power / Auto Focus LED 12. Delete button 15. Menu button 18. Mode button 22. Play / Pause / Up button 19. Product Overview...
... 14. Set / Display button 21. Battery / SD card door 2 15 9 16 10 17 11 18 12 19 13 20 14 21 22 23 Polaroid i533 Digital Camera User Guide www.polaroid.com Power / Auto Focus LED 12. Delete button 15. Menu button 18. Mode button 22. Play / Pause / Up button 19. Product Overview...

User Guide
Page 3
.... Table of Contents Product Overview 2 Table of Contents 3 1 Getting Started 6 • Camera Package Contents 7 • Attaching the Wrist Strap 8 • Installing the Batteries 8 • ...Camera Modes 16 • Capture Modes 17 • How to Default Settings 30 • Turning the Information Display On/Off 31 3 Taking Pictures 33 • Taking Pictures in Normal Mode 33 • Taking Pictures in Macro Mode 35 • Taking Pictures in Different Scene Shooting Modes 36 Polaroid i533 Digital Camera... User Guide 3 www.polaroid.com
.... Table of Contents Product Overview 2 Table of Contents 3 1 Getting Started 6 • Camera Package Contents 7 • Attaching the Wrist Strap 8 • Installing the Batteries 8 • ...Camera Modes 16 • Capture Modes 17 • How to Default Settings 30 • Turning the Information Display On/Off 31 3 Taking Pictures 33 • Taking Pictures in Normal Mode 33 • Taking Pictures in Macro Mode 35 • Taking Pictures in Different Scene Shooting Modes 36 Polaroid i533 Digital Camera... User Guide 3 www.polaroid.com
User Guide
Page 4
...; Protecting/Unprotecting Pictures, Video and Audio Clips 64 • Deleting Pictures, Video and Audio Clips 66 • Viewing Pictures and Video Clips on a TV 67 4 Polaroid i533 Digital Camera User Guide www...
...; Protecting/Unprotecting Pictures, Video and Audio Clips 64 • Deleting Pictures, Video and Audio Clips 66 • Viewing Pictures and Video Clips on a TV 67 4 Polaroid i533 Digital Camera User Guide www...

User Guide
Page 5
...Memory Card ...........83 9 Installing the Software onto a Computer 84 • Installing the Software 84 • Software Included with Your Camera 86 • Computer System Requirements 87 10 Transferring Pictures and Video Clips to a Computer 88 • Before Transferring Files 88 ... Problems 91 12 Getting Help 94 • Polaroid Online Services 94 • ArcSoft Software Help 94 13 Appendix 95 • Technical specifications 95 • Storage Capacities 97 • Uninstalling Polaroid i533 Driver (PC only 101 • Camera Default Settings 102 • Tips, Your Safety...
...Memory Card ...........83 9 Installing the Software onto a Computer 84 • Installing the Software 84 • Software Included with Your Camera 86 • Computer System Requirements 87 10 Transferring Pictures and Video Clips to a Computer 88 • Before Transferring Files 88 ... Problems 91 12 Getting Help 94 • Polaroid Online Services 94 • ArcSoft Software Help 94 13 Appendix 95 • Technical specifications 95 • Storage Capacities 97 • Uninstalling Polaroid i533 Driver (PC only 101 • Camera Default Settings 102 • Tips, Your Safety...

User Guide
Page 6
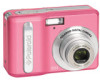
... TFT LCD, high quality optics and many manual settings and options. Outstanding features that your imaging needs. 1 Getting Started Thank you for selecting the new Polaroid i533 digital camera for your i533 digital camera has: • A high quality glass lens system for more accurate reproduction of pictures...
... TFT LCD, high quality optics and many manual settings and options. Outstanding features that your imaging needs. 1 Getting Started Thank you for selecting the new Polaroid i533 digital camera for your i533 digital camera has: • A high quality glass lens system for more accurate reproduction of pictures...
User Guide
Page 8
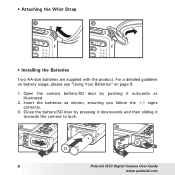
For a detailed guideline on battery usage, please see "Using Your Batteries" on page 9. 1. signs correctly. 3. Close the battery/SD door by pushing it towards the camera to lock. 1 2 3 a b 8 b a Polaroid i533 Digital Camera User Guide www.polaroid.com Insert the batteries as illustrated. 2. Open the camera battery/SD door by pressing it downwards and then sliding it outwards as shown, ensuring you follow the +/- • Attaching the Wrist Strap 1 2 • Installing the Batteries Two AA-size batteries are supplied with the product.
For a detailed guideline on battery usage, please see "Using Your Batteries" on page 9. 1. signs correctly. 3. Close the battery/SD door by pushing it towards the camera to lock. 1 2 3 a b 8 b a Polaroid i533 Digital Camera User Guide www.polaroid.com Insert the batteries as illustrated. 2. Open the camera battery/SD door by pressing it downwards and then sliding it outwards as shown, ensuring you follow the +/- • Attaching the Wrist Strap 1 2 • Installing the Batteries Two AA-size batteries are supplied with the product.
User Guide
Page 9
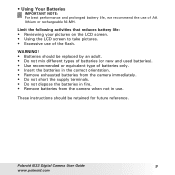
Polaroid i533 Digital Camera User Guide 9 www.polaroid.com These instructions should be retained for future reference. WARNING! • Batteries should be replaced by an adult. • Do not mix different types of ... LCD screen to take pictures. • Excessive use of batteries only. • Insert the batteries in the correct orientation. • Remove exhausted batteries from the camera immediately. • Do not short the supply terminals. • Do not dispose the batteries in fire. • Remove batteries from the...
Polaroid i533 Digital Camera User Guide 9 www.polaroid.com These instructions should be retained for future reference. WARNING! • Batteries should be replaced by an adult. • Do not mix different types of ... LCD screen to take pictures. • Excessive use of batteries only. • Insert the batteries in the correct orientation. • Remove exhausted batteries from the camera immediately. • Do not short the supply terminals. • Do not dispose the batteries in fire. • Remove batteries from the...
User Guide
Page 10
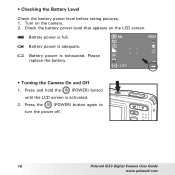
• Checking the Battery Level Check the battery power level before taking pictures. 1. Press and hold the (POWER) button until the LCD screen is full. Please replace the battery. 5M 50 +2.0EV 9999 IN 2 • Turning the Camera On and Off 1. Battery power is activated. 2. Battery power is exhausted. Battery power is adequate. Turn on the LCD screen. Press the (POWER) button again to turn the power off. 10 Polaroid i533 Digital Camera User Guide www.polaroid.com Check the battery power level that appears on the camera. 2.
• Checking the Battery Level Check the battery power level before taking pictures. 1. Press and hold the (POWER) button until the LCD screen is full. Please replace the battery. 5M 50 +2.0EV 9999 IN 2 • Turning the Camera On and Off 1. Battery power is activated. 2. Battery power is exhausted. Battery power is adequate. Turn on the LCD screen. Press the (POWER) button again to turn the power off. 10 Polaroid i533 Digital Camera User Guide www.polaroid.com Check the battery power level that appears on the camera. 2.

User Guide
Page 11
... Resolution 5M , , 16:9 ,3M , 1M , VGA 4 Quality , , 5 Sharpness , , 6 White balance , , , H , HL , , AUTO Polaroid i533 Digital Camera User Guide www.polaroid.com 44 44 50 46 11 2 Camera Settings • Checking Camera Status Turn on the camera, view the camera LCD screen to check which camera settings are not activated. • Capature Modes Still Image Mode 21 23 22...
... Resolution 5M , , 16:9 ,3M , 1M , VGA 4 Quality , , 5 Sharpness , , 6 White balance , , , H , HL , , AUTO Polaroid i533 Digital Camera User Guide www.polaroid.com 44 44 50 46 11 2 Camera Settings • Checking Camera Status Turn on the camera, view the camera LCD screen to check which camera settings are not activated. • Capature Modes Still Image Mode 21 23 22...

User Guide
Page 12
... 9999 22 Digital Zoom Factor X 1.0 X 4.0 23 Optical & Digital Zoom Bar Ref. Page 47 45 48 --------49 10 52 49 41 41 35 ------42 42 12 Polaroid i533 Digital Camera User Guide www.polaroid.com No.
... 9999 22 Digital Zoom Factor X 1.0 X 4.0 23 Optical & Digital Zoom Bar Ref. Page 47 45 48 --------49 10 52 49 41 41 35 ------42 42 12 Polaroid i533 Digital Camera User Guide www.polaroid.com No.
User Guide
Page 13
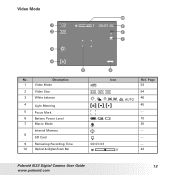
Description 1 Video Mode 2 Video Size 3 White balance 4 Light Metering 5 Focus Mark 6 Battery Power Level 7 Macro Mode Internal Memory 8 SD Card 9 Remaining Recording Time 10 Optical & Digital Zoom Bar 5 6 Icon , , , , , H , HL , , AUTO , , , , IN 00:01:03 Ref. Video Mode 1 2 3 10 00:01:30 9 IN 8 7 4 No. Page 53 54 46 45 --10 35 ------42 Polaroid i533 Digital Camera User Guide 13 www.polaroid.com
Description 1 Video Mode 2 Video Size 3 White balance 4 Light Metering 5 Focus Mark 6 Battery Power Level 7 Macro Mode Internal Memory 8 SD Card 9 Remaining Recording Time 10 Optical & Digital Zoom Bar 5 6 Icon , , , , , H , HL , , AUTO , , , , IN 00:01:03 Ref. Video Mode 1 2 3 10 00:01:30 9 IN 8 7 4 No. Page 53 54 46 45 --10 35 ------42 Polaroid i533 Digital Camera User Guide 13 www.polaroid.com
User Guide
Page 15
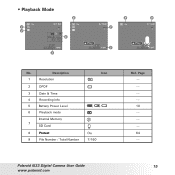
Polaroid i533 Digital Camera User Guide 15 www.polaroid.com Page --------10 ------64 --- • Playback Mode 1 5M 2 6 5/150 IN 320 +2.0EV AWB 4 F2.8 1/30 18:59 2006/07/01 3 6/150 IN 7 Play 18:59 2006/07/01 5 8 9 7/150 IN Play 18:59 2006/07/01 No. Description 1 Resolution 2 DPOF 3 Date & Time 4 Recording info 5 Battery Power Level 6 Playback mode Internal Memory 7 SD Card 8 Protect 9 File Number / Total Number Icon 5M , , IN 7/160 Ref.
Polaroid i533 Digital Camera User Guide 15 www.polaroid.com Page --------10 ------64 --- • Playback Mode 1 5M 2 6 5/150 IN 320 +2.0EV AWB 4 F2.8 1/30 18:59 2006/07/01 3 6/150 IN 7 Play 18:59 2006/07/01 5 8 9 7/150 IN Play 18:59 2006/07/01 No. Description 1 Resolution 2 DPOF 3 Date & Time 4 Recording info 5 Battery Power Level 6 Playback mode Internal Memory 7 SD Card 8 Protect 9 File Number / Total Number Icon 5M , , IN 7/160 Ref.
User Guide
Page 16
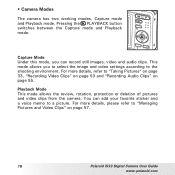
...Pictures and Video Clips" on page 55. Playback Mode This mode allows the review, rotation, protection or deletion of pictures and video clips from the camera. For more details, please refer to "Taking Pictures" on page 33, "Recording Video Clips" on page 53 and "Recording Audio Clips" on ...page 57. 16 Polaroid i533 Digital Camera User Guide www.polaroid.com You can record still images, video and audio clips. Capture Mode Under this mode, you to select the image and video settings...
...Pictures and Video Clips" on page 55. Playback Mode This mode allows the review, rotation, protection or deletion of pictures and video clips from the camera. For more details, please refer to "Taking Pictures" on page 33, "Recording Video Clips" on page 53 and "Recording Audio Clips" on ...page 57. 16 Polaroid i533 Digital Camera User Guide www.polaroid.com You can record still images, video and audio clips. Capture Mode Under this mode, you to select the image and video settings...
User Guide
Page 17
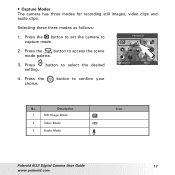
Press the button to confirm your No. button to access the scene mode palette. 3. Press the choice. SELECT OK 4. • Capture Modes The camera has three modes for recording still images, video clips and audio clips. Press button to capture mode. Selecting these three modes as follows: 1. Description Icon 1 Still Image Mode 2 Video Mode 3 Audio Mode Polaroid i533 Digital Camera User Guide 17 www.polaroid.com PROGRAM 2. Press the button to set the camera to select the desired setting.
Press the button to confirm your No. button to access the scene mode palette. 3. Press the choice. SELECT OK 4. • Capture Modes The camera has three modes for recording still images, video clips and audio clips. Press button to capture mode. Selecting these three modes as follows: 1. Description Icon 1 Still Image Mode 2 Video Mode 3 Audio Mode Polaroid i533 Digital Camera User Guide 17 www.polaroid.com PROGRAM 2. Press the button to set the camera to select the desired setting.

User Guide
Page 18
• How to Navigate Menus Menus are used to exit. 2. Press the button to enter a menu bar and press it again to select capture and play settings, as well as other camera settings like the Date/Time and Auto Power Off. Press the and buttons to scroll up and down through the menu bar. 3. Menu button 1. Press the and buttons to scroll left and right through menu options. 4. Press the button to enter a submenu or confirm your choice. 5M 5M 3:2 16:9 3M 1M Resolution WB ISO 18 Polaroid i533 Digital Camera User Guide www.polaroid.com
• How to Navigate Menus Menus are used to exit. 2. Press the button to enter a menu bar and press it again to select capture and play settings, as well as other camera settings like the Date/Time and Auto Power Off. Press the and buttons to scroll up and down through the menu bar. 3. Menu button 1. Press the and buttons to scroll left and right through menu options. 4. Press the button to enter a submenu or confirm your choice. 5M 5M 3:2 16:9 3M 1M Resolution WB ISO 18 Polaroid i533 Digital Camera User Guide www.polaroid.com
User Guide
Page 19
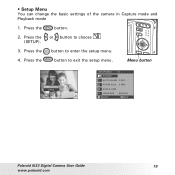
Menu button Enter Setup SETUP MENU 1/3 SOUNDS AUTO REVIEW 3 SEC. POWER SAVE 5 MIN DATE & TIME LANGUAGE SELECT ENGLISH EXIT Polaroid i533 Digital Camera User Guide 19 www.polaroid.com Press the button to exit the setup menu. Press the button. 2. • Setup Menu You can change the basic settings of the camera in Capture mode and Playback mode 1. Press the button to enter the setup menu. 4. Press the or button to choose (SETUP). 3.
Menu button Enter Setup SETUP MENU 1/3 SOUNDS AUTO REVIEW 3 SEC. POWER SAVE 5 MIN DATE & TIME LANGUAGE SELECT ENGLISH EXIT Polaroid i533 Digital Camera User Guide 19 www.polaroid.com Press the button to exit the setup menu. Press the button. 2. • Setup Menu You can change the basic settings of the camera in Capture mode and Playback mode 1. Press the button to enter the setup menu. 4. Press the or button to choose (SETUP). 3.

User Guide
Page 20
...3. Press the or button to select the desired item. 6. You can set the start-up sound, beep and playback sound. 20 Polaroid i533 Digital Camera User Guide www.polaroid.com Setup Menu Sounds Auto Review Power Save Date & Time Language Select Sounds 1/3 3 s ec 1 min English Exit Shutter On... START-UP 1 Beep On Volume Select Ok 7. When the beep sound is turned on, the camera will beep when you press the buttons...
...3. Press the or button to select the desired item. 6. You can set the start-up sound, beep and playback sound. 20 Polaroid i533 Digital Camera User Guide www.polaroid.com Setup Menu Sounds Auto Review Power Save Date & Time Language Select Sounds 1/3 3 s ec 1 min English Exit Shutter On... START-UP 1 Beep On Volume Select Ok 7. When the beep sound is turned on, the camera will beep when you press the buttons...
User Guide
Page 21
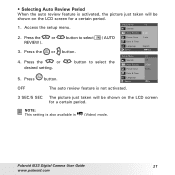
.... Press the REVIEW ). 3. NOTE: This setting is activated, the picture just taken will be shown on the LCD screen for a certain period. 1. Polaroid i533 Digital Camera User Guide 21 www.polaroid.com button to select or button. ( AUTO 4. Press the or button to select the 5. Press button. Ok OFF The auto review feature...
.... Press the REVIEW ). 3. NOTE: This setting is activated, the picture just taken will be shown on the LCD screen for a certain period. 1. Polaroid i533 Digital Camera User Guide 21 www.polaroid.com button to select or button. ( AUTO 4. Press the or button to select the 5. Press button. Ok OFF The auto review feature...
User Guide
Page 22
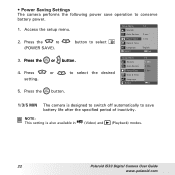
... 1/3 1 Min. 3 Min. 5 Min. Press the ro (POWER SAVE). or button. Press the button. 1/3/5 MIN The camera is also available in (Video) and (Playback) modes. 22 Polaroid i533 Digital Camera User Guide www.polaroid.com • Power Saving Settings The camera performs the following power save battery life after the specified period of inactivity. button to...
... 1/3 1 Min. 3 Min. 5 Min. Press the ro (POWER SAVE). or button. Press the button. 1/3/5 MIN The camera is also available in (Video) and (Playback) modes. 22 Polaroid i533 Digital Camera User Guide www.polaroid.com • Power Saving Settings The camera performs the following power save battery life after the specified period of inactivity. button to...

User Guide
Page 23
... removed for about two days, the TIME setting will be lost. • This setting is also available in the field and select the date format. 6. Polaroid i533 Digital Camera User Guide 23 www.polaroid.com Press the or button to select TIME). 3. Access the setup menu. 2.
... removed for about two days, the TIME setting will be lost. • This setting is also available in the field and select the date format. 6. Polaroid i533 Digital Camera User Guide 23 www.polaroid.com Press the or button to select TIME). 3. Access the setup menu. 2.


