

User Manual
Page 1
Please read it before using your projector. LCD PROJECTOR MODEL XL2550U XL1550U User Manual XL2550 XL1550 This User Manual is important to you.
Please read it before using your projector. LCD PROJECTOR MODEL XL2550U XL1550U User Manual XL2550 XL1550 This User Manual is important to you.
User Manual
Page 5
...surface; Please maintain an operating temperature, humidity, and altitude as specifically explained in the User Manual do not set the projector on uneven surface. it and hurt your projector. If this equipment. Do not modify this case, unplug immediately and contact your eyes. Do not ...result in a particular installation. Do not face the projector lens to turn off before turning the main power off and on . If you keep using the damaged projector. Also, do not attempt to service this product by Mitsubishi could void the user's authority to operate this equipment ...
...surface; Please maintain an operating temperature, humidity, and altitude as specifically explained in the User Manual do not set the projector on uneven surface. it and hurt your projector. If this equipment. Do not modify this case, unplug immediately and contact your eyes. Do not ...result in a particular installation. Do not face the projector lens to turn off before turning the main power off and on . If you keep using the damaged projector. Also, do not attempt to service this product by Mitsubishi could void the user's authority to operate this equipment ...
User Manual
Page 6
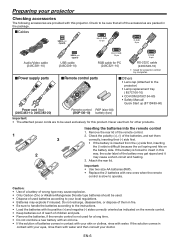
...the batteries with water. If the solution comes in contact with your eyes, rinse them for projector control by computer. Never use them with this projector. Preparing your projector Checking accessories The following accessories are packed in the package. Check the polarity (+), (-) of ...short-circuit and heating. 3. EN-6 Remote control parts Others • Lens cap (Attached to the projector) • Lamp replacement tray ( 857C106-10) • CD-ROM (919C154-60) • Safety Manual/ Quick Start up (871D489-60) Power cord (two) (246C483-10, 246C383-20) Remote control ...
...the batteries with water. If the solution comes in contact with your eyes, rinse them for projector control by computer. Never use them with this projector. Preparing your projector Checking accessories The following accessories are packed in the package. Check the polarity (+), (-) of ...short-circuit and heating. 3. EN-6 Remote control parts Others • Lens cap (Attached to the projector) • Lamp replacement tray ( 857C106-10) • CD-ROM (919C154-60) • Safety Manual/ Quick Start up (871D489-60) Power cord (two) (246C483-10, 246C383-20) Remote control ...

User Manual
Page 13
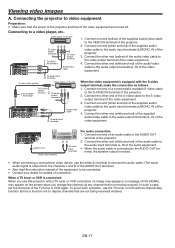
... to the AUDIO OUT terminal, the speaker output is connected to a desktop computer, disconnect the RGB cable that is muted. Connect the RGB cable from the monitor to the DVI terminal of the projector. Connect the other end of the RGB cable to be connected. &#... that of the computer are required depending on the type of the connected computer. • Also read the instruction manual of the computer to the monitor port of the projector. 2. For monitor connection: 1. COMPUTER/COMPONENT VIDEO IN-1/IN-2 1 Computer 2 To monitor port RGB cable For analog connection:...
... to the AUDIO OUT terminal, the speaker output is connected to a desktop computer, disconnect the RGB cable that is muted. Connect the RGB cable from the monitor to the DVI terminal of the projector. Connect the other end of the RGB cable to be connected. &#... that of the computer are required depending on the type of the connected computer. • Also read the instruction manual of the computer to the monitor port of the projector. 2. For monitor connection: 1. COMPUTER/COMPONENT VIDEO IN-1/IN-2 1 Computer 2 To monitor port RGB cable For analog connection:...
User Manual
Page 16
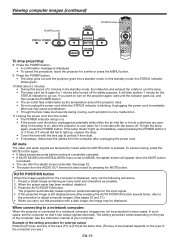
...image is still displaced even after pressing the AUTO POSITION button several seconds before muting is set the computer so that it . 3. The projector automatically makes optimum positional settings for external output Press the [Fn] key and any of 2 minutes in the INSTALLATION menu is completely canceled...standby mode, the intake fan and exhaust fan rotate to cool down for safety purpose. See the instruction manual of the computer. The setting procedure varies depending on the projector again, wait until the indicator goes out, and then press the POWER button. • The air ...
...image is still displaced even after pressing the AUTO POSITION button several seconds before muting is set the computer so that it . 3. The projector automatically makes optimum positional settings for external output Press the [Fn] key and any of 2 minutes in the INSTALLATION menu is completely canceled...standby mode, the intake fan and exhaust fan rotate to cool down for safety purpose. See the instruction manual of the computer. The setting procedure varies depending on the projector again, wait until the indicator goes out, and then press the POWER button. • The air ...
User Manual
Page 17
...MONO, R) of connection. Connect one end (yellow) of the supplied audio/video cable to be connected. • Contact your dealer for details of the projector. 3. AUDIO OUT Audio cable (option) To audio input terminals For audio connection: 1. minal, the speaker output is muted. • When connecting a ... signal is output from the channels L and R of the AUDIO OUT terminal.) • Also read the instruction manual of the equipment to the VIDEO IN terminal of the projector. 2. To avoid such symptom, use the TV tuner or VCR with the S-video output terminal, make the connection...
...MONO, R) of connection. Connect one end (yellow) of the supplied audio/video cable to be connected. • Contact your dealer for details of the projector. 3. AUDIO OUT Audio cable (option) To audio input terminals For audio connection: 1. minal, the speaker output is muted. • When connecting a ... signal is output from the channels L and R of the AUDIO OUT terminal.) • Also read the instruction manual of the equipment to the VIDEO IN terminal of the projector. 2. To avoid such symptom, use the TV tuner or VCR with the S-video output terminal, make the connection...
User Manual
Page 25
If the image isn't displayed correctly, select the desired video format manually. Select to make black lighter. SCART terminal is set -up can select the display position among CENTER, UPPER, and LOWER. EN-25 AUTO AUTO AUTO ... when the image is output to ON, normal computer signals aren't projected. • Use a commercially available SCART-Mini D-SUB 15-pin cable when connecting this projector with an AV device equipped with the SCART terminal. • Some AV devices equipped with the SCART terminal aren't compatible with the SCART terminal that...
If the image isn't displayed correctly, select the desired video format manually. Select to make black lighter. SCART terminal is set -up can select the display position among CENTER, UPPER, and LOWER. EN-25 AUTO AUTO AUTO ... when the image is output to ON, normal computer signals aren't projected. • Use a commercially available SCART-Mini D-SUB 15-pin cable when connecting this projector with an AV device equipped with the SCART terminal. • Some AV devices equipped with the SCART terminal aren't compatible with the SCART terminal that...

User Manual
Page 30
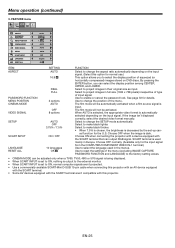
...press the ENTER button. Adjusting projected images (continued) This projector automatically selects a proper signal format according to the type of the projector. In such a case, make adjustment according to be projected correctly depending on the desktop, select Properties, and click the Settings tab to display ... the setting of RESOLUTION (MEMORIZE ) in the SIGNAL menu of video signal supplied from the computer may not be projected. NO Perform manual adjustment. Note) Disable the screen saver if it is displayed, select MEMORY 1 or MEMORY 2 and press the ENTER button. Project ...
...press the ENTER button. Adjusting projected images (continued) This projector automatically selects a proper signal format according to the type of the projector. In such a case, make adjustment according to be projected correctly depending on the desktop, select Properties, and click the Settings tab to display ... the setting of RESOLUTION (MEMORIZE ) in the SIGNAL menu of video signal supplied from the computer may not be projected. NO Perform manual adjustment. Note) Disable the screen saver if it is displayed, select MEMORY 1 or MEMORY 2 and press the ENTER button. Project ...
User Manual
Page 36
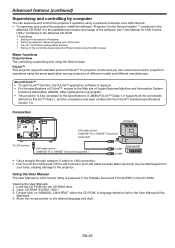
...PJLink™ Class 1. Using the User Manual The User Manual for projector control and you can supervise and control the projector's operation using the same application among projectors of different models and different manufacturers. Move the mouse pointer to the projector. About PJLink™ • To ...ROM "XL2550_1550." 3. For the installation procedure and usage of the software, see "User Manual for LAN Control Utility" contained in the attached CD-ROM. *) Functions • Setting of the projector's IP address • Setting of password, display language, and LAN control • ...
...PJLink™ Class 1. Using the User Manual The User Manual for projector control and you can supervise and control the projector's operation using the same application among projectors of different models and different manufacturers. Move the mouse pointer to the projector. About PJLink™ • To ...ROM "XL2550_1550." 3. For the installation procedure and usage of the software, see "User Manual for LAN Control Utility" contained in the attached CD-ROM. *) Functions • Setting of the projector's IP address • Setting of password, display language, and LAN control • ...