

User Manual
Page 1
Please read it before using your projector. LCD PROJECTOR MODEL XL2550U XL1550U User Manual XL2550 XL1550 This User Manual is important to you.
Please read it before using your projector. LCD PROJECTOR MODEL XL2550U XL1550U User Manual XL2550 XL1550 This User Manual is important to you.
User Manual
Page 5
...may fall , causing serious injury and damage to the projector. • Slanting the projector more of the projector. In this product by Mitsubishi could void the user's authority to fire or electric shock. It can be generated inside the projector rises very high while the ...;cally explained in a residential installation. This equipment generates, uses and can lead to provide reasonable protection against harmful interference in the User Manual do not place equipment on a solid, vibration free surface; Do not operate if smoke, strange noise or odor comes out of the...
...may fall , causing serious injury and damage to the projector. • Slanting the projector more of the projector. In this product by Mitsubishi could void the user's authority to fire or electric shock. It can be generated inside the projector rises very high while the ...;cally explained in a residential installation. This equipment generates, uses and can lead to provide reasonable protection against harmful interference in the User Manual do not place equipment on a solid, vibration free surface; Do not operate if smoke, strange noise or odor comes out of the...
User Manual
Page 6
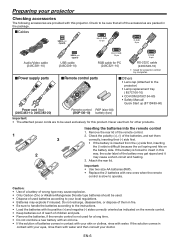
...; Remove the batteries, if the remote control is forced to the projector) • Lamp replacement tray ( 857C106-10) • CD-ROM (919C154-60) • Safety Manual/ Quick Start up (871D489-60) Power cord (two) (246C483-10, 246C383-20) Remote control R6P (size-AA) (290P136-10) battery (two) Important: • The attached...
...; Remove the batteries, if the remote control is forced to the projector) • Lamp replacement tray ( 857C106-10) • CD-ROM (919C154-60) • Safety Manual/ Quick Start up (871D489-60) Power cord (two) (246C483-10, 246C383-20) Remote control R6P (size-AA) (290P136-10) battery (two) Important: • The attached...

User Manual
Page 13
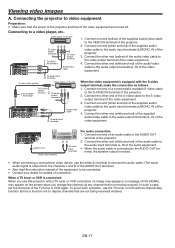
.../COMPONENT VIDEO DVI-D (HDCP) Computer 1 2 To DVI DVI cable (option) For digital connection: 1. Connect the other end of the DVI cable to a desktop computer, disconnect the RGB cable that of the computer are required depending on the type of the connected computer. • Also read the instruction... manual of the equipment to the MONITOR OUT terminal of the projector. 2. Connect the other end of the RGB cable to the monitor port...
.../COMPONENT VIDEO DVI-D (HDCP) Computer 1 2 To DVI DVI cable (option) For digital connection: 1. Connect the other end of the DVI cable to a desktop computer, disconnect the RGB cable that of the computer are required depending on the type of the connected computer. • Also read the instruction... manual of the equipment to the MONITOR OUT terminal of the projector. 2. Connect the other end of the RGB cable to the monitor port...
User Manual
Page 16
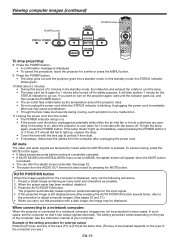
... again, press the POWER button. AUTO POSITION button When the image supplied from the outlet. • The POWER indicator will go out. See the instruction manual of the computer. Press the POWER button. • A confirmation message is displaced, carry out the following procedure. 1. If you want to turn on...
... again, press the POWER button. AUTO POSITION button When the image supplied from the outlet. • The POWER indicator will go out. See the instruction manual of the computer. Press the POWER button. • A confirmation message is displaced, carry out the following procedure. 1. If you want to turn on...
User Manual
Page 17
... that is equipped with its channel skip function (that is output from the channels L and R of the AUDIO OUT terminal.) • Also read the instruction manual of the equipment to the audio input terminals (L/MONO, R) of the projector. 4. Connect one end (white and red) of the supplied audio/ video cable to...
... that is equipped with its channel skip function (that is output from the channels L and R of the AUDIO OUT terminal.) • Also read the instruction manual of the equipment to the audio input terminals (L/MONO, R) of the projector. 4. Connect one end (white and red) of the supplied audio/ video cable to...
User Manual
Page 25
... the set to the external monitor. • When SCART INPUT is used in Europe. If the image isn't displayed correctly, select the desired video format manually. cel function for details. Use to the factory setting values. • CINEMA MODE can select the display position among CENTER, UPPER, and LOWER. AUTO AUTO...
... the set to the external monitor. • When SCART INPUT is used in Europe. If the image isn't displayed correctly, select the desired video format manually. cel function for details. Use to the factory setting values. • CINEMA MODE can select the display position among CENTER, UPPER, and LOWER. AUTO AUTO...

User Manual
Page 30
... input signal. YES NO Display the screen resolution setting menu of your computer. (Example: In the case of Windows® PC, right-click on the desktop, select Properties, and click the Settings tab to display the screen resolution setting.) The screen resolution setting of your computer. (Example: When the screen resolution... is projected correctly. Press the AUTO POSITION button. YES Select RESOLUTION (MEMORIZE ) in the SIGNAL menu. PIXELS and VERT. LINES to be projected. NO Perform manual adjustment. Adjust HORIZ. POSITION, VERT. EN-30
... input signal. YES NO Display the screen resolution setting menu of your computer. (Example: In the case of Windows® PC, right-click on the desktop, select Properties, and click the Settings tab to display the screen resolution setting.) The screen resolution setting of your computer. (Example: When the screen resolution... is projected correctly. Press the AUTO POSITION button. YES Select RESOLUTION (MEMORIZE ) in the SIGNAL menu. PIXELS and VERT. LINES to be projected. NO Perform manual adjustment. Adjust HORIZ. POSITION, VERT. EN-30
User Manual
Page 36
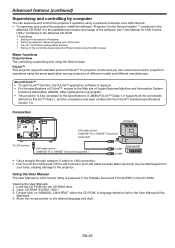
...cable (option) (100BASE-TX or 10BASE-T should be displayed. 4. Load the CD-ROM into the CD-ROM drive. 2. Opening the User Manuals 1. Double-click on "MANUAL_LAN.HTML" within the CD-ROM. Advanced features (continued) Supervising and controlling by PJLink™ Class 1, and the ...functions ProjectorView The controlling /supervising tool using the Web browser PJLink™ This projector supports standard protocol PJLink™ for the User Manual will be supported.) External HUB • Use a straight-through category-5 cable for LAN Control Utility is fully compliant to the ...
...cable (option) (100BASE-TX or 10BASE-T should be displayed. 4. Load the CD-ROM into the CD-ROM drive. 2. Opening the User Manuals 1. Double-click on "MANUAL_LAN.HTML" within the CD-ROM. Advanced features (continued) Supervising and controlling by PJLink™ Class 1, and the ...functions ProjectorView The controlling /supervising tool using the Web browser PJLink™ This projector supports standard protocol PJLink™ for the User Manual will be supported.) External HUB • Use a straight-through category-5 cable for LAN Control Utility is fully compliant to the ...