
User Manual
Page 2
.... NOTE: SINCE THIS PROJECTOR IS PLUGGABLE EQUIPMENT, THE SOCKET-OUTLET SHALL BE INSTALLED NEAR THE EQUIPMENT AND SHALL BE EASILY ACCESSIBLE. CAUTION RISK OF ELECTRIC SHOCK DO NOT OPEN CAUTION : TO REDUCE THE RISK OF ELECTRIC SHOCK, DO NOT REMOVE COVER (OR BACK) NO USER-SERVICEABLE PARTS INSIDE REFER SERVICING TO QUALIFIED SERVICE PERSONNEL. WARNING Use the attached RGB cable with radio and...
.... NOTE: SINCE THIS PROJECTOR IS PLUGGABLE EQUIPMENT, THE SOCKET-OUTLET SHALL BE INSTALLED NEAR THE EQUIPMENT AND SHALL BE EASILY ACCESSIBLE. CAUTION RISK OF ELECTRIC SHOCK DO NOT OPEN CAUTION : TO REDUCE THE RISK OF ELECTRIC SHOCK, DO NOT REMOVE COVER (OR BACK) NO USER-SERVICEABLE PARTS INSIDE REFER SERVICING TO QUALIFIED SERVICE PERSONNEL. WARNING Use the attached RGB cable with radio and...

User Manual
Page 5
... into the air outlet grilles when projector is operating. Do not use the lamp attachment unit designed specifically for this equipment does cause harmful interference to radio or television reception, which the receiver is connected. • Consult the dealer or an experienced Radio / TV technician for help. Please maintain an operating temperature, humidity, and altitude as specifically explained in a particular installation. COMPLIANCE...
... into the air outlet grilles when projector is operating. Do not use the lamp attachment unit designed specifically for this equipment does cause harmful interference to radio or television reception, which the receiver is connected. • Consult the dealer or an experienced Radio / TV technician for help. Please maintain an operating temperature, humidity, and altitude as specifically explained in a particular installation. COMPLIANCE...

User Manual
Page 6
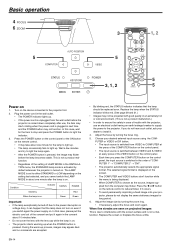
... (rear) 12 Lock bar 13 Foot Adjustment button (Front) 14 Lamp cover Caution: Do not replace the lamp immediately after using the projector because the lamp would be extremely hot and it may cause burns. 11 8 Control panel 9 12 11 7 3 2 9 8 5 6 4 1 7 Terminal board 11 2 14 8 12 6 7 5 4 13 1 39 10 1 Power button 2 AUTO POSITION / S button 3 COMPUTER / W button 4 MENU button 5 STATUS indicator 6 POWER indicator 7 KEYSTONE/ENTER button 8 VIDEO/ X button 9 T button Important: • While the menu or the screen for the keystone adjustment or password entry is...
... (rear) 12 Lock bar 13 Foot Adjustment button (Front) 14 Lamp cover Caution: Do not replace the lamp immediately after using the projector because the lamp would be extremely hot and it may cause burns. 11 8 Control panel 9 12 11 7 3 2 9 8 5 6 4 1 7 Terminal board 11 2 14 8 12 6 7 5 4 13 1 39 10 1 Power button 2 AUTO POSITION / S button 3 COMPUTER / W button 4 MENU button 5 STATUS indicator 6 POWER indicator 7 KEYSTONE/ENTER button 8 VIDEO/ X button 9 T button Important: • While the menu or the screen for the keystone adjustment or password entry is...
User Manual
Page 10
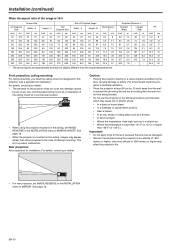
... grille and the air outlet grilles that emit hot air from being blocked. • Do not use of any non-recommended ceiling mount kit or installation of the ceiling mount kit in an improper location. • When using the projector at an altitude of 1500 meters or higher may affect the projector's life. • For rear projection, set IMAGE REVERSE in the INSTALLATION menu to MIRROR. EN-10...
... grille and the air outlet grilles that emit hot air from being blocked. • Do not use of any non-recommended ceiling mount kit or installation of the ceiling mount kit in an improper location. • When using the projector at an altitude of 1500 meters or higher may affect the projector's life. • For rear projection, set IMAGE REVERSE in the INSTALLATION menu to MIRROR. EN-10...

User Manual
Page 12
... video port, a monitor output adapter is connected to this standard is required. DVI-A (analog) cannot be used , you start the com- About DDC The COMPUTER/COMPONENT VIDEO IN-1 terminal of this projector. When a computer supporting this terminal, plug the power cord of the connected computer and prepare a proper cable for connection. puter. • The DVI type that the projector supports is connected to output appropriate images. • If the projector is DVI-D (digital...
... video port, a monitor output adapter is connected to this standard is required. DVI-A (analog) cannot be used , you start the com- About DDC The COMPUTER/COMPONENT VIDEO IN-1 terminal of this projector. When a computer supporting this terminal, plug the power cord of the connected computer and prepare a proper cable for connection. puter. • The DVI type that the projector supports is connected to output appropriate images. • If the projector is DVI-D (digital...

User Manual
Page 13
... image by pressing the foot adjustment buttons. Tilt up the projector to change the wall outlet. • In case that in a shape of a regular rectangle or with its aspect ratio 4:3, depending on the installation conditions of the projector and the screen. • To correct vertical keystone distortion, press the KEYSTONE button on the remote control). Plug the power cord in the power cord firmly. If the power cord is indicated...
... image by pressing the foot adjustment buttons. Tilt up the projector to change the wall outlet. • In case that in a shape of a regular rectangle or with its aspect ratio 4:3, depending on the installation conditions of the projector and the screen. • To correct vertical keystone distortion, press the KEYSTONE button on the remote control). Plug the power cord in the power cord firmly. If the power cord is indicated...
User Manual
Page 14
... LAMP MODE in case of the VIDEO button on the control panel, the input source is switched in about one minute for long period. 6. Replace the lamp when the STATUS indicator blinks red. (See page 28 and 31.) • Images may start rotating when the power cord is plugged in the consent about one minute after use an electrical outlet having an earth leakage breaker to supply the power to the projector. Adjust the focus by turning...
... LAMP MODE in case of the VIDEO button on the control panel, the input source is switched in about one minute for long period. 6. Replace the lamp when the STATUS indicator blinks red. (See page 28 and 31.) • Images may start rotating when the power cord is plugged in the consent about one minute after use an electrical outlet having an earth leakage breaker to supply the power to the projector. Adjust the focus by turning...

User Manual
Page 15
... menu screen. To cancel the menu: 4. blinks red on the remote control. • The message "POWER OFF? Unplug the power cord. • The POWER indicator will start again. 3. You can 't be distorted. See page 21. AV mute The video and audio signals are operating or the lamp is running, turn off . ENGLISH Basic operation (continued) Power-off Use the following procedure to the type of the input video signal. To light the lamp again, press the POWER button (or OFF button...
... menu screen. To cancel the menu: 4. blinks red on the remote control. • The message "POWER OFF? Unplug the power cord. • The POWER indicator will start again. 3. You can 't be distorted. See page 21. AV mute The video and audio signals are operating or the lamp is running, turn off . ENGLISH Basic operation (continued) Power-off Use the following procedure to the type of the input video signal. To light the lamp again, press the POWER button (or OFF button...

User Manual
Page 16
... times when images may not be displayed correctly. • When OFF or BLACK BOARD/WHITE BOARD is selected, the density cannot be adjusted. • When WHITE BOARD is changed, images may not be used for more details.) opt. When connecting to a laptop computer: When this projector is connected to reproduce natural color tones when images are projected. • When the GAMMA mode setting is selected, BrilliantColorTM in use. INSTALLATION WALL SCREEN LAMP MODE...
... times when images may not be displayed correctly. • When OFF or BLACK BOARD/WHITE BOARD is selected, the density cannot be adjusted. • When WHITE BOARD is changed, images may not be used for more details.) opt. When connecting to a laptop computer: When this projector is connected to reproduce natural color tones when images are projected. • When the GAMMA mode setting is selected, BrilliantColorTM in use. INSTALLATION WALL SCREEN LAMP MODE...

User Manual
Page 17
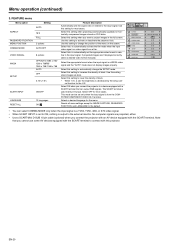
..., CC1, CC2 INSTALLATION WALL SCREEN LAMP MODE AUTO POWER ON AUTO POWER OFF IMAGE CAPTURE *1 *2 SPLASH SCREEN BACK COLOR AV MUTE MODE IMAGE REVERSE BEIGE 1-5 LIGHT BLUE 1-5 LIGHT GREEN 1-5 PINK 1-5 BLACK BOARD WHITE BOARD OFF STANDARD, LOW ON, OFF OFF, 5, 10, 15, 30, 60 min GO ON, OFF BLUE, BLACK, IMAGE BLACK, IMAGE OFF, MIRROR, INVERT, MIRROR INVERT FEATURE ASPECT PASSWORD FUNCTION MENU POSITION CINEMA MODE *3 VIDEO SIGNAL *6 WXGA *2 *7 SETUP *1 SCART INPUT *4 LANGUAGE RESET ALL AUTO 16:9 FULL DISPLAY INPUT , MENU ACCESS , SPLASH ID LOCK 1 (upper left...
..., CC1, CC2 INSTALLATION WALL SCREEN LAMP MODE AUTO POWER ON AUTO POWER OFF IMAGE CAPTURE *1 *2 SPLASH SCREEN BACK COLOR AV MUTE MODE IMAGE REVERSE BEIGE 1-5 LIGHT BLUE 1-5 LIGHT GREEN 1-5 PINK 1-5 BLACK BOARD WHITE BOARD OFF STANDARD, LOW ON, OFF OFF, 5, 10, 15, 30, 60 min GO ON, OFF BLUE, BLACK, IMAGE BLACK, IMAGE OFF, MIRROR, INVERT, MIRROR INVERT FEATURE ASPECT PASSWORD FUNCTION MENU POSITION CINEMA MODE *3 VIDEO SIGNAL *6 WXGA *2 *7 SETUP *1 SCART INPUT *4 LANGUAGE RESET ALL AUTO 16:9 FULL DISPLAY INPUT , MENU ACCESS , SPLASH ID LOCK 1 (upper left...

User Manual
Page 18
... of projected images when the input signal is selected as the input source. COLOR TINT SHARPNESS ADVANCED MENU AUTO 0 0 STANDARD 0 0 0 OK opt. Press the W or X button to select AUTO POWER OFF. Press the ENTER button (or T button). INSTALLATION WALL SCREEN BEIGE 4. Press the W or X button to a setting other than OFF. • When COMPUTER 1 or COMPUTER 2 is selected, COLOR and TINT do not work. • When COLOR ENHANCER is switched, projected images may be adjusted using the menu...
... of projected images when the input signal is selected as the input source. COLOR TINT SHARPNESS ADVANCED MENU AUTO 0 0 STANDARD 0 0 0 OK opt. Press the W or X button to select AUTO POWER OFF. Press the ENTER button (or T button). INSTALLATION WALL SCREEN BEIGE 4. Press the W or X button to a setting other than OFF. • When COMPUTER 1 or COMPUTER 2 is selected, COLOR and TINT do not work. • When COLOR ENHANCER is switched, projected images may be adjusted using the menu...

User Manual
Page 19
... room. INSTALLATION menu Menu option WALL SCREEN LAMP MODE AUTO POWER ON AUTO POWER OFF IMAGE CAPTURE SPLASH SCREEN BACK COLOR AV MUTE MODE IMAGE REVERSE Setting OFF/BEIGE / LIGHT BLUE / LIGHT GREEN / PINK / BLACK BOARD/WHITE BOARD STANDARD LOW ON/OFF OFF/5-60 min ON/OFF BLUE/BLACK/IMAGE BLACK/IMAGE OFF MIRROR INVERT MIRROR INVERT Feature description Selects a desired setting based on the color of time, an afterimage may linger on the 1 to view images in standby. When IMAGE is selected...
... room. INSTALLATION menu Menu option WALL SCREEN LAMP MODE AUTO POWER ON AUTO POWER OFF IMAGE CAPTURE SPLASH SCREEN BACK COLOR AV MUTE MODE IMAGE REVERSE Setting OFF/BEIGE / LIGHT BLUE / LIGHT GREEN / PINK / BLACK BOARD/WHITE BOARD STANDARD LOW ON/OFF OFF/5-60 min ON/OFF BLUE/BLACK/IMAGE BLACK/IMAGE OFF MIRROR INVERT MIRROR INVERT Feature description Selects a desired setting based on the color of time, an afterimage may linger on the 1 to view images in standby. When IMAGE is selected...
User Manual
Page 20
... PASSWORD FUNCTION MENU POSITION CINEMA MODE ? Use this setting to a device equipped with this setting when images are projected, either. • Use a SCART-Mini D-SUB 15-pin cable (optional) when you connect the projector to change the SETUP mode. Use this projector. Selects a desired language for most cases. opt. Use this setting to automatically activate the film mode when the input video signal is a WXGA video signal and the "AUTO" mode does not display images properly. Use this setting for the menu. If projected images...
... PASSWORD FUNCTION MENU POSITION CINEMA MODE ? Use this setting to a device equipped with this setting when images are projected, either. • Use a SCART-Mini D-SUB 15-pin cable (optional) when you connect the projector to change the SETUP mode. Use this projector. Selects a desired language for most cases. opt. Use this setting to automatically activate the film mode when the input video signal is a WXGA video signal and the "AUTO" mode does not display images properly. Use this setting for the menu. If projected images...

User Manual
Page 21
... turns yellow. INFORMATION LAMP TIME (LOW) INPUT RESOLUTION VERTICAL FREQUENCY HORIZONTAL FREQUENCY R GB H V SYNC. SIGNAL HORIZ. Important: • You can set the IMAGE, SIGNAL, and SIGNAL-USER menus only when the signal is 4000 hours.) Indicates the name of the image. VERT. Use this setting to correct solid white or solid black that appears in the left half of projected images. When it reaches 3800 hours, the bar turns red. (The lamp lifetime is input. 5. Use this setting to adjust projected images...
... turns yellow. INFORMATION LAMP TIME (LOW) INPUT RESOLUTION VERTICAL FREQUENCY HORIZONTAL FREQUENCY R GB H V SYNC. SIGNAL HORIZ. Important: • You can set the IMAGE, SIGNAL, and SIGNAL-USER menus only when the signal is 4000 hours.) Indicates the name of the image. VERT. Use this setting to correct solid white or solid black that appears in the left half of projected images. When it reaches 3800 hours, the bar turns red. (The lamp lifetime is input. 5. Use this setting to adjust projected images...

User Manual
Page 24
... via the USB port, the "Page up/down " function when connecting with the USB cable cannot be captured correctly because of XGA is input. Select IMAGE CAPTURE by adjusting its resolution to the regular operation screen. opt. To resume the motion in the menu become unselectable. Switch the pages using the remote control, connect the projector with the computer as the startup screen (or splash screen). DISPLAY INPUT When the projector is turned on, the...
... via the USB port, the "Page up/down " function when connecting with the USB cable cannot be captured correctly because of XGA is input. Select IMAGE CAPTURE by adjusting its resolution to the regular operation screen. opt. To resume the motion in the menu become unselectable. Switch the pages using the remote control, connect the projector with the computer as the startup screen (or splash screen). DISPLAY INPUT When the projector is turned on, the...
User Manual
Page 27
..., the replacement message (LAMP EXCHANGE) will be shortened to secure the lamp cover (d). • Make sure that the lamp needs to be regulated due to prevent injuries or fire. When the lamp operation time exceeds the time elapsed until the lamp shutdown warning*2 is reset. EN-27 Pull up the screw (c) using a Phillips screwdriver (+) to 2000 hours. Otherwise, the POWER indicator flashes red and green, disallowing the projector to cut yourself with a new one...
..., the replacement message (LAMP EXCHANGE) will be shortened to secure the lamp cover (d). • Make sure that the lamp needs to be regulated due to prevent injuries or fire. When the lamp operation time exceeds the time elapsed until the lamp shutdown warning*2 is reset. EN-27 Pull up the screw (c) using a Phillips screwdriver (+) to 2000 hours. Otherwise, the POWER indicator flashes red and green, disallowing the projector to cut yourself with a new one...

User Manual
Page 28
... the fan stops rotating, press the POWER button to hot air emitted from the wall outlet. 2. If images are projected correctly, use an RGB signal amplifier along with the supplied cable for the intake fan and/or exhaust fan to stop using the correct terminals. • Check that the cables connected to light up on the power of the projector, check the following proce- Power can 't turn back on the POWER indicator. • Set SCART INPUT in...
... the fan stops rotating, press the POWER button to hot air emitted from the wall outlet. 2. If images are projected correctly, use an RGB signal amplifier along with the supplied cable for the intake fan and/or exhaust fan to stop using the correct terminals. • Check that the cables connected to light up on the power of the projector, check the following proce- Power can 't turn back on the POWER indicator. • Set SCART INPUT in...
User Manual
Page 29
... button on the remote has been pressed, or the Lamp mode setting has changed, images may be flickering until the lamp lights stably. This is carried out, the image may not be displayed correctly because of the type of -spec signals on rare occasion. Only the motion areas in the images supplied from equipment generating interfering radio waves. • When the keystone adjustment is not a malfunction. In this projector...
... button on the remote has been pressed, or the Lamp mode setting has changed, images may be flickering until the lamp lights stably. This is carried out, the image may not be displayed correctly because of the type of -spec signals on rare occasion. Only the motion areas in the images supplied from equipment generating interfering radio waves. • When the keystone adjustment is not a malfunction. In this projector...

User Manual
Page 30
... ambient temperature rises high. The lens surface is illuminating. The buttons on the projector. Solution • Fit the lamp cover securely. (See page 27.) • Reset the lamp operating time. (See page 27.) • Reset the lamp operating time. (See page 27.) Maintenance Warning: Do not use benzin or thinner to direct sunlight or fluorescent light. (See page 8.) • Use the remote control within its operation range. (See page 8.) • Use the remote control at...
... ambient temperature rises high. The lens surface is illuminating. The buttons on the projector. Solution • Fit the lamp cover securely. (See page 27.) • Reset the lamp operating time. (See page 27.) • Reset the lamp operating time. (See page 27.) Maintenance Warning: Do not use benzin or thinner to direct sunlight or fluorescent light. (See page 8.) • Use the remote control within its operation range. (See page 8.) • Use the remote control at...

User Manual
Page 31
... lamp Blinking green/red shutdown notice while the power is off . Blinking green • The protection circuit is working or the lamp is not effective, replace the lamp. Steady red The lamp operation time exceeds the time elapsed until the STATUS indicator goes out, then press the POWER button. Change with dust or dirt. • The room temperature is high. • Clean the ventilation grilles. • Relocate the projector to possible problems. If these problem persist, turn the projector...
... lamp Blinking green/red shutdown notice while the power is off . Blinking green • The protection circuit is working or the lamp is not effective, replace the lamp. Steady red The lamp operation time exceeds the time elapsed until the STATUS indicator goes out, then press the POWER button. Change with dust or dirt. • The room temperature is high. • Clean the ventilation grilles. • Relocate the projector to possible problems. If these problem persist, turn the projector...

