
User Guide
Page 8
...Mode Detection (3:2 Reverse Pull Down) ▪ This function can carry up to 5 Gbps of combined video and audio in TV tuner to receive HD ATSC ▪ This function allows the reception of HD broadcasting without the addition of a set -...Video input terminals ▪ 1 VGA/ Audio input terminals ▪ 2 HDMI/Audio input terminals ▪ 1 set of Audio(L/R) output terminals ▪ 2 SPDIF output terminals (Optical x 1 /Coaxial x 1) ▪ 1 Headphone terminal The built-in a single cable. Chapter 1 Introducing the LCD TV Chapter 1 Introducing the LCD TV Key Features Various Audio/Video ...
...Mode Detection (3:2 Reverse Pull Down) ▪ This function can carry up to 5 Gbps of combined video and audio in TV tuner to receive HD ATSC ▪ This function allows the reception of HD broadcasting without the addition of a set -...Video input terminals ▪ 1 VGA/ Audio input terminals ▪ 2 HDMI/Audio input terminals ▪ 1 set of Audio(L/R) output terminals ▪ 2 SPDIF output terminals (Optical x 1 /Coaxial x 1) ▪ 1 Headphone terminal The built-in a single cable. Chapter 1 Introducing the LCD TV Chapter 1 Introducing the LCD TV Key Features Various Audio/Video ...

User Guide
Page 14
... 1 Introducing the LCD TV Rear View and Jacks VIDEO2 IN Connects to receive high/standard definition television. HDMI1 IN/HDMI2 IN Connects all digital AV equipment with VGA and AUDIO(L/R) output jacks. HDTV/TV Air/CABLE VHF/UHF IN TV CABLE/AIR Connects RF...IN Connects to the AUDIO(L/R) input jacks on external video equipment. The AUDIO(L/R) of HDMI IN is for DVI connection. HDMI 2 IN HDMI 1 IN AUDIO L R VGA IN AUDIO L R YPbPr1 IN Y Pb Pr AUDIO AUDIO OUT STEREO DIGITAL OPTICAL L R Y Pb Pr L COAXIAL L R VIDEO AUDIO VIDEO2 IN S-VIDEO L ...
... 1 Introducing the LCD TV Rear View and Jacks VIDEO2 IN Connects to receive high/standard definition television. HDMI1 IN/HDMI2 IN Connects all digital AV equipment with VGA and AUDIO(L/R) output jacks. HDTV/TV Air/CABLE VHF/UHF IN TV CABLE/AIR Connects RF...IN Connects to the AUDIO(L/R) input jacks on external video equipment. The AUDIO(L/R) of HDMI IN is for DVI connection. HDMI 2 IN HDMI 1 IN AUDIO L R VGA IN AUDIO L R YPbPr1 IN Y Pb Pr AUDIO AUDIO OUT STEREO DIGITAL OPTICAL L R Y Pb Pr L COAXIAL L R VIDEO AUDIO VIDEO2 IN S-VIDEO L ...

User Guide
Page 21
........ Use the ▲▼ buttons to select a channel. ENGLISH Chapter 2 Installing the LCD TV Press the button on the remote to turn on the LCD TV. (Scroll down using the UP/DOWN buttons to see Computer-VGA option) Main TV(CABLE/AIR) VIDEO1 (SIDE) VIDEO2 (REAR) VIDEO3 (S-VIDEO) VIDEO4 (YPbPr1) VIDEO5 (...YPbPr2) VIDEO6 (HDMI1) VIDEO7 (HDMI2) COMPUTER(VGA) Press the INPUT button on the remote...
........ Use the ▲▼ buttons to select a channel. ENGLISH Chapter 2 Installing the LCD TV Press the button on the remote to turn on the LCD TV. (Scroll down using the UP/DOWN buttons to see Computer-VGA option) Main TV(CABLE/AIR) VIDEO1 (SIDE) VIDEO2 (REAR) VIDEO3 (S-VIDEO) VIDEO4 (YPbPr1) VIDEO5 (...YPbPr2) VIDEO6 (HDMI1) VIDEO7 (HDMI2) COMPUTER(VGA) Press the INPUT button on the remote...

User Guide
Page 22
...METHOD B: Use an audio cable to connect the VCR's audio output jacks to the LCD TV's S-VIDEO IN input jack. Press the button on the remote to turn on the power switch of TV HDMI 2 IN HDMI 1 IN AUDIO L R VGA IN AUDIO L R VIDEO L R AUDIO VIDEO2 IN S-VIDEO L AUDIO R ...METHOD B). 20 Connect all AC power sources, before turning on the LCD TV. Use a S-Video cable to connect the VCR's s-video output jack to the LCD TV's audio inputs. Chapter 2 Installing the LCD TV Connecting a VCR Rear of the LCD TV or other connected equipment. To watch a videotape, press the INPUT button...
...METHOD B: Use an audio cable to connect the VCR's audio output jacks to the LCD TV's S-VIDEO IN input jack. Press the button on the remote to turn on the power switch of TV HDMI 2 IN HDMI 1 IN AUDIO L R VGA IN AUDIO L R VIDEO L R AUDIO VIDEO2 IN S-VIDEO L AUDIO R ...METHOD B). 20 Connect all AC power sources, before turning on the LCD TV. Use a S-Video cable to connect the VCR's s-video output jack to the LCD TV's audio inputs. Chapter 2 Installing the LCD TV Connecting a VCR Rear of the LCD TV or other connected equipment. To watch a videotape, press the INPUT button...

User Guide
Page 23
...IN jacks or VIDEO1 IN jacks. To watch a video vis camera or game console, press the INPUT button on the power switch of TV HDMI 2 IN HDMI 1 IN AUDIO L R VGA IN AUDIO L R VIDEO L R AUDIO VIDEO2 IN S-VIDEO L AUDIO R S-VIDEO IN YPbPr1 IN Y Pb Pr AUDIO AUDIO ...Cable NOTE: The connections shown for compatibility. 21 ENGLISH Connecting a Video Camera or Game console Chapter 2 Installing the LCD TV Right Side VIDEO L R VIDEO1 IN Rear of the LCD TV or other connected equipment. A METHOD A: Use a composite cable to connect the video camera's or game console's ...
...IN jacks or VIDEO1 IN jacks. To watch a video vis camera or game console, press the INPUT button on the power switch of TV HDMI 2 IN HDMI 1 IN AUDIO L R VGA IN AUDIO L R VIDEO L R AUDIO VIDEO2 IN S-VIDEO L AUDIO R S-VIDEO IN YPbPr1 IN Y Pb Pr AUDIO AUDIO ...Cable NOTE: The connections shown for compatibility. 21 ENGLISH Connecting a Video Camera or Game console Chapter 2 Installing the LCD TV Right Side VIDEO L R VIDEO1 IN Rear of the LCD TV or other connected equipment. A METHOD A: Use a composite cable to connect the video camera's or game console's ...
User Guide
Page 24
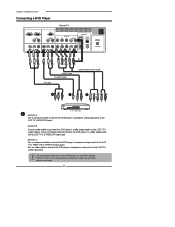
...'s user guide. 22 METHOD C: Use a component cable to connect the DVD player's component output jacks to the LCD TV's S-VIDEO IN input jack. Chapter 2 Installing the LCD TV Connecting a DVD Player Rear of component video, see your DVD player are sometimes labeled YPbPr, or YCbCr. For... an explanation of TV HDMI 2 IN HDMI 1 IN AUDIO L R VGA IN AUDIO L R L R VIDEO AUDIO VIDEO2 IN S-VIDEO L AUDIO R S-VIDEO IN YPbPr1...
...'s user guide. 22 METHOD C: Use a component cable to connect the DVD player's component output jacks to the LCD TV's S-VIDEO IN input jack. Chapter 2 Installing the LCD TV Connecting a DVD Player Rear of component video, see your DVD player are sometimes labeled YPbPr, or YCbCr. For... an explanation of TV HDMI 2 IN HDMI 1 IN AUDIO L R VGA IN AUDIO L R L R VIDEO AUDIO VIDEO2 IN S-VIDEO L AUDIO R S-VIDEO IN YPbPr1...
User Guide
Page 26
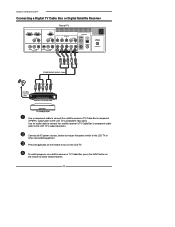
...the remote to select VIDEO4/VIDEO5. 24 To watch programs via satellite receiver or TV Cable Box, press the INPUT button on the remote to turn on the power switch of TV HDMI 2 IN HDMI 1 IN AUDIO L R VGA IN AUDIO L R L R VIDEO AUDIO VIDEO2 IN S-VIDEO L AUDIO R ... jacks to the LCD TV's audio input jacks. Use an audio cable to connect the satellite receiver's/TV Cable Box's component audio jacks to the LCD TV's component input jacks. Connect all AC power sources, before turning on the LCD TV. Chapter 2 Installing the LCD TV Connecting a Digital TV Cable Box or Digital...
...the remote to select VIDEO4/VIDEO5. 24 To watch programs via satellite receiver or TV Cable Box, press the INPUT button on the remote to turn on the power switch of TV HDMI 2 IN HDMI 1 IN AUDIO L R VGA IN AUDIO L R L R VIDEO AUDIO VIDEO2 IN S-VIDEO L AUDIO R ... jacks to the LCD TV's audio input jacks. Use an audio cable to connect the satellite receiver's/TV Cable Box's component audio jacks to the LCD TV's component input jacks. Connect all AC power sources, before turning on the LCD TV. Chapter 2 Installing the LCD TV Connecting a Digital TV Cable Box or Digital...
User Guide
Page 27
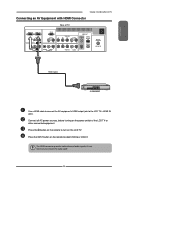
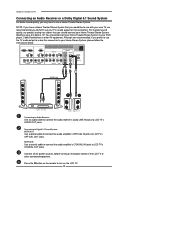
...VGA IN AUDIO L R VIDEO L R AUDIO VIDEO2 IN S-VIDEO L AUDIO R S-VIDEO IN YPbPr1 IN Y Pb Pr AUDIO AUDIO OUT STEREO DIGITAL OPTICAL L R Y Pb Pr L COAXIAL L R R YPbPr2 IN AUDIO HDTV/TV Air/CABLE VHF/UHF IN HDMI Cable AV EQUIPMENT Use a HDMI cable to connect the AV equipment's HDMI output jack to the LCD TV...'s HDMI IN jacks. Connect all AC power sources, before turning on the LCD TV. Press the INPUT button on the remote to connect the audio cable. 25 ENGLISH Chapter 2...
...VGA IN AUDIO L R VIDEO L R AUDIO VIDEO2 IN S-VIDEO L AUDIO R S-VIDEO IN YPbPr1 IN Y Pb Pr AUDIO AUDIO OUT STEREO DIGITAL OPTICAL L R Y Pb Pr L COAXIAL L R R YPbPr2 IN AUDIO HDTV/TV Air/CABLE VHF/UHF IN HDMI Cable AV EQUIPMENT Use a HDMI cable to connect the AV equipment's HDMI output jack to the LCD TV...'s HDMI IN jacks. Connect all AC power sources, before turning on the LCD TV. Press the INPUT button on the remote to connect the audio cable. 25 ENGLISH Chapter 2...

User Guide
Page 28
Connect all AC power sources, before turning on the remote to select VIDEO6 or VIDEO7. Press the INPUT button on the power switch of TV HDMI 2 IN HDMI 1 IN AUDIO L R VGA IN AUDIO L R VIDEO L R AUDIO VIDEO2 IN S-VIDEO L AUDIO R S-VIDEO IN YPbPr1 IN Y Pb Pr AUDIO AUDIO OUT STEREO DIGITAL... output jacks to turn on the LCD TV. Press the button on the remote to LCD TV's HDMI AUDIO jacks. If the LCD TV is connected to AV equipment's DVI connector, you will need an HDMI-to the LCD TV's HDMI IN jacks. Chapter 2 Installing the LCD TV Connecting an AV Equipment with DVI ...
Connect all AC power sources, before turning on the remote to select VIDEO6 or VIDEO7. Press the INPUT button on the power switch of TV HDMI 2 IN HDMI 1 IN AUDIO L R VGA IN AUDIO L R VIDEO L R AUDIO VIDEO2 IN S-VIDEO L AUDIO R S-VIDEO IN YPbPr1 IN Y Pb Pr AUDIO AUDIO OUT STEREO DIGITAL... output jacks to turn on the LCD TV. Press the button on the remote to LCD TV's HDMI AUDIO jacks. If the LCD TV is connected to AV equipment's DVI connector, you will need an HDMI-to the LCD TV's HDMI IN jacks. Chapter 2 Installing the LCD TV Connecting an AV Equipment with DVI ...
User Guide
Page 29
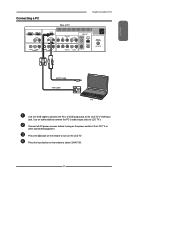
Use an audio cable to connect the PC's audio output jacks to the LCD TV's VGA input jack. ENGLISH Connecting a PC Rear of the LCD TV or other connected equipment. Press the Input button on the LCD TV. Press the button on the remote to turn on the remote to select COMPUTER.... 27 Connect all AC power sources, before turning on the power switch of TV Chapter 3 Using the LCD TV HDMI 2 IN HDMI 1 IN AUDIO L R VGA IN AUDIO L R VIDEO L R AUDIO VIDEO2 IN S-VIDEO L AUDIO R S-VIDEO IN YPbPr1 IN Y Pb Pr AUDIO AUDIO OUT STEREO ...
Use an audio cable to connect the PC's audio output jacks to the LCD TV's VGA input jack. ENGLISH Connecting a PC Rear of the LCD TV or other connected equipment. Press the Input button on the LCD TV. Press the button on the remote to turn on the remote to select COMPUTER.... 27 Connect all AC power sources, before turning on the power switch of TV Chapter 3 Using the LCD TV HDMI 2 IN HDMI 1 IN AUDIO L R VGA IN AUDIO L R VIDEO L R AUDIO VIDEO2 IN S-VIDEO L AUDIO R S-VIDEO IN YPbPr1 IN Y Pb Pr AUDIO AUDIO OUT STEREO ...
User Guide
Page 30
... to your A/V device. Connect all AC power sources, before turning on the power switch of the LCD TV or other AV equipment. Press the button on the LCD TV. 28 HDMI 2 IN HDMI 1 IN AUDIO L R VGA IN AUDIO L R VIDEO L R AUDIO VIDEO2 IN S-VIDEO L AUDIO R S-VIDEO IN YPbPr1... IN Y Pb Pr AUDIO AUDIO OUT STEREO DIGITAL OPTICAL L R Y Pb Pr L COAXIAL L R R YPbPr2 IN AUDIO HDTV/TV Air/CABLE VHF/UHF IN ...
... to your A/V device. Connect all AC power sources, before turning on the power switch of the LCD TV or other AV equipment. Press the button on the LCD TV. 28 HDMI 2 IN HDMI 1 IN AUDIO L R VGA IN AUDIO L R VIDEO L R AUDIO VIDEO2 IN S-VIDEO L AUDIO R S-VIDEO IN YPbPr1... IN Y Pb Pr AUDIO AUDIO OUT STEREO DIGITAL OPTICAL L R Y Pb Pr L COAXIAL L R R YPbPr2 IN AUDIO HDTV/TV Air/CABLE VHF/UHF IN ...

User Guide
Page 32
Chapter 3 Using the LCD TV Operating the Menu Press the button to turn the LCD TV on the screen. VIDEO MENU: Allows you to make adjustments to customize the audio options and effects. ▪ If the signal source is VIDEO/S-VIDEO/YPbPr/ HDMI/VGA, the AUDIO MENU appears as: Video Select Exit ▪... If the signal source is VGA, the VIDEO MENU...
Chapter 3 Using the LCD TV Operating the Menu Press the button to turn the LCD TV on the screen. VIDEO MENU: Allows you to make adjustments to customize the audio options and effects. ▪ If the signal source is VIDEO/S-VIDEO/YPbPr/ HDMI/VGA, the AUDIO MENU appears as: Video Select Exit ▪... If the signal source is VGA, the VIDEO MENU...

User Guide
Page 33
... Closed Caption,Factory Reset, Parental Control, and Sleep Timer. ▪ If the signal source is TV/VIDEO/S-VIDEO/YPbPr, the SETUP MENU appears as: ▪ If the signal source is HDMI/VGA, the SETUP MENU appears as: OSD Language Time Setup Closed Caption Parental Gamma Reset Default English Middle.... Press the EXIT button to edit and label channels. Channel Scan Tuner Mode Channel Skip Time Zone Cable Eastern Time Chapter 3 Using the LCD TV TV Select Exit SETUP MENU: Allows you to exit the menu. 31 While in adjustment mode, and use the ◄► buttons to highlight...
... Closed Caption,Factory Reset, Parental Control, and Sleep Timer. ▪ If the signal source is TV/VIDEO/S-VIDEO/YPbPr, the SETUP MENU appears as: ▪ If the signal source is HDMI/VGA, the SETUP MENU appears as: OSD Language Time Setup Closed Caption Parental Gamma Reset Default English Middle.... Press the EXIT button to edit and label channels. Channel Scan Tuner Mode Channel Skip Time Zone Cable Eastern Time Chapter 3 Using the LCD TV TV Select Exit SETUP MENU: Allows you to exit the menu. 31 While in adjustment mode, and use the ◄► buttons to highlight...
User Guide
Page 34
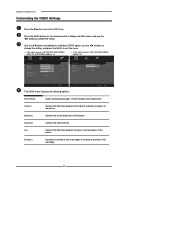
... Mode User Picture Mode User Contrast 50 Contrast 50 Brightness 54 Brightness 54 Saturation 54 Color Temperature HUE 0 Noise Reduction Medium Sharpness 5 VGA Color Temperature Noise Reduction Medium Video The VIDEO menu includes the following options: Select Exit Picture Mode Cycles among display types: Vivid/Hi-... Hue Controls the difference between the green and red regions of the picture Sharpness Increase this setting to turn the LCD TV on. Chapter 3 Using the LCD TV Customizing the VIDEO Settings Press the button to see crisp edges in the picture;
... Mode User Picture Mode User Contrast 50 Contrast 50 Brightness 54 Brightness 54 Saturation 54 Color Temperature HUE 0 Noise Reduction Medium Sharpness 5 VGA Color Temperature Noise Reduction Medium Video The VIDEO menu includes the following options: Select Exit Picture Mode Cycles among display types: Vivid/Hi-... Hue Controls the difference between the green and red regions of the picture Sharpness Increase this setting to turn the LCD TV on. Chapter 3 Using the LCD TV Customizing the VIDEO Settings Press the button to see crisp edges in the picture;
User Guide
Page 35
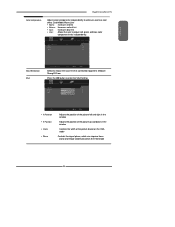
... Select Exit Select to reduce the noise level of the picture based on the VGA mode Controls the signal phase, which can improve focus clarity and image stability based on the VGA mode 33 ENGLISH Chapter 3 Using the LCD TV Color temperature Adjusts color components independently to achieve a warm or cool effect: Cool/Middle...
... Select Exit Select to reduce the noise level of the picture based on the VGA mode Controls the signal phase, which can improve focus clarity and image stability based on the VGA mode 33 ENGLISH Chapter 3 Using the LCD TV Color temperature Adjusts color components independently to achieve a warm or cool effect: Cool/Middle...

User Guide
Page 36
...LCD TV on the remote control to display the Main menu, and use the ◄► buttons to change the setting, and press the MENU to exit the menu ▪ If the signal source is VIDEO/S-VIDEO/YPbPr/ HDMI/VGA..., the AUDIO MENU appears as: ▪ If the signal source is TV, the AUDIO MENU appears as: Bass Treble Balance Sound ...individual AUDIO option, use the ◄► buttons to high-fidelity stereo sound while watching TV ▪ Stereo: Use separate audio tracks for left and right speakers, if available ▪ ...
...LCD TV on the remote control to display the Main menu, and use the ◄► buttons to change the setting, and press the MENU to exit the menu ▪ If the signal source is VIDEO/S-VIDEO/YPbPr/ HDMI/VGA..., the AUDIO MENU appears as: ▪ If the signal source is TV, the AUDIO MENU appears as: Bass Treble Balance Sound ...individual AUDIO option, use the ◄► buttons to high-fidelity stereo sound while watching TV ▪ Stereo: Use separate audio tracks for left and right speakers, if available ▪ ...
User Guide
Page 39
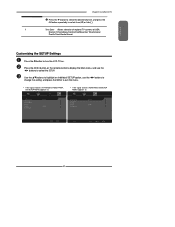
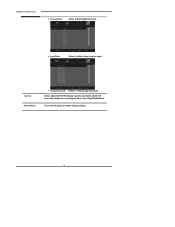
...9658; buttons to select the SETUP. ENGLISH Chapter 3 Using the LCD TV Press the ▼ button to select the desired channel, and press the OK button repeatedly to select show ( ) or hide( ) F Time Zone Allows selection of regional TV systems of USA: Eastern Time/Indiana/Central time/Mountain Time/Arizona/ ... SETUP Settings Press the button to exit the menu. ▪ If the signal source is TV/VIDOE/S-VIDEO/YPbPr, the SETUP MENU appears as: ▪ If the signal source is HDMI/VGA, the SETUP MENU appears as: OSD Language Time Setup Closed Caption Parental Gamma Reset Default English...
...9658; buttons to select the SETUP. ENGLISH Chapter 3 Using the LCD TV Press the ▼ button to select the desired channel, and press the OK button repeatedly to select show ( ) or hide( ) F Time Zone Allows selection of regional TV systems of USA: Eastern Time/Indiana/Central time/Mountain Time/Arizona/ ... SETUP Settings Press the button to exit the menu. ▪ If the signal source is TV/VIDOE/S-VIDEO/YPbPr, the SETUP MENU appears as: ▪ If the signal source is HDMI/VGA, the SETUP MENU appears as: OSD Language Time Setup Closed Caption Parental Gamma Reset Default English...
User Guide
Page 42
... of the display's gamma correction, which fine tunes both brightness and red/green/blue ratios: Bright/Middle/Dark. Chapter 3 Using the LCD TV Gamma Reset Default Channel Block Allows to block digital channels. 2 ABC 3 DISC 4 5 6 7 8 9 10 Analog Analog Analog Analog ...Block Set OK Select Exit Selects to block a Input source signal 1 TV(CABLE/AIR) 2 VIDEO1 (Side) 3 VIDEO2 (S-VIDEO) 4 VIDEO3 (REAR) 5 VIDEO4 (YPbPr1) 6 VIDEO5 (YPbPr2) 7 VIDEO6 (HDMI1) 8 VIDEO7 (HDMI2) 9 COMPUTER(VGA) Channel Block Set OK Select Exit Change Password Selects to restore factory...
... of the display's gamma correction, which fine tunes both brightness and red/green/blue ratios: Bright/Middle/Dark. Chapter 3 Using the LCD TV Gamma Reset Default Channel Block Allows to block digital channels. 2 ABC 3 DISC 4 5 6 7 8 9 10 Analog Analog Analog Analog ...Block Set OK Select Exit Selects to block a Input source signal 1 TV(CABLE/AIR) 2 VIDEO1 (Side) 3 VIDEO2 (S-VIDEO) 4 VIDEO3 (REAR) 5 VIDEO4 (YPbPr1) 6 VIDEO5 (YPbPr2) 7 VIDEO6 (HDMI1) 8 VIDEO7 (HDMI2) 9 COMPUTER(VGA) Channel Block Set OK Select Exit Change Password Selects to restore factory...