
Instruction Manual
Page 1
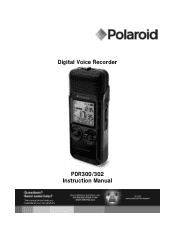
Digital Voice Recorder PDR300/302 Instruction Manual
Digital Voice Recorder PDR300/302 Instruction Manual
Instruction Manual
Page 2
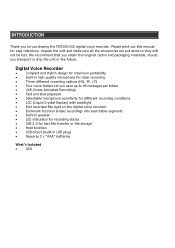
...; Four voice folders let you save up to 99 messages per folder • VAR (Voice Activated Recording) • Fast and slow playback • Selectable microphone sensitivity for different recording conditions • LCD (Liquid Crystal Display) with backlight • Edit recorded file right on the digital voice recorder • Bookmark function breaks recordings into searchable segments • Built-in speaker • LED indication for recording status • USB 2.0 for fast file transfer or file storage • Hold function • USB direct...
...; Four voice folders let you save up to 99 messages per folder • VAR (Voice Activated Recording) • Fast and slow playback • Selectable microphone sensitivity for different recording conditions • LCD (Liquid Crystal Display) with backlight • Edit recorded file right on the digital voice recorder • Bookmark function breaks recordings into searchable segments • Built-in speaker • LED indication for recording status • USB 2.0 for fast file transfer or file storage • Hold function • USB direct...

Instruction Manual
Page 3
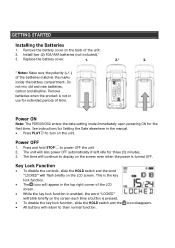
FOLDER / BOOKMARK 7. Built-in Microphone 11. Battery compartment Microphone jack 3. ERASE 8. STOP 13. VOL 18. 19. LCD screen 5. VOL + 15. 16. Earphone jack 2. REC 12. OK / MENU 17. Speaker 4. RECORDING QUALITY 9. GETTING STARTED Location of controls 1 2 10 3 4 11 5 12 13 6 14 7 15 8 16 17 18 19 9 1. HOLD switch 6. USB plug 10. PLAY 14.
FOLDER / BOOKMARK 7. Built-in Microphone 11. Battery compartment Microphone jack 3. ERASE 8. STOP 13. VOL 18. 19. LCD screen 5. VOL + 15. 16. Earphone jack 2. REC 12. OK / MENU 17. Speaker 4. RECORDING QUALITY 9. GETTING STARTED Location of controls 1 2 10 3 4 11 5 12 13 6 14 7 15 8 16 17 18 19 9 1. HOLD switch 6. USB plug 10. PLAY 14.
Instruction Manual
Page 4
... hold STOP to display on the unit. Remove the battery cover on the LCD screen. Install two (2) R03/AAA batteries (not included).* 3. Remove batteries when the product is pressed. • To disable the key lock function, slide the HOLD switch and the • All buttons will blink briefly on the screen each time a button is not in the manual. • Press PLAY to their normal function. The unit will continue to power...
... hold STOP to display on the unit. Remove the battery cover on the LCD screen. Install two (2) R03/AAA batteries (not included).* 3. Remove batteries when the product is pressed. • To disable the key lock function, slide the HOLD switch and the • All buttons will blink briefly on the screen each time a button is not in the manual. • Press PLAY to their normal function. The unit will continue to power...

Instruction Manual
Page 5
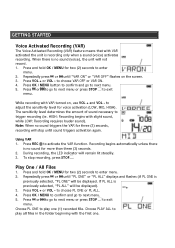
DICT (dictation) is used in the following order: CONF / DICT (Rec. Press OK / MENU button to confirm and go to the recorder. 1. Cond.) -> VAR -> PL ONE / ALL -> Beep -> Light -> Date -> Time 3. Press and hold OK / MENU for two (2) seconds to turn ON / OFF a function or choose desired setup. 4. to enter menu. 2. Press or to go to next or previous menu or press STOP to next or previous menu. 6. If...
DICT (dictation) is used in the following order: CONF / DICT (Rec. Press OK / MENU button to confirm and go to the recorder. 1. Cond.) -> VAR -> PL ONE / ALL -> Beep -> Light -> Date -> Time 3. Press and hold OK / MENU for two (2) seconds to turn ON / OFF a function or choose desired setup. 4. to enter menu. 2. Press or to go to next or previous menu or press STOP to next or previous menu. 6. If...
Instruction Manual
Page 6
... will stop recording, press STOP . To stop until "VAR ON" or "VAR OFF" flashes on , use VOL + and VOL - Play One / All Files 1. Repeatedly press or until "PL ONE" or "PL ALL" displays and flashes (if PL ONE is previously selected, "PL ALL" will be displayed). 3. Choose PLAY ALL to play all files in the folder beginning with VAR turned on the screen. 3. Press and hold OK / MENU for voice activation (LOW, MID...
... will stop recording, press STOP . To stop until "VAR ON" or "VAR OFF" flashes on , use VOL + and VOL - Play One / All Files 1. Repeatedly press or until "PL ONE" or "PL ALL" displays and flashes (if PL ONE is previously selected, "PL ALL" will be displayed). 3. Choose PLAY ALL to play all files in the folder beginning with VAR turned on the screen. 3. Press and hold OK / MENU for voice activation (LOW, MID...

Instruction Manual
Page 7
... "BP OFF." 4. Press OK / MENU to confirm and go to next menu or press STOP to next menu. 5. Press or to go to exit menu. Repeatedly press or until "LT ON" or "LT OFF" flashes on the screen (if LT ON has been previously chosen, backlight will be activated. 1. GETTING STARTED Beep Function To hear a "beep" each time a button is displayed. Press VOL + or VOL- Press...
... "BP OFF." 4. Press OK / MENU to confirm and go to next menu or press STOP to next menu. 5. Press or to go to exit menu. Repeatedly press or until "LT ON" or "LT OFF" flashes on the screen (if LT ON has been previously chosen, backlight will be activated. 1. GETTING STARTED Beep Function To hear a "beep" each time a button is displayed. Press VOL + or VOL- Press...

Instruction Manual
Page 8
... or decrease to main screen. Press VOL+ or VOL- Press VOL+ or VOL- Press and hold OK / MENU for two (2) seconds to enter menu. 2. GETTING STARTED Setting the Date 1. Press and hold OK / MENU for two (2) se conds to enter menu. 2. Press once and TIME will blink. 7. Press STOP to next menu. (Pressing or before confirmation will restart the date setting again from 12/24...
... or decrease to main screen. Press VOL+ or VOL- Press VOL+ or VOL- Press and hold OK / MENU for two (2) seconds to enter menu. 2. GETTING STARTED Setting the Date 1. Press and hold OK / MENU for two (2) se conds to enter menu. 2. Press once and TIME will blink. 7. Press STOP to next menu. (Pressing or before confirmation will restart the date setting again from 12/24...
Instruction Manual
Page 9
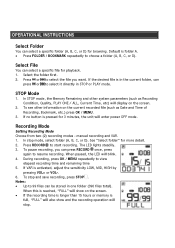
... recording, press OK / MENU repeatedly to start recording. To stop mode, select folder (A, B, C, or D). See "Select folder" for browsing. To pause recording, you want. Notes: • Up to resume recording. When this is reached, "FULL" will show and the recording operation will stop. Select File You can select a specific file for 3 minutes, the unit will also show on the screen. 2. If no button is pressed for playback. 1. STOP Mode 1. Recording Mode Setting Recording Mode Choose from two (2) recording modes - When paused...
... recording, press OK / MENU repeatedly to start recording. To stop mode, select folder (A, B, C, or D). See "Select folder" for browsing. To pause recording, you want. Notes: • Up to resume recording. When this is reached, "FULL" will show and the recording operation will stop. Select File You can select a specific file for 3 minutes, the unit will also show on the screen. 2. If no button is pressed for playback. 1. STOP Mode 1. Recording Mode Setting Recording Mode Choose from two (2) recording modes - When paused...
Instruction Manual
Page 10
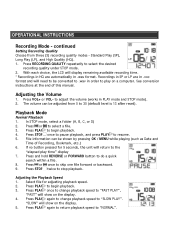
...- In STOP mode, select a folder (A, B, C, or D) 2. Press or to skip one file forward or backward. 9. Press PLAY to 30 (default level is 13 after reset). continued Setting Recording Quality Choose from 0 to begin playback. 4. If no button pressed for adjusting playback speed. 2. With each choice, the LCD will display remaining available recording time. * Recordings in HQ are in .wav format. Playback Mode Normal Playback 1. Press PLAY to "SLOW PLAY". Press or once to select a file. 3. Select file for...
...- In STOP mode, select a folder (A, B, C, or D) 2. Press or to skip one file forward or backward. 9. Press PLAY to 30 (default level is 13 after reset). continued Setting Recording Quality Choose from 0 to begin playback. 4. If no button pressed for adjusting playback speed. 2. With each choice, the LCD will display remaining available recording time. * Recordings in HQ are in .wav format. Playback Mode Normal Playback 1. Press PLAY to "SLOW PLAY". Press or once to select a file. 3. Select file for...
Instruction Manual
Page 11
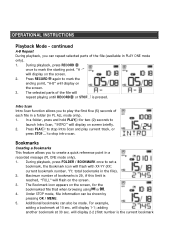
... Bookmark icon appears on screen briefly. 2. Additional bookmarks can repeat selected parts of each file in a folder (in a recorded message (PL ONE mode only). 1. will flash with XX-YY (XX: current bookmark number. In a folder, press and hold PLAY for two (2) seconds to stop intro scan. YY: total bookmarks in PLAY ONE mode only). 1. OPERATIONAL INSTRUCTIONS Playback Mode - continued A-B Repeat During playback, you can also be shown by pressing OK / MENU. 5. Bookmarks Creating a Bookmarks...
... Bookmark icon appears on screen briefly. 2. Additional bookmarks can repeat selected parts of each file in a folder (in a recorded message (PL ONE mode only). 1. will flash with XX-YY (XX: current bookmark number. In a folder, press and hold PLAY for two (2) seconds to stop intro scan. YY: total bookmarks in PLAY ONE mode only). 1. OPERATIONAL INSTRUCTIONS Playback Mode - continued A-B Repeat During playback, you can also be shown by pressing OK / MENU. 5. Bookmarks Creating a Bookmarks...

Instruction Manual
Page 12
... on the display. 3. Notes: • Bookmarks cannot be erased one by one. • Bookmarks cannot be made while the battery is low and the battery icon is the total number of bookmarks). "WAIT" will enter STOP mode. number; OPERATIONAL INSTRUCTIONS Bookmarks- Select Folder. 2. Press to go to cancel). Start playback of the unwanted part. Press ERASE once to previous Bookmark. "CUT-E" flashes on the display. 4. After the cut is blinking...
... on the display. 3. Notes: • Bookmarks cannot be erased one by one. • Bookmarks cannot be made while the battery is low and the battery icon is the total number of bookmarks). "WAIT" will enter STOP mode. number; OPERATIONAL INSTRUCTIONS Bookmarks- Select Folder. 2. Press to go to cancel). Start playback of the unwanted part. Press ERASE once to previous Bookmark. "CUT-E" flashes on the display. 4. After the cut is blinking...
Instruction Manual
Page 13
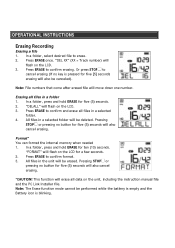
... Erase function mode cannot be deleted. "DEL XX" (XX = Track number) will flash on the LCD. 3. In a folder, press and hold ERASE for a few seconds. 2. OPERATIONAL INSTRUCTIONS Erasing Recording Erasing a file 1. Erasing all data on the LCD. 3. All files in a selected folder will also cancel erasing. This function will be canceled). Press ERASE once. Note: File numbers that come after erased file will flash on the unit, including the instruction manual file and the PC Link Installer file. Or press STOP to erase...
... Erase function mode cannot be deleted. "DEL XX" (XX = Track number) will flash on the LCD. 3. In a folder, press and hold ERASE for a few seconds. 2. OPERATIONAL INSTRUCTIONS Erasing Recording Erasing a file 1. Erasing all data on the LCD. 3. All files in a selected folder will also cancel erasing. This function will be canceled). Press ERASE once. Note: File numbers that come after erased file will flash on the unit, including the instruction manual file and the PC Link Installer file. Or press STOP to erase...
Instruction Manual
Page 14
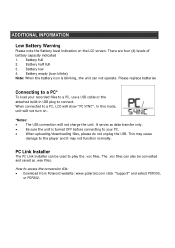
... to access the conversion file: • Download from Polaroid website: www.polaroid.com click "Support" and select PDR300, or PDR302. How to the player and it may not function normally. Battery empty (icon blinks) Note: When the battery icon is turned OFF before connecting to your recorded files to a PC, use a USB cable or the attached built-in USB plug to a PC, LCD will not charge the unit. Please replace batteries Connecting to play...
... to access the conversion file: • Download from Polaroid website: www.polaroid.com click "Support" and select PDR300, or PDR302. How to the player and it may not function normally. Battery empty (icon blinks) Note: When the battery icon is turned OFF before connecting to your recorded files to a PC, use a USB cable or the attached built-in USB plug to a PC, LCD will not charge the unit. Please replace batteries Connecting to play...
Instruction Manual
Page 15
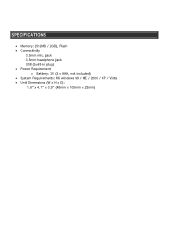
SPECIFICATIONS • Memory: (512MB / 2GB), Flash • Connectivity 3.5mm mic. jack 3.5mm headphone jack USB (built-in plug) • Power Requirement ο Battery: 3V (2 x AAA, not included) • System Requirements: MS windows 98 / ME / 2000 / XP / Vista • Unit Dimensions (W x H x D): 1.8" x 4.1" x 0.9" (45mm x 105mm x 22mm)
SPECIFICATIONS • Memory: (512MB / 2GB), Flash • Connectivity 3.5mm mic. jack 3.5mm headphone jack USB (built-in plug) • Power Requirement ο Battery: 3V (2 x AAA, not included) • System Requirements: MS windows 98 / ME / 2000 / XP / Vista • Unit Dimensions (W x H x D): 1.8" x 4.1" x 0.9" (45mm x 105mm x 22mm)
Instruction Manual
Page 16
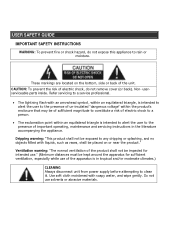
USER SAFETY GUIDE IMPORTANT SAFETY INSTRUCTIONS WARNING: To prevent fire or shock hazard, do not remove cover (or back). Refer servicing to a service professional. • The lightning flash with an arrowhead symbol, within an equilateral triangle, is intended to alert the user to the ...to rain or moisture. Non- Do not use of important operating, maintenance and servicing instructions in tropical and/or moderate climates.) CLEANING Always disconnect unit from power supply before attempting to clean it. userserviceable parts inside. Dripping warning: "This product shall not...
USER SAFETY GUIDE IMPORTANT SAFETY INSTRUCTIONS WARNING: To prevent fire or shock hazard, do not remove cover (or back). Refer servicing to a service professional. • The lightning flash with an arrowhead symbol, within an equilateral triangle, is intended to alert the user to the ...to rain or moisture. Non- Do not use of important operating, maintenance and servicing instructions in tropical and/or moderate climates.) CLEANING Always disconnect unit from power supply before attempting to clean it. userserviceable parts inside. Dripping warning: "This product shall not...

Instruction Manual
Page 17
... PRECAUTIONS 1. The safety and operating instructions should be connected to a collection point for the recycling of the type described in its proper ventilation. This symbol on the appliance. 9. WATER AND MOISTURE - All operating and use or the packing will inform about the methods for use instructions should be followed. 5. POWER SOURCES - bring it to a power supply only of electrical and...
... PRECAUTIONS 1. The safety and operating instructions should be connected to a collection point for the recycling of the type described in its proper ventilation. This symbol on the appliance. 9. WATER AND MOISTURE - All operating and use or the packing will inform about the methods for use instructions should be followed. 5. POWER SOURCES - bring it to a power supply only of electrical and...
Instruction Manual
Page 18
... not likely to operate normally or exhibits a marked change in the user's operating instructions. PROTECTIVE ATTACHMENT PLUG - The power cord of the appliance should not attempt to a wall or ceiling, it should be left unused for an extended period of the plug is equipped with an attachment plug that described in performance. 18. CARTS AND STANDS - Quick stops, excessive force, and...
... not likely to operate normally or exhibits a marked change in the user's operating instructions. PROTECTIVE ATTACHMENT PLUG - The power cord of the appliance should not attempt to a wall or ceiling, it should be left unused for an extended period of the plug is equipped with an attachment plug that described in performance. 18. CARTS AND STANDS - Quick stops, excessive force, and...
Instruction Manual
Page 19
..., recording or use of this device must accept any form without notice. © 2009 PLC Technology. USER SAFETY GUIDE FCC NOTICE (USA) This device complies with Part 15 of Industry Canada. IC NOTICE (CANADA) This digital apparatus does not exceed the Class B limits for radio noise emissions from digital apparatus as set out in any interference received, including interference that any change...
..., recording or use of this device must accept any form without notice. © 2009 PLC Technology. USER SAFETY GUIDE FCC NOTICE (USA) This device complies with Part 15 of Industry Canada. IC NOTICE (CANADA) This digital apparatus does not exceed the Class B limits for radio noise emissions from digital apparatus as set out in any interference received, including interference that any change...